How Can I Recover Audio Files from Zoom Recorder
How do I recover lost voice recordings?
"Hello, how can I recover audio files from the Zoom recorder. I have some recordings on my Zoom H4n Pro, but somehow, they got deleted. I am still surprised how I lost them, but I would like to know a safe method to recover them."
One of the scariest things in life is checking your storage device and not finding your files. It is harder to process, but this does not signify the end.
This article deals with how recordings on Zoom recorder are stored and how you can recover audio files from zoom recorder when lost without having any issue. If you have issues, the article has also been optimized to help with whatever you want.
Although, if you strictly follow the instructions, I doubt you can have issues.
Part 1. Where Are Zoom Voice Recordings Stored?
You will be glad to know that even though you’ve lost the audio files stored on the Zoom recorder, they can still be recovered. Here is a little bit of knowledge that can help you to relax while you find a tool for Zoom audio recovery.
What is a Zoom Recorder?
Zoom is a very well-known company for its inexpensive audio and video recording solutions. If you are working as a video or music director and producer, musician, journalist, or any other related field, then you obviously need to keep voice recorder recovery software for safety. But before you get to the recovery application, the main decision is to choose the best Zoom for you.

Not all the zoom recorders are created equally. Each one of them has different capabilities which make them unique. So, choosing the one that would be perfect for you is a hard decision. Digital technology has improved every feature of portable recorders.
There are various models available for Zoom recorders such as Zoom H1/H2/H4/H6/H1N/H4N and each one of them has its own specialty. But if you see reviews and compare the products, then you’ll find that Zoom H1n Handy Recorder is mainly on the top followed by H5, H6, H2n, and H4n recorders. Plus they have support for the MP3 and WAV formats in high quality.
Locations of storing Zoom Recorder Audio files
Zoom recorders lack inbuilt storage space. Therefore, the default way of storing files is by the use of SD cards. You can also store files by transferring them to a computer.
There are many folders on Zoom recorders. For example, Zoom H4n has about 30 folders for you to store audio. Depending on the mode, e.g., stereo or multitrack, you can choose any folder that you like.
You can also change the location of the storage of the audio files by connecting the recorder to your computer. You can follow these steps to change the location
- Connect your Zoom recorder to the computer.
- Navigate to "Settings" and select "Recordings."
- Select "Browse" and change the location.
After knowing the locations, the next thing is to know the scenarios where audio recordings of the Zoom recorder can get lost.
Scenarios Where Zoom Voice Recordings Get Lost
There are many scenarios by which your files can get lost. Therefore, it is essential to know them to avoid looking for solutions on how to recover audio files from Zoom recorder.
Most files are lost mainly due to the action of the users and the storage device.
- Accidentally Deleting Files
This is the most common way you can lose any of your files. It occurs as a result of a lack of proper workflow procedures and a backup plan.
- Malware Infection
A malware infection can also lead to you losing your files. It occurs in a myriad of ways. However, the most common one is by using SD cards on multiple devices. Malware can edit and modify your files, which means that they can also delete them.
- Power Failure:
Any file can get lost due to power failure. If there is a power failure during the writing process, there is a high probability of your audio files getting lost. Another way files can get lost is by shutting down your system abruptly during the writing process.
- Physical Damage
The SD cards used by Zoom recorders can be easily damaged. When not properly taken care of, it can lead to permanent loss of files.
- Theft
It is a sure way for you to lose your audio recordings is the theft of your zoom recorder or the SD card.
Where Do Deleted Zoom Voice Recordings Go?
You can delete your Zoom audio recordings when you connect the SD card to a PC. Many people think that when they delete a file, it just goes poof! No, it does not. Whenever you delete a file on a storage device, it remains there. However, it becomes unallocated. To remove the techy phrases associated with this process, we will explain using the illustration below.
If an audio file named XXXXXX is under Audio recordings, the table notes it when you delete file XXXXXX the table changes by removing the first character of the filename.
Any file having a name with an unknown character is not visible. The drive can also overwrite it. Therefore, when you delete an audio file on the storage device, the files are still there. Until there is an addition of new files, the drive cannot overwrite them.
Why Can Audio Files be Recovered?
Usually, the Zoom recorders use a MicroSD card to store the audio files. As the devices don’t have any inbuilt storage space, the files are stored on the card by default. You can also connect the recorder to a computer using a USB cable to transfer the files to the computer. It will also allow the users to create a backup of the data. The files stored inside the zoom audio recorder will be displayed in a folder or directly in the main storage.
The users can also change the location where the audio files are saved. Just connect the recorder to a computer and open settings and choose the Recordings option. There you will see the browse option. From that option, you can either change the location or make a new folder to save the recordings. If you’ve never changed the location, then it will be stored in the default location.
You will worry less when you’ll learn that the chances of voice recording file recovery are very high. In reality, when we delete the files from storage, the system marks the files as useless but the data is kept in binary form unless it is overwritten with new files. Thus, you can obviously use the recovery tools to get those files back. But as you lost the files, it is vital that you stop using the card otherwise the files will be lost permanently.
In other to recover the files, the first character must be restored, and this is possible by the use of audio data recovery software.
Part 2. What Are the Methods of Zoom Audio Recordings Recovery?
You now understand file storage, deleting files, and how audio files can be lost. However, the real question is how to recover audio files from a Zoom recorder. Using the knowledge you gathered, this section will show you the way you can recover such files.
Solution 1: Recover Deleted Audio Files with Software
It happens very often that audio files get deleted from various devices. But the internet is filled with tools that allow the users to recover any kind of data. Yet the best software that can be used to recover voice recording is Recoverit. This software is an overall solution for users to recover their lost or deleted media files under various circumstances. The software can be used on both Mac and Windows operating systems. So, hurry up and use Recoverit Audio Recovery Software to get your deleted audio/voice recordings back on the device.
You’ve seen the features of the software and now it’s time that you learn how you can recover the media files with Recoverit too.
Step 1. Launch the software on the system and when the home interface opens up; choose the location from where you lost your audio files.

Step 2. Once the scanning is done, the results will be displayed on the screen. The files will be sorted out according to their formats.

Step 3. When you’ve found the files, select the files for recovery. You can select multiple files at once and also have a preview. After you’ve selected all files, tap on the Recover button and the files will be saved on the customized location.

If the files are large, then the recovery might take some time. And soon enough, you will have all your voice recording back.
Solution 2: Restoring from the Recycle Bin
This method is ideal if you deleted it on a computer, and the file is still present in the recycle bin. It is also ideal for any other type of file, whether videos or photos. If the files are still in the recycle bin, you can restore them. Below are the steps on how to restore files from the recycle bin.
Windows Users
- Navigate to the Recycle bin and choose the file or data you want to restore.
- Right-click the Zoom Recorder audio files, and hit the "Restore" option.
There are also many filtering options that you can use. Options such as Restore all will restore all the files. However, you must be careful of the "Empty Recycle bin," which will permanently delete all files. You can also sort and group files based on properties such as name and location.
Mac Users
- Open the Trash bin on the Dock.
- Choose the Zoom Recorder recordings, right-click it or them, and hit on "Put back."
Solution 3: Restoring Backup
This is the general method to use if you have emptied your Recycle bin. With constant back up, there should be no fear of losing any audio files on your zoom recorder. There are many ways to back up files on Windows and Mac. For example, the steps we will be using is for Windows 10, and it involves the use of File History. Windows 7 uses Windows Backup, and Mac uses Time Machine.
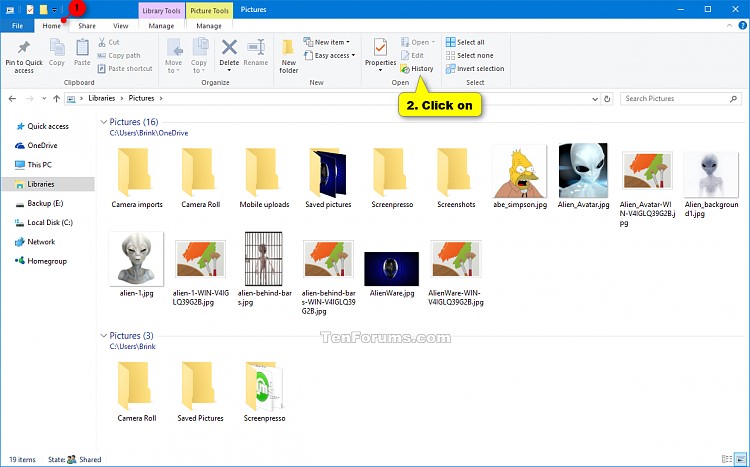
Open File Explorer and navigate to Libraries. Under the "Home" tab, click on History.
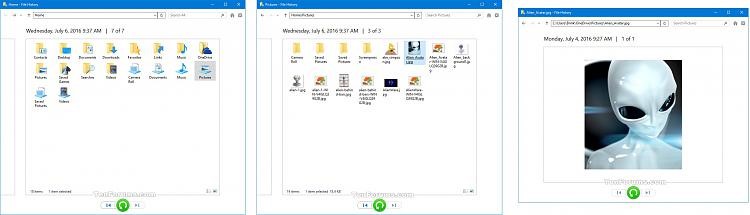
Check through and choose the right version that you want to restore. You can also do this by searching for the file names.
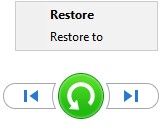
You can restore files via two methods. One is using the "Restore," while the other is the "Restore to" method.
- "Restore" will restore the files to the original path.
- "Restore to" will let you choose the location. Right-click on the green button > "Restore to." Choose the location and click on the "Select folder" to restore the files.
Part 3. How to Resolve Zoom Recorder Errors
To optimize the article for the general public, we have to put in the common things that we face during the process. Therefore, this section will cover how you can resolve errors and tips to avoid your audio files from getting lost.
The main zoom recorder related errors experienced by users is during the backup process. This error is common majorly on Windows and visible via error codes such as 0x80070001, 0x81000037, or 0x80070003.
Error 1: When Trying to Back Up
This error is visible as error codes 0x80070001 and 0x81000037. It occurs due to the presence of reparse points in the folder containing the audio files that you want to back up.
Error code 0x80070001 is due to the reparse points, pointing to a folder/volume that uses the FAT file system.
Error code 0x81000037 is due to the reparse point containing compressed files.
Removing both error codes is possible by locating the reparse point folder. To locate this folder on the SD card containing your audio recordings, you can follow these steps:
- Open the Command Prompt (admin).
- Enter the code dir /al /s and press Enter.
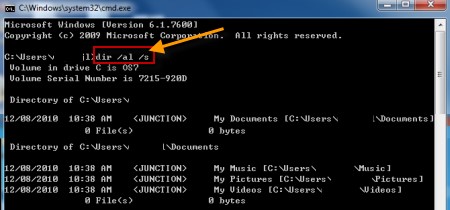
On completion, the list of the folders will be displayed. The next step is to delete the reparse point.
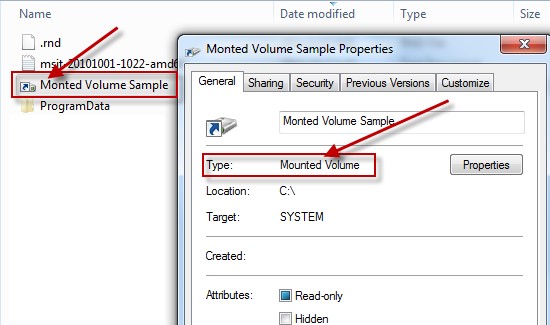
- Locate the reparse points and click "Properties."
- Under General, confirm the type of folder.
- Delete the folder.
Error 2: When Restoring a Backup
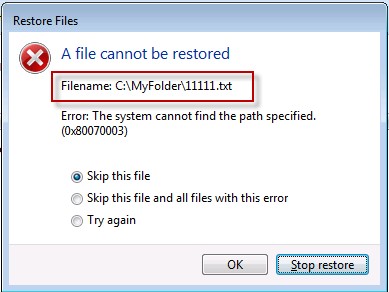
It is visible as error code 0x80070003. This is due to the reparse points pointing to another directory on another volume. When users face this problem, they are unable to recover audio files from a zoom recorder using the restore system.
There are two solutions to this error.
Solution 1. Using the Search Function
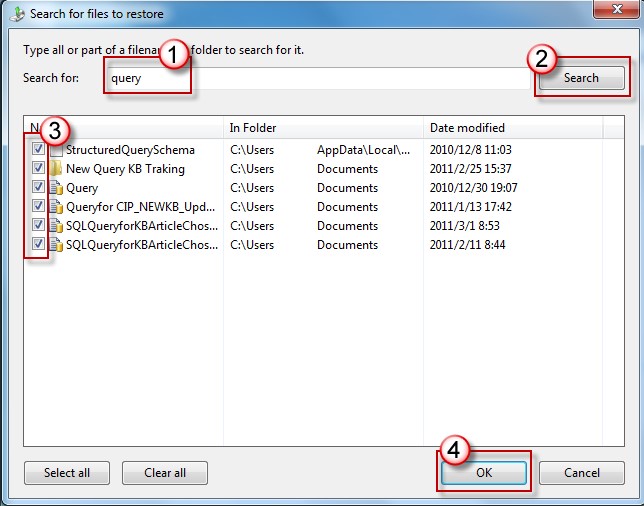
You can use the search function present in the File Restore Wizard for this process. Follow these steps:
- Click on "Search." Enter the file name in the Omni box then press search.
- Select the audio files that you want to restore and click OK.
Solution 2. Recreating the Missing Directory
This method is appropriate if the system restore failed because of an unspecified file path. To use the method, follow these steps.
- Copy the file path and create the corresponding folder.
- Try to restore the files.
These two errors are the significant errors seen when users want to recover audio files from zoom recorders while using Windows.
Part 4. Tips on Protecting Your Zoom Recorder and Recordings
There are also many things that you can do to avoid losing your files during the recovery process. There will be an explanation of each one to make you understand what to do to avoid this problem.
Tip 1: Back Up Your Files
The golden rule about keeping your files from being lost is by having a backup. With a backup of your files, you have the original copy of the files in a different place. There are many ways you can back up your files.
Common ways to backup are using applications such as File History on Windows 10 and Time Machine on Mac
Note that when performing a backup of your audio files, you must do the following:
- Store them in a safe location.
- Back up the files regularly.
- Keep a data backup log.
- Label your back up.
This depends on whether you are using an external drive or cloud storage as the backup method.
Tip 2: Use an Antivirus
Antiviruses will protect your system from infection by malware. Infection by malware is another common way to lose files, especially audio files on zoom recorders. There are many antiviruses that you can get. However, do check reviews, plans, and prices before opting for one.
Tip 3: Use a Power Surge Protector
If there is a power failure during file transfer, there can be a loss of your audio files. To combat this, you can protect your computer and files by using power surge protectors such as UPS. Another way to avoid audio loss is by shutting down your computer following the right procedures.
Tip 4: Keep the SD Card from Physical Damage
Keeping the SD card on which your audio files are from mechanical damage is very important. Do not apply pressure or expose them to extreme conditions.
By going through this article, you must have learned many things. Ranging from the way zoom recorders store files to the tips on how you can avoid audio file loss. We believe you now know how to recover audio files from Zoom recorders without encountering any problem.
Tip 5. Transfer Audio Files from Zoom Recorder
Even though you can recover DVR recordings with Recoverit, you still should make a backup of the files for such scenarios. You can think about copying the files on a computer or any external device to be on the safe side.
You can either learn how to recover deleted recordings or keep multiple backups so that you won’t even need a third-party tool. Here’s how you can transfer the files to a computer or any other storage media.
- Step 1: Connect your Zoom recorder with the computer using a USB cable. When the recorder is connected to the system, it works as a card reader and the card details are simply displayed as external storage.
- Step 2: Access the contents of the card and browse the folder where the recordings are located. By default, you will find the recording in a folder named recordings or Folder.
- Step 3: After selecting the files, either use the copy-and-paste method or use the drag-and-drop method to copy the audio files to the computer.
Conclusion
Sometimes, even though people had made copies of the important audio files, they tend to lose them somehow. But don’t worry as Recoverit Photo recovery software is here. As you clearly see in the article, it can be concluded that Recoverit is one of the best file recovery software in the market. So, the next time someone loses their files, you can simply look at how to recover deleted voice recordings here and get them back on your device easily.
Solve Media File Problems
- Recover & Repair Photos
- Recover & Repair Videos
- Recover & Repair Audio
- Recover & Repair Cameras


Eleanor Reed
staff Editor