Whenever I try to launch a program on Windows 10, 8, or even 7, an error message pops up on the screen as "Error Status 0xc000012f," which means that this is a bad image error.
The revolutionized world has different kinds of tasks to perform with different mediums. Today, most work is done through computers and laptops. Even the most manual systems are converted into computerized systems, and tasks are automated.
But what if you face such errors while working? Importantly, a layman can never deal with such errors by themselves, so we are here to help you because we will provide answers to questions like fixing bad image error windows 10, 8, or 7. Few people might have a question: how do I remove the bad image error pop-up that constantly reappears on the screen.
In this article
Part 1. What Is A Bad Image Error in Windows 11/10/8/7?
A bad image error is when you try to launch a Windows program, but it does not launch properly. The reason for that is that the files or the libraries needed to run the program might be corrupted, or the process is interrupted, leading the user to face a bad image error. This error usually occurs in any version of Windows, especially Windows 10, 8, and 7.
This error generally appears after downloading and installing a defective update for Windows and, in some cases, updating the computer's Windows to Windows 8 or Windows 10 iteration but with flawed pre-installed updates. When the message pops up, you try to dismiss the error message by clicking on 'Ok,' but it reappears.
Other than these reasons, few different factors lead the user to the same problem of bad image error. Such as the factor of misconfigured system settings, corrupted registry entries, excessive startup programs or else, fragmented files, etc.
Bonus: Are you ready for photo shooting, editing, managing or sharing? Do you have a question about what makes your photo corrupted? If the answer is yes, let's check your intimate guard to photos with any corruption scenarios - Photo Corrupted? Let's Rescue Them Right Now!
Part 2. How Can You Fix Windows Bad Image Errors?
A person who is facing the ongoing issue of bad image error that even cannot be dismissed is confused in the beginning. But as time passes, the same confused person becomes annoyed by the error message that keeps on popping on the screen.
If you are looking for a solution to fix the trouble, you are lucky to choose the right platform. This problem is commonly faced among Windows 10, 8, and 7 users. The error message is long enough that confuses the reader because the message has less or no information in it.
Let's take a look together at different bad image error fix ways;
Method 1: Uninstall problematic windows update
As discussed earlier, this error might be due to the installation of a flawed Windows update. So, a solution to this problem might be reversing the mistake by just uninstalling the problematic Windows update. The following steps will guide you on how to do that;
1. Firstly, the user is requested to press the 'Windows + I' keys to open the Windows settings.
2. Once the settings application is opened, the user should select the 'Update & Security' panel.

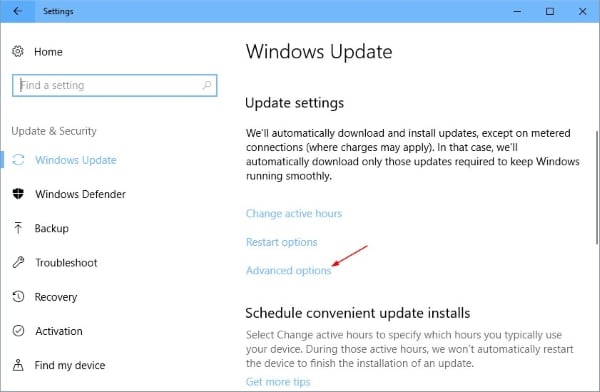
3. After a new window is in front of you, go to 'Windows Update' and, from there, select the option of 'Advanced Options.'
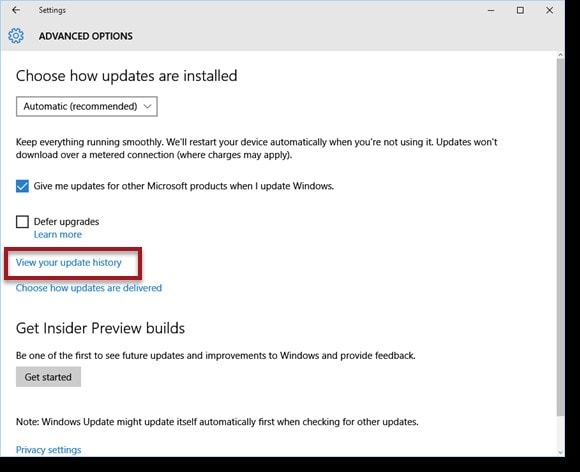
4. A new page will now appear, from which the user is suggested to click on 'View your update history.'
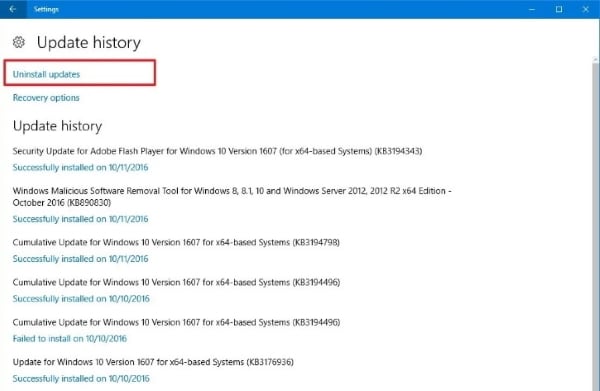
5. At this point, your screen will have a list of all the updates on your device, including failed updates too.
6. The user is now supposed to click on the 'Uninstall Updates.'
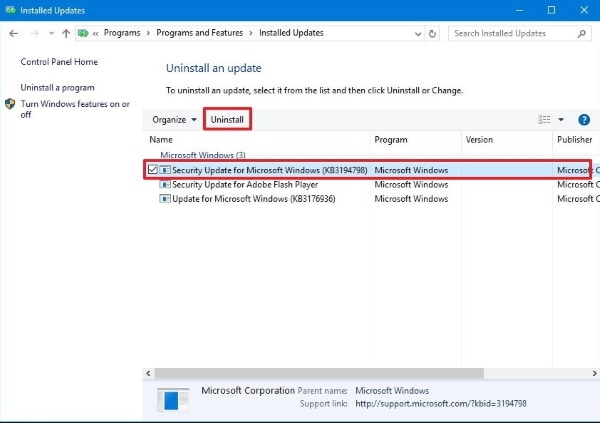
7. This click will take you to a new window as, 'Uninstall an update.'
8. In the final step, the user has to click on the first update visible in the list and click on 'Uninstall.'
Method 2: By running SFC scan
Among these drawbacks of Windows, its Operating System still offers many tools that help fix any sort of issue. Among those tools, System File Checker (SFC) comes at the top of the list. Using the same tool, we will now guide you on how to fix bad image errors;
1. Click and open the start menu. Type 'cmd' in the box.
2. Now, from the search result, select 'Command Prompt.' By right-clicking on it, a small menu will appear. From there, choose 'run as an administrator.'
3. After that, a new window will be visible. You are requested to type 'sfc/scannow' without any inverted comma.
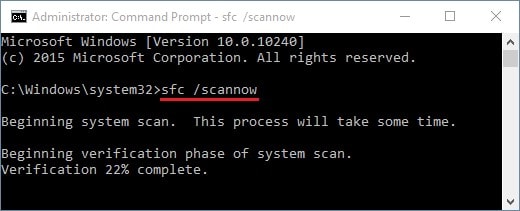
4. After typing, press the 'Enter' button.
5. The Windows will now scan the error, and by the end, it will fix the issue.
What's more, here is the guide to fix SFC/SCANNOW finding corrupted files.
Method 3: Install Visual C++ redistributable
The installation of Visual C++ Redistributable for Visual Studio 2015 can also help resolve the problem at hand. The software fixes the image issue, which also can be used to fix missing DLL files. But in case you don't know how to use it then, stay with us;
1. First of all, install Visual C++ Redistributable for Visual Studio 2015.
2. After that, choose the package's language and version according to your system specifications, and once that is done, then download it.
3. After the setup file has been downloaded successfully, run the file on your computer to install the Visual C++ Redistributable package.
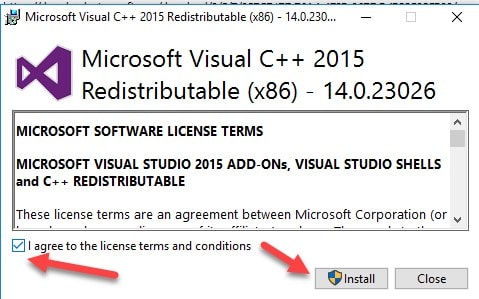
4. As soon as the installation is complete, you are supposed to restart your PC and check that whether if the bad image error fix worked or not.
Method 4: Uninstall and reinstall the program
It might be a scenario that a single program faces the trouble and error of a bad image, whereas the rest of the programs work fine. For such a case, the specific program needs to be treated to resolve the problem. We will tell you how to uninstall and then reinstall a specific affected program that will surely help you in resolving the issue;
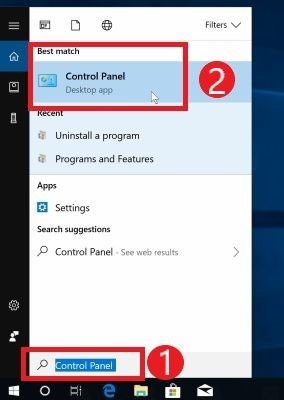
1. Firstly, go to the Windows search box, and type 'Control Panel.'
2. When the search results appear in the form of a list, select Control Panel from there.
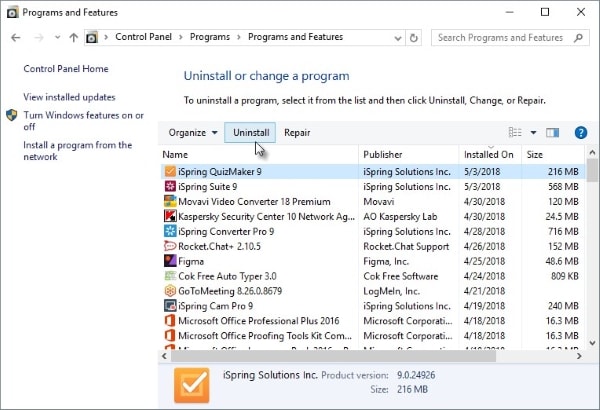
3. Now a new window will be opened. Click on 'Uninstall a Program' that will be visible in the 'Programs' section.
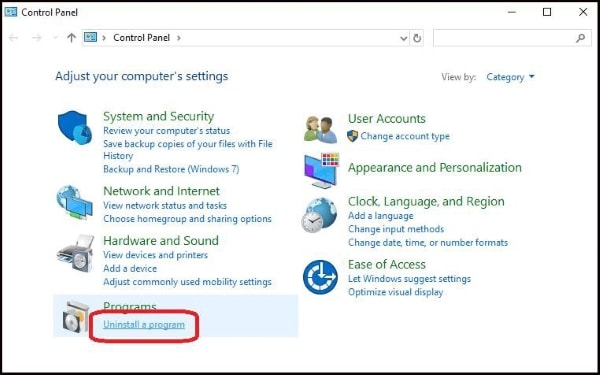
4. A new window with a list of installed apps will appear. From that, find the problematic program that causes the bad image error. And then select it.
5. After the selection, you are supposed to click on the 'Uninstall' button.
6. Once it is uninstalled, you should download it again from any trusted source.
After completing all the required steps, you should relaunch the program to check if it still throws an error.
More articles related to Windows:
1. Fix Black Screen Issue When Playing Videos on Windows 10.
2. Fix VLC Audio-video Sync Issues on Windows or Mac.
3. Effective Ways to Open HEIC Files on Windows 10.
Conclusion
The good news for everyone who used to face bad image errors is that they won't be in trouble anymore. The practical solutions discussed above will help them eradicate the error and carry on with the smooth working of their devices.
Anyone who is worried out there because they lost a file that was needed. Accidentally, they deleted a document that was required for later work? You don't have to worry anymore about anything because Wondershare Repairit software will take all your troubles and worries away within few minutes.
The Data Repair Software is more like a miracle to those worried about regenerating the lost or deleted file. Wondershare Repairit can recover any deleted or lost files. It can be recover data from any flash drive, hard drive, recycle bin, etc.
All the data recovered through the software is complete. The software is 100% safe and effective to use. It allows the user to save the file where ever they want to after recovery is made.
People Also Ask
-
How do I fix error 0xc00012f?
This is the 'bad image error.' Several methods have been discussed regarding fixing it, like; uninstall problematic Windows updates, installing Visual C++ Redistributable, running SFC Scan, and reinstalling the affected program. -
How do you fix bad picture pop up?
Bad picture pop-ups can be fixed through several ways like; performing clean and boot checks, or scanning your computer with a safety scanner, etc. -
How do I fix an invalid image?
There are many ways to fix an invalid image. For instance, you can try by converting the image format or unhide the file extension. You can also try opening the file with image editors. -
Can corrupted photos be repaired?
Yes, corrupted photos can be repaired. Various tools do the job and provide the service.