
"My iphone has no sound on videos!"
-- Are you facing the video no sound issue on iPhone, android device, Instagram, YouTube or Google Chrome? Download Repairit to have a quick fix!
While playing the video on your iPhone, does its sound cut out suddenly? Or sound not working on iPhone videos? You will get your answer in this article.
The high-quality cameras and innovative video modes of iPhones have made it a worthy opponent to digital cameras. A considerable part of the videos uploaded on YouTube and other platforms are now being shot with this particular device. While most of the video shot or downloaded on the iPhone turn well, some of them may come with issues like audio not playing.
Are you also facing the same situation? If yes, then this post will tell you more about this "iPhone video no sound" problem and provide you with solutions to deal with it.
In this article
Part 1. The Causes of "iPhone Video Has No Sound" and Corresponding Fixes
First of all, why is there no sound on my iPhone videos? The built-in speakers and microphones of the iPhone allow you to record precious moments to see and reminisce on them later in your life. But if it fails to play the audio part in it, how disappointing it would be. This part will explain why this happens and what are the common causes for it.
What Does No Sound on iPhone Video Mean?
There are instances when you record something, and the phone doesn't detect it, or it fails to play an audible voice, and even the iPhone videos are blurry. These cases are labeled under the iPhone, not playing sounds error. Sometimes, the error is related to all the files, while in other cases, it occurs only during the video playback.
To handle such scenarios, you need to follow different types of troubleshooting for restoring the audio part in your iPhone video.
Before learning about the different solutions for fixing the iPhone not playing sound on videos, first understand the various reasons that cause it.
Case 1: Common Causes of No Sound on Recorded iPhone Video
Does the sound of your iPhone is playing normally but causing problems only while playing a video file? Here's a list of possible causes for it:
- Software Glitch: The applications on the Apple store are usually stable, but bugs and viruses can affect their performance. These factors can make it unstable and interrupt its audio playback.
- Update Error: If you interrupt the iPhone while it's upgrading or the updates don't download correctly, it can affect the device's performance. It can also affect its applications and sound modules.
- App Settings: Many times, when you play a video, you accidentally click a button or option that mutes the video. You don't realize this and think of it as an audio playback error.
- Microphone Error: The speaker of your iPhone is also vulnerable to damage over time. So, your iPhone may not have recorded the sound in the first place.
- The video itself corrupted: The video itself is corrupted caused by unexpected reasons like network error, download error, etc., which can make the video no sound when playing.
Solution for This Case:
If the iPhone video without sound error is present only in the recently recorded iPhone videos, it may be an application or video error. It may happen due to the iPhone not recording sound on the video issues. Its hacks will be a bit different from the ones you read above. For the application section, you can try reinstalling the application or resetting it.
However, before you proceed with any further option, firstly check your videos.
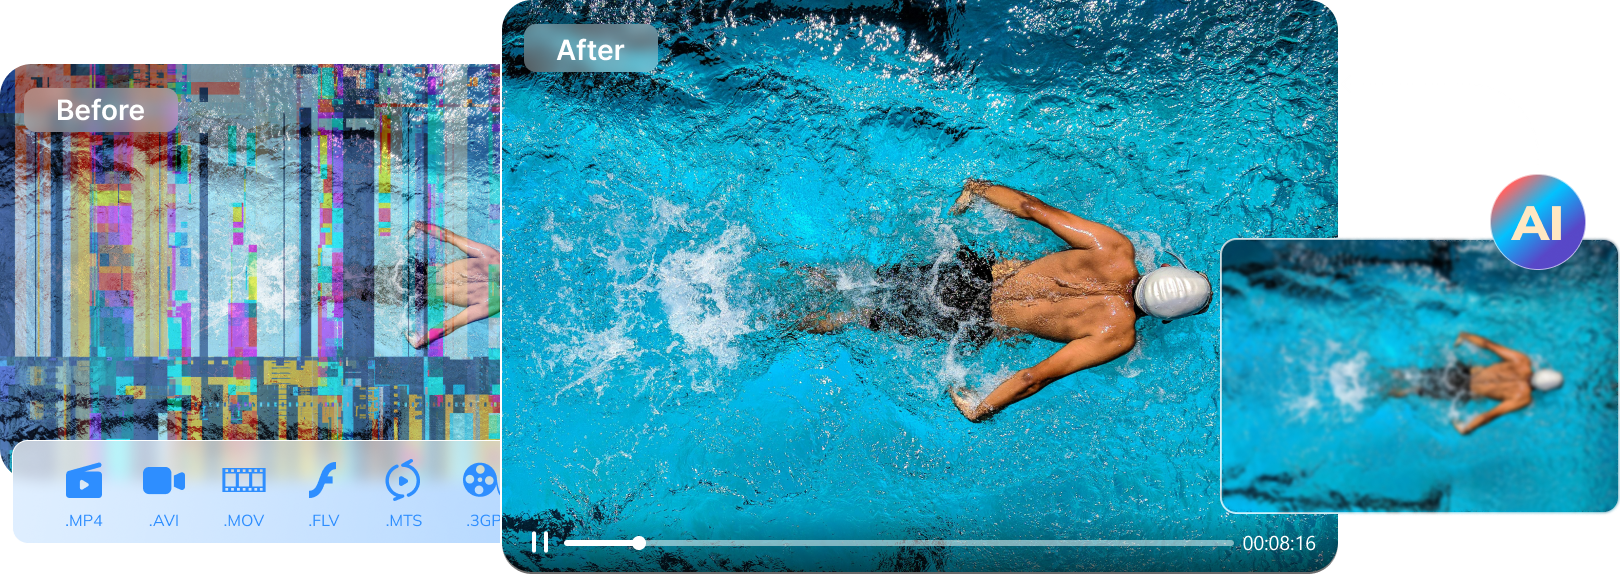
In the first case, converting the files will do the job, while in the second case, you need to re-record the video or add sound to it manually. As for the video corruption error that causes a video no sound problem, you will need an application to repair your videos. Wondershare Repairit Video Repair tool can help you with this hack. Here's how you can use it to recover the videos.
Repair damaged Files in most of corruption scenarios, such as hard disk crashes & bad sectors, virus attacks & tojan horse, software corruption & malfunctions, improper shutdown procedure, etc.

See how to use Repairit for desktop to repair your damaged videos:
01of 03 Move the video to a pc or laptop
Wondershare is a desktop software, you need to move the files to your Windows PC or MacBook to get a professional video repair result. Therefore, you must install the iTunes application on your system and connect your phone via a data cable to import the corrupted videos.
Save them in a separate folder on the system drive and then head to the Wondershare Repairit application.
02of 03 Repair video
Launch the Wondershare Repairit, and upload the videos to run the repairs. The procedure will be the same for both Mac and Windows applications.
1. Add videos
Use the "Add corrupted video" option or the "Add" button to upload videos on the interface.

Once the videos are uploaded, they will display the videos in a list format. You will see the file name along with its format, path, size, and some other properties.

2. Repair video
Select the videos you want to repair and then click on the "repair" button on the lower right side. Wondershare Repairit will immediately start to process.
When a video is repaired, a popup window shows up to save the video. Click "OK" to save the video. These files are in autosave mode, which will keep them in the default directory.

After saving the video, preview it to see if the issue is fixed. If the problem persists, fix it with the advanced repair function.

The advanced repair will use the sample video from the same device and the same format to repair the video.

03of 03 Save video
While the files of normal repair may get autosaved, the advanced repair needs you to do it manually. You can also add names, tags, and other information.

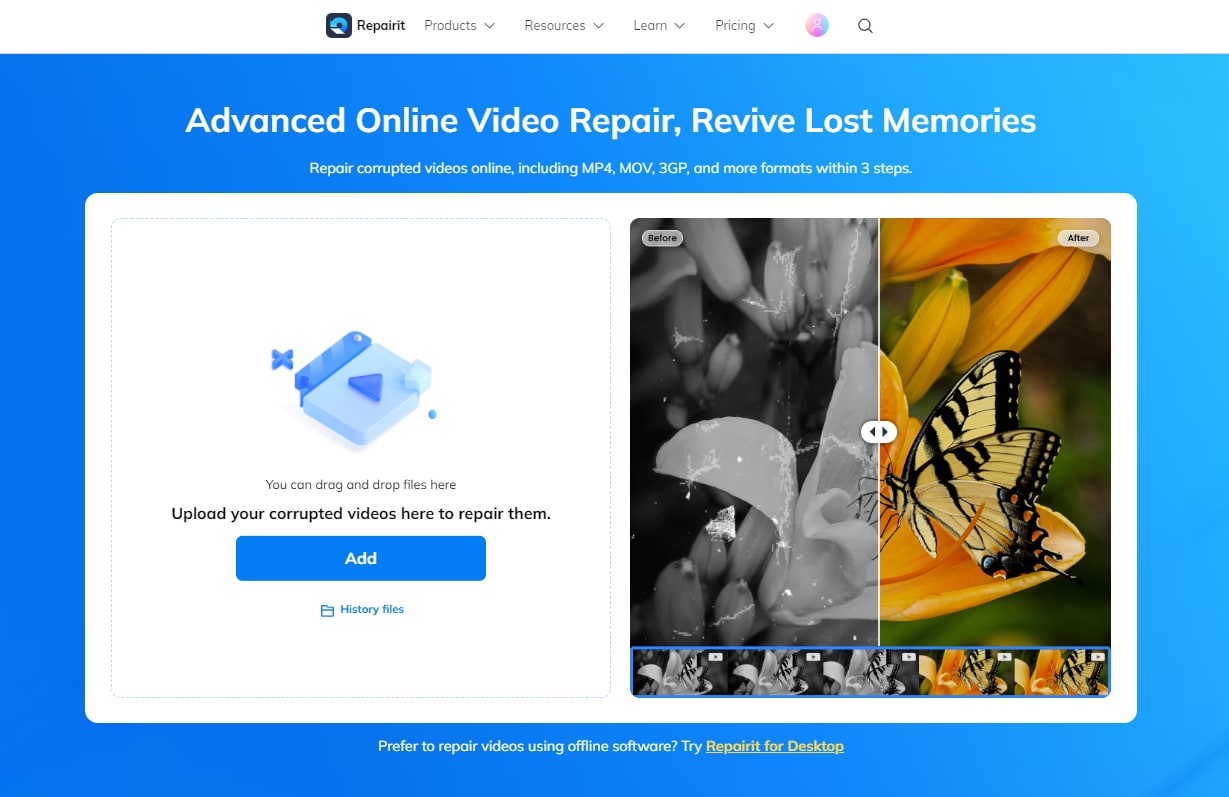
It just need 3 steps to repair the blurry videos online.
Step 1: Add corrupt videos
Step 2: Repair uploaded videos.
Step 3: Preview and save the fixed videos.
Case 2: Common iPhone Sound Not Working Causes
The cause for sound not working on iPhone can be many. Some of them are:
- Speaker Error: Moisture, or sometimes when you accidentally drop your iPhone, it loosens the connection of the iPhone speaker, causing the audio failure.
- DND: The Do Not Disturb mode of the iPhone turns off the entire sound of the iPhone. The features are designed to make it silent. At times, when you accidentally turn it on, the phone won't play any audio. It may be the reason for the error you are experiencing.
- External Connectivity: If you have connected your iPhone to an external Bluetooth device, it will use it for audio playback. Any error in the output device or obstacles between the device and your iPhone interrupts the sound and causes the audio error.
- Dusty Ports: The newer version of iPhones doesn't have a dedicated audio jack like the older models, but they do have a hybrid jack. If this jack gets clogged with dust or debris, it can interrupt the normal working of the iPhone audio system. The phone may detect an earphone and try to send audio output through it, but since nothing is connected, you won't get any playback.
For this problem, please check the methods in Part 2.
Part 2. Other Common Fixes for "iPhone Video Sound Not Working"
You know, now the possible cause for the iPhone video sound not working. Here are the common solutions that you can try. You do not require professional knowledge to fix the problems with the troubleshooting explained below.
Solution 1: Check the Sound Settings
Although it's the most used function when playing videos on your phone, the sound setting can still be easily overlooked when targeting the problem.
Just check the Volume level by simply tapping the volume buttons. If it's to the left, it will make your iPhone mute sound. All you need to do is to slide the volume button to the right.
Solution 2: Clean the Jack
If the dust accumulation in the iPhone jack creates an illusion of plugged-in earphones, the iPhone will show a headphone icon on the top. If you see it, remove the cover of your phone and check it for dust and debris collection. You can use a soft, lint-free microfiber to wipe it. After that, use the tools in the iPhone kit to reach the inner parts of the jack and clear them.
If you don't have a cleaning kit, use an earbud and clear the accumulation by applying a small amount of force.
Solution 3: Reset the Sound Levels
If the iPhone video sound is not working due to the sound profile of your phone, switching it from silent to general and adjusting the sound can solve the problem. Here's how you can do it.
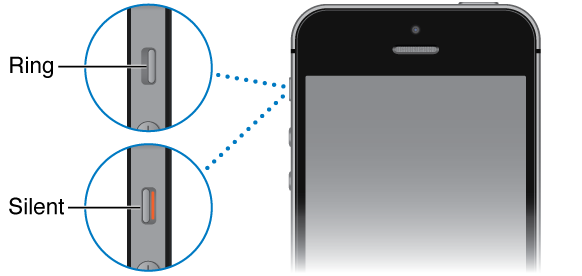
Step 1: Switch to Ring Mode
A switch on the side of the iPhone helps you to swap between silent and general profile. Usually, you will find an orange mark when the phone is in silent mode. Flip the switch if you can see it.
Step 2: Adjust the Volume
For an iPhone 7 or newer version, go to the path settings-> Sounds and Haptics.
The path will change to settings-> Sounds for an earlier iPhone version.
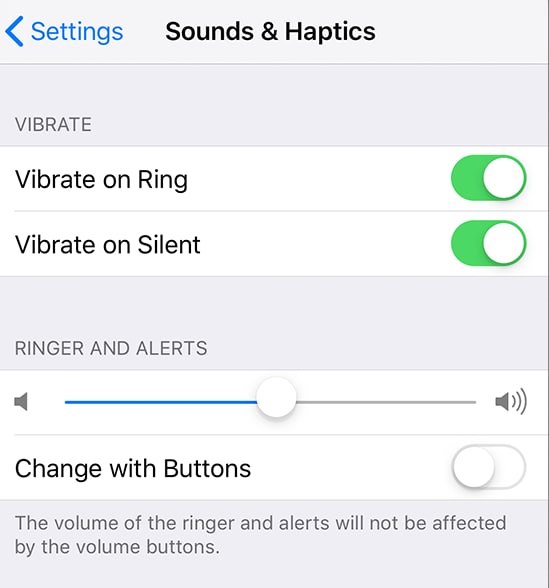
You will find several sound options and level indicators, and adjust the slider for ringtones and alerts.
Solution 4: Disconnect External Devices
Head to the Bluetooth and Wi-Fi settings on your iPhone and turn them off. It will disconnect any external devices that may interrupt the sound playback and resume the standard functionality of your iPhone.
Solution 5: Turn Off DND Mode
If the iPhone audio playback failure is related to the DND level, turning it off from the setting will fix it instantly. Here's how you can turn it off.
Step 1: Unlock your iPhone screen and go to 'Settings' to reach the 'Do Not Disturb' option.
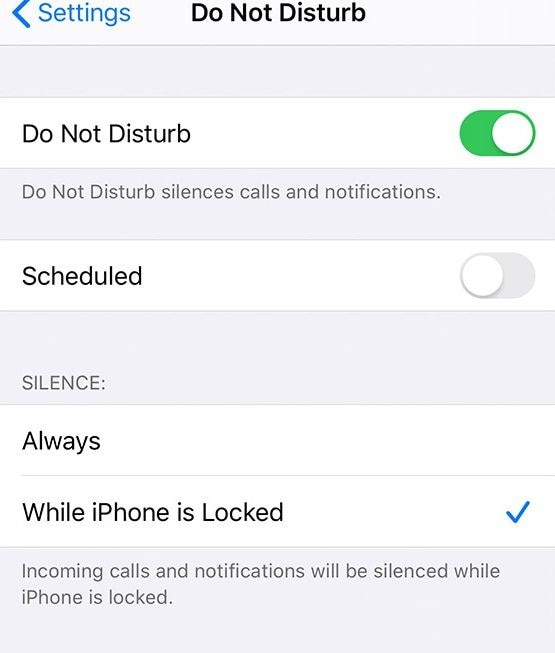
Step 2: There is a button on the top of the DND setting screen that indicates if the mode is active or not. If it's active, tap on the button to turn it off.
Solution 6: Soft Reset the iPhone
The data accumulation, cache, and files on the iPhone may bulk it over time. It will cause the iPhone to misbehave. The one way to eliminate this error is to soft reset your phone.
Click and hold the iPhone power button and then select the reset option. Consider turning it off for a while. It will eliminate extra static energy that may be interfering with the speakers.
Part 3. Tips Against No Sound on iPhone Video
Usually, most of the problems that lead to iPhone video not recording sound and playback errors occur due to minor faults in an application or the smartphone's hardware. You can avoid them with a bit of care. Here are the tips that will guide you to prevent these errors:
- Use plugs to prevent dust or dirt accumulation in the jacks of your phones.
- Keep your iPhone away from high accumulation areas.
- Check and convert all the videos according to your iPhone's compatibility before loading them.
- Avoid bulking up your devices with applications from unknown sources.
- Buy only a genuine iPhone cover and check its fitting before buying.
- Make sure to download and install the most recent version of OS updates for your device.
- Turn off Bluetooth and disconnect the external devices when not in use.
- Never use a high-power speaker or microphone with your iPhone. It may damage its circuits.
- Keep your device away from high-moisture or low-temperature areas.
- Use a high-quality cover and temper to prevent shocks during the accidental drop of your phone.
Closing Words
iPhone video not recording sound or not playing it while a video playback may be troublesome. But the solutions discussed in this post will help you to fix the problem. First, try the simple troubleshoots that are discussed here. If the issue is not resolved, Wondershare Repairit will surely fix the error.
So the next time, whenever you face such an issue, upload the video to the Wondershare Repairit video repair tool to repair it and enjoy watching your favorite videos without any trouble.
Frequently Asked Question:
-
Q1. I Can't hear snapchat videos on iPhone! What should I do?
-
A1: You need to turn off your phone's silent mode and enable auto-play sound so that when you go to the Snapchat app, it will always play sound.