
Many users experience frustration when their video card is not detected on their devices. Along with that, this error can disrupt gaming, video editing, and even basic tasks. The problem comes due to outdated drivers, incorrect BIOS settings, or hardware malfunctions. When your screen remains black or your device switches to integrated graphics, your video card may not be detected.
This issue can affect both new and old GPUs, which makes it essential to find a reliable solution. Plus, you have to identify its root causes to find practical solutions. Thus, this guide will provide you with the top 5 solutions to fix this problem efficiently and ensure smooth performance for gaming and work.
In this article
Part 1. Understanding The Cause Behind Video Cards Not Detected
Before resolving the issue, you need to understand why your system displays a graphics card not found error. In many cases, simple troubleshooting steps resolve the problem, while in others, deeper system adjustments are needed. Below are the most common reasons your video card might not be detected:
| Causes | Description |
| Defective Slot | If the card slot on the device is damaged, the system may fail to detect it. Thus, you should test the card in a different slot or on another motherboard to identify the real problem. |
| Improper Placement | When the graphics card isn't seated correctly in its primary slot, the system may fail to detect it. That's where you should reseat the card and clean the slot to restore its functionality. |
| Power Connection | Most dedicated video cards require external power from the PSU. So, you need to verify that the correct power connectors are plugged in securely and your power supply meets the requirements. |
| Damaged GPU | Sometimes, physical damage to the graphics card can prevent its detection on your device. In such a case, you have to test the GPU on another system to confirm whether it’s working or not. |
| Old Video Card | In case your graphic drivers are old or missing, your system might not recognize the card. Here, you should reinstall or update drivers through your device’s manager to resolve the issue. |
Part 2.Potential Solutions Behind "Graphics Card Not Found"
Upon understanding the possible reasons, it's time to apply practical solutions. As we discussed, no video card detected error can disrupt gaming, editing, or general system use if this issue is not addressed timely. So, let’s dive below to explore the 5 proven solutions to help you resolve this problem.
Way 1. Check the Card Slot
The most common reason for a VGA card not detected error is an improperly seated video card. When it isn’t securely installed in the designated slot, the system may fail to recognize it. Here, you need to turn off your device and open its case. Afterward, carefully remove the graphics card and clean the video card slot to remove dust.
Going ahead, just reinsert the card firmly by ensuring it clicks into place, and the locking mechanism is engaged. Plus, if your motherboard has multiple card slots, you should try inserting the card into a different one. After reseating the card, simply power on the system and check if it is recognized.
Way 2. Reinstall Essential Drivers (Device Manager + Reinstallation)
When checking the card slot didn't resolve the issue; you should try to reinstall your graphic driver. Sometimes, a computer not detecting video cards often results from missing or incompatible drivers, which prevents proper GPU communication with the system. Thus, follow the detailed steps below to learn how to fix your video card not detected problem by using this method:
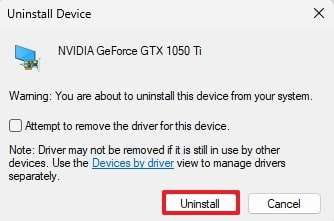
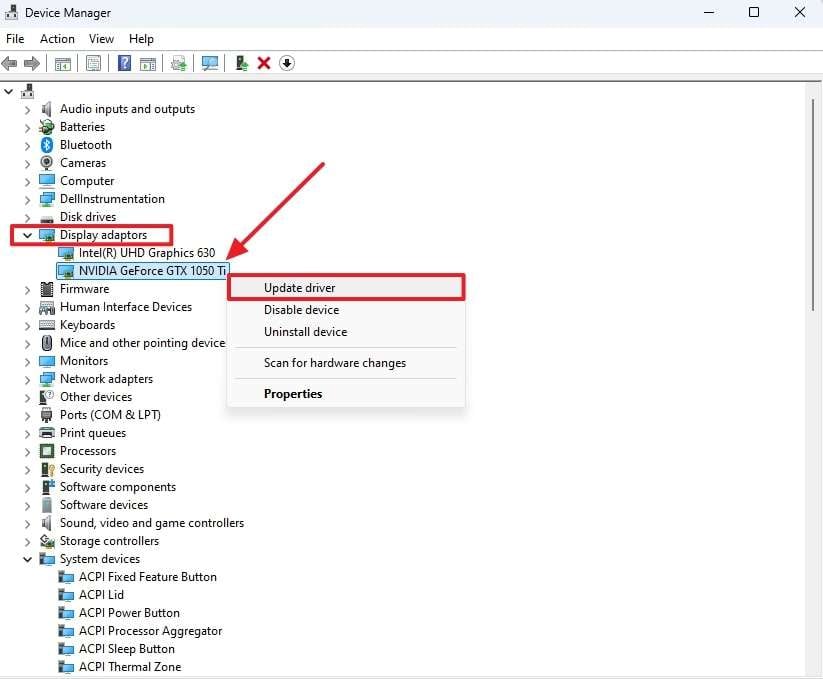
Step 1. You need to navigate to “Device Manager” on your desktop and locate your inserted video card driver. Afterward, click the right mouse button on the driver under the “Display Adaptors” section and choose the “Uninstall Device” option.
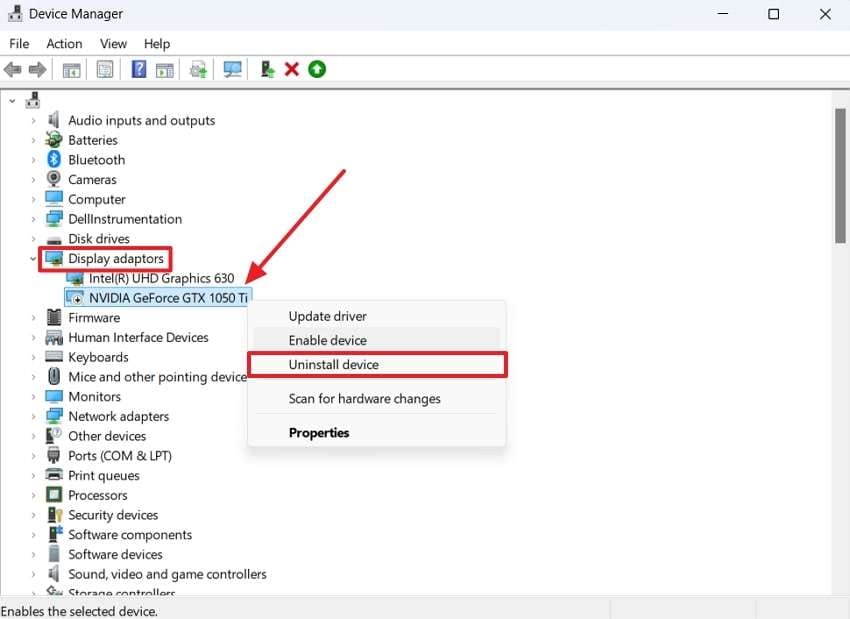
Step 2. Upon seeing a small dialog box, press the “Uninstall” button to successfully delete it. After a few seconds, you need to restart your device, and your deleted driver will be automatically reinstalled on your PC.
Way 3. Manage BIOS Settings
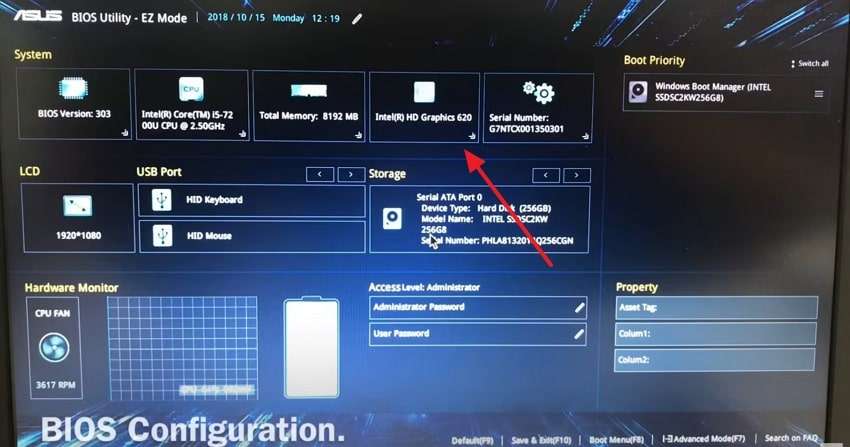
Another problem that might cause this issue is incorrect BIOS settings on your device. A VGA not detected error can occur when the system prioritizes integrated graphics instead of the dedicated GPU. So, go through the instructions below to explore how you can manage these settings and resolve this problem:
Instruction. To fix this, restart your PC and enter the “BIOS” by pressing the designated key (usually F2 or F12). Upon accessing it, look for display settings and set the primary graphics adapter to PCIe instead of integrated graphics. Afterward, save changes, restart your system, and check if the GPU is recognized.
Way 4. Update Device Drivers
If the above methods don’t resolve the issue, you have to update your drivers to fix the laptop not detecting the graphics card problem. In case your video card is not detected, it means that your system is running an old driver version. Without wasting any time, follow the steps below to update your video card driver:
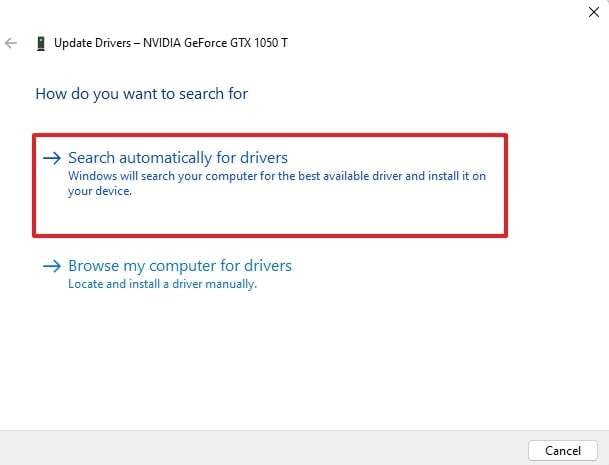
Step 1. To commence the task, open “Device Manager” and locate your GPU under the “Display Adapters” section. After that, right-click on the driver that is not detected and select the “Update Driver” option.
Step 2. Going ahead, choose “Search Automatically for Drivers” and let the system update it. After updating, you need to restart your system and check if the GPU is detected.
Way 5. Check If Video Card is Faulty
A video card not recognized error can also occur if the card is defective. In such cases, you need to test it on another computer to check your video card status. In case the card isn’t detected there either, it’s likely damaged. Along with that, you can also try a different GPU in your system to confirm whether the issue is with the card or your device.
Part 3. Videos Corrupted Due to Faulty VGA Card: Fix Instantly!
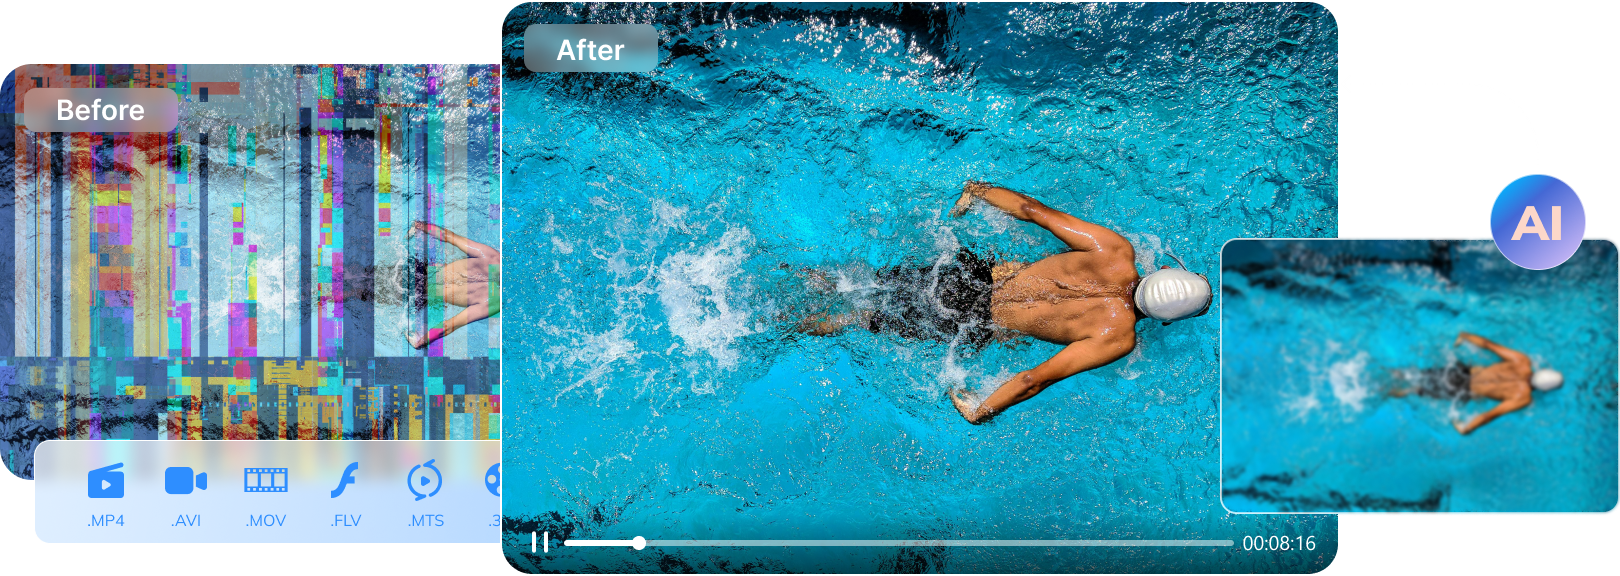
Apart from the fixes, a failing VGA card doesn’t just cause display errors, as it can also corrupt your videos. When you face a video card not detected issue, it is possible that your recorded videos are missing frames or fail to open. In such cases, you should consider using a repair toolbox like Repairit to retrieve your videos. This dedicated toolkit can fix damaged video files across multiple formats and ensure they play smoothly.
Users can fix either minor or severely damaged videos with just three steps while maintaining the original quality. Furthermore, it lets you use sample videos to recover details to ensure better restoration results. Beyond repairing your videos, this tool can also improve resolution and remove noise for a flawless playback experience. Whether your video was damaged during editing or transfer, Repairit ensures a high success rate for recovery.
Key Features

-
RAW Optimization: It ensures HD color processing by optimizing RAW-encoded and HDR/LOG videos to preserve every detail.
-
Gyroscope Data Repair: This tool supports gyro data correction, which stabilizes GoPro sports camera footage to ensure smooth playback.
-
Format Support: You can repair various video files, including RAW and FLV, which makes it ideal for all users.
-
Repairit has a quick and advanced scanning mode. You can use either depending on the level of corruption the video file has undergone.
-
No limit to the number and size of the repairable videos.
-
Repaired videos are more compatible with professional editing software such as DaVinci, Composer, Final Cut Pro, and Premiere Pro.
-
Support Windows 11/10/8/7/Vista, Windows Server 2003/2008/2012/2016/2019/2022, and macOS 10.12~macOS 15.
Step-by-Step Guide to Using Repairit to Repair Videos Due to Faulty VGA
Upon discovering its features, follow the detailed steps below to learn how to repair your video files using this advanced tool:
Step 1. Press either the center section of the interface labeled "Add Video and Begin Repairing, or click the "Add" button to import your video for recovery.

Step 2. Upon importing the damaged videos, the interface displays details for each corrupted video, such as Image name, file size, and more. At this point, hit the "Repair" button to start the video repair procedure.

Step 3. Now, you need to click the "Save" button to export your fixed videos to your device.

Repair Videos Corrupted Due to Faulty VGA Card
 Security Verified. Over 7,302,189 people have downloaded it.
Conclusion
To wrap up, a graphics card not found error can be challenging, especially when it affects gaming or regular tasks. This issue comes due to several reasons, which we have already discussed above, such as faulty hardware or improper placement. Along with that, we have also explored the top 5 proven fixes that can help you restore your card functionality.
Besides detection problems, a failing VGA card can corrupt your video files, causing glitches or playback errors. When this happens, you should use Repairit to fix your damaged or lost video files. It supports various formats, ensures quality restoration, and repairs severe damage efficiently. So, you must download and try Repairit today for a seamless video restoring experience.
FAQ
-
Q1. Can a faulty power supply cause my video card to go undetected?
When your power supply unit doesn’t provide enough wattage or the cables are not properly connected, the video card might not turn on. So, you should check the power supply rating and ensure all power connectors are properly attached to your device. -
Q2. How can I tell if my PCIe slot is faulty?
In case the slot may prevent your graphics card, you have to remove the card and insert it into another slot on your motherboard. When the card works in a different slot, it surely means that the original one might be defective. -
Q3. Can a corrupted video file be repaired if my video card is faulty?
To overcome this challenge, you can use professional video repair tools like Repairit to restore the corrupted files. The tool supports various video formats and uses sample videos to reconstruct damaged footage. It also enhances resolution and removes noise to improve playback quality after the repair process.