
"My VLC can't play MKV files. I tried every solution I could find on the forums, Yahoo answer, but it still stutters on playback. Should I give up on VLC because of this?"
The high-definition files hold audio, video, image, and subtitle content in a single container even though they have different formats. Many users turn to VLC media players to play these massive files and end up facing problems.
The most common ones when playing MKV files on the VLC player are VLC audio delay, playback stuttering, fuzzy image, and buggy interface quirks. With these issues, users are left with one or two options, like using a second-best alternative VLC media player or converting MKV files to a better compatible video format MP4 or MOV.
Along with these options, the user ends up getting more hassled in solving the issue. Today, plenty of MKV repair solutions are available in the market to tackle the problems, but it is essential to opt for reliable, secure, and user-friendly repair tools.
Part 1: The Reasons That Cause VLC Not Playing Play MKV Files
In this Part, we will explore the common obstacles that users encounter when attempting to play MKV files with VLC Media Player. Despite VLC's reputation for handling a wide range of multimedia formats, there are specific situations where MKV files may not play smoothly.
One reason VLC may struggle with MKV files is due to codec issues. MKV files can contain multiple video, audio, and subtitle tracks in a single file. If VLC lacks the codec to decode a specific stream within the MKV file, playback problems can occur. This can result in video not playing, only audio playing, or the file not opening at all.
Another possible cause is MKV file corruption, often due to incomplete downloads or power failures. Corrupted MKV files may freeze, stutter, or fail to open in VLC.
Using an outdated VLC version may also lead to difficulties playing MKV files efficiently. Updating VLC regularly can help resolve these playback issues and improve compatibility with various formats.
Part 2: 4 Solutions to MKV File Not Playing In VLC
MKV format is by default supported by VLC. It can easily read and open MKV videos. Even so, many users face issues whenever they play MKV videos on the VLC media player.
The most common errors that usually occur are MKV file not playing, grey screen, pop-up error messages while playing MKV file, downloading MKV indefinitely, choppy videos, no sound, errors on the external subtitle, and many more. At the same time, there are various step-by-step solutions provided online to tackle the troubles.
Issue 1. VLC Skipping MKV or HD MKV
-
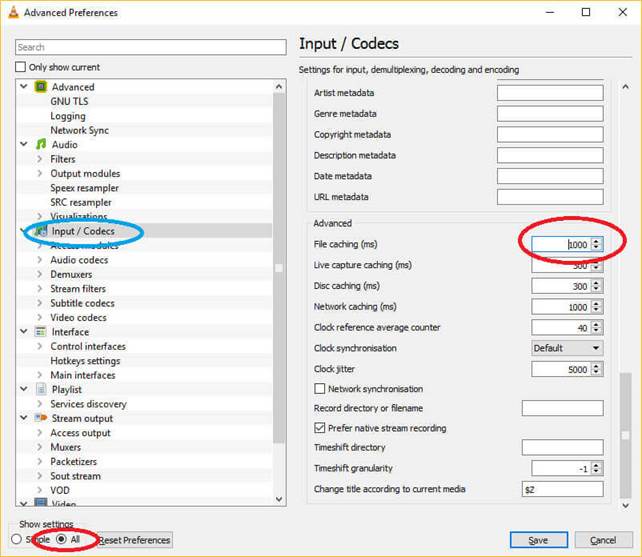
Go to VLC Menu – From Tools menubar - Select Preferences option.
-
Select the All Radio Button on the bottom left from the dialog window.
-
Go to the Input/Codecs section – a list will appear.
-
Select the File Caching(ms) option under the advanced section.
-
Set it to 1000.
Issue 2. Choppy Video While Playing MKV and HD MKV on VLC
Choppy videos spoil the fun of the viewing experience. There can be several reasons behind a rough, jerky, or broken video. Reasons include faulty SD cards, technical glitches, audio/video codec issues, outdated media players, corrupt or damaged video files, unsupportable video file format, etc.
-
Go to VLC Menu – From Tools menubar - Select Preferences option.
-
Select the All Radio Button on the bottom left from the dialog window.
-
Select Input/Codecs option.
-
Select the Video Codecs option.
-
Select the FFmpeg option - Disable Hardware Decoding option on the list that appears.

Issue 3. VLC Media Player Has No Sound
Most VLC users get frustrated when the VLC media player produces no audio while playing the videos. Like viewing, aural experience is equally essential for enjoyment. If the problem continues to persist after checking all the sound-related panels and speakers on our devices, just check the steps.
To enable the audio settings:
-
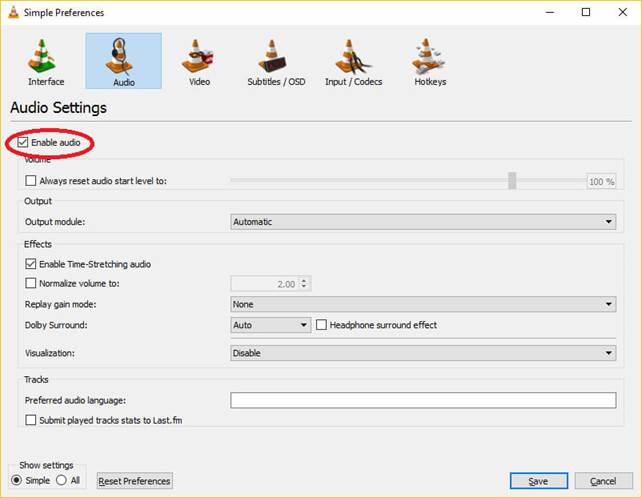
Go to VLC Menu – From Tools menubar - Select Preferences option.
-
Click on the Audio icon.
-
Select the Enable Audio option.
-
Go to Output option and Select options from Output Module and HDMI/SPDIF audio passthrough.
To enable the video settings:
-
Navigate to the Video tab on the Simple Preferences page, then look for the "Enable Video" option and ensure it is checked.
-
Adjust the Video Output mode to a suitable one, choose "OpenGL video output".
-
Click "Save" to finalize your settings adjustments.

Issue 4. MKV file is corrupted or damaged
In some cases, the MKV file may get corrupted or damaged, and thus VLC fails to play it. But you can try a video repair tool to fix it.
Wondershare Repairit Video Repair is one of the robust tools of modern times in the market. The ultimate corrupt video file fixer repairs videos from different devices, like memory cards, SD cards, computer hard drives, digital cameras, action cameras, etc.

-
Repair damaged videos with all levels of corruption, such as video not playing, video no sound, out-of-sync video or audio, playback errors, header corruption, flickering video, missing video codec, etc.
-
Repair videos of diverse formats, including MOV, MP4, M2TS, MKV, MTS, 3GP, AVI, FLV, MXF, KLV, INSV, M4V, WMV, MPEG, ASF, etc.
-
Repair damaged or corrupted videos caused by memory card error, file transfer error, video compression, system crash, video format change, virus attacks, etc.
-
Repair critically damaged or corrupted videos available on SD cards, mobile phones, cameras, USB flash drives, etc.
-
Repairit has a quick and advanced scanning mode. You can use either depending on the level of corruption the video file has undergone.
-
No limit to the number and size of the repairable videos.
-
Support Windows 11/10/8/7/Vista, Windows Server 2003/2008/2012/2016/2019/2022, and macOS 10.10~macOS 14.
The powerful software guides us on how to recover a corrupt video file instantly with easy steps. How easy are they? The instruction shows you the easy task - 4 steps to repairing the damaged MKV file using the MKV Video Repair tool.
Step 1 Add Damaged MKV Video File
Firstly, launch the application on the computer. Click the "+Add" button to import the corrupted video and start repairing the option to add damaged videos.

Step 2 Repair Damaged MKV Video File
-
Select multiple video files for repairing.
-
Select the Repair button to start the process.

Step 3 Preview and Save Repaired MKV Video File
-
The repair process will take some time.
-
Once the process completes, a pop-up screen will display.
-
Once selected, it starts repairing MKV video files.
-
Click on the preview button to see repaired MKV files.

Step 4 Advanced Video Repair (Optional)
-
The Advanced Repair mode helps you repair severely corrupted video files. Click on the button.
-
A new window will display and click the Folder icon to browse and choose a sample file.
-
Click on the Repair button.

Step 5 Save Repaired Video
-
The repair process is over in some time.
-
Save the repaired MKV video file at the desired location.

This software also enables you to repair MP4 videos.
Attention:
If you do not want to download a software on your computer and your corrupted video is smaller than 3GB, you can try the online version of Repairit Video Repair to get your video repaired online with ease.
Attention:
Fix MKV Video Error Code 0xc00d3e8c
Repair Corrupted MKV Videos Online
MXF VLC: An Easy Way to Play or Your Files
Part 3: 2 Tricks on Playing MKV Files on VLC Smoothly
Tip 1. Convert MKV Files to More Compatible Formats
If the error screen, choppy videos, no audio, dragging, or any other type of problem persists, convert the MKV file to DivX, WMV, MPEG-4, and other VLC-supported formats.
Tip 2. Play MKV Files Sleekly with VLC Alternative
5KPlayer is an online MKV player that is called the second-best VLC alternative available globally to meet user demands. It is embedded with 450+ video codec and 180+ audio codec, the need to install third-party software, plug-ins, or any codec pack like CCCP - the one VLC needs to play MKV are not at all required. There are many features that make the VLC alternative a better and superior option compared to VLC on Video playback.
-
It supports MKV fluently without issues.
-
Allows playing 4K MKV on both Mac and PC.
-
No DVD problem.
-
It contains a media library.
-
Easy to download.
-
Drag and drop MKV files and enjoy high-quality video viewing without interruptions.
* Some of the above codec formats may need to be supported by system.
People Also Ask
-
Does VLC play MKV files?
Yes, VLC does support MKV playback. However, if your MKV file is not playing correctly, it may be due to missing codecs, an outdated VLC version, or a corrupted video file. -
How can I play MKV files smoothly on Windows?
To ensure smooth playback, try updating VLC, disabling hardware decoding, or converting the MKV file to a more compatible format like MP4. If the MKV file is damaged, consider using a reliable MKV file player or a video repair tool like Repairit. -
Why is my MKV file not playing correctly?
Common causes include video corruption, unsupported codecs, or outdated media software. If your MKV file stutters, has no sound, or won't open, try repairing it or switching to an alternative player.
