
Q: I got a message saying that "This video cannot be played on Google Drive". How do I open an mp4 file on Google Drive?
We often think that Google Drive is a reliable resource for sharing and saving videos, but it is not entirely risk-free. Many factors can damage the Google Drive video and lead to the error - "The video cannot be played".
Luckily, most of these errors that arise due to the standard format and compatibility issues are fixable. This article will take you through the different solutions for fixing the Google Drive video not playing error.
You will also learn the common reasons that can lead to "Google Drive video cannot be played" error. If the video gets damaged, you can repair it with the Wondershare Repairit - Video Repair tool. In this article, you will also come across useful tips for Google Drive videos.
Use Repairit to Repair Your Corrupted Video Filess Now
 Security Verified. Over 7,302,189 people have downloaded it.
Part 1. Why Are Videos Not Playing In Google Drive
While playing the video, if Google Drive not playing videos, most of the time, it is the application or the browser that is causing the error. But, sometimes, it can also be because of the hardware of the computer system. You will understand here about both the software and the hardware that can cause the Google Drive video error.
Browser Version: To meet the requirements of the market, Google keeps on updating its settings. This can be the reason that the video cannot be played on Google Drive because, after updating, the older version cannot provide full functionality.
Third-party Plug-in: The plug-in or the extension that you add to your web browser modifies its performance. However, sometimes the newer introduced feature interferes with the default functionality of the browser. It could also be the reason for Google Drive not playing videos.
File Properties: Google Drive doesn't align with the older and less-used video formats. It won't be able to play files in incompatible formats.
Video Resolution: 1920*1080p is the maximum size supported by Google Drive. Any video that exceeds this resolution fails to load or play on it.
Internet Speed: Google Drive needs stable and high-speed internet to play video in your cloud storage. You can't play video with slow internet or fluctuating network.
RAM: Google uses the temporary memory of your devices to create files for playing videos. If your RAM is low or too bulky, the video will take too long to play, or it will not play at all.
Router Setting: The newer version of internet routers comes with internet limiters and security protocols. These features may prevent large and non-scannable files from opening.
Further reading:
7 Best Solutions to Videos Not Playing in Windows 10/11
10 Best Ways to Fix a Video Not Playing on an Android Phone
7 Ways to Troubleshoot and Repair Video Playback Errors
Part 2. 9 Common Solutions to Google Drive Videos Not Playing
Depending upon the reason for Google Drive not playing video error, you need to check and fix multiple types of error possibilities. The following are something that you can try:
Solution 1. Check Network Connection
Step 1: Check your internet speed using an online speed tester. If the speed is fine, then skip the next steps and proceed to the second solution. But if the speed is causing trouble, continue with the below steps.
Step 2: Reset the modern and router. Turn them off for a few minutes and then restart them. Resetting their default setting is also an option.
Step 3: Check the LAN cable entering or exiting your modem router and system. If none of them works, call your network operator with the speed issue. In case you attain the required speed, the video will work if it is not working, try the other troubleshoots.
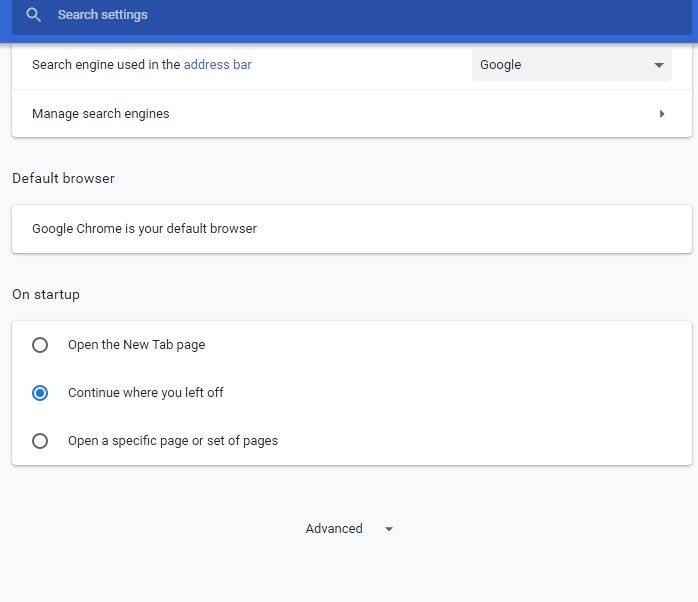
Solution 2. Check Browser Version
Open the 'About Browser' section of your browser and check its version. Check whether you are working on the latest available version on the internet. If it's up to date, skip to the next hack, if not, you need to update it.
You can try downloading the latest browser and install it or update the current browser. Here's how you can do it in Chrome.
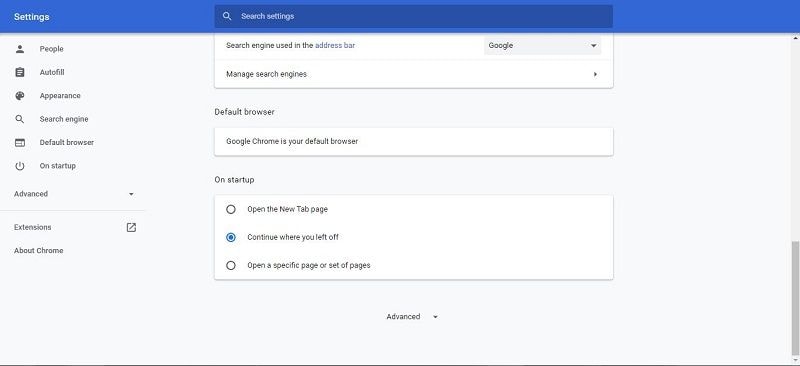
Step 1: Open the 'About Chrome' menu by opening Chrome and then navigating to- Setting-> About Chrome. You can also open it by typing 'chrome://settings' in the search bar.
Step 2: Click on the 'Check for Update option.' Chrome will show you the newest version available and provide you a direct button to install it. Then, you have to relaunch the browser, and you are good to go.
Related: Further, read and know all fixes on video no sound on Chrome.
Solution 3. Clear RAM and Browser Cache
Clearing the RAM can also work for you. There are multiple ways to do so. Considering you don't want to install a new RAM, this solution will focus on clearing it. Again, there are two ways for clearing it. You can start by closing the background application. Does this work? If no, then try clearing the browser cache files. Here's how to do it in Chrome.
Step 1: Open the chrome option and click on the three-dot button on the upper right side.
Step 2: Navigate to the 'History' option and open it. You can also open history windows by click CTRL+H. Now, click on the 'Clear browsing data' option, checkmark the 'cache and cookie' option, and click 'Clear Data.'
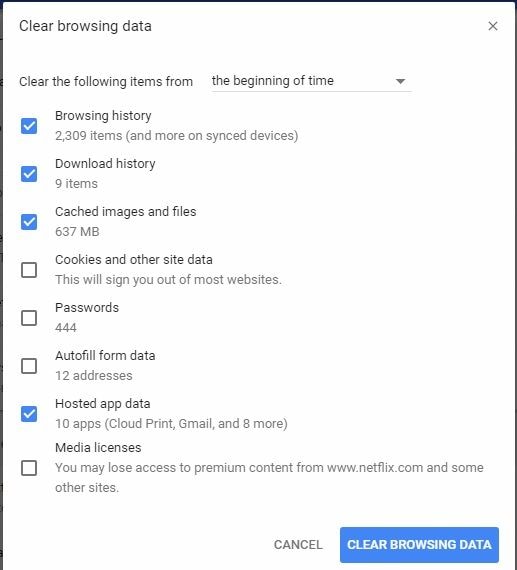
Alternatively, you can also access the clear data option by navigating to Chrome Setting->Clear Browsing Data.
Solution 4. Disable Plug-in
Open Chrome and navigate to setting-> more tools-> Extensions. Here, go to the extensions and turn it off using the button under it. Alternatively, you can also install another browser to verify the error.
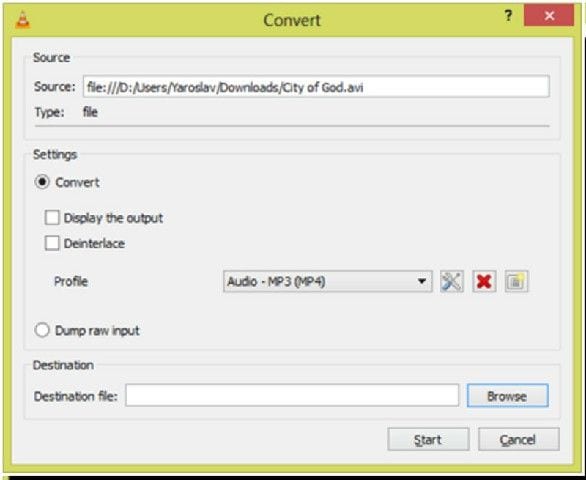
Solution 5. Convert the Videos
If none of the above hacks work, then the format and resolution of the video can be the issue. The simplest way to deal with it will be to convert videos. You can consider doing it using an online website, but it will be best if you use an offline tool, or more preferably, a media player like VLC for converting it. Here's how to do it.
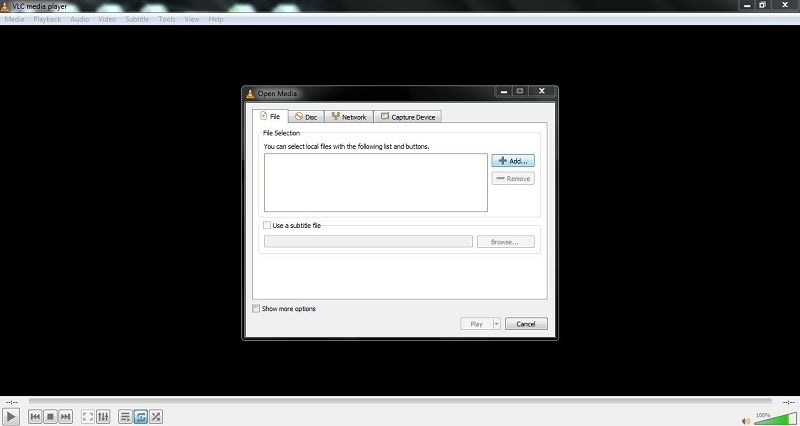
Step 1: Open VLC and head to the Files-> Open multiple Files. Then click on the 'Add' button and upload the files that need conversion.
Step 2: Now, click on the drop-down button next to 'Play' and select the 'Convert' option in it.

Step 3: VLC will now ask for a path to save the file, output format, and then click the 'Start' button. The player will instantly start to convert the video.
Videos are damaged after converting? Just get the video repair solutions here.
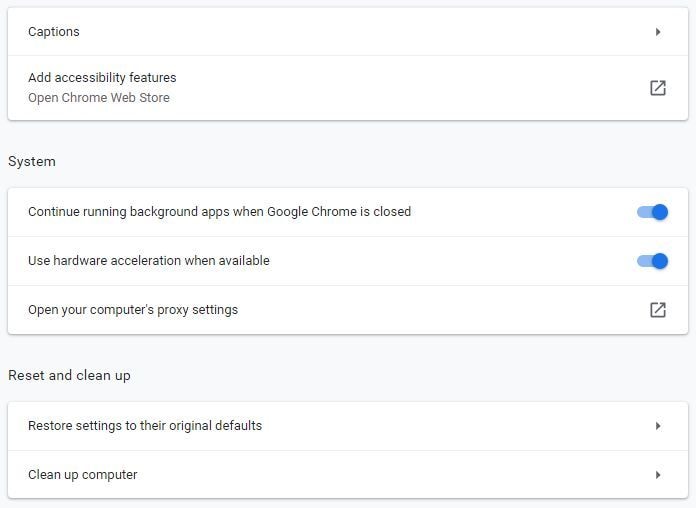
Solution 6. Disable Hardware Acceleration
Hardware acceleration enables a browser like Google Chrome to access and use your Graphics Processing Unit or GPU for rendering video results. If it's too bulky, the video will fail to render and won't play. The only way to prevent this problem is to shut down this feature.
Step 1: Open Chrome and navigate to its settings.
Step 2: Click on the 'Advanced' option at the bottom of the setting page and then navigate to 'System.'
Step 3: Now, you will notice a 'use hardware acceleration when available' option. Toggle the button next to it and restart the browser. Then run the video to check if it works or not.
Solution 7. Try Incognito Mode
The plug-ins or extensions added to your web browser may be helpful. However, some extensions introduce features that interfere with your browser's default functionality. So, you may face the "Google Drive video cannot be played" error sometimes.
It is necessary to check if an extension is causing this error by turning on the incognito mode, which will disable all extensions and allow you to browse privately. From there, log in to Google Drive and try playing your video. To find the problematic plug-in, disable all extensions and re-enable them.
Solution 8. Check If the Video Format is Supported
Google Drive offers support for a multitude of video formats, albeit not comprehensively. While it permits the uploading of videos in any format, playback is restricted to compatible ones. The list of video formats playable on Google Drive encompasses 3GPP, AVI, FLV, MPEG4, MPEG-PS, MOV, MTS, WebM, and WMV. On encountering an unsupported video, a straightforward solution is to convert the video into a compatible format and re-upload it. It's noteworthy that Google Drive allows the uploading of videos in any resolution. However, the maximum playback resolution is capped at 1920x1080 pixels, implying that videos exceeding this resolution may face playback issues.
Solution 9. Not Use Pirated Videos
Google Drive is a powerful tool for storing and sharing files, but it doesn't support play pirated videos. Google has implemented stringent measures to detect and prevent the sharing and playback of copyrighted content without permission. This includes using advanced content identification systems to compare uploaded files with a database of copyrighted material. If a match is found, Google can block the file or remove it completely to uphold copyright laws and protect intellectual property. Therefore, using Google Drive to play pirated videos not only violates Google's terms of service, but also infringes upon copyright laws.
Part 3. Ultimate Solution to Corrupted Videos on Google Drive
Most of the time, the above hacks will surely resolve "Google Drive videos not playing" problem. However, after trying all the above-discussed troubleshoots, if you can't play video on Google Drive, then chances are there that your video file is corrupted. A case of Google Drive not playing MP4 of optimal resolution is also an indication of file corruption.
Wondering what to do if your video is corrupted? Do you think that you have lost the video forever? Worry not! You can still get it repaired with the Wondershare Repairit Video Repair tool.

Wondershare Repairit - Video Repair
Security Verified. Over 7,302,189 people have downloaded it.
-
Support to repair damaged videos with all levels of corruption, such as video not playing, video no sound, out-of-sync video or audio, sluggish video display, flickering video, missing video codec, etc.
-
Support to repair videos of diverse formats, including MOV, MP4, M2TS, MKV, MTS, 3GP, AVI, FLV, MXF, KLV, INSV, M4V, WMV, MPEG, ASF, etc.
-
Repair damaged or corrupted videos caused by video compression, system crash, video format change, etc.
-
Repair critically damaged or corrupted videos available on SD cards, phones, cameras, USB flash drives, etc.
-
Repairit has a quick and advanced scanning mode. You can use either depending upon the level of corruption the video file has undergone.
-
No limit to the number and size of the repairable videos.
-
Compatible with Windows PC, Mac OS, and supports PC to mobile transferring/sharing.
Stepwise Guide to Fix Corrupted Videos
To begin the repair process, you need to transfer the corrupted videos to your laptop or computer. So download the videos from Google Drive to your system and launch the Wondershare Repairit to initiate the repair.
The recovery process of Repairit runs in three quick and easy steps. You do not require any professional skills to run this user-friendly tool. Proceed with the following steps that remain the same for both iOS and Windows systems.
Step 1: Adding the Corrupted Videos
The default opening window of the Wondershare application will look like the one shown in the picture below. Click on the 'Add' button to upload the videos of the software.

Step 2: Running the Repair Operations
There is a blue button on the bottom right side of the video detail windows with the label 'Repair.' Select the video files and hit this repair button.
Wondershare Repairit will instantly start repairing the videos. It will show you a popup after finishing the task. Click 'OK' on this popup, and save the files will be saved to your drive.

The files in the repair process are under the Wondershare Repairit auto-save program and won't need you to provide any path or manual saving. Repairit will automatically move them to the default directory.
After saving all the files, the repair tool will show a 'Preview' button next to every video. You can use this button to verify the video results. If the files work fine, you can exit the application, but if not, click the 'Advanced Repair' option in the video preview.

For the advanced repair, Wondershare Repairit will ask for a sample video. Click on the 'Folder' icon, browse to the video folder, and select a healthy file that shares the same properties as corrupted videos. Now click the 'Repair' button and wait for the files to process.

After Wondershare Repairit completes the processing, you can use the preview button to verify the video files again.
Step 3: Save the Repaired Videos
While the repaired files are auto-saved in the normal repair process, the advanced repair requires manual saving. You can see a 'save' button next to every video that you need to click.
Now, select the path or folder, so that Wondershare Repairit can move the repaired file to that directory.

With this, your video repair process completes. Whenever any of your video files get corrupted, quickly launch Wondershare Repairit to get it fixed.
Wondershare Repairit Video Repair is a complete solution for you to repair different kinds of video issues. For example, recorded videos can't be played.
Attention:
As Wondershare Repairit is a desktop software that needs to be downloaded on Windows or Mac, so if you just want to repair video online and your corrupted video is no more than 3GB, you can try the Repairit Video Repair Online Version to get your video repaired online with ease.
![]()
Part 4. Useful Tips for Google Drive Videos
Google Drive is a secure platform for storing and sharing your videos, but as you know, it has room for error. The following tricks can help you to prevent these potential errors. They can help you to secure your drive as well as enhance your access to it.
-
Keep a tab on the application accessing your Google Drive account. They may be a source of malware or viruses.
-
Never share a video with full access unless it is necessary.
-
Employ security measures and a secure password so that no one can temper your Google Drive videos.
-
Before uploading the videos, Check the Google Drive specifications and convert them accordingly.
-
Always use a compatible browser and keep it up to date to get the most out of your Google Drive.
-
If possible, use a high compression video format for your Google Drive videos.
-
Scan the files for malicious codes before uploading them on your Google Drive.
-
Consider synchronizing your drive with your smartphone or PC, so that you can access the video offline.
-
Check the video on your Google Drive regularly. If any of them is not working, repair videos without delay.
-
Try to keep a backup of the video files on Google Drive.
-
Create shortcuts and use them for quick access to your data.
-
Implement two-way authentication for accessing your Google Drive videos.
Closing Words
While Google has been a preferred video playing platform for many, a lot of users avoided it due to the issue of videos not playing on Google Drive. Now, with the information in this post, you don't have to worry about that you can't play video on Google Drive anymore. You can upload and access as many Google Drive videos as you want, and if anything doesn't work, the Wondershare Repairit Video Repair tool has got your back. Download the video, upload it on Repairit, and let it fix the issue in just a few clicks.
People Also Ask
-
How do I make an MP4 playable on Google Drive?
First, upload an MP4 video to your Google Drive account so you can play it. Open your file manager, locate the MP4 video, and long-press on the file. Tap "Share" and then select Google Drive from the list to upload the video. -
My videos are deleted from my Google Drive. I want them all back. What should I do?
Google Drive sets many retrieval functions for you. Even though all fail, you can have Plan B. Check out solutions now - A Complete Guide to Google Video Recovery
