
Matroska videos or MKV is an ingenious video file format that was created in Russia in 2002. What's so great about it is the way it combines audio, video, and subtitles in a single file and provides added functionality to boot.
Unfortunately, many have encountered a nagging issue. The MKV video no sound problem occurs when audio is absent during playback. Everyone's first thought is to redownload the video, but that isn't always the solution. So stop wasting your data and try out these methods instead.
8 Solutions to Repair MKV Video No Sound Problem
Solution 1. Check the Media Player
There are several ways for an MKV video to become corrupt but here are just a couple: memory card issues, change in video format, device crash, improper transfer or download, unreliable media players, etc.
First and foremost, check that your media player isn't at fault. You can confirm this by playing other videos in the player (MKV and non-MKV files). If you have another media player installed, try the problem video there as well. Here are some scenarios that could result:
- MKV videos played with sound in your other media player: The fault is from the first media player you used. You can switch to using your other media player to playback MKV files or follow the solution we will provide below.
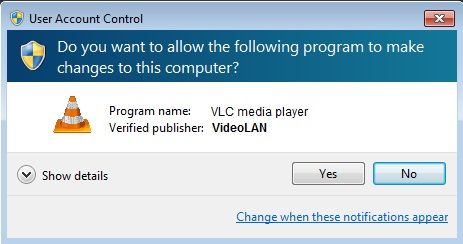
- MKV videos did not play on either media player: It could be a codec problem, or your media player cannot play MKV files. We recommend downloading and using a media player like VLC to fix this issue.
- Only that particular MKV video did not play: This means the MKV video file is corrupt. We've provided a solution to this in the "How to Fix MKV File No Sound with Wondershare Repairit" section of our guide.
- You don't have another media player: We suggest downloading the excellent free media player, VLC.
If you use third-party media players like VLC, PotPlayer, and GOM player, they should play MKV files without taking any additional steps. This means that the likely cause for your issue is a faulty installation. You can check out how to repair corrupt MKV files further in this article, but regarding your media player, here's what you do.
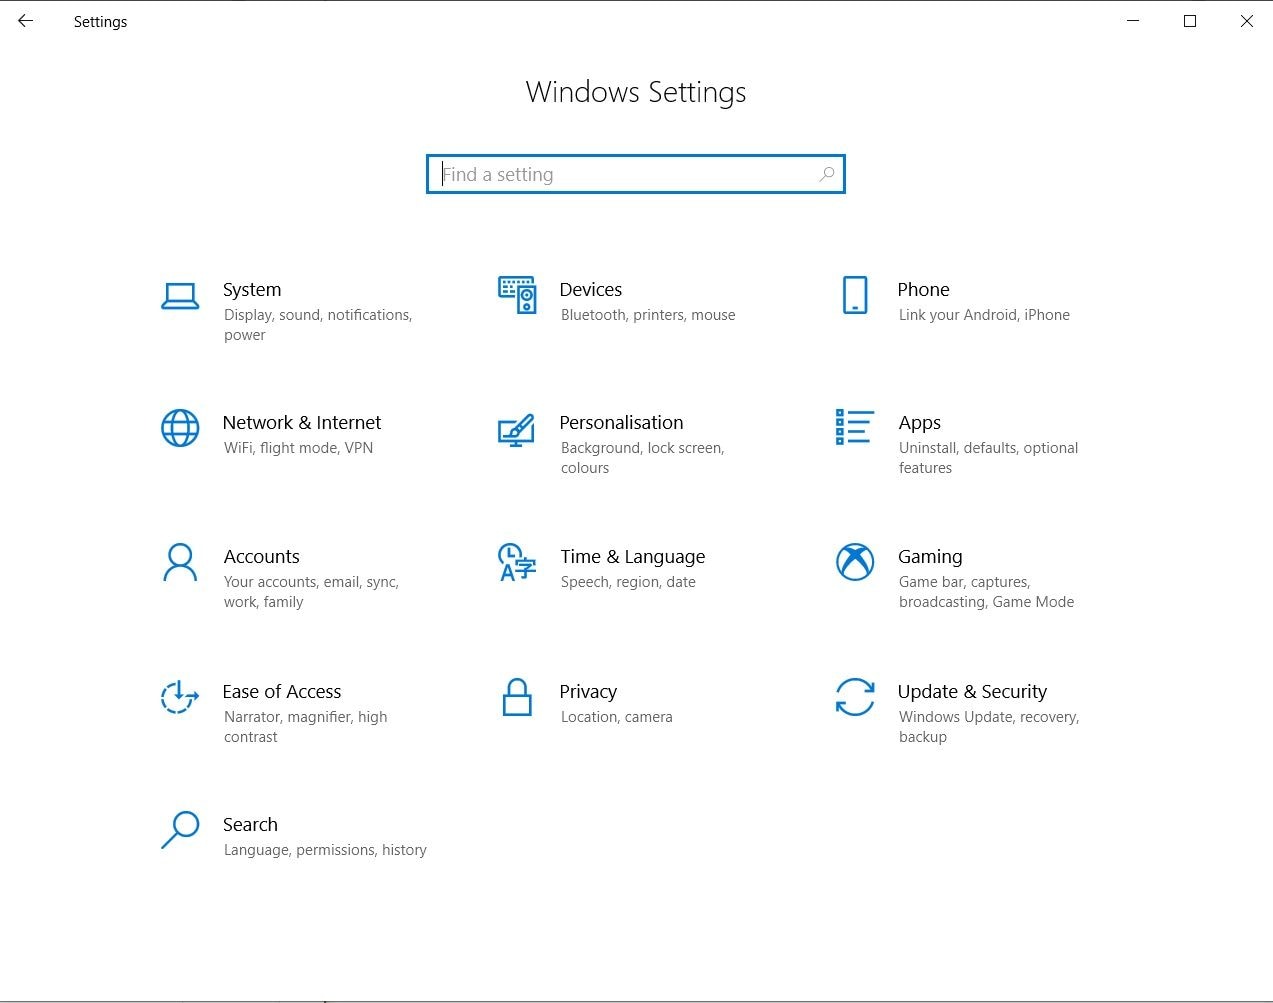
Step 1: Press the "Windows" key to bring up the Windows menu. Click on the "Settings" icon.
Step 2: In Windows Settings, click on "Apps." Make sure you are on the Apps & Features tab by checking the menu on your left.
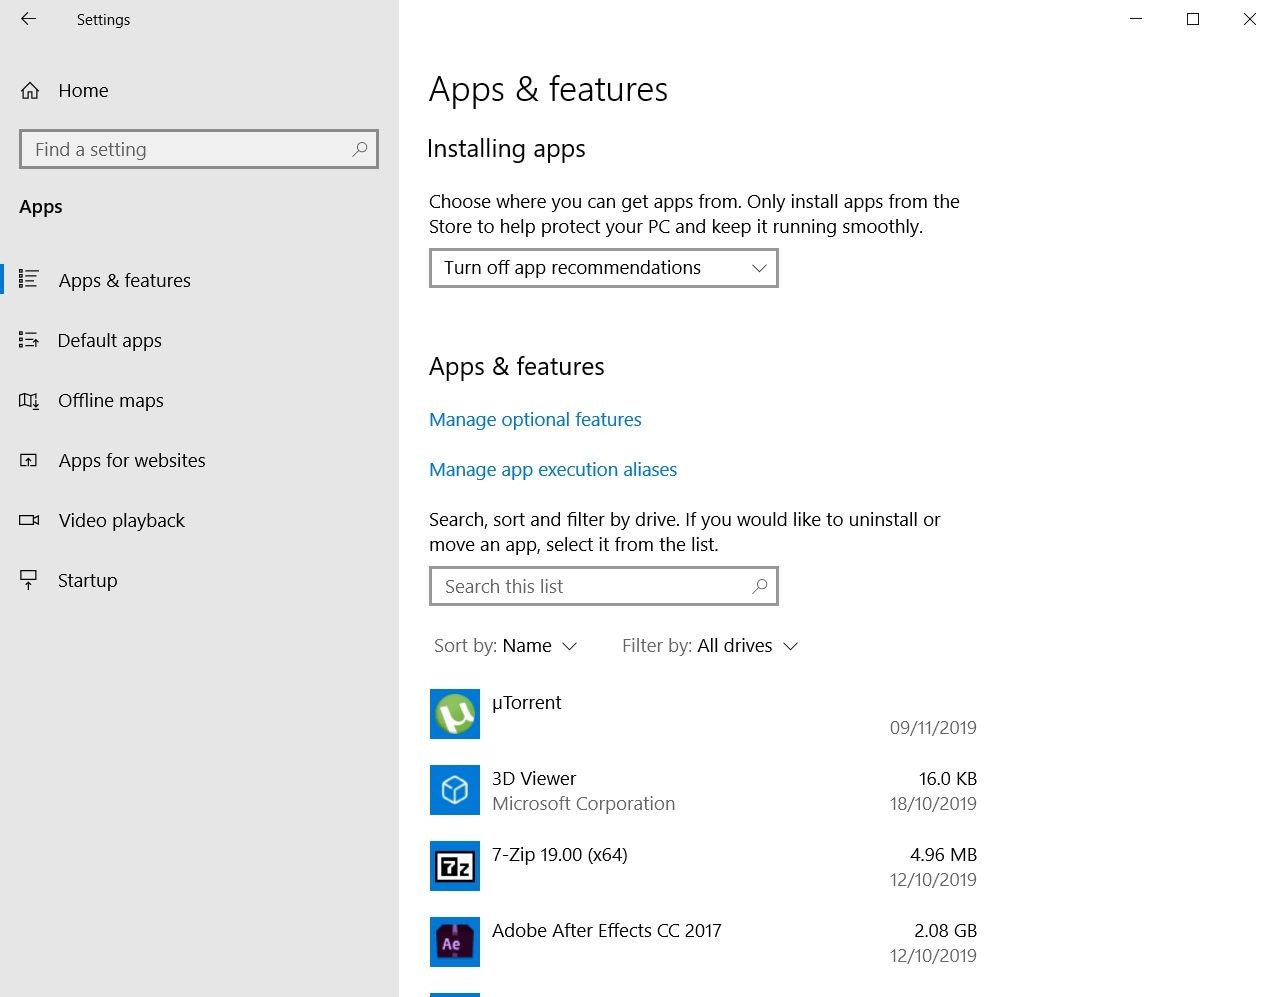
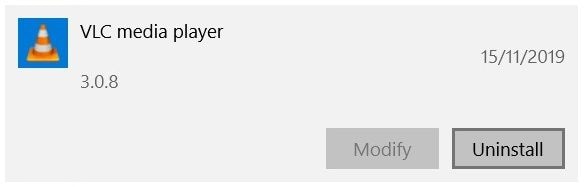
Step 3: Scroll down until you find your media player. Select it and click on "Uninstall." Agree to any prompts about fully uninstalling the media player and wait for it to finish.
Step 4: Now download a new installation file for your third-party media player to any location you prefer.
Step 5: In the "download complete" page, tick the "Run VLC media player" box and click finish.
Step 6: Once VLC opens, try your MKV video once more to make sure your problem has been fixed.
Solution 2. Fix MKV No Sound Caused by Video Itself Corruption
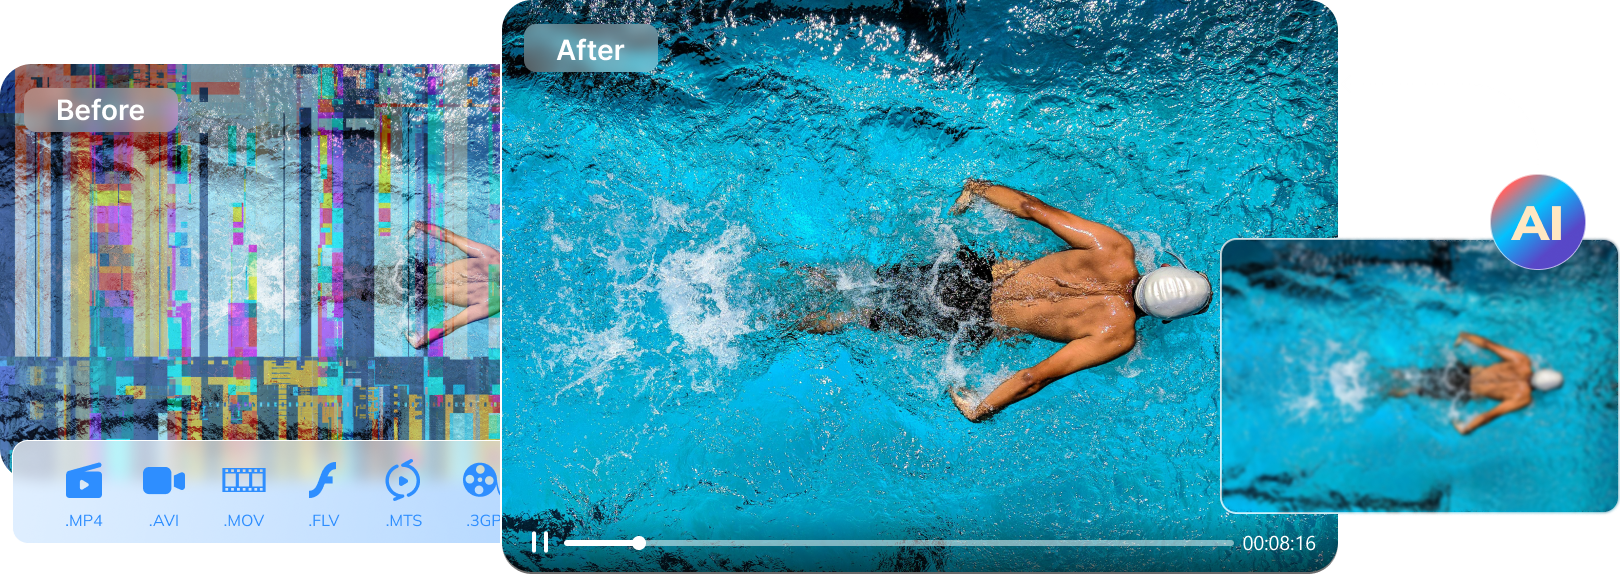
Let's say you discover your MKV video isn't playing with sound, so you decide to try other media players, but they all have the same issue. You've done everything you can think of, from installing more codecs to updating all your drivers. Then it means your MKV video is damaged. When you try to play a corrupted MKV video, the video will have no sound, and sometimes, the error code 0xc00d3e8c may appear on your screen.
So rejoice because you no longer have to delete your corrupt MKV videos. Wondershare has come up with the ultimate tool to repair corrupted MKV files called Wondershare Repairit. It's a handy data repair software that can quickly repair corrupted MKV video files on your computer. Users can scan and preview their files for free using Wondershaere Repairit Video Repair, so you're sure it can solve all your MKV video problems before you commit to getting it. The following are the main features of it:

Wondershare Repairit - Video Repair
 Security Verified. Over 7,302,189 people have downloaded it.
-
Repair damaged videos with all levels of corruption, such as video not playing, video no sound, out-of-sync video or audio, playback errors, header corruption, flickering video, missing video codec, etc.
-
Repair videos of diverse formats, including MOV, MP4, M2TS, MKV, MTS, 3GP, AVI, FLV, MXF, KLV, INSV, M4V, WMV, MPEG, ASF, etc.
-
Repair damaged or corrupted videos caused by video compression, system crash, video format change, etc.
-
Repair critically damaged or corrupted videos available on SD cards, mobile phones, cameras, USB flash drives, etc.
-
Repairit has a quick and advanced scanning mode. You can use either depending on the level of corruption the video file has undergone.
-
No limit to the number and size of the repairable videos.
-
Support Windows 11/10/8/7/Vista, Windows Server 2003/2008/2012/2016/2019/2022, and macOS 10.10~macOS 14.
If you're in a hurry or believe the corruption in your MKV video isn't too bad, go with Quick Repair. However, Advanced Repair is always the way to go if you want to cover all your bases. It uses the sample to figure out how the file should be structured and then does its magic.
How to Repair Corrupt MKV Videos
Wondershare Repairit Video Repair is designed to fix video corruption in video files across multiple formats by first scanning them and then giving the user a preview of the fixed video. It's built to repair simple video errors to larger, more severe forms of file damage.
Here's our guide on how to use the Quick Repair mode:
Step 1: Launch Wondershare Repairit

Launch Recoverit then drags and drop your corrupt MKV videos into the application's process window. Add your corrupt MKV videos.
Step 2: Add Your Corrupt MKV Video Files
After your files appear in the process window, click on the boxes to the extreme left beside the file names to select those you want to work with. You can view the file name, file path, and file size all in one place. If everything is in order, click the "Repair" button in the bottom right corner.

Step 3: Preview Your MKV Video
Once the repair is complete, a dialog box will notify you. Preview your video to confirm your MKV video is fixed. If everything is as it should be, save the video and enjoy your corruption-free playback. 
Step 4: Use Advanced Repair mode (optional)
Sometimes, video corruption is just too much for Quick Repair to handle. In these situations, we make use of Advanced Repair instead. This mode ingeniously analyses the data and technology behind a working sample video, which it then uses to repair your corrupt files. Select the "Advanced Repair" link located under the Operation tab. A dialog box will appear, asking you to select a sample file.

Once complete, you'll see a dialog asking you to preview and save the file. Congrats! You've now fixed your MKV video with no sound problem.
So if you have any other videos in other formats with any of the problems above, why don't you have a try? You won't regret it.
Attention:
If you want to repair MKV video quickly and your corrupted video is no more than 3GB, you can try the online version of Repairit Video Repair.
Solution 3. Check the Audio Driver
Audio drivers are a type of computer file that allows other programs to recognize and appropriately interact with an audio device, like speakers and headphones. Check to make sure that your audio drivers aren't outdated or malfunctioning, as this could also be the cause of your MKV with no sound. Here are a few things you can try.
1. Update Your Audio Driver
This is the most direct way of updating your audio drivers without the use of any third-party programs.
2. Open Device Manager
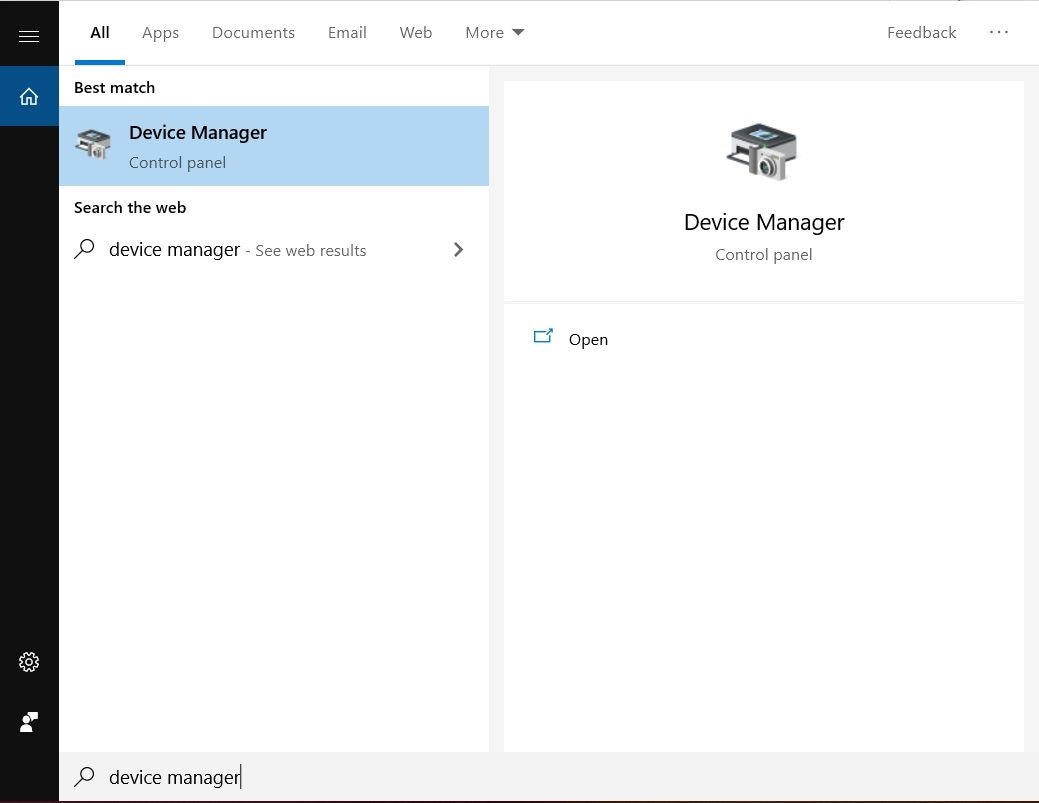
Step 1: Type "Device Manager" in the taskbar's search box and select it from the results.
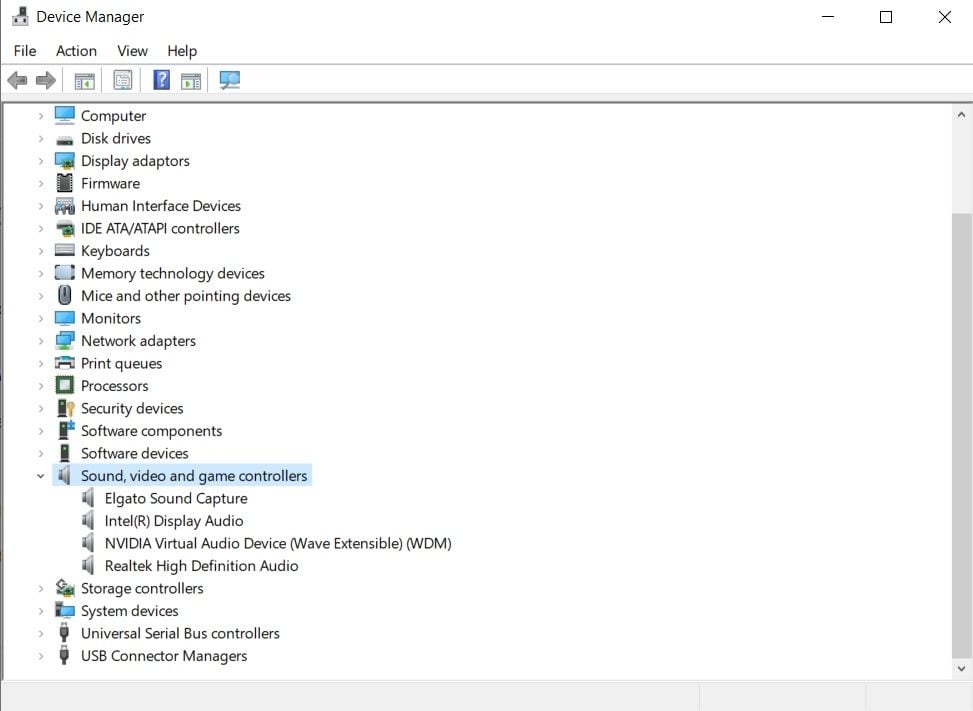
Step 2: Select the arrow beside "Sound, video, and game controllers" to expand it.

Step 3: From the expanded list, right-click the listing for your audio device or sound card, and select "Update driver." Wait for the search to end.
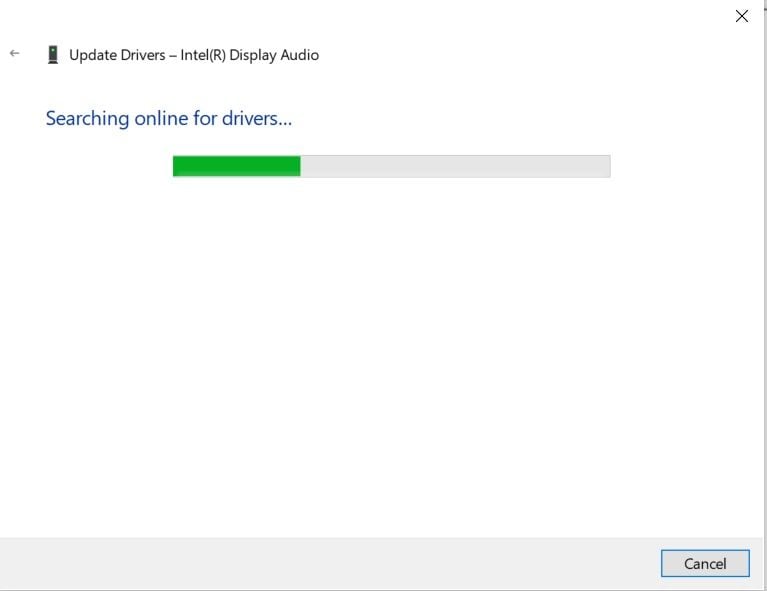
Step 4: Now select "Search automatically for updated driver software." Your computer will then proceed to search for any available updates for your audio device or sound card.
Step 5: If it finds an update, follow the instructions provided to complete the update process.
Step 6: If Windows can't find any available updates for your audio driver, try visiting the manufacturer's website to see if anything is available.
All the solutions also work on any other video playing error.
- 2 minutes to read it.
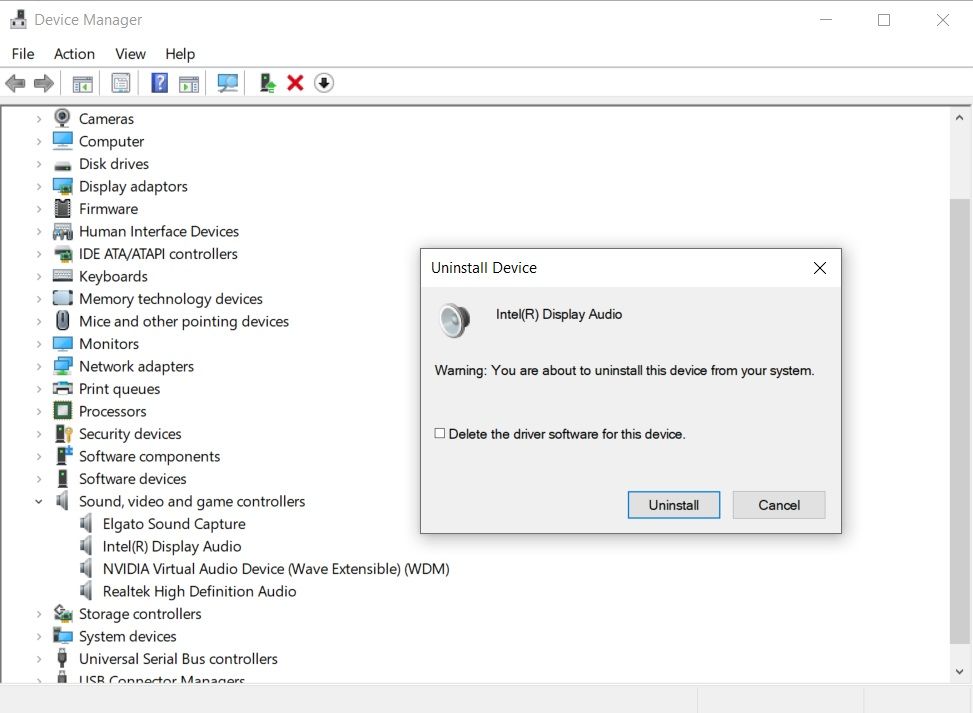
Solution 4. Uninstall Your Audio Driver
If there are no updates for your audio driver, then it could be that what you have installed is malfunctioning. Try uninstalling it by doing the following;
Step 1: Type in the taskbar search box, "Device Manager," and then select it from the search results.
Step 2: Click on the arrow beside "Sound, video and game controllers" to expand the list and then click on the "Delete the driver software for this device" checkbox to uninstall.
Step 3: Restart your computer after uninstalling, but make sure you've saved all your documents and any work you might have open. Select the Start button.
Step 4: Select "Power" from the menu.
Step 5: Select Restart from the Power menu to initiate the restart process. Restarting will automatically prompt your computer to reinstall your audio driver.
Solution 5. Use the Generic Windows Audio Drivers
If your audio drivers still aren't working, try using the generic audio drivers with Windows. To do so, follow these instructions;
Step 1: Type "Device Manager" in the taskbar search box and pick it from the results.
Step 2: Click on the small arrow beside "Sound, video, and game controllers" to expand it.
Step 3: Right-click on your audio device or sound card and select "Update driver."
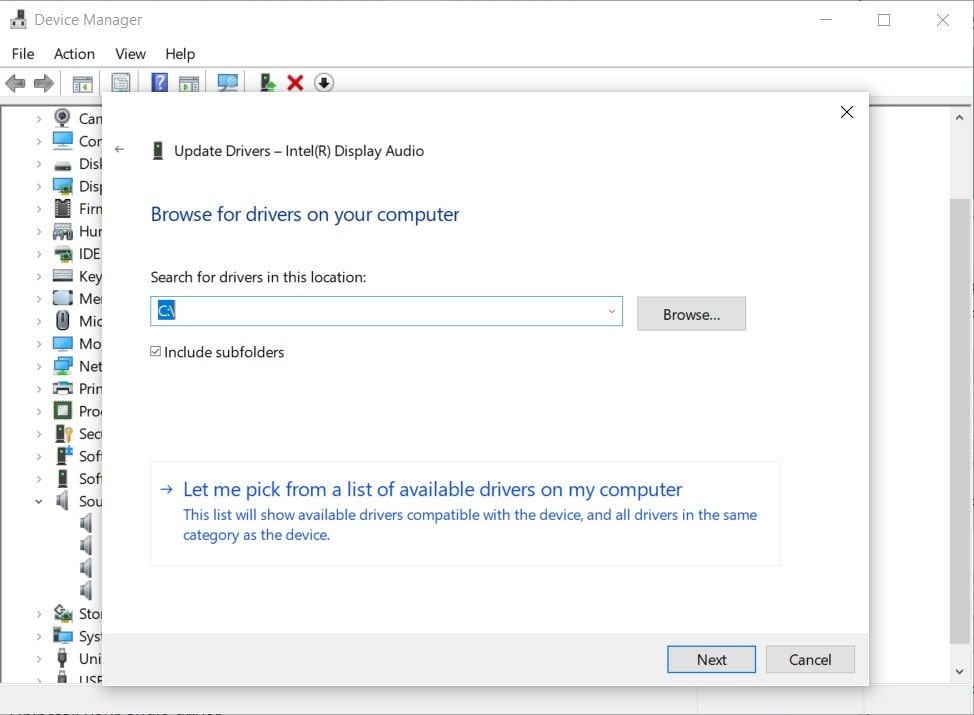
Step 4: Select "Browse my computer for driver software." Select "Let me pick from a list of device drivers on my computer."

Step 5: Now select the audio device whose driver you wish to change and choose "Next." Follow the instructions that follow to install the audio driver.
Solution 6. Use the Windows Troubleshooter
One of the cool new additions introduced in Windows 10 is the built-in troubleshooter, including an audio troubleshooter tool. Troubleshooters help users fix many common issues they may be experiencing, including the MKV video no sound problem. What's great about the tool is that it initiates an automatic process which fixes your audio issues for you. Just follow these steps to get it done.
Step 1: Click on the Start button or tap the Windows key and select "Settings" from the menu.
Step 2: Click on "Update & Security" in the settings window.
Step 3: Choose "Troubleshoot" from the menu.
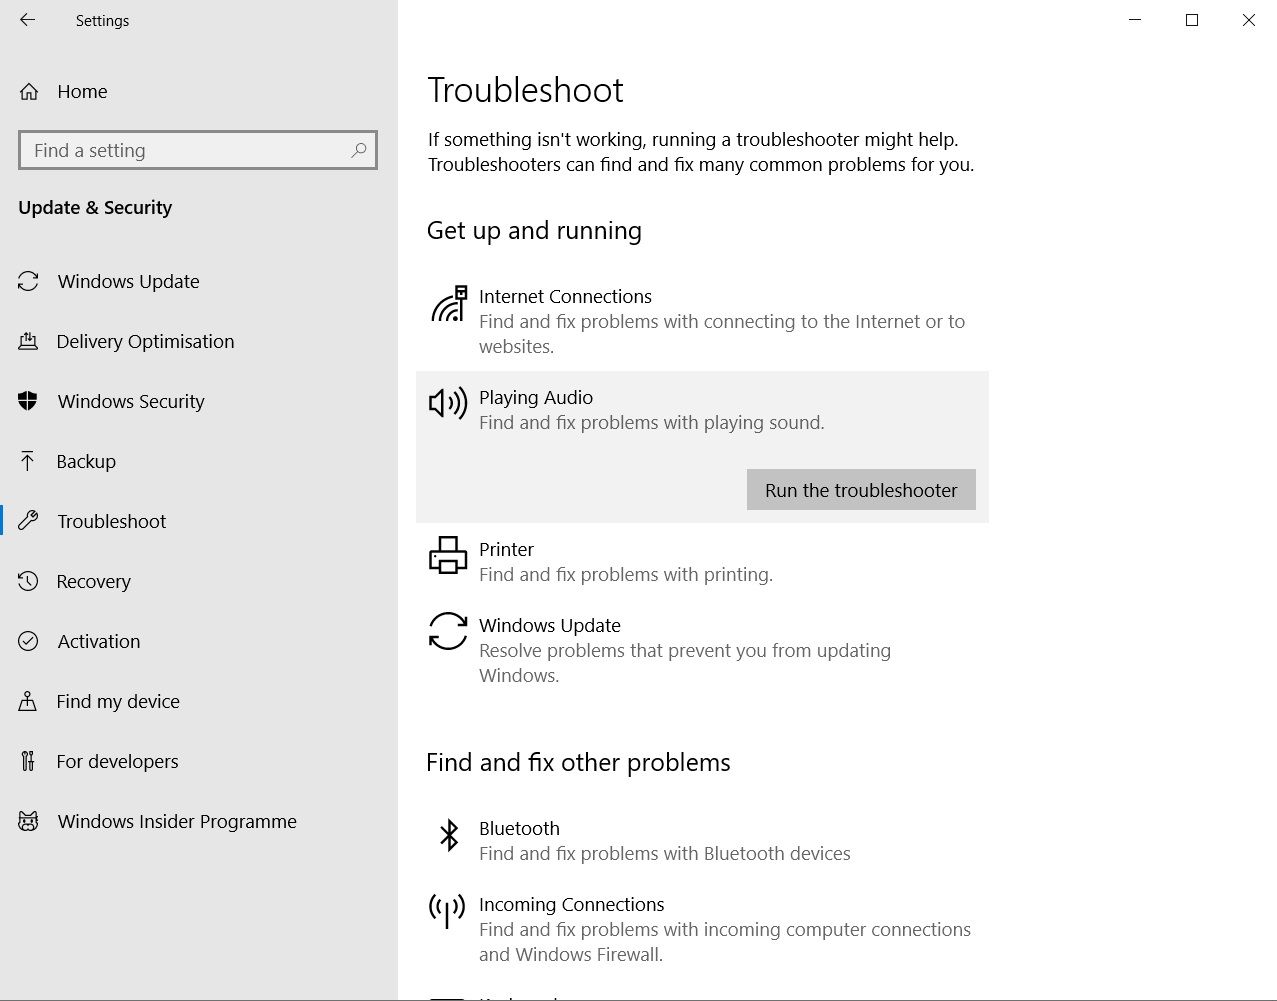
Step 4: Find "Get up and running" on the right-hand side and then click on "Playing audio" to activate the audio troubleshooter.
Step 5: The audio troubleshooter will begin to detect the problem you're facing and try to fix it. Give the troubleshooter some time to get the job done.
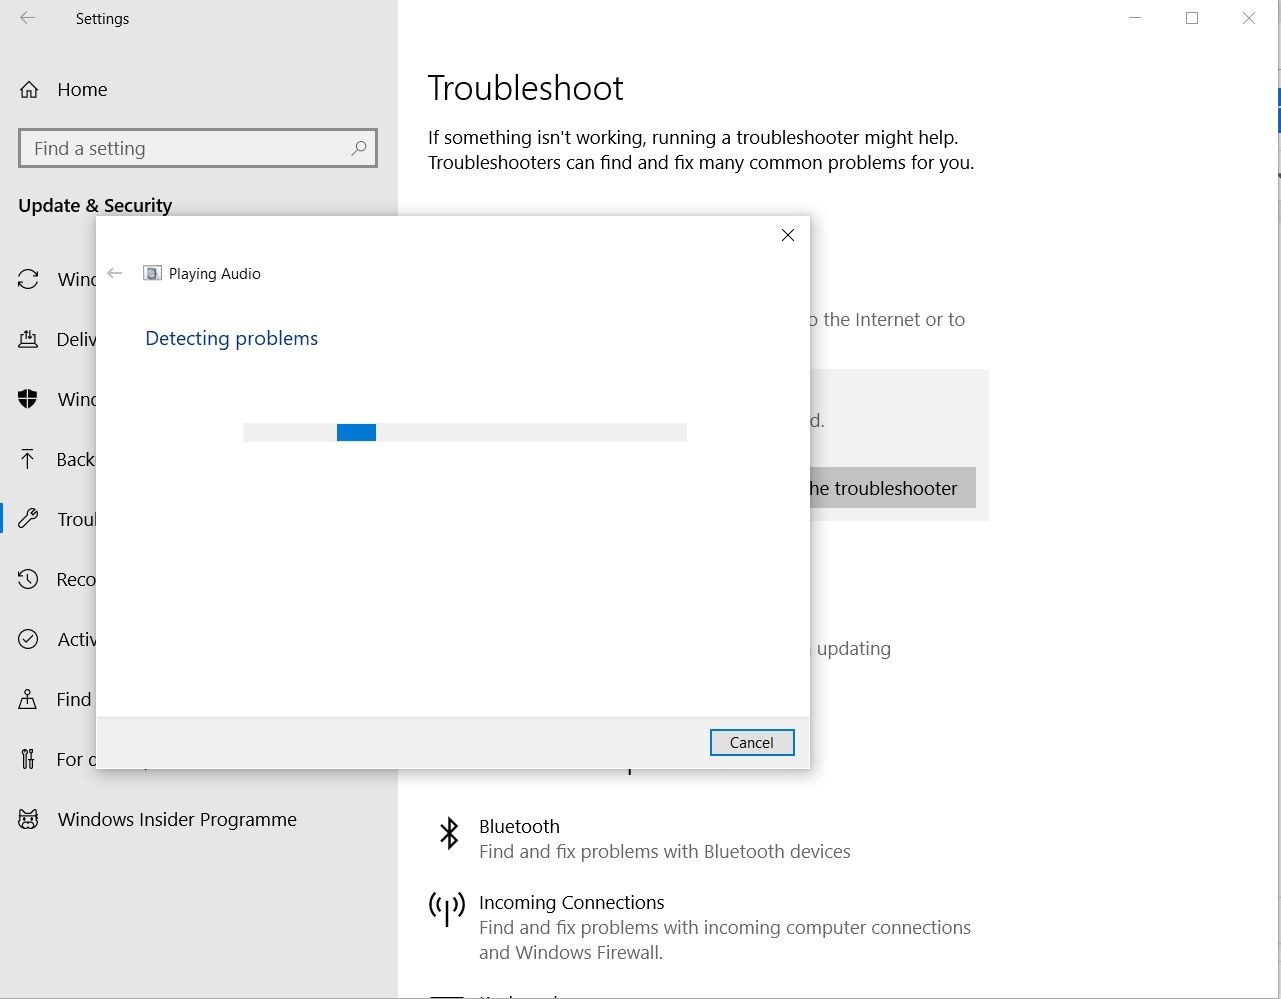
Step 6: Once the repair process has ended, play your MKV video to confirm that you've gotten rid of the no sound problem.
The Troubleshoot settings "Get up and running" section has the more common problems that users experience arranged in alphabetical order and includes Internet Connections, Printer, and Windows Update. The "Find and fix other problems" section provides troubleshooting options for a more extensive range of system-related problems.
These include Bluetooth, Incoming Connections, Network Adapter, Windows Store Updater, Searching & Indexing, Video Playback, Recording Audio, and Program Compatibility Troubleshooter. With all these options and more, there isn't any reason not to give the Windows Troubleshooter a try when encountering any issue on your computer.
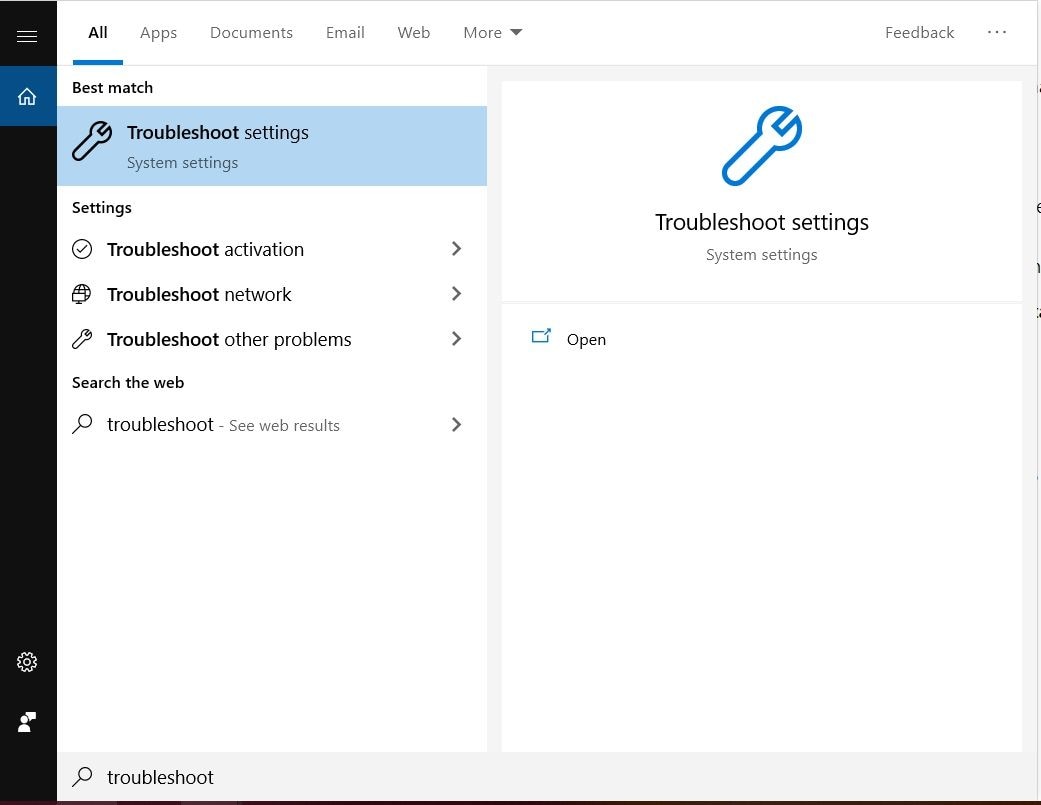
You can also access the audio troubleshooter by typing "Troubleshoot settings" in the taskbar's search box.
Solution 7. Change the MKV File Format
Your computer might lack the resources to play your MKV video properly or driver and codec issues, leading to MKV video playback with no sound. Whatever the cause, converting your video to a more common format like MP4 will save you many headaches.
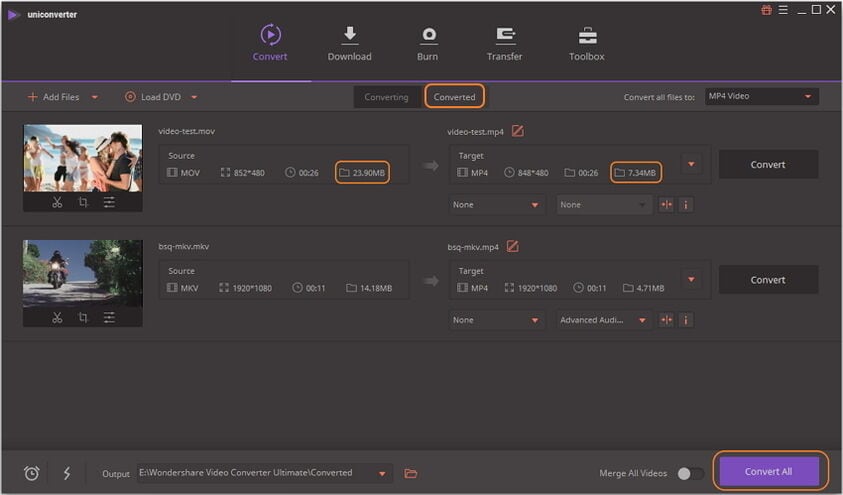
Here's our guide on how to convert your MKV video file format to MP4 using Wondershare Uniconverter:
Step 1: Click on the triangle near "Add Files" and select "Add from Camcorder." Select your MKV video in the popup window and click "Add to List."
Step 2: Click on the triangle near "Convert all files to:" and select "Video." Pick MP4 as your desired file format.
Step 3: Click on the Edit icon next to the file resolution to enter the "Settings" window. Select the settings you prefer or pick "Small Size" to let Uniconverter select the details for you.
Step 4: Click "OK." Then click on the "Convert All" button to begin the conversion process. Once the process has ended, play your converted MKV video to make sure it now has sound during playback. Click the Convert button.
Solution 8. Repair MKV Codec Problems
Video files are ordinarily large files, but we can compress them into smaller file sizes and then decode them during playback through codecs. Codecs are small pieces of code that make this possible, without which playback would be impossible.
That's why the absence of codecs will prevent playback, while corrupt codecs will cause many issues, including the MKV video no sound problem. K-Lite Codec Pack is one of, if not the most popular high-quality codec packages out there. Using it will ensure your MKV videos will be encoded and decoded correctly, removing your no sound woes.
This is what you do if your codecs are corrupt or outdated.
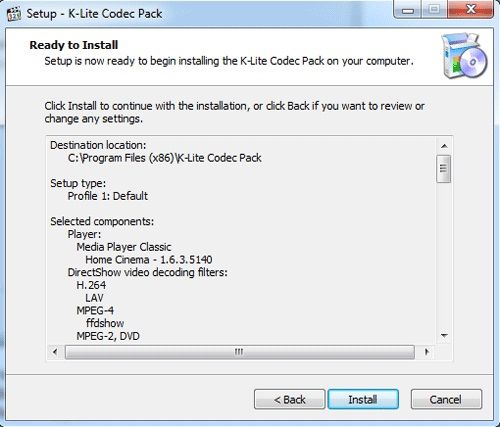
Step 1: Install the software. Make sure Profile 1 is selected and leave all the options in their default setting and click "Next."
Step 2: For "Additional Tasks and Options," leave the default options and click "Next." Under "Hardware Acceleration," leave the default options and click "Next."

Step 3: Under "File associations," make sure to select all media players installed on your computer if you want the codecs to work with them. Or make sure you've set your primary media player to "All Video Extensions." Click "Next."
Step 4: Under "Speaker configuration," select whatever preference your computer can handle. Click "Next."
Speaker configuration setting
Step 5: The "Ready to Install" page will provide a summary of all your selections. Look through to make sure all is in order, and then click "Next" to begin the installation process.
Step 6: Once the installation is complete, click "Finish" and test your MKV video to make sure there's no sound during playback.
Understand and Avoid the Causes of MKV File No sound
There are five possible reasons why MKV video files lose audio during playback.
- A problem with the MKV codec on your computer or device.
- A problematic media player who either wasn't installed properly or received damage afterward.
- Your chosen media player is not compatible with DTS audio, which is the audio format most commonly used by MKV files.
- The MKV file itself is corrupt, rendering a part or all of the sound unplayable.
- Errors were introduced to the file during conversion from one format into an MKV file.
How to Prevent Video Corruption?
Ever heard of the saying," Prevention is better than cure?" It's hard to argue with it after you've experienced losing valuable data or treasured videos due to irreparable damage. To protect yourself from the possibility of having to deal with corrupt MKV videos all the time, follow these tips:
- Make sure your computer is protected from voltage spikes by a surge protector.
- Always correctly shutdown your computer and don't abruptly turn it off while in use, especially when working on or playing files.
- Always use the USB cable that was supplied with your devices and only buy a replacement approved by the manufacturer.
- Make sure your antivirus software is always up to date and turned on. Scan your computer regularly.
- Keep backups of your files in a separate location like an external hard drive, so if the video on your computer becomes corrupt, you can replace it with your backup.
- Backup your system often, so if your files and programs end up corrupt, restore the backup.
Final Reviews on MKV Video No Sound
Unlike audio and video compression formats, MKV is a container that can combine audio, video, and subtitles in a single file, no matter what each of these encoding components was encoded in. Additionally, MKV files support several key features like:
- Chapter, menu, and metadata.
- Different audio and video streams.
- Error recovery allows the playback of corrupt files.
- Fast seeking
- Online streaming
Closing Words
It's never fun to find out that the videos you've been looking forward to watching won't play properly. It's even worse if you don't know what to do about it. Now that we've given some causes and solutions to MKV videos having no sound during playback, nothing will get in the way of your viewing experience again.
People Also Ask
-
Why there is no sound when play .mkv video?
Check media player settings for muted audio, ensure volumes are up, and verify your player supports the MKV codec (e.g., DTS). Switch to VLC if compatibility issues persist. -
How can I fix no sound in an MKV video on my computer?
Update/reinstall audio drivers via Device Manager, try a different player (e.g., VLC), or use Wondershare Repairit to fix corrupted files. -
Why does my MKV file have no sound on certain devices?
Devices may not support codecs like TrueHD/FLAC. Convert audio to AAC/MP3 with HandBrake or test on another device to check hardware compatibility.
