You Can Move or Download Photos to SD Card Without Much Effort
"My Android phone has limited storage, and I would like to move my photos to an SD card permanently. Can someone tell me how to move photos to SD card storage?"
It doesn't matter if you are using an SD card or an Android phone, or a digital camera. You might encounter an issue like this. These days, many people use SD cards to expand the storage of their device but can't seem to move photos to SD card storage.
It is pretty easy to learn how to move photos from phone to SD card storage or even from computers. This in-depth guide on how to move photos to an SD card on Android, Mac, and Windows will get you covered.
Part 1: What You Should Know about SD Cards?
Before we discuss different ways to move photos to an SD card, let's cover some basics. Ideally, you should know the type of SD card that you own and its capacity so that you can use it without any trouble. While picking any SD card for your device, make sure that it is compatible.
You can encounter different SD cards in the market that can be classified in either of the following ways.
SD Card Sizes
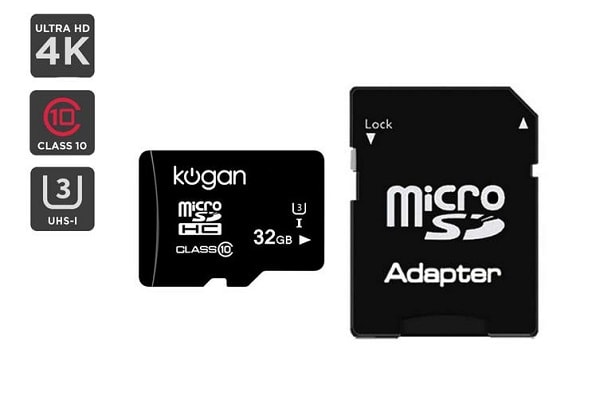
Based on their size, SD cards can be standard, mini, or micro. The dimensions for these categories are around 32mm x 24mm (standard), 21.5mm x 20mm (mini), or 15mm x 11mm (micro).

SD Card Capacity
Besides that, SD cards can also be classified based on their storage capacity. Standard SD cards have a maximum storage of 2 GB, while SDHC cards have storage from 2 to 32 GB. SDXC cards are most popular these days, with the storage of 32 GB to 2 TB as of now.
SD Card Speed
SD cards also have a class rating that would define how fast they can transfer data between different sources. Some of these popular SD card categories are Class 2 (2 Mbps), Class 4 (4 Mbps), Class 6 (6 Mbps), and Class 10 (10 Mbps).
Therefore, while buying an SD card, check all these things in advance. Mostly, the capacity, class, and type of the SD card category would be mentioned on its top.
Part 2: How to Move Photos from Android to SD Card Storage?
One of the best things about Android devices is that they let us expand their storage by using all kinds of SD cards. If you want, you can mount any compatible SD card to your Android phone and directly move photos to SD card storage.
The process is similar for all Android devices, but I have considered the example of a Samsung phone here. To learn how to move photos to an SD card on Samsung (or any other Android device), follow these steps:
Step 1. Before you start, make sure that a compatible SD card is connected to your Android phone and you have a File Manager installed. Most of the Android phones already come with a file manager app installed in advance.
Step 2. Now, unlock your device and launch the File Manager from the list of available apps. On the File Manager, select the device's Internal Storage and go to its Camera/DCIM/Pictures folder where your photos are stored.
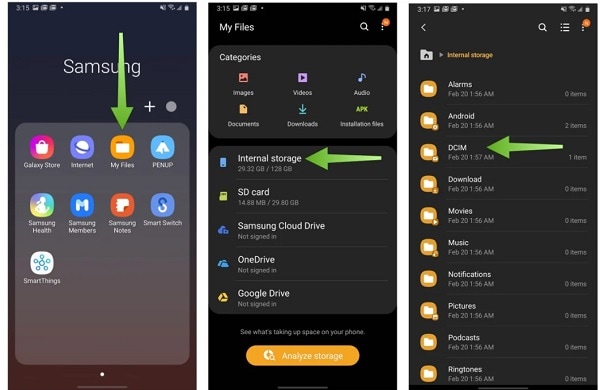
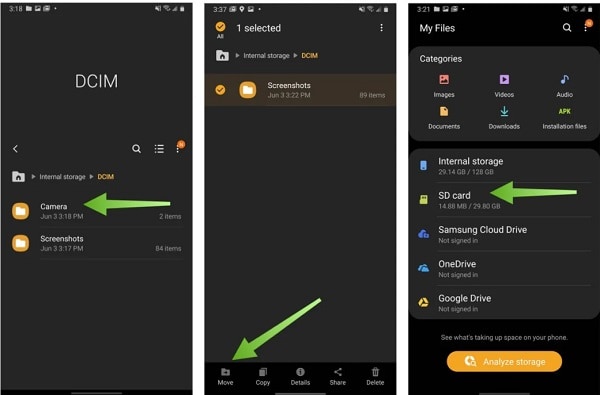
Step 3. In most of the devices, you will view the saved camera pictures in the DCIM folder. After locating the pictures, long-press, and select the files you wish to move.
Step 4. Once the pictures are selected, go to more options, and tap on the "Move" button. You can now go to your SD card storage and browse to any folder to move photos to an SD card.
Part 3: Make SD Card Default Storage to Save Photos on Android
As you can see, it is pretty easy to learn how to move photos from phone to SD card storage. If you want to save your time, you can make your SD card the default location to save your camera photos.
Not just that, a lot of apps also let us make the connected SD card as default storage for saving their media. Here's how you can change your Android device's settings to directly move photos to an SD card.
Set Camera's Default Storage as SD Card
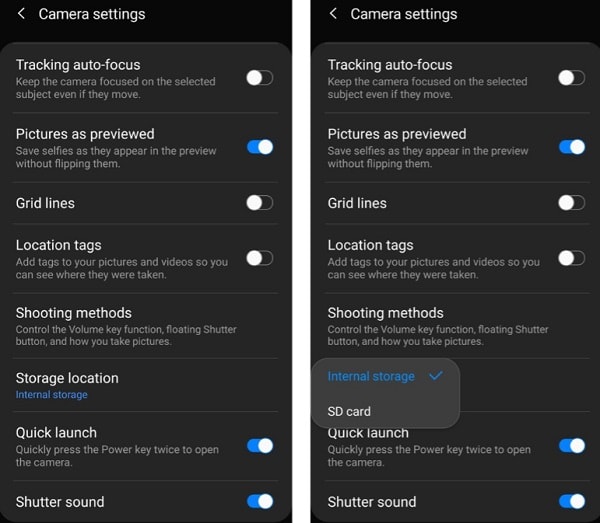
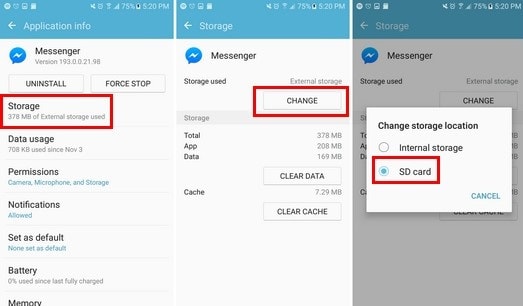
The easiest way to set an SD card as the default storage for your phone's camera is by visiting its settings. You can either launch the Camera app to go to its settings or directly browse your phone's Settings > Camera. Here, tap on the option to set the location for saving your photos and mark an SD card as default.
Set any App's Default Storage to SD Card
Apart from your camera, you might wish to set up the default storage of any other app as your SD card as well. This will directly download photos from the app to your SD card and save your phone's storage. You can go to your phone's Settings > Apps and select any app from here. Now, go to the default storage feature and select your SD card instead.
Please note that the feature to set default storage is limited to a few apps and might not work on all apps.
Part 4: How to Transfer Photos from Windows PC to an SD Card?
Apart from Android, you might wish to use your Windows PC to manage your SD card storage as well. Since Windows fully supports almost every SD card, you can easily move photos to an SD card from its local storage.
You can also use your Windows system to move photos from any other storage (like an external hard drive) to your SD card. Just follow these simple steps to learn how to move photos to an SD card on a Windows system.
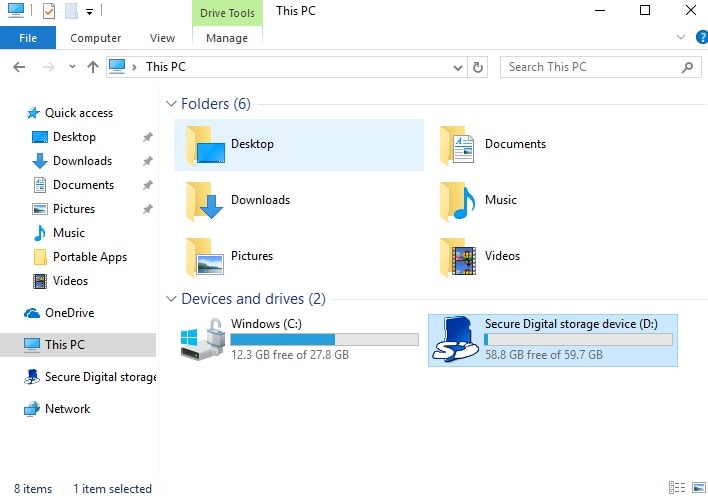
Step 1. Firstly, connect your SD card to the computer in the right slot and wait for Windows to detect it.
Step 2. Once the SD card is detected, you can launch Windows Explorer and go to My Computer or This PC to view the card details.
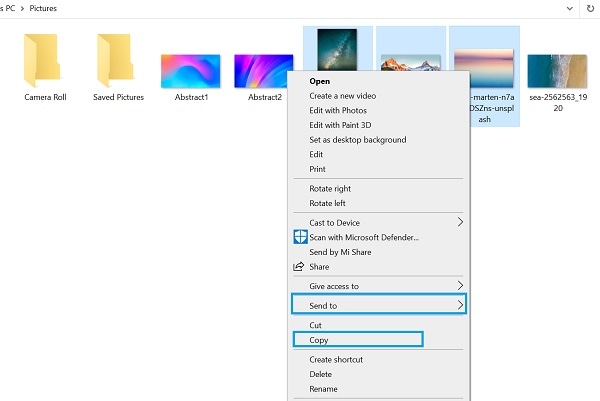
Step 3. Afterward, you can launch a different window and go to the location where your photos are saved. Once you have selected your photos, right-click and copy them. You can also press the Ctrl + C keys to copy the selected pictures.
Step 4. Now, go to the SD card storage and paste your photos here by pressing the Ctrl + V keys or right-clicking and selecting the paste option.
Step 5. Besides that, once you select your photos on the source location, you can right-click and choose the "Send to" option from the context menu. From here, you can select your memory card to move photos to SD card storage directly.
Part 5: How to Transfer Photos from Mac to an SD Card?
Like Windows, you can also learn how to move photos to an SD card on Mac. The process is pretty easy since Mac also has a user-friendly interface that you can explore. You can take Finder's assistance to select photos from your Mac and move them to the connected SD card storage. Ideally, you can follow these simple steps to learn how to move photos to an SD card from Mac.
Step 1. Using the right card reader, insert your SD card on your Mac, and wait as it would anatomically be detected by it.
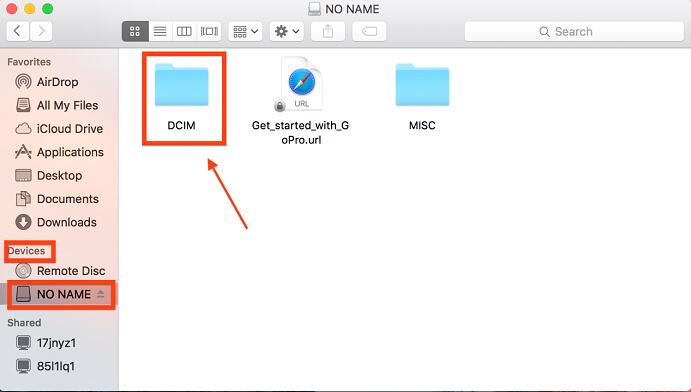
Step 2. Now, launch Finder on your Mac and first go to the location where your photos are stored. From here, you can use the Shift key to select multiple photos and press Command + C to copy them.
Step 3. From the sidebar, you can view your SD card's icon under the External devices section. Click on it and go to the SD card storage on your Mac now.
Step 4. In the end, press the Command + V keys or use the available options to paste the copied photos to the SD card storage.
Part 6: Tips to Manage SD Cards on Various Devices
I'm sure that after reading this guide, you can easily learn how to move photos from phone to SD card storage on different platforms. If you want to improve your SD card's overall performance and manage your data, follow these suggestions.
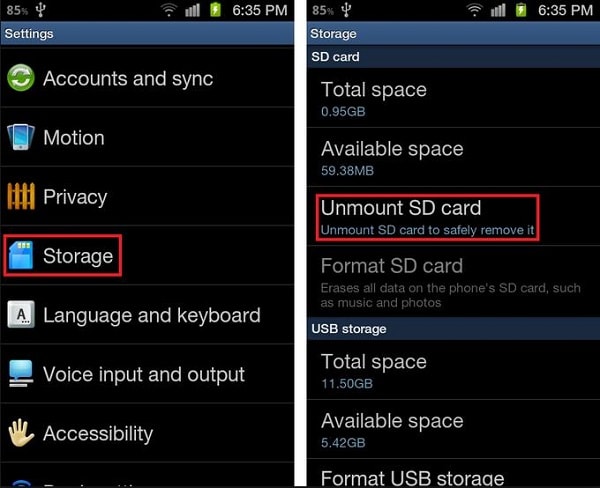
Tip 1: Always Safely unmount your SD card
It doesn't matter if you are using your SD card on a computer or an Android. You should always eject it safely. Windows users can get the safe-eject feature by clicking on the devices icon on the taskbar. On the other hand, Android users can just go to their device's Settings > Storage and choose to unmount their SD card from here.
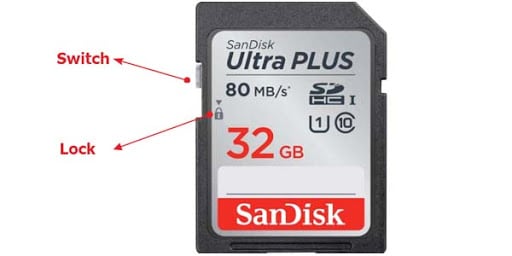
Tip 2: Keep your SD card locked
Often, users end up losing photos and other media files from their SD cards by mistake. If you want to avoid it, then consider keeping your SD card locked. There is a write-protection switch on the SD card's side that you can enable by sliding it down.
Once the SD card is locked, you won't be able to write anything on it or delete its content. Whenever you wish to write anything on it, swipe the slider upward to unlock it.
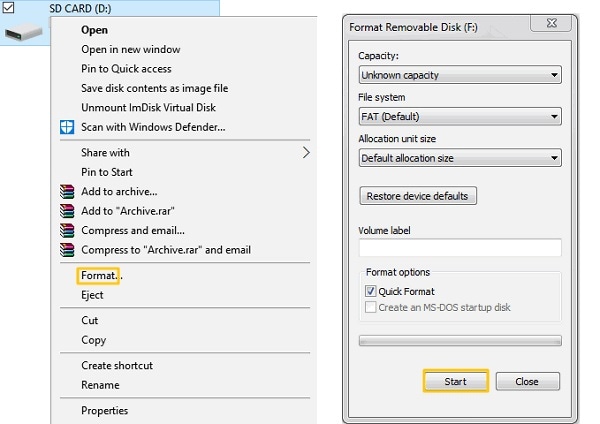
Tip 3: Format your SD card to troubleshoot an issue
Furthermore, there are times when a lot of us encounter unwanted issues using SD cards. To troubleshoot it, you can format your SD card to a compatible file system. Most of the experts recommend formatting SD cards every 6 to 12 months as well.
To format your SD card, you can connect it to your system and select it from the Explorer. Now, right-click the SD card icon to get its context menu and choose to format it. You can select a suitable file system and partitioning style for your SD card from here.
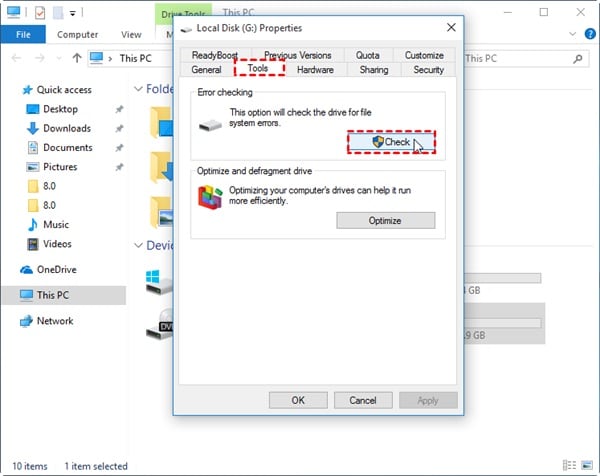
Tip 4: Check your SD card regularly
To improve your SD card's overall performance, you can also consider scanning it on your system. If you are a Mac user, you can just take Disk Utility's assistance to scan the SD card.
On the other hand, Windows users can use Microsoft Defender or any other anti-malware tool to check their SD card. You can also right-click the SD card icon from the explorer to go to its properties. Afterward, go to Tools > Error Checking and choose to check the SD card for any error.
Tip 5: Recover your lost data from an SD card
If you have formatted your SD card by mistake or deleted some of your important data, then you can consider using a data recovery tool. For instance, you can take the assistance of Recoverit Data Recovery to scan all kinds of SD cards in no time.
The application is known for its high recovery rate and is extremely easy to use. You can recover all data types (like photos, videos, audios, documents, etc.) pretty easily. The application will also let you preview your data and select a location to save the recovered content.

This brings us to the end of this extensive guide on how to move photos to an SD card. As you can see, I have included solutions to move photos to SD card storage on Android, Windows, and Mac. You can also implement some of these suggestions to manage your SD card storage and keep your data safe. Go ahead and implement these tips or share the guide with others to teach them how to move photos from phone to an SD card in a jiffy.
SD Card Users Might Have the Related Questions
- How can I move photos to an SD card on my Android?
You can use any File Explorer on your Android to select your choice photos and move them to the SD card storage.
- How can I check the speed of an SD card?
An SD card class is mostly written on its top that would also depict its speed (like class 2 or 10).
- How is an SDHC card different from SDXC?
SDHC (high capacity) has a maximum storage of 32 GB, while SDXC (Extended Capacity) can carry maximum storage of up to 2 TB.
- How to make an SD card the default storage for the camera?
You can go to the Camera settings on your Android phone and manually change the default storage to an SD card (from internal storage).
- Can I get back my deleted photos from my SD card?
To recover your lost or deleted photos from your SD card, you can use a reliable data recovery application (like Recoverit Data Recovery).
SD Card Recovery
- Recover Card Data
- Repair Card Errors


Eleanor Reed
staff Editor