File Recovery
- Recovers deleted or lost files effectively, safely and completely.
- Supports data recovery from 500+ data loss scenarios, including computer crash, partition loss, accidental human error, etc.
- Supports 1000+ file formats recovery with a high success rate and without any quality loss.

How to Restore Previous Versions of Windows 7 Files or System

Oct 22, 2026 • Filed to: Windows Computer Solutions • Proven solutions
 TL;DR:
You can restore previous versions of Windows 7 files using the native System Protection feature, recover permanently lost data with Recoverit Data Recovery, or manually revert an entire Windows installation using the Windows.old folder.
● The native restore feature requires System Restore to be active beforehand, and executing the restore action will overwrite your current file, making it safer to use the copy function to extract the older version to your desktop.
● Recoverit Data Recovery is necessary for bulk restorations or when previous file versions are completely unavailable due to system crashes, formatted recycle bins, or intentional deletion.
● Reverting a system installation via the Windows.old folder requires a Windows 7 installation disc to boot into the Command Prompt, verified free space on Local Disk (C:), and specific boot sector commands that vary depending on whether the prior OS was Windows Vista, Windows XP, Windows Server 2003, or Windows 2000.
Ask AI for a summary
 ChatGPT
 Perplexity
 Gemini
 Claude
 Grok

If you are in a situation where you are trying to get back an older version of a file in your Windows 7, you can either restore previous versions of your Windows 7 to get back the files or choose to use a third-party recovery app.
This article will show you how to use both methods to restore previous versions of Windows 7 files, depending on your situation.
Part 1: How to Restore Previous Versions of Windows 7 Files and Folders
First, you need to turn on your system protection by doing the following:
- In the search field of the "Start" button, type to search for "Control Panel". Launch it
- From the list of items, choose "System Security" and move on to select "System"

- On the left section, choose "System protection". Tap on the drive that stores your files and choose to "Configure"
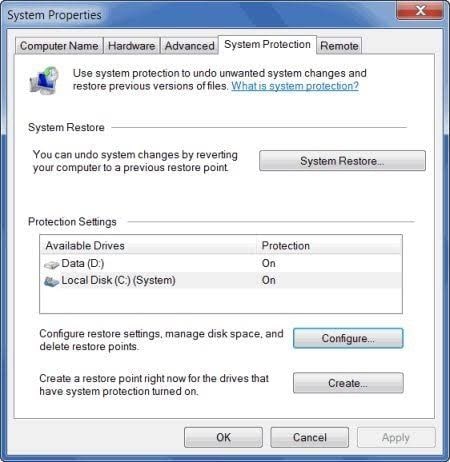
- Select the option to recover both previous versions of your files and system settings. Choose "OK"

The previous versions can now be accessed to restore Windows 7 files using the steps below:
- Start by right-clicking the folder or file you wish to recover. Note that if the file was accidentally deleted and there is no way to get it back from your "Recycle Bin", then just right-click the folder that had once contained the lost file. Now, go ahead to select "Restore Previous Versions"

- You will be able to see the previous versions here, from either restore points or from "File History". You will also get to see the "Properties" dialog box of the chosen folder to file. This will be opened to the tab for "Previous Versions"
- You can choose the file edition you seek, then select "Restore". In the warning box that appears, confirm your action and select "OK".

Note that when you choose to "Restore", the version of the file you presently have will be overwritten. Therefore, you should copy the older version you have restored unto your desktop using the "Copy" or "Open" buttons.
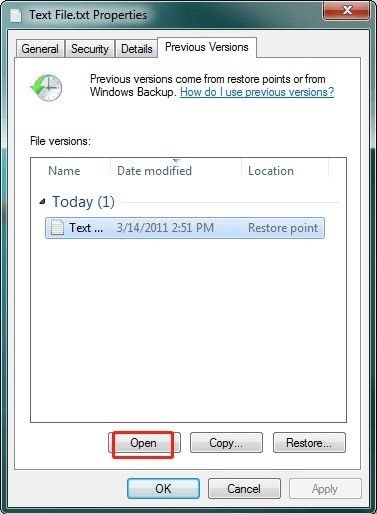
- Close the Properties dialog box of the folder or file. Go through and use the older version to be sure it is what you want. If you are satisfied with the contents of the file, you can return it to its original location and delete the recent version.
Part 2: How to Recover Files if No Previous Versions Are Found
The above solution is ideal if you want to restore a single file or a few previous folders. But what if you have a large number of files you wish to restore? What if you are told that there is a better way you can restore previous file versions at once, won't you jump at the opportunity? Well, be ready to do just that because the Recoverit Data Recovery will give you what you need. Also, it is necessary for situations where you cannot find previous versions of the files you wish to restore. All you need to do with this tool after downloading and installing it is to follow the three simple steps that shall be explained to you and get back those files, wherever they may have disappeared to.
Recoverit Data Recovery supports the restoration of files in formats that span over a thousand, be it in image form, documents, videos, audios, etc. Because it is compatible with all Windows versions including Windows 7, you can use this app in your Windows 7 system. Therefore, files that have been lost via system crash, no previous versions being found, accidental or intentional deleting, formatted recycle bins, card errors, and many more, can be recovered back with this comprehensive tool.
Follow the steps below to know how to use Recoverit Data Recovery:
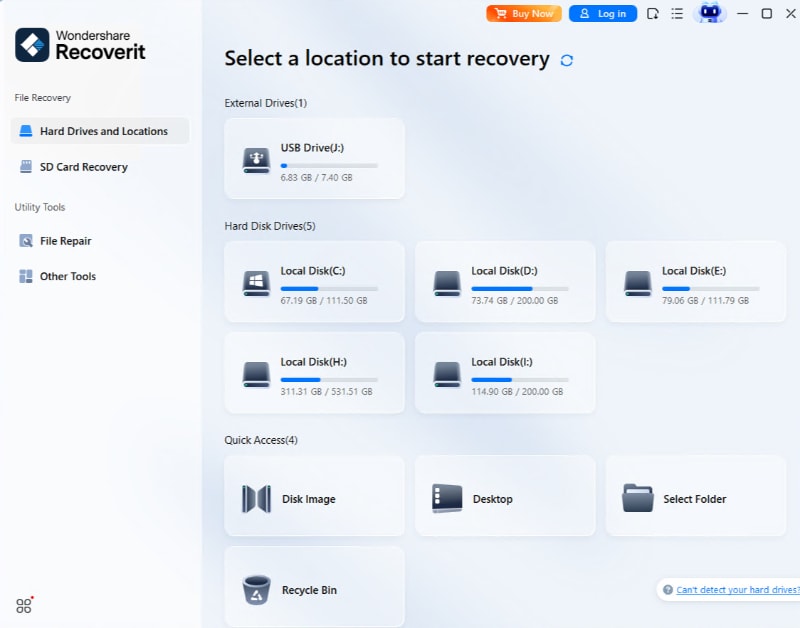
Step 1: Select a Location
Go to the location where your folder got missing, select it and click "Start"
Step 2: Scan the Location
Now that you have clicked "Start", the selected location will be scanned to find all the files that are meant to be there.
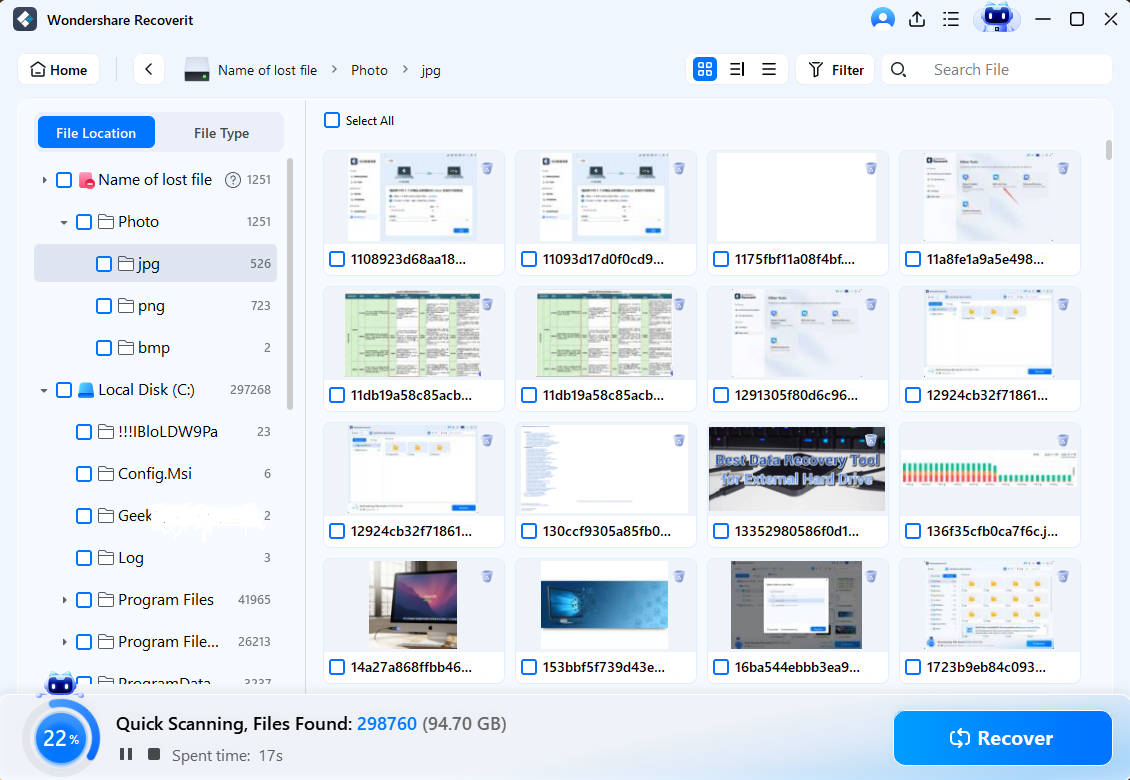
Step 3: Preview and Save Recovered Files
Peruse through all the files that Recoverit has found for you, then choose to "Recover" them all and save.

Part 3: How to Restore Windows 7 to a Previous Windows Installation by Using the Windows.old Folder
This solution is a manual walk-through to Windows 7 previous version using Windows. old folder. The steps below will guide you in detail and you will be able to fix the problem you are facing in no time:
1. First, check if the space on your Windows hard disk will be sufficient and if there is a Windows. old folder by doing the following:
- Select "Start" > "Computer"

- Select the option "Details" from the list under "View"

- Go to the "Free Space" column. Here, find the "Hard Disk Drives" section and note the available space for your "Local Disk (C:)"

- Again in the same section, double-click the "Local Disk (C:)" to see if the folder for Windows.old exists or not

- If the Windows. the old folder exists, right-click it and wait for some seconds as Windows 7 determines the folder's size. Compare the size with that of your Local Disk C: and if it is smaller, then move on to the next step.

2. Start "Windows Recovery Environment"
- You need the installation disc for Windows 7. Once you have it, install in your computer's DVD drive and restart your computer
- Press any when you get the prompt to restart from the disc
- The "Installation Windows" is the next thing you will see. Here, you get to choose a currency, language, a keyboard input method, or another input method of your choice, as well as the correct time. Now, select "Next"

- Again, click on "Repair your computer"

- A "System Recovery Options" window will appear, from where you should choose the Windows 7 version you wish to repair. Again, click "Next"

- In this same window as above, choose the "Command Prompt" option
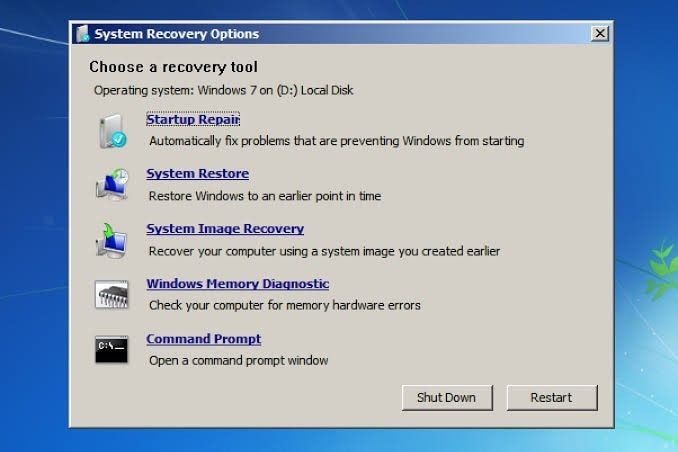
3. Make a new Win7 folder and move the Windows 7 folders into it. Do this by typing the following commands in your Command Prompt field and pressing "Enter" after each command:
C:
Md Win7
Move Windows Win7\Windows
Move "Program Files" "Win7\Program Files"
Move Users Win7\Users
Attrib –h –s –r ProgramData
Move ProgramData Win7\ProgramData
Rd "Documents and Settings"
After typing each a command and pressing enter, you may receive a message like "The system cannot find the file specified". Do not let this deter you; just continue with the next command and so on.
4. Move or copy the contents of the Windows. old folder using the following set of commands. Remember to continue with the commands even if you get the message "The system cannot file the file specified":
move/y c:\Windows.old\Windows c:\
move/y "c:\Windows.old\Program Files" c:\
move/y c:\Windows.old\ProgramData c:\
move/y c:\Windows.old\Users c:\
move /y "c:\Windows.old\Documents and Settings" c:\
5. Restore the previous Windows installation's boot sector by inputting any of the commands that follow, depending on what applies to your specific situation (for instance, "D:" is the letter representing the drive in this case.
- If the previous installation of Windows was Windows Vista, then input this command:
D:\boot\bootsect /nt60 c: - If the previous installation of Windows was Windows XP, Windows Server 2003, or even Microsoft Windows 2000, then input this:
D:\boot\bootsect /nt52 c:
6. If the previously installed Windows is Windows XP or Windows 2000, then restore the boot.ini file using the following commands. Remember to press "Enter" after each command is inputted:
Attrib –h –s –r boot.ini.saved
Copy boot.ini.saved boot.ini
7. Exit the Command Prompt field and restart your system:
- In the command prompt window, input the command: exit. Hit the "Enter" key
- Go back to choose to "Restart" your PC.

Bonus Tip on Setting Up and Configuring Previous Versions
- When setting up previous versions of Windows 7 files, make sure they are located on the hard drive which contains your Windows OS. This is unnecessary, however, if you instruct it to include the hard drive in the running of the previous version
- When Windows is running a restore point of previous file versions, you have to close a file. This is to ensure that the current version is saved. Leaving files open will only compromise the smooth running of the process.
- Restoring and configuring previous versions is more effective if you are in the habit of backing up your files regularly. Also, the "System Restore" function must be enabled or active for this to work.
- You cannot set up and configure previous versions on your bad programs. For such cases, a program reinstallation is advisable
- Just put off "System Restore" if you must disable the Previous Versions feature.
The Bottom Line
It may come as a shock to you, but sometimes using the "Undo" shortcut may simply not work because of the change in file versions or the time frame. With the key pointers in this article, you can now effectively recover previous versions of Windows 7 files using "restore previous versions" or the Recoverit Data Recovery tool.
Computer Data Recovery
- Windows PE
- System problems
- Reset Windows 10
- Install Windows 10 on SSD
- Can't Enter Safe Mode
- Fix no Sound issue
- Parameter is Incorrect
- PC Errors
 > Resources > Windows Computer Solutions > How to Restore Previous Versions of Windows 7 Files or System


Recoverit Editorial Team
chief Editor