
Jun 03, 2026 • Filed to: Windows Computer Solutions • Proven solutions
While the original Scandisk utility was retired after Windows 9X, its modern successor is CHKDSK.
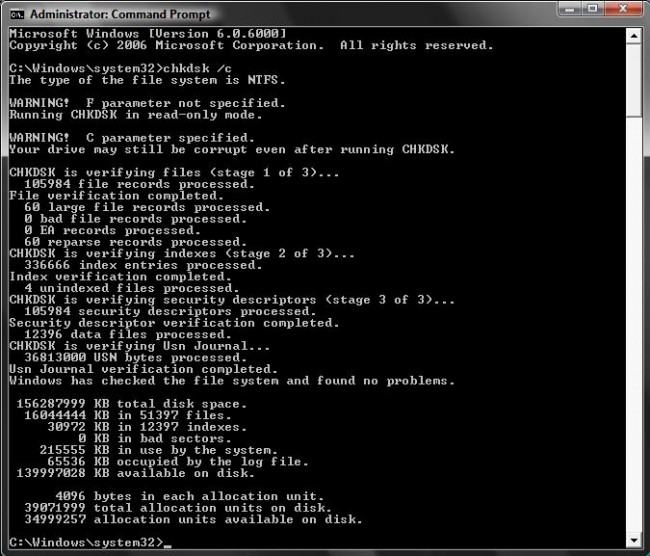
For Modern Windows (11, 10, 8, 7): Open Command Prompt as Admin and type chkdsk c: /f (replace 'c' with your drive letter). Or, right-click your drive in File Explorer > Properties > Tools > Check.
For Legacy Windows (95, 98, ME): Click Start > Programs > Accessories > System Tools > Scandisk.
For MS-DOS Users: Type scandisk at the C:\ prompt and press Enter.
Key Benefit: Running these commands repairs file system errors, fixes cross-linked files, and identifies "bad sectors" on physical hard drives.
In the following article, we shall assist our users who are looking to make good use of the Scandisk command in the Windows Operating System. Before we move on to the specifics of the topic, you must develop a precise understanding of how the Windows Operating System works. Don’t worry, we won’t dig into the basics of Windows OS, but merely learn about the commands that make it so special. As a Windows User, I have found the OS Commands to be pretty helpful in times of crisis. While some of the users may feel skeptical and end up comparing the Windows OS with MAC or Linux, there is no denying that Windows has created a pretty impressive interface with built-in commands for its users. The following article deals with one such helpful functionality, which happens to be the Scandisk Command.
Part 1: How to run the Scandisk Command in different versions of Windows
In the following section, we look at how to run the Scandisk command in different versions of Windows.
For Microsoft Windows XP, 2000, Vista, and 7 Users:
We recommend the following steps when you wish to run the Scandisk command in the above-listed variants of Windows:
- Double-click on My Computer;
- Highlight a local hard drive. This can be done through a single click on it;
- Right-click the local drive you have highlighted in the above step;
- You are now required to click on Properties;
- Click on the ‘Tools’ tab and click check now in order to scan the drive for errors.
- The computer is now required to be restarted in order to run the Scandisk command without getting interrupted.
Microsoft Windows 3.X and MS-DOS Users:
Before you question our love for the primitive Windows variants, it is important to note that even today; some very advanced users prefer MS-DOS when it comes to ensuring the success of their programs and applications. So, to help our user segment, we list out the steps that can help them with the Scandisk Command.
Scandisk was introduced with MS-DOS 6.2, and it has been here since then. For the ones running MS-DOS 6.2 or 6.22, here are the steps to run Scandisk;
- For the users of Windows 3.X, check File and then Exit in order to get to MS-DOS prompt;
- In MS-DOS, users must type, CDDOS and tap on entering;
- In the C: DOS>Type Scandisk and tap on entering. This will enable the Scandisk command on your Computer.
How to Run the Modern "Scandisk" (CHKDSK) in Windows 10 & 11
In 2026, the Command Prompt is the most reliable way to perform a deep scan.
- Type cmd in the Start Menu, right-click it, and select Run as Administrator.
- To scan and fix errors, type the following command and press Enter:
chkdsk /f /r - If prompted to schedule the scan for the next restart, type Y and restart your PC.
- To start with, it recognizes all the versions of the legacy File Allocation Table (FAT) System. These include FAT-12, FAT-16, and FAT-32;
- It also comes with the functionality to recognize ‘compressed’ volumes;
- Can help users automatically fix cross-linked files and lost clusters;
- It also helps to recognize long filenames;
- The Scandisk command can easily run on disk partitions that are marked as ‘dirty’ by an improper shutdown of the Operating System;
- The Scandisk command can help users perform a full scan of the hard drives and floppy disks in order to check for damage;
- The Scandisk command can also be run from the command line, thus permitting it to be through booting from a floppy disk, which enhances its functionality;
- The Scandisk command comes with a Graphical User Interface that offers a more intuitive interface and easier control, thus acting as an easier alternative to scan options.
- Recover lost or deleted files, photos, audio, music, emails from any storage device effectively, safely and completely.
- Supports data recovery from recycle bin, hard drive, memory card, flash drive, digital camera, and camcorders.
- Supports to recover data for sudden deletion, formatting, lost partition, virus attack, system crash under different situations.
- Windows PE
- System problems
- Reset Windows 10
- Install Windows 10 on SSD
- Can't Enter Safe Mode
- Fix no Sound issue
- Parameter is Incorrect
- PC Errors
The importance of the Scandisk command cannot be ruled out in any Windows variant, especially if users are looking for the flexibility to check their drives and local hard-disks for errors and issues. For the ones who are unsure as to how to run the Scandisk command on their systems, we have listed out all the possible steps with simple instructions. If you have some alternate techniques for the same or used on of the above-listed methodologies, do share your experience with us in forums.
Evolution of Disk Diagnostics: Scandisk vs. CHKDSK
| Feature | Legacy Scandisk (FAT) | Modern CHKDSK (NTFS/ReFS) |
| Windows Versions | DOS, Win 3.1, 95, 98, ME | Win XP, 7, 8, 10, 11, Server |
| File System Support | FAT12, FAT16, FAT32 | NTFS, ReFS, FAT32, exFAT |
| Interface | Text/GUI (Blue Screen) | Command Line / File Explorer |
| Repair Capability | Lost Clusters, Cross-links | Metadata Errors, Bad Sectors |
| SSD Optimization | No (May cause wear) | Yes (TRIM-aware) |
Part 2: What is the Scandisk Command in Windows Operating System?
Microsoft Scandisk command is essentially a diagnostic utility that has been included in MS-DOS and Windows 9X. While its brilliance lies in the fact that it can check file system errors on the disk drive, it is crucial to know that this command came as an advanced successor to CHKDSK. The command was first introduced in MS-DOS 6.2.
Scandisk overshadowed its predecessor (CHKDSK) because of the more user-friendly interface it came with, multiple configuration options, and most importantly, the functionality that was critical to detect and in some cases even recover the physical errors on the disk. This was helpful for the users in those times as it replaced and enhanced the limited functionality that was otherwise offered by the MS-DOS Recovery Utility. Scandisk command could also manage to repair cross-linked files, something that wasn’t possible with CHKDSK, thus appealing to more users.
From the onset of Windows 95, the Scandisk command also came with an engaging Graphical User Interface along with the text-based user interface that was being made available for the users working in single-tasking DOS mode.
Alongside, it is important to note that Scandisk cannot check the NTFS Disk Drives, and hence, it has not been made available for computers that run the NT based versions of Windows, and instead, users are provided the CHKDSK command to comply with. This command is relatively new, and shouldn’t be confused with the earlier MS-DOS CHKDSK Command.
Part 3: Advantages of using the Scandisk Command:
In the following section, we look at the benefits of using the Scandisk Command:
If you are using a modern SSD (Solid State Drive), avoid using the /r switch (surface scan) frequently. Unlike traditional Hard Disk Drives (HDDs), SSDs do not have physical "spinning" sectors. Instead, use chkdsk /f to fix file system metadata errors without unnecessary write cycles that can wear out flash memory.


David Darlington
staff Editor