Fix Screen Brightness Changing With The Background
To prevent Windows 10 from automatically adjusting your screen brightness based on open applications or ambient lighting, you must disable the system's Adaptive Brightness toggle or your graphics card's display power-saving modes.
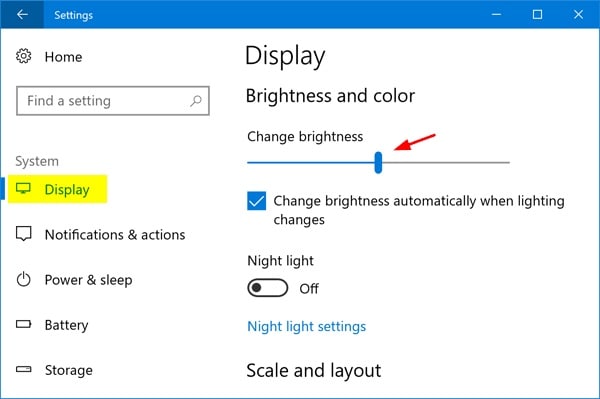
● Turn off the operating system's automatic adjustments by navigating to Settings > System > Display and unchecking the option to change screen brightness automatically.
● Override the hardware ambient sensor by opening the Intel Graphics Control Panel, navigating to Power > Current Settings > Balanced Mode, and disabling both Display Power Saving Technology and Enhanced Power Saving Mode.
● Use the Windows taskbar notification icon slider or designated keyboard function keys like F4 or F5 to quickly recalibrate the brightness manually if temporary automatic shifts occur.
Ask AI for a summary
A while back, I opened an application in the dark theme, and it automatically changed the brightness of my system’s screen. While it was an intuitive experience, I didn’t like switching back to the standard screen of my system. This made me realize that a lot of people also encounter this automatic option, which is commonly known as Adaptive Brightness. Thankfully, it can easily be disabled or calibrated as per your requirements. Here, I will let you know how to fix this issue on your Windows systems instantly.

Part 1: Why does Windows Screen Brightness changes with the Background?
Before I provide a simple solution to fix this issue, let’s diagnose it a bit. You might not know this, but Windows 10 systems come with an inbuilt Adaptive Brightness feature. This means, when there is dim light in the room or you have opened a dark interface on the screen, the brightness of the screen would automatically be decreased. Later, when you switch back to a standard environment, the brightness will gradually be increased as well.
Ideally, the change in your system’s brightness happens in a gradual way without any flicker. This is done by an ambient display sensor that is present in high-end laptops to provide a better viewing experience.
Part 2: How to Fix the Adaptive Brightness feature in Windows?
While the Adaptive Brightness feature in Windows 10 is a premium offering, a lot of people don’t like the sudden change in the system’s brightness. The good news is that you can easily fix this issue in the following ways:
Method 1: Manually Change the Screen Brightness
Ideally, there are two ways to calibrate the screen brightness of your system. Whenever the Adaptive Brightness feature would change the screen brightness, you can manually set it right.
To do this, you just have to click on the notification icon from the taskbar. You can find it at the bottom-right corner of your Windows 10 desktop. Once you click on it, you can get different options about your system with the brightness slider. You can now swipe the brightness slider in any direction to change it.

Besides that, you can also go to your Windows 10 Settings by clicking on the gear icon from the Startup menu. Now, you can go to its Settings > System > Display and manually change the brightness by moving the slider. You can also turn off the option to change the screen brightness automatically from here.
Furthermore, you can even use the designated Function Keys (like F4 or F5) on your computer to adjust your system’s brightness.
Method 2: Disable the Enhanced Power Saving Mode in the Graphics Control Panel
It has been observed that the change in the system’s screen brightness with respect to its background is related to its Graphics Control instead. For instance, if your system has been set up in the Power Saving mode, then it would automatically dim its brightness via its ambient sensor.
To make sure that Windows 10 won’t change the brightness of your screen automatically for any background, you can follow this simple drill:
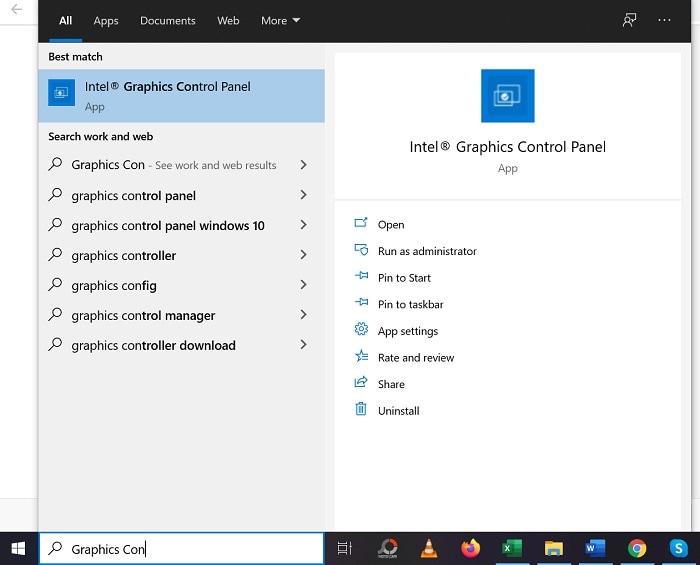
Step 1: Open the Intel Graphics Control Panel
In order to fix this issue, you can just go to the search option on the taskbar and look for Intel Graphics Control Panel. In most Windows PCs, it is an inbuilt option, but you can have the Graphics Control Panel of any other brand installed as well.
If you want, you can also go to your System’s Control Panel and find the Intel Graphics Control Panel option from there.
Step 2: Visit the Power Settings of the Control Panel
As the dedicated interface for Intel Graphics Control Panel would be launched, you can click on the “Power” feature to calibrate its brightness settings.

Step 3: Disable the Enhanced Power Saving Mode
As the Power settings would be launched in Intel Graphics Control Panel, go to the Current Settings from the sidebar. Now, from the list of the power modes available, select “Balanced Mode”.
Here, you can view dedicated settings for the Display Power Saving Technology that you can disable or enable as per your requirements. You can also adjust the slider from Maximum Battery and place it in the mid to get optimum performance for both Quality and Battery output.
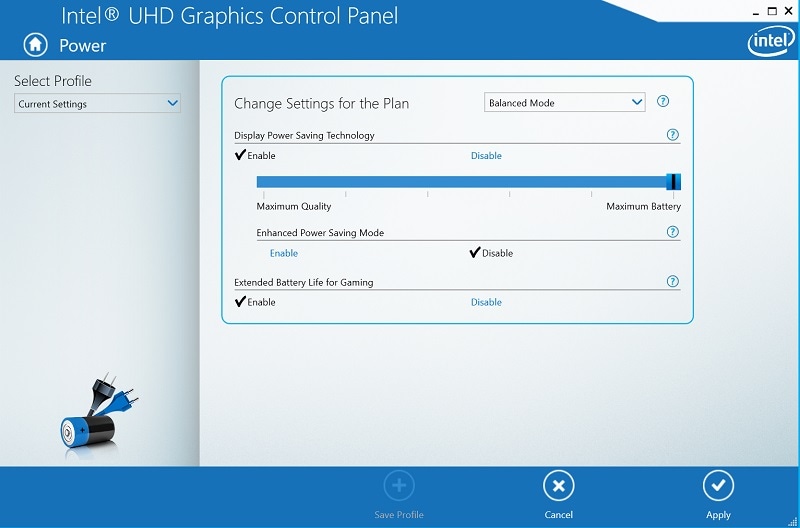
Lastly, you can go to the Enhanced Power Saving Mode from here and make sure it is disabled. You can click on the “Apply” button from the bottom to implement these changes before closing the application.
Pro Tip: Use Wondershare Recoverit to Instantly Restore any Lost Data
At times, while troubleshooting these issues, we can end up losing our important data in the process. If this is the case, then consider using Wondershare Recoverit Data Recovery. A user-friendly DIY application, it can help you recover all kinds of files under every possible data loss scenario.
- You can go through a simple click-through process to recover your photos, videos, documents, compressed files, and more.
- The application can help you get back your lost data in scenarios like accidental deletion, formatted drive, malware attack, and so on.
- It lets us preview our photos, videos, documents, etc. on its native interface and selectively restore the files of our choice.
- You can manually look for lost files from any partition, drive, folder, or even an external storage unit.
- It fully supports the recovery of data from hard drives running in different file systems like FAT, exFAT, NTFS, HFS+, APFS, etc.

I’m sure that after going through this guide, you would be able to fix this brightness-related glitch on your Windows PC. Ideally, the Adaptive Brightness feature is an add-on option, but it can sometimes affect our overall working experience. Therefore, you can just go to the Graphics Control Panel on your system and turn it off or manually calibrate the screen’s brightness, whenever needed. Though, if you have lost your data while troubleshooting any issue, then simply take the assistance of Recoverit Data Recovery to get it back.
Computer Data Recovery
- Windows PE
- System problems
- PC Errors


 ChatGPT
 Perplexity
 Gemini
 Claude
 Grok
Grok


Theo Lucia
chief Editor