All you need to know about the Desktop.ini File
In the following article, we shall learn all there is about the Desktop.ini file. Surprisingly, not many users are aware of this issue which usually arises with the Windows users. Not just this, but many other files are present about which users do not know whatsoever, and this is because they lack the functionality or appearance of these files. These are not files you will see every day on your desktop or application, but when you do, rest assured, they’ll cause you a lot of trouble by not allowing you to complete your tasks easily. Therefore, we help our users understand the Desktop.ini file in the following article.
Part 1 What is the Desktop.ini File?
The first question we shall address in the article is what is the Desktop.ini file all about? This is because it makes no point to proceed with the understanding of the Desktop.ini file virus without garnering the basic knowledge around it. To begin with, the desktop.ini files are created automatically within our computer systems. Similar to the thumbs.DB files are generated automatically, but unlike them, they aren’t hidden by default, and therefore, users have to exercise the ‘show hidden files’ option that occurs below the ‘Folder Options’ to access these files. However, if the file is removed due to some reason, it will get automatically re-created once the folder has been re-opened.
So, coming to the main question that we must address in this section, what is the desktop.ini file all about? To begin with, the desktop.ini file carries information regarding a folder’s display settings. This includes the information relevant to the icon along with the pop-up information that is displayed on the screen when the cursor is dragged to that point. Also, it is possible to edit the desktop.ini file and also to customize an individual folder. The desktop.ini files can be found in every folder of the computer once the option to ‘show hidden files’ is exercised. If you are looking to reduce the number of desktop.ini files in your computer, the only way to do it is by reducing the number of folders within the system.
Users are always surprised when they see two desktop.ini files appearing out of nowhere. However, it is quite normal for two desktop.ini files being created; this is because one file caters to the administrator account while the other file caters to the local user account.
I checked the same for my computer and found over 900 desktop.ini file locations. However, I am not worried as these files occupy very little space. However, rarely, there are desktop.ini files that amount to a size that is in a few MBs because the folder they are in has a lot of files, and therefore, they are required to carry a lot of information. Therefore, ignoring the desktop.ini file is one option as they are relatively harmless. However, for the ones alarmed by them, and wishing to remove them from their hard-disk, there are surely some methods to be followed.
Part 2 How to Remove Desktop.Ini File?
In the following section, we shall address two questions. While the first question helps you get rid of the desktop.ini file, the second helps you understand the procedure that can prove to be helpful if these files are recreated again automatically.
Here are the steps to remove the desktop.ini file:
While there are a lot of free tools that are instrumental in helping you remove these files, we advise the process of simple deletion that can be done using the Command Prompt.
1) Start by tapping the Window key+ R combination, type ‘cmd’, and get started with the command prompt window.
2) The command to remove the desktop.ini file from your system is ‘del/s/ah desktop.ini’;
However, what can one do when the desktop.ini files are being recreated even after proceeding with the deletion procedure. To address that issue, here are the steps:
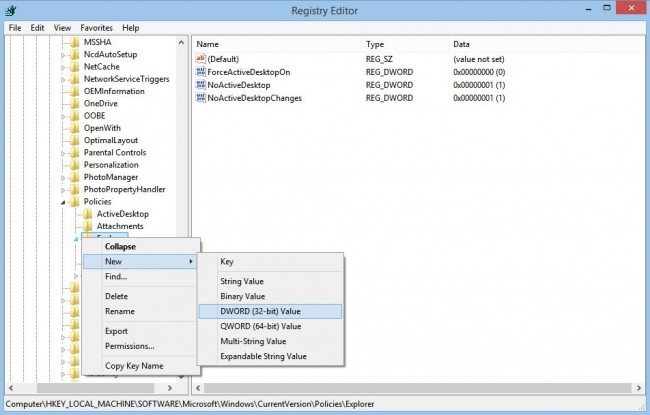
1) Tap the Windows Key + R combination and type ‘Regedit’. This allows you to access the registry editor.
2) Once you move to the left side, navigate to the HKEY_LOCAL_MACHINE-> SOFTWARE-> Microsoft-> Windows-> Current Version-> Policies_> Explorer;

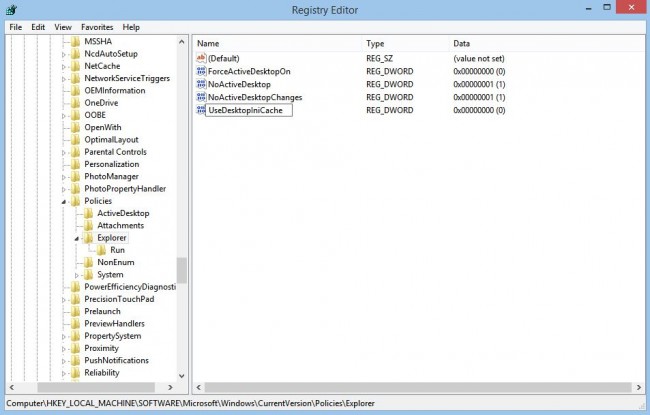
3) You are then required to right-click on the Explorer Folder, check new, and click DWORD.

4) Simply rename the new DWORD to DesktopIniCache;

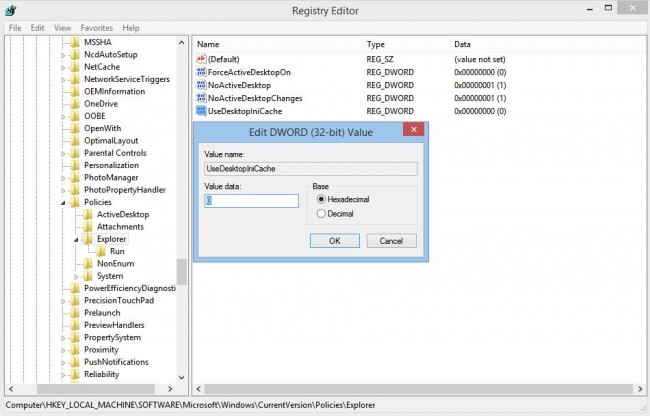
5) Set the value to zero with a double click;
Part 3 How to Remove Desktop.ini virus from Computers?
In the following section, we shall learn how to remove the desktop.ini virus from the computer systems.
1) Start with restarting your computer in the safe mode along with the networking options. For the users working on Windows 7/XP/Vista, tapping F8 repeatedly would do the job. Once the Advanced Boot Options screen shows up, all you have to do is select the Safe Mode with Networking and tap ‘Enter to Proceed’.
2) In this step, we address the files that have been created by the desktop.ini virus. To start with, one must change the Folder Options settings to seek hidden and protected files as the desktop.ini virus could create files in the hidden folders. Tap the ‘Start’ button, and go to the Control Panel, access Appearance, Personalization, and then tap on Folder Options. Under the Advanced Settings contained within the view box, you can tap on ‘Show Hidden Files, folders, drives, and then tap on Ok.
3) Delete the registry entities that have been created by the desktop.ini virus. Input ‘Regedit’ in the search box, and then tap on entering.
4) You are then required to click on ‘Yes’ when prompted by the UAC.
5) Once the Windows registry editor opens, you can search for the infected registry entries and delete them. Finish the process by restarting your computer.
In the above article, we learned quite a lot about the desktop.ini files, its functions, and what it means to your folder space. While conventional users tend to ignore this file without much consideration for unforeseen issues, some prefer getting rid of it right away. If you achieved any success using the above method, let us know about it in the forums.
Computer Data Recovery
- Windows PE
- System problems
- PC Errors


 ChatGPT
 Perplexity
 Google AI Mode
 Grok
Grok


David Darlington
staff Editor