How to Fix Dropbox Not Syncing in Windows 10
Dropbox is a file hosting service, which is one of the most popular in the world, with millions of users who back up, share, and synchronize their information daily. This cloud platform needs to sync the information of the computers to be able to share and link it, therefore, on some occasions, this process may fail due to different circumstances. In this post, you will know the most common reasons why Dropbox won't sync and I will give you both solutions and alternatives so that your information is always safe and backed up.
Part 1: Methods to Fix Dropbox Not Syncing in Windows 10
Q: Since some days ago, Dropbox is not syncing my files on my computer. Could you help me and find a solution?
Virtually all users tend to worry about their information, which can contain very important files. Making backups is a task that has become an everyday thing, therefore, the options that exist to perform this process are very diverse and varied, with file hosting services being one of the most popular alternatives, thanks to the fact that it is not necessary to acquire any new storage device and therefore, the user will not be in danger of having their disk or backup drive stop working or misplacing.
Dropbox is a file hosting service with more than 500 million users worldwide, synonymous with practicality, security, and quality on the platform. However, the data synchronization process is not without its problems or limitations, which can arise in various ways.
Part 2: Why Is My Dropbox Not Syncing?
- File in use: When a file is in use, it cannot be synced, this works similarly to when you want to rename or move it and Windows gives you a notification that it cannot be done because it is open. Make sure that all your files are closed so that the sync takes place properly.
- Identical names: If two different files have identical names, they cannot be synchronized, check if you have files with the same name, even in different folders to make sure everything will be synchronized.
- File with incompatible characters: Some files cannot be named with some signs, which are:
> (greater than)
: (colon)
" (double quote)
| (vertical bar or pipe)
? (question mark)
* (asterisk)
. (period) or space at the end of a file or folder name
Verify that the name of your files does not contain any of these signs, otherwise it cannot be synchronized.
- Anti-virus software: Some antivirus programs can put Dropbox on their blacklist, categorizing it as malicious software, which limits its functions such as syncing. To do this, all you have to do is remove Dropbox from the blacklist and it should work without problems.
- Misconfigurations and bugs in settings: It may sound very obvious, but you may have forgotten to check and make sure that your Dropbox settings are correct. Check that synchronization is active and that the program is working on your computer correctly.
- Firewall issues: Generally, Windows Firewall does not apply restrictions to Dropbox. However, if you see synchronization stop, Firewall has probably denied Dropbox internet connection permission. To fix this, just add Dropbox to apps with internet access and sync should work without limitations.
- Proxy settings: If synchronization does not work it may also be due to your proxy connection. If you are not sure if you are using a proxy server to connect, you can configure the Dropbox connection without a proxy and the software will use the Windows settings to update automatically.
Part 3: How to Fix Dropbox Not Syncing in Windows 10?
1. Check the files: Reiterating the previous part, check that your files are fine, without incompatible characters and that there are no two files with identical names. Also, check that you do not have corrupted files since this will interfere with Dropbox synchronization.
2. Check for software causing problems: Firewalls, antivirus, and some other applications related to the security of your computer can turn off or hinder the synchronization because Dropbox needs to be connected to your IP all the time. This action is usually blocked by security programs, so you must activate Dropbox permissions and at the same time remove it from the antivirus blacklists.
3. Check the Dropbox process: In Dropbox, you can go to settings to check the progress of the files that are being synchronized. Based on this, you will be able to see if there are errors or limitations, so I suggest you review the process. Also, you can check the transfer speed, so you can see if your internet server has connection problems or there is an evident decrease in the data transfer speed.
4. Delete Dropbox caches: You can clear the Dropbox cache, which can affect synchronization performance. Next, I will show you how to do it:
Step 1: Show hidden files

Open your Windows Explorer and click on the "View" tab, then click on the blank square next to "Hidden items."
Step 2: Go to Dropbox cache folder
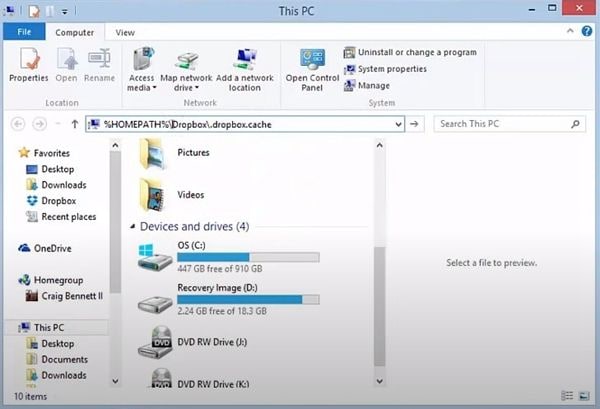
Open the Dropbox cache folder. To do this, write in the address bar:
%HOMEPATH%\Dropbox\.dropbox.cache and then hit "Enter."
Step 3: Delete Dropbox cache folders
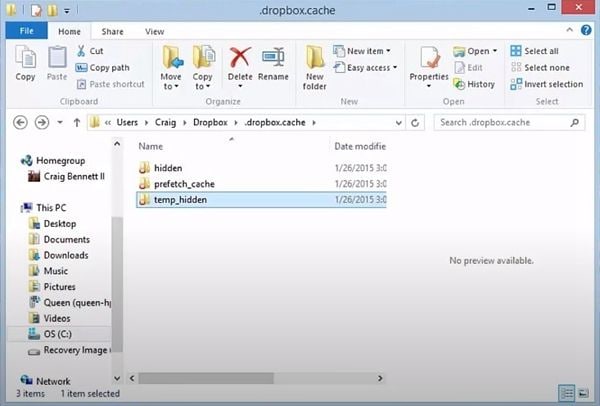
Now, you can see three folders. Delete them and Dropbox cache will be cleared.
5. Disable selective sync: Selective sync is a feature that lets you save space. It allows you to customize which folders or files you want to sync, however, you may have skipped some important data to sync so, if you don't make use of this feature, all of your files will be synced. To disable selective sync just follow these simple steps:
Step 1: Open Dropbox tool
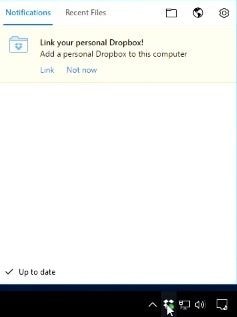
Click on the Dropbox icon which is on the right side of the taskbar.
Step 2: Open Dropbox preferences
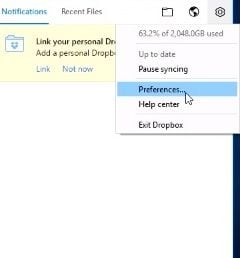
Click on the gear icon which is on the upper-right corner of the tool window, then click on "Preferences…" on the drop-down list.
Step 3: Open Selective Sync
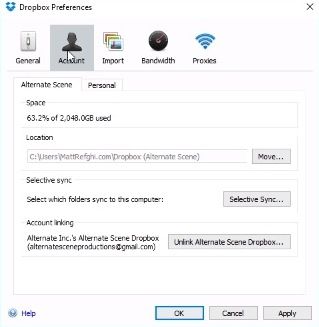
Once you are in the preferences window, click on "Account" and then click on "Selective Sync…"
Step 4: Uncheck all folders
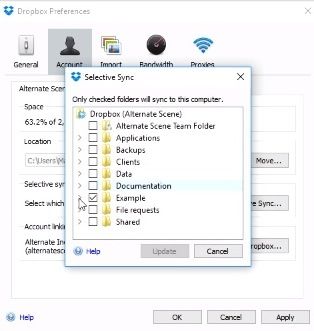
In the Selective Sync window, you will see all the folders that are selectable to sync. Just uncheck all folders and then click on "Update." After this, Selective Sync will be disabled.
6. Reset Dropbox settings using CMD: You can use Command Prompt to reset Dropbox settings. This may delete modifications that may have been made and may have interfered with data synchronization. Below I will show you how to do this task:
Step 1: Open Dropbox tool
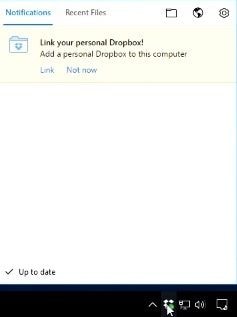
Click on the Dropbox icon which is on the right side of the taskbar.
Step 2: Open Dropbox preferences
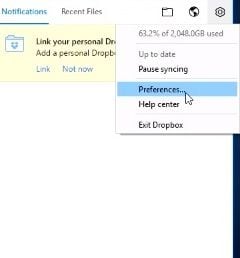
Click on the gear icon which is on the upper-right corner of the tool window, then click on "Preferences…" on the drop-down list.
Step 3: Close Dropbox
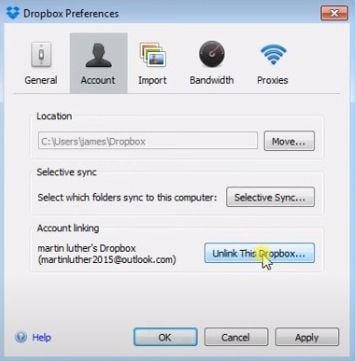
In this window, click on "Unlink This Dropbox…" and it will immediately sign out your account and close the application.
Step 4: Open "Command prompt"
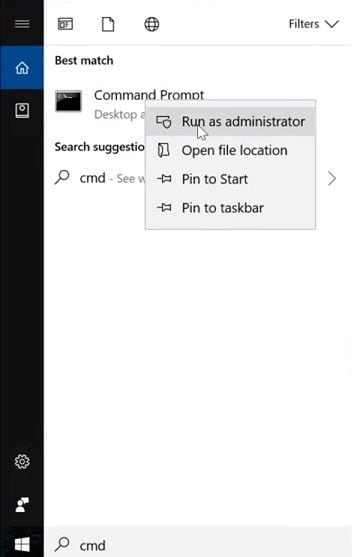
Go to the win menu and type "CMD", then right-click on its icon and select the "Run as Administrator" option.
Step 5: Type the commands to reset Dropbox settings
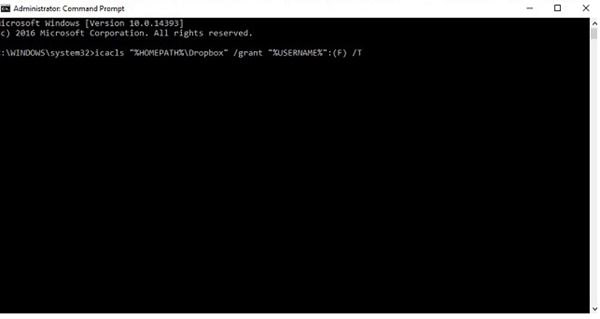
Text or copy and paste these commands in the Command Prompt window. You have to hit Enter after each command:
icacls "%HOMEPATH%Dropbox" /grant "%USERNAME%":(F) /T
icacls "%APPDATA%Dropbox" /grant "%USERNAME%":(F) /T
icacls "%LOCALAPPDATA%Dropbox" /grant "%USERNAME%":F /T
icacls "%PROGRAMFILES%Dropbox" /grant "%USERNAME%":F /T
Remember to make sure that your Dropbox folder is "C:UsersYourUserDropbox," if that's not the location you will have to modify the first command, changing "%HOMEPATH%Dropbox" with the correct location like in the next example: icacls "D:Dropbox" /grant "%USERNAME%":(F) /T
Finally, open Dropbox and verify if the settings are reset and if sync works again.
Part 4: Alternative to Dropbox-Sync Files with AOMEI Backupper
Although Dropbox is a reliable option to perform backups, there may be some synchronization failures that can generate negative experiences. You can rely on an application such as AOMEI Backupper, which is professional software that performs backups and can sync your information with ease and efficiency. To sync your Dropbox files, you just have to follow the following steps:
Step 1: Go to "File Sync"
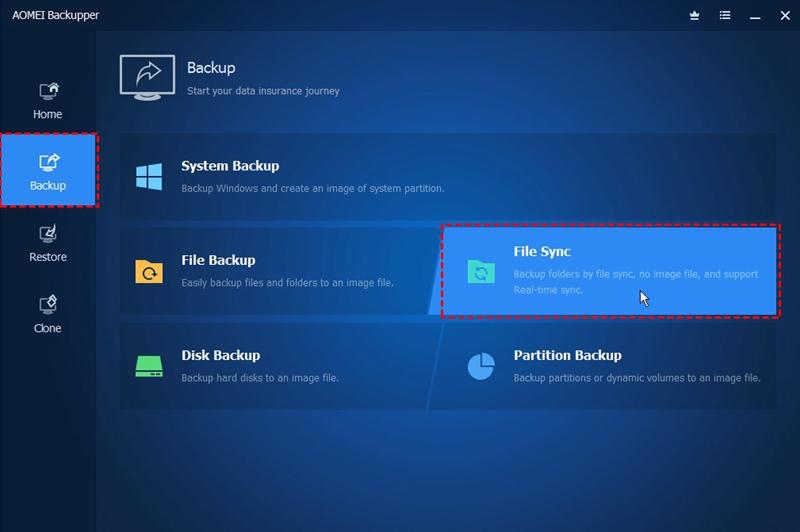
Once the tool is open, go to the "Backup" section (located on the left panel of the window). Now click on the "File Sync" option.
Step 2: Assign a name to your task
Before going further, it's advisable to name each backup task to help you to distinguish each backup process from other ones. You can do this by clicking on the "Task name" edit icon.
Step 3: Select the folder to backup

Click on "Add Folder" and select the one where you want to store your backup data.
Step 4: Select "cloud drive" option
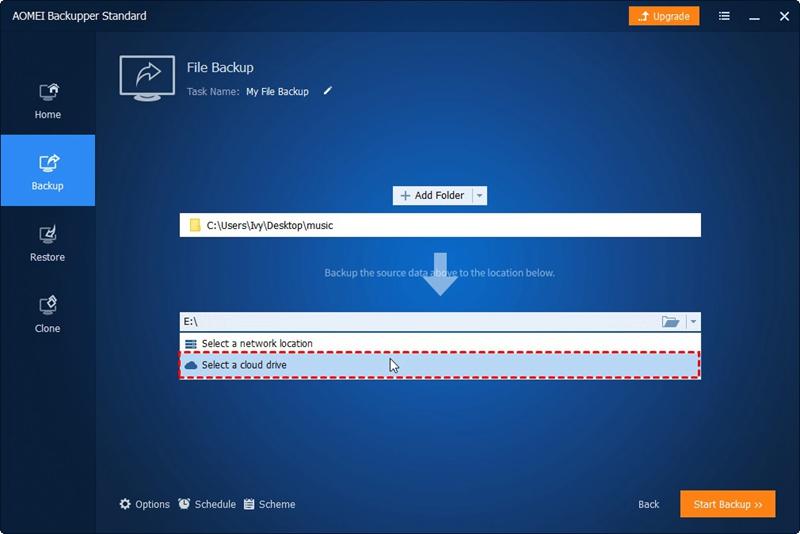
Once you've edited the filter preferences, you must select the cloud drive option. To do this, you have to click on the "folder" icon.
Step 5: Select "Dropbox"

Once you've selected the "Cloud Drive" option, a Window like this will be displayed. Please select "Dropbox" and click on "Ok."
Step 6: Start the backup process
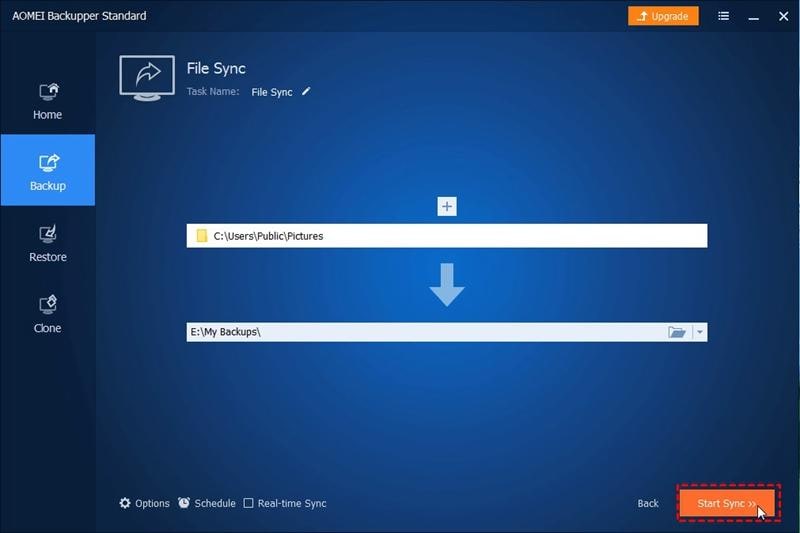
If all the preferences have been set up, you will have to click on the "Start Sync" button. As you have seen, the AOMEI Backupper tool is pretty simple to use and allows you to make any kind of backup process with great ease
Conclusion
Having data backed up is a daily and essential task since very important information can be contained in a large number of files, so it is natural for a user to be demanding with the backup of his information, worrying about the security of his documents and the practicality to sync it. There are interesting options like Dropbox to sync your files, but if you want to make sure that your files are going to be synced at all times, you can use a software like AOMEI, an application that will sync your Dropbox files safely and effectively.
Data Backup Services
- Computer Backup
- Hard Drive Backup
- Mac Backup
- Cloud Backup


Amy Dennis
staff Editor