


 TL;DR:
The most reliable method to back up an SD card depends on its function: use a standard file copy for media devices and a full disk image for bootable operating systems, keeping at least two verified copies before clearing the source.
● Copying only the visible DCIM folder will exclude necessary video folders, sidecar files, camera databases, and GPS logs, requiring a full root-level transfer to an exFAT, NTFS, or APFS formatted destination.
● A full disk image, necessary for preserving hidden partitions and boot sectors on single-board computers, requires uncompressed destination space equal to the card's total nominal capacity and cannot be stored on FAT32 drives if the file exceeds 4 GB.
● If the card disconnects under load or already contains missing files, normal backup methods will fail; you must halt usage and extract data to a separate healthy drive using recovery software prior to any formatting or repair.
Ask AI for a summary
 ChatGPT
 Perplexity
 Gemini
 Claude
 Grok
Grok
TL;DR:
For photos and videos: copy the whole card—not just a few visible files—to a dated folder on a PC, Mac, or external SSD.
For bootable cards: create a full disk image because normal file copy does not preserve every partition or boot sector.
Before formatting: compare file counts and sizes, open sample files from the backup, and keep at least two verified copies.
If files are missing: stop using the card and recover them before formatting, running repairs, or writing a new backup to the same card.
The safest way to back up an SD card is to copy the entire card to a computer or external drive, verify the copied files, and keep a second copy in another location before erasing the card. For a camera, drone, dashcam, or phone card, a file-level copy is usually enough. For a bootable Raspberry Pi, retro-console, or device card, create a full disk image so the backup also preserves partitions and boot data.
Do not format, repair, or continue recording to a card that already has missing or unreadable files. Recover those files first, save them to another healthy drive, and only then create a new backup.
In this article
Part 1. Choose The Right SD Card Backup Type
“SD card backup” can mean four different things: copying files, syncing a folder, creating a disk image, or cloning the card. The right choice depends on what the card does—not whether it is 32 GB, 128 GB, or 1 TB.
| Backup Type | Best For | What It Preserves | Main Limitation |
| File-level copy | Camera, drone, phone, dashcam, audio recorder, and document cards | Visible folders and files you select | Does not preserve boot sectors, unmounted partitions, or deleted files |
| Cloud upload | An offsite copy of important files already copied to a computer | Uploaded files and folders | Needs enough cloud storage and is not a substitute for a local copy |
| Disk image | Raspberry Pi, single-board computer, retro-console, industrial, and other bootable cards | The card's complete block-level layout, including partitions and boot data | A raw image may require free space equal to the card's full capacity |
| Card-to-card clone | Creating a ready-to-use duplicate on another card | A direct source-to-destination copy | Can overwrite the destination and is less flexible than storing an image file |
For most photographers and videographers, start with a file-level copy of the entire card root. Copying only DCIM can omit video folders, sidecar files, camera databases, GPS logs, thumbnails, or project metadata created elsewhere on the card. If you specifically need a second bootable card, see the separate guide to cloning an SD card in Windows rather than treating cloning and normal backup as the same task.
Part 2. Prepare The Card And Destination
A clean backup starts before the copy begins. These checks reduce wrong-disk mistakes, incomplete transfers, and backups that cannot hold large video files.
- Stop recording: remove the card only after the camera, drone, phone, or recorder has finished writing and has been powered down as its manual recommends.
- Inspect the card and reader: do not force a damaged card or adapter into a slot. Use a stable reader and cable; avoid hubs that disconnect under load.
- Check the source: confirm the mounted card name and approximate capacity before copying. If the operating system asks to format it, cancel that prompt.
- Create a clear destination: use a name such as 2026-08-25_Client_Project_Card-A. A date, project, device, and card label are more useful than “SD backup.”
- Check free space: a file copy needs more space than the card's used data. An uncompressed disk image normally needs at least the card's full nominal capacity.
- Check the destination format: FAT32 cannot store one file larger than 4 GB. For a destination used by both Windows and Mac, exFAT is commonly practical; use NTFS for Windows-only or APFS for Mac-only workflows when device compatibility allows.
- Use copy, not cut: do not move or delete source files until the backup has been verified.
If files are already missing, the card disconnects repeatedly, or copying produces read errors, stop here and go to Part 8. A normal backup copies what the file system can read; it does not recover deleted or inaccessible data.
Part 3. Back Up An SD Card To A Windows PC
Windows 11 File Explorer is the simplest choice when the card mounts normally and you need a readable backup of photos, videos, documents, or other visible files. Microsoft recommends copying files to external storage, checking the destination, and ejecting the device before disconnecting it.
Method 1. Copy SD Card Files With File Explorer
- Connect the card: insert the SD or microSD card into a compatible reader and connect it to the PC.
- Open File Explorer: press Windows + E, choose This PC, and open the removable drive that matches the card's name and capacity.
- Select the entire card: press Ctrl + A in the card's top-level folder, then press Ctrl + C. Copying the whole root preserves folders beyond DCIM.
- Paste to a healthy drive: open the dated destination folder on the PC or an external SSD and press Ctrl + V.
- Wait for completion: leave the reader connected until the progress dialog closes. Transfer time depends on card capacity, used space, reader speed, and destination performance.
- Verify and eject: complete the checks in Part 7, then right-click the card in File Explorer and select Eject.
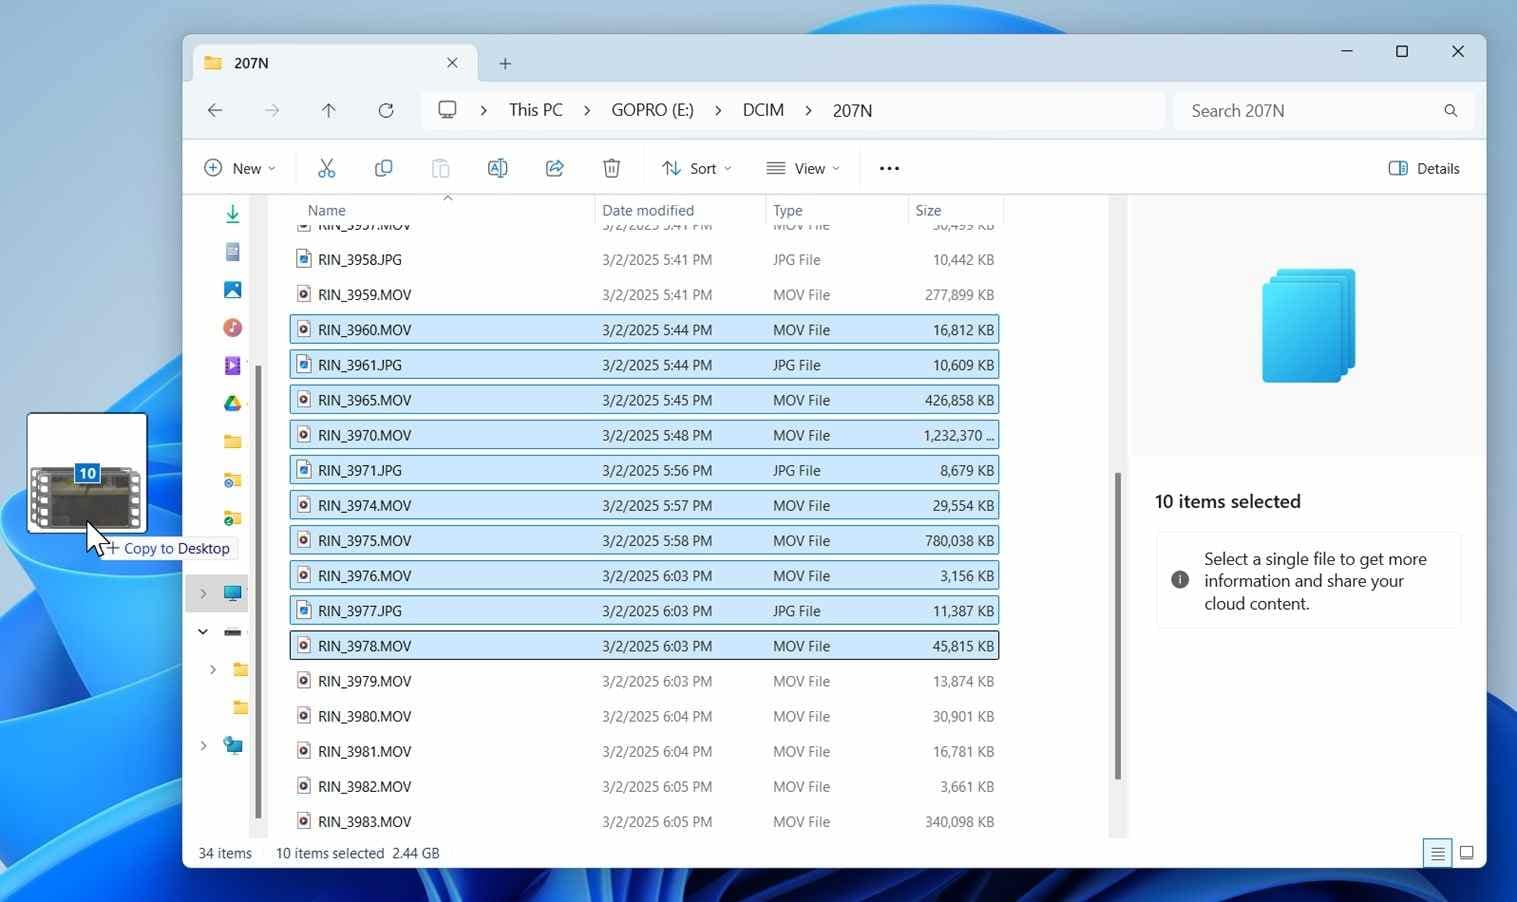
Important: Desktop and Downloads are convenient, but they are not automatically separate backups if they live on the same internal drive. For valuable work, make another verified copy to an external drive or offsite storage.
Part 4. Back Up An SD Card To A Mac
On current macOS, a readable SD card appears in Finder under Locations. The Apple-supported workflow is to open the storage device, drag or copy its files to the Mac, and eject it in Finder when finished.
Method 2. Copy SD Card Files With Finder
- Connect the card: insert it into the Mac's SD slot or a compatible USB card reader.
- Open the card in Finder: open Finder and select the card under Locations. If Locations is hidden, choose Finder > Settings > Sidebar and enable external disks.
- Create a dated folder: make a project folder on the Mac or a healthy external SSD. Confirm the destination has enough free space.
- Copy the card root: select all top-level items with Command + A, copy with Command + C, open the destination, and paste with Command + V. Dragging between different volumes also copies, but keyboard copy and paste makes the intention explicit.
- Check the result: compare the source and destination and open representative photos, RAW files, and videos from the destination.
- Eject safely: click the eject icon beside the card in Finder before removing it.
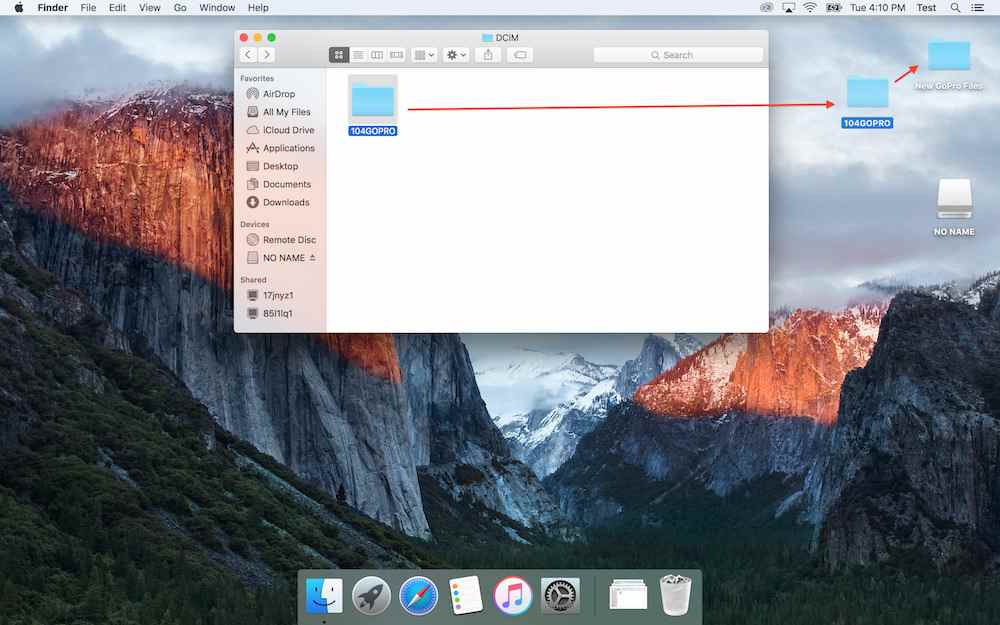
If the card appears in Disk Utility but not Finder, or macOS reports errors, protect readable files before repair. Follow the separate workflow to check and fix an SD card on Mac only after important data is safe.
Part 5. Back Up An SD Card To Google Drive
A cloud copy protects against theft, loss, fire, or failure at the location holding your computer and external drive. Upload from a verified local folder instead of directly from an unstable card, and keep a local copy because cloud upload is not a substitute for every backup layer.
Method 3. Upload A Verified SD Card Folder To Google Drive
- Finish the local copy first: copy the SD card to a dated folder on the PC, Mac, or external drive and verify it using Part 7.
- Check cloud capacity: confirm the Google account has enough available storage for the folder.
- Open Google Drive: sign in at drive.google.com.
- Start a folder upload: click New > Folder upload, select the dated backup folder, and confirm the upload. Google also supports dragging files or folders into Drive.
- Confirm completion: wait until Drive reports the upload is complete, then open the folder in Drive and spot-check several uploaded files.
- Protect the account: use a unique password and multi-factor authentication. For confidential client media, follow your organization's encryption and retention policy before uploading.
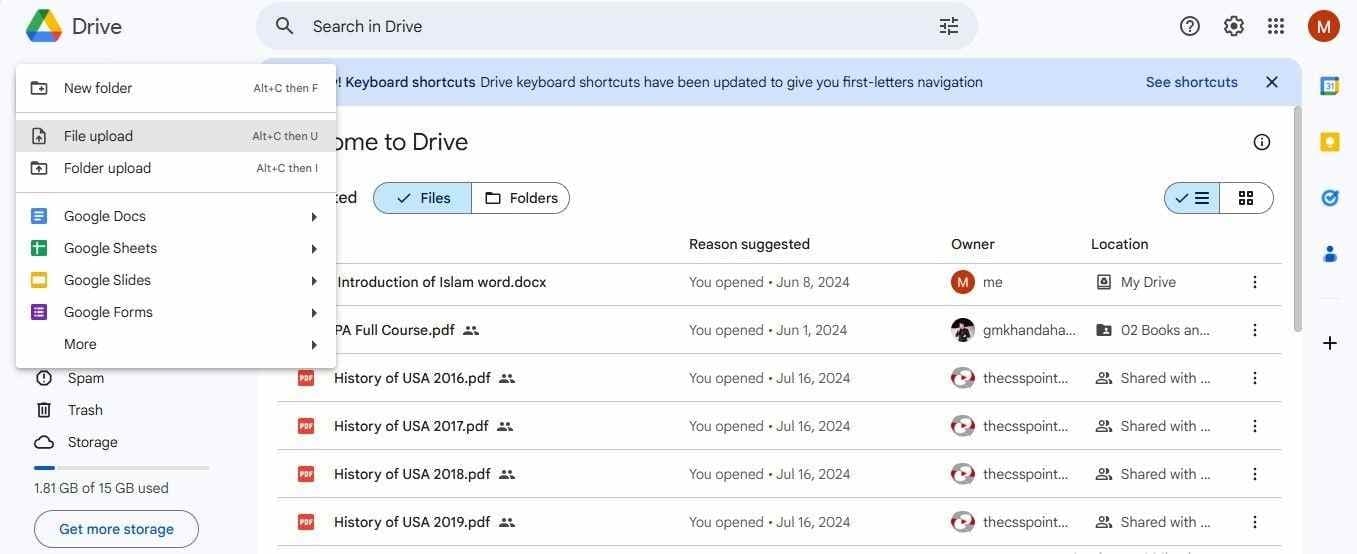
Google Drive stores only what finishes uploading. It does not preserve a bootable card's partition table, and a sync client can propagate deletions or changes. Treat cloud storage as an offsite copy, not as proof that the source card or local backup is complete.
Part 6. Create A Full SD Card Image
Create a disk image when the SD card must remain bootable or contains hidden and multiple partitions. This is common with Raspberry Pi systems, retro handhelds, router or appliance cards, and some industrial devices. A disk image is a file you can archive; a clone writes directly to another device and carries a greater wrong-destination risk.
Method 4. Create An SD Card Image With USBImager
USBImager is an open-source, MIT-licensed utility for Windows, macOS, and Linux. Its official standard interface can read a physical device into a raw or compressed backup image. The simplified download is write-only, so obtain a standard-interface build from the official repository when you need the Read function.
- Prepare enough space: for an uncompressed image, keep free space at least equal to the card's full capacity. Compression may reduce the result, but the final size depends on the data.
- Connect only necessary removable drives: this makes the correct source easier to identify. Never guess based only on a drive letter or device number.
- Open the standard USBImager build: grant only the disk-access permission required by the operating system.
- Select the source device: click the third row and choose the SD card by matching its device name and capacity.
- Choose compression if needed: the official tool can create a raw image or a Zstandard-compressed backup. Keep it uncompressed if maximum tool compatibility matters.
- Click Read: in the standard interface, click the second button labeled Read. By default, USBImager saves a timestamped image on the Desktop; the first row shows the name.
- Preserve and test: move the finished image to a clearly labeled backup folder, calculate a checksum if long-term integrity matters, and perform a test restore to a spare card for a mission-critical bootable system.
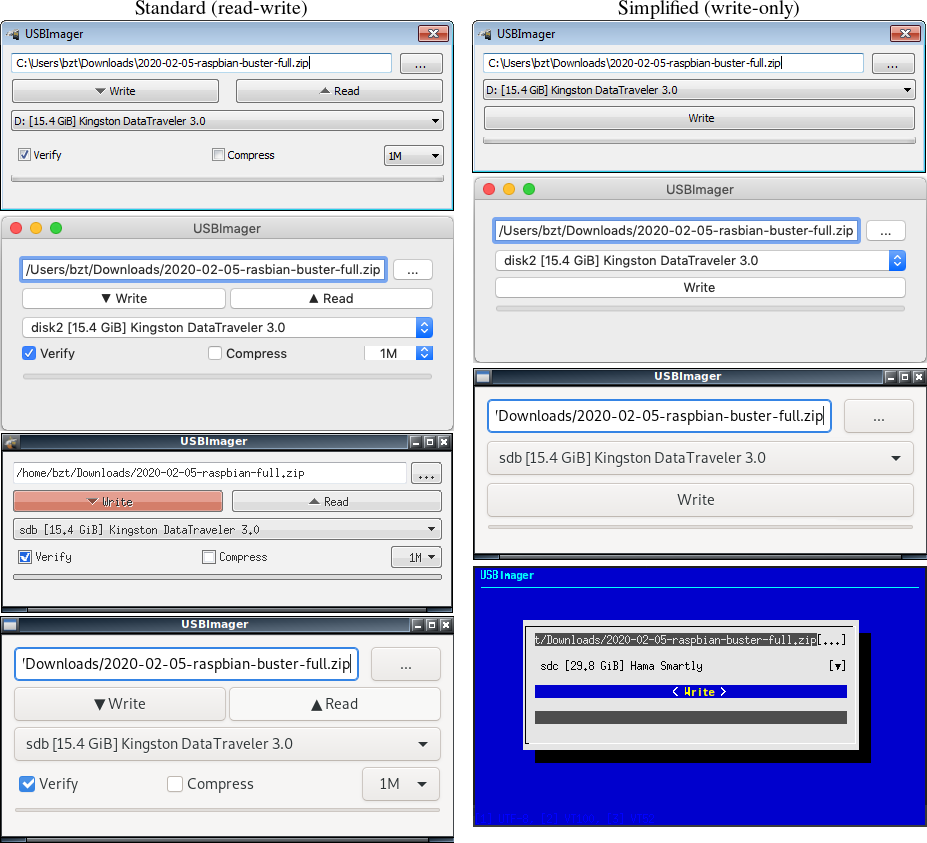
Do not click Write when creating the backup. Write restores an image to the selected device and can overwrite its contents. Also note that the tool's Verify option verifies a write operation; it does not replace checking that a newly read backup image can be restored and used.
Part 7. Verify The SD Card Backup
A copy is not a dependable backup until it has been checked. Verification should happen before the card is formatted, returned to a camera, mailed, or reused.
- Compare the structure: confirm that every expected top-level folder exists in the destination, including DCIM, PRIVATE, MISC, video, audio, sidecar, and device-specific folders when present.
- Compare file counts and used bytes: use Properties on Windows or Get Info on Mac for the source selection and destination. Small metadata differences can occur, but missing files or a large size mismatch require investigation.
- Open files from the destination: test several items from the beginning, middle, and end of the shoot or recording session. Open large videos long enough to seek through multiple points, not just the first frame.
- Check critical files more deeply: for paid work, scientific data, or long-term archives, compare cryptographic hashes with a trusted checksum tool or use verified-copy software.
- Verify the second copy: a cloud folder or external drive is useful only after its transfer is complete and sample files open successfully from that location.
- Eject every removable device: wait for write activity to finish, then use the operating system's eject control.
A checksum recorded for an image file can show whether that stored image changes later. It does not, by itself, prove that every sector was read correctly from a failing source. For an important bootable card, restoring the image to a spare card and boot-testing it is the strongest practical check.
Part 8. Recover Missing Files Before Backing Up
Backup and recovery solve different problems. Backup copies accessible data; recovery searches for files that were deleted, lost after formatting, or made inaccessible by file-system damage. If the card is detected with the expected capacity but files are missing, recover them before reformatting or running repeated repair attempts.
Method 5. Recover Missing SD Card Files With Recoverit
Recoverit Memory Card Recovery is relevant at this decision point—not as a routine backup app. It can scan a detected SD or microSD card for lost photos, videos, audio, documents, and other supported file types, then save selected results to a different healthy drive. Recovery results depend on overwrite, formatting type, card condition, and whether the device remains readable; no software can guarantee every file.
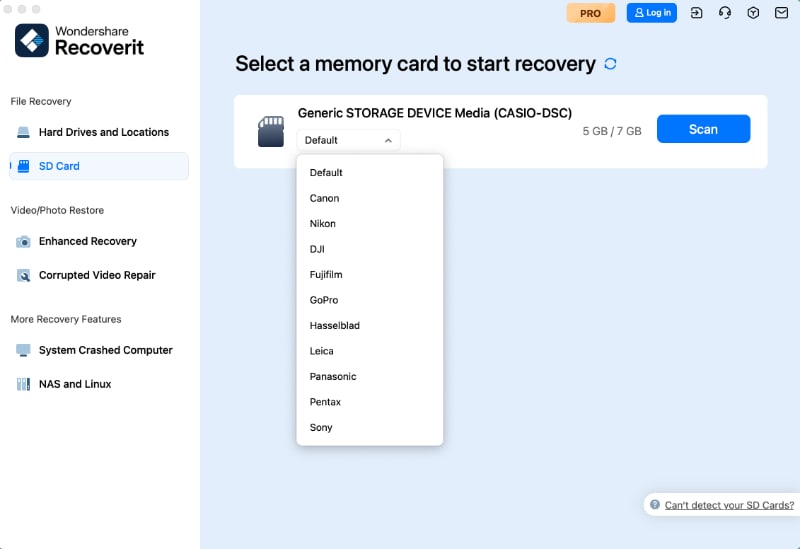
- Select the SD card: connect the card through a stable reader, open Recoverit, choose SD Card Recovery, confirm the correct card, and start the scan.
- Scan and narrow the results: allow the scan to run and use file type, path, date, size, or search filters where available. Preview supported files instead of recovering every result blindly.
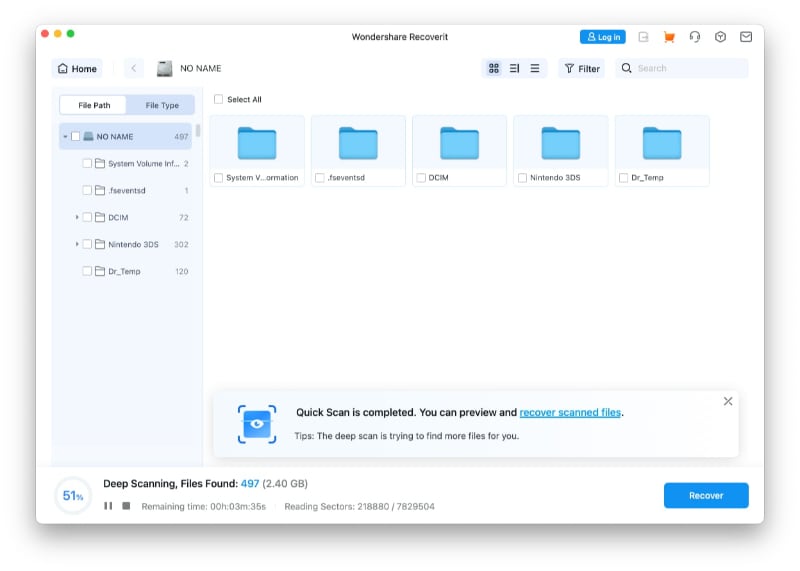
- Recover to another drive: select the files you need, click Recover, and save them to the computer or a different healthy external drive—not back to the source SD card.

- Verify recovered files: open the recovered copies and check important photos and videos before repairing or formatting the original card.
Do not keep scanning a card that disconnects, becomes extremely slow, is cracked, burned, water-damaged, or is not detected by any computer, camera, or reader. Repeated power cycles can worsen some physical failures. For irreplaceable data, stop and consult a professional recovery lab.
For a formatted card, see the dedicated guide to recovering files from a formatted memory card. If only pictures are missing, the focused memory card photo recovery guide explains the photo-specific workflow.

Part 9. Build A Reliable Creator Backup Workflow
For travel, client work, and once-only events, use a 3-2-1-style workflow: keep at least three copies, on two types of storage, with one copy offsite. An SD card in a camera is the working copy, not the archive.
| Stage | Recommended Action | Do Not Do This Yet |
| On location | Label full cards, lock them in a protective case, and copy to two separate drives when the job requires immediate redundancy. | Do not erase a card after only one transfer. |
| At the workstation | Copy the entire card to a dated project folder, verify it, and create a second local or network copy. | Do not import and then assume an editing catalog contains the originals. |
| Offsite | Upload an approved encrypted or cloud copy, or rotate a second drive to another secure location. | Do not rely on a sync folder as the only independent backup. |
| Before card reuse | Confirm two verified copies exist and that representative files open from both. | Do not format merely because a copy dialog disappeared. |
| After approval | Format the card in the device that will use it, if the manufacturer recommends that workflow. | Do not delete individual files in-camera as a substitute for a controlled format and reuse cycle. |
Keep the folder name, card label, camera body, and date consistent across copies. For multi-camera shoots, separate Cam-A/Card-01 from Cam-B/Card-01. Consistent naming prevents two cards with identical camera-generated filenames from overwriting each other.
Part 10. Related SD Card Tasks
Backup should come before formatting, repair, or card replacement. Use the following guides only after valuable files have been copied or recovered.
- How to Clone an SD Card in Windows
- How to Format a microSD Card Safely
- How to Check and Fix SD Card Errors on Mac
- Recoverit Memory Card Recovery
Conclusion
For a normal camera, drone, phone, or recorder card, the best default is simple: copy the entire card to a clearly named folder, verify the files, and keep a second copy elsewhere. Use a full disk image only when boot data or hidden partitions matter. Do not format the source until two verified copies exist. If files are missing or the card is unreadable, switch from backup to recovery before making any repair or formatting change.
FAQ
-
What is the best way to back up an SD card?
For photos, videos, and documents, copy the entire card root to a dated folder on a computer or external drive, verify the files, and create a second offsite or cloud copy. For a bootable card, create a full disk image instead of relying only on file copy. -
How do I back up an SD card before formatting it?
Copy the full card to a different healthy drive, compare the source and destination file counts and sizes, open representative files from the backup, and keep a second verified copy. Format only after those checks pass. If files are missing, recover them before formatting. -
Is copying an SD card the same as cloning it?
No. File copy preserves selected visible folders and files. A clone duplicates the card directly to another device, while a disk image stores the card's block-level contents in a file. Bootable and multi-partition cards generally need an image or clone. -
Can I back up an SD card to Google Drive?
Yes. First copy and verify the card on a computer, then use Google Drive's New > Folder upload option. Keep a local copy too. Google Drive does not preserve the partition structure of a bootable SD card. -
Can I back up an SD card without a computer?
Yes, if you use a phone or tablet with a compatible card reader and enough internal or cloud storage, or a dedicated field backup device. Verify the copied files and keep the original card unchanged until a second copy exists. -
How much storage do I need for an SD card backup?
A file-level copy needs more free space than the card's used data. An uncompressed full-disk image generally needs at least the card's total capacity, even when much of the card is empty. A compressed image may be smaller, depending on the data. -
Is cloud sync the same as a backup?
Not by itself. Sync can copy changes and deletions across devices. Use version history where available and keep an independent local or offline copy that is not automatically changed by the sync process. -
Can I back up a corrupted SD card?
Copy any files that remain readable, but stop if the card disconnects or produces repeated read errors. If files are missing, recover them to another drive before formatting or repair. A card that is physically damaged or undetected by every device may require a professional recovery lab.


