
 TL;DR:
To safely upgrade to macOS 13 Ventura without risking data loss, back up your MacBook using Time Machine for comprehensive local restoration, iCloud for document syncing, or SuperDuper to create a fully bootable system clone.
● Time Machine requires an external USB or Thunderbolt drive for a complete system backup, while iCloud only syncs your Desktop and Documents folders and cannot back up applications or system files.
● Creating a bootable backup requires formatting your external drive to Mac OS Extended via Disk Utility and using third-party software like SuperDuper to clone your hard drive for use on other Mac devices.
● If data loss occurs during the upgrade, Wondershare Recoverit can restore missing files, provided you save the recovered data to a new disk to prevent overwriting and note that file previews are limited to under 15MB.
Ask AI for a summary
 ChatGPT
 Perplexity
 Gemini
 Claude
 Grok
Grok
With the release of the new macOS 13 Ventura, most people would like to jump on the new operating system. However, there are many risks involved with upgrading your operating system. It could be a bad connection, corrupted file download, bugs, etc. However, when things go wrong, it could lead to data loss.
That’s why you should back up your crucial files before upgrading. In this article, we’ll teach you how to backup MacBooks. You will learn how to back up using Time Machine and make a backup on Mac to iCloud. On that note, let’s take a look.
Part 1. Why Is It Necessary to Backup Mac Before Upgrade?
Many risks come with not backing up your files before an upgrade. For example, most beta software is buggy and could lead to many issues like bricking, overheating, and even data loss. Therefore, they shouldn’t start upgrading to the new OS without acknowledging the risk and putting measures in place. Hence, you should back up your Mac before beginning the process.
If anything goes wrong during the upgrade, your backup will allow you to restore your data. In such a case, you can even downgrade to the MacOS 12 easily. So now that you know why it is necessary to back up your Mac, let’s get started.
Part 2. How to Back Up Your Mac with Time Machine?
One of the ways you can back up your data before an upgrade is with a time machine. Time machine is the in-built backup feature found in macOS and allows you automatically backup your photos, documents, apps, music, and other personal data. Of course, your device will need ample storage space before you start backing up with a time machine. In some cases, creating a partition of the primary hard drive works.
You can use an external device like a USB when there’s no space on your device. You can choose to attach this device only when performing a backup. Alternatively, you can leave it connected to the computer at all times. This is an excellent choice if you plan to run automatic backups. If you’re wondering how to time machine backup, keep reading.
- To start, you have to connect an external storage device to your Macbook. This could either be a thunderbolt device or a USB.
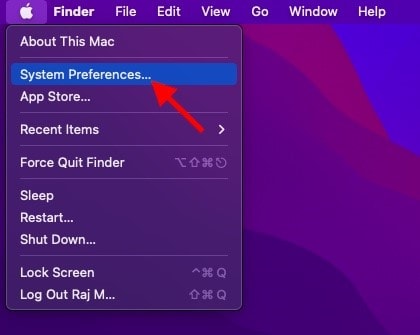
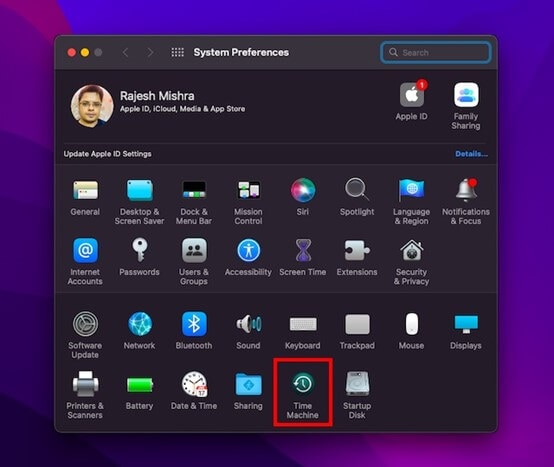
- Afterward, go to 'system preferences' and select 'time machine' to launch the software. To do this, you must click the ‘Apple menu’ at the top corner of the screen. Then, from the dropdown menu, select ‘system preferences’ and choose ‘Time Machine.’
- When the Time Machine window launches, select ‘backup disk’ to proceed.
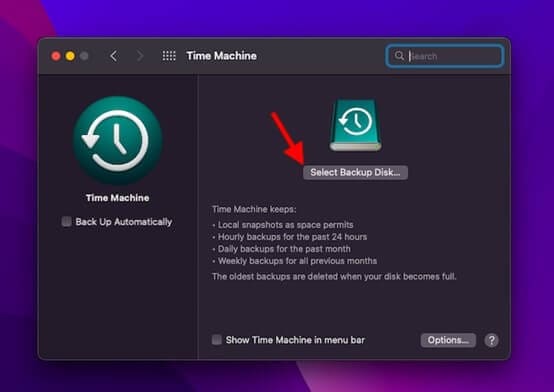
- Now, choose the name of the disk you would like to backup and select ‘use disk.’
That’s all you have to do; the Time Machine will start backing up the device for you.
2.1 How to Restore Mac with a Time Machine Backup?
After learning how to back up Mac using Time Machine, you might be curious about the process of restoring your files, especially after the upgrade. Below are the steps to restore Mac with a time machine backup. First, we’ll explore how you can restore the files backed up using a time machine. The files you’re restoring are only files included in one of your time machine backups. If you’re looking to restore a file unavailable in any of your backups, this method won’t work for you. On that note, let’s check out how to restore Mac with a time machine backup.
- Connect the external device containing the time machine backup to your Mac to get started. The recovery isn’t possible without this device.
- Next, open a Finder window displaying the storage location where the lost data was once stored. An example is if you last saved the missing files in the Documents folder, then open Finder windows displaying that folder.
- Now open Time Machine by selecting the icon on the menu bar; you can choose the software from the launchpad.
- Now, use Time Machine’s timeline to locate the device and the item you want to recover. You can either choose to recover some files or the entire disk.

- Select the files you want to recover and then hit the ‘recover’ button. It will restore the selected files to their original locations.
Part 3. How to Back Up Your Mac with iCloud?
Another option you have when learning how to back up Macbook is to back up to your iCloud. Then, if you still have enough iCloud storage, you can store all your files in the iCloud drive. This ensures a higher safety level for your files in case of data loss and allows users to access their files on every device. Below are the steps if you’re wondering how to make a backup on Mac.
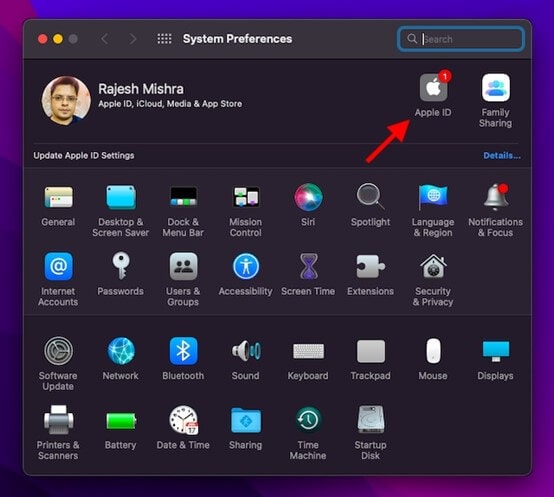
- On the MacBook, click the Apple menu at the top corner and click ‘system preferences.’
- Now, click ‘Apple ID’ and choose iCloud from the left sidebar.
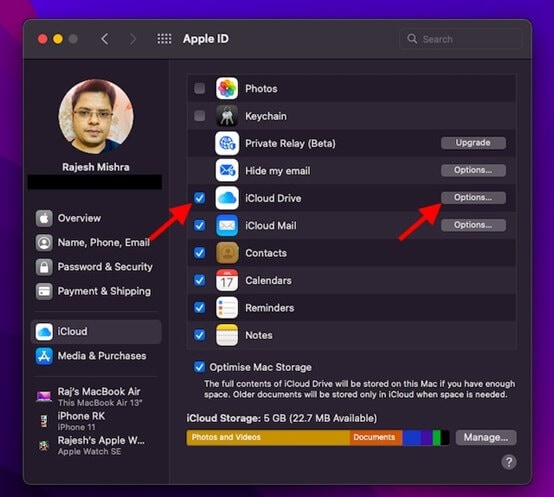
- Make sure the iCloud Drive option is turned on. Once you confirm it is turned on, select the ‘options’ button next to the iCloud Drive option.
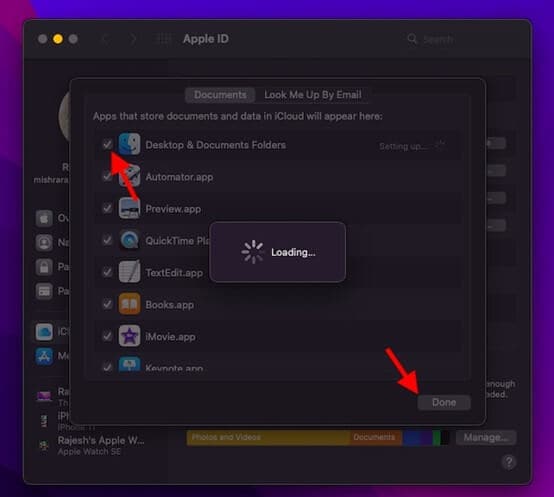
- Now, hit the box next to the desktop & documents folder and click ‘done’ to complete the process.
That’s it; it will back up your files to iCloud, and you can access them whenever possible.
Part 4. How to Make a Bootable Backup for Your Mac?
Although backups usually have the same purpose, not all backups are created equally. For example, while there are simple processes like the Time Machine backup and iCloud, there’s also a type of backup called bootable backup. This valuable backup gives you access to your information and allows you to use other Macs like your own. That is because this type of backup becomes a bootable disk like your hard drive. This way, you can utilize it with other Mac devices. Below are the steps to make a bootable backup for your Mac.
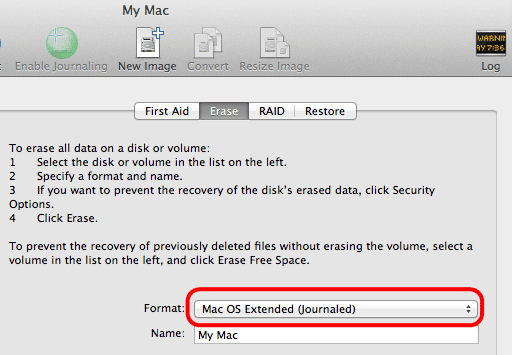
- First, you have to get your hard drive ready. Doing this means putting your hard drive in the Mac OS Extended format. To do this, launch the disk utility and choose your hard drive to continue.
- Next, click the ‘erase’ tab and choose the format mentioned above from the list above.
- Next, download software that allows you to carry out the bootable backup process. An example is SuperDuper.
- Now, connect the external hard drive to your Mac and open SuperDuper! When the software opens up, choose the name of your hard drive on the ‘copy’ field and then select the external hard drive on the ‘to’ field.
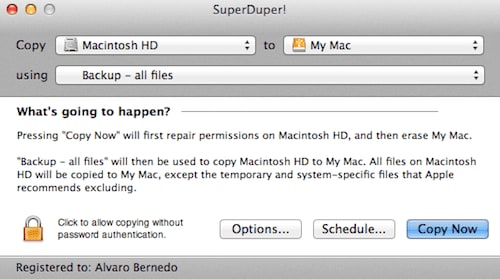
- Select the 'backup all files' option in the 'using' field.
- Now, click ‘options’ and choose to erase; pick your external hard drive, click ‘copy files from’ and select your hard drive name.
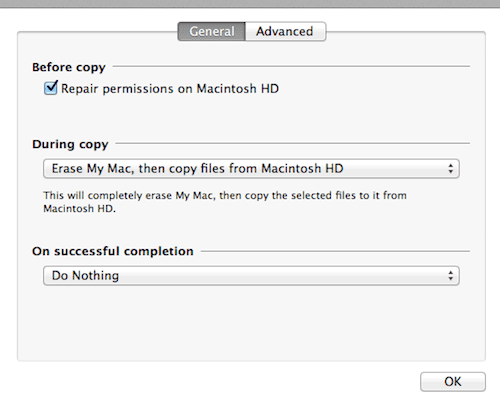
- This will erase the external hard drive and copy the hard drive. Once it is completed, your PC will notify you.
Read More:
Part 5. What If Data Got Lost during Backup or Upgrade?
Sometimes you lose some files during backup or upgrade; it’s quite normal for this to happen. However, that doesn't always mean the file is gone completely. One way to do this is with recovery software like Wondershare Recoverit. This recovery software allows you to easily restore deleted, overwritten or lost files on your Mac.
It supports major file types, and there’s no limit on the file size you can recover. The data recovery process works for damaged hard drives, deleted data, unrecognized hard drives, and formatted hard drives. The process of using Recoverit is simple; below is a breakdown of the steps.
Step 1: Download Wondershare Recoverit on Your Mac
First, download Wondershare Recoverit on your Mac from the official website. Once you download it, install and launch the software on your device.
For Windows XP/Vista/7/8/10/11
For macOS X 10.10 or later
Step 2: Select the Hard Drive Where the Data was Lost
When the software launches, it will present you with a list of available drives on your Mac. Choose the hard drive from which the file got missing and you would like to recover data.

Step 3: Scan Hard Drive
Once you select the hard drive, it will show you a list of the files being scanned and a progress bar of how many folders it scanned and the estimated duration of the scan. Wait until the scan is over, and it will show you the recovered files.
However, the software might recover your file before the scan is over. If this happens, you can stop the scan. If the scan is complete and doesn’t show you the file, you can select ‘Advanced Recovery’, and it will start an in-depth search to recover large and complex files.

Step 4: Preview Recovered Files
You can preview the file after Recoverit finds the file. You can filter the scan results by various categories like file size, file type, date modified, and many more. Click the preview button next to the file you want to recover. You’re only allowed to preview files that are less than 15MB.

Step 5: Save Recovered File
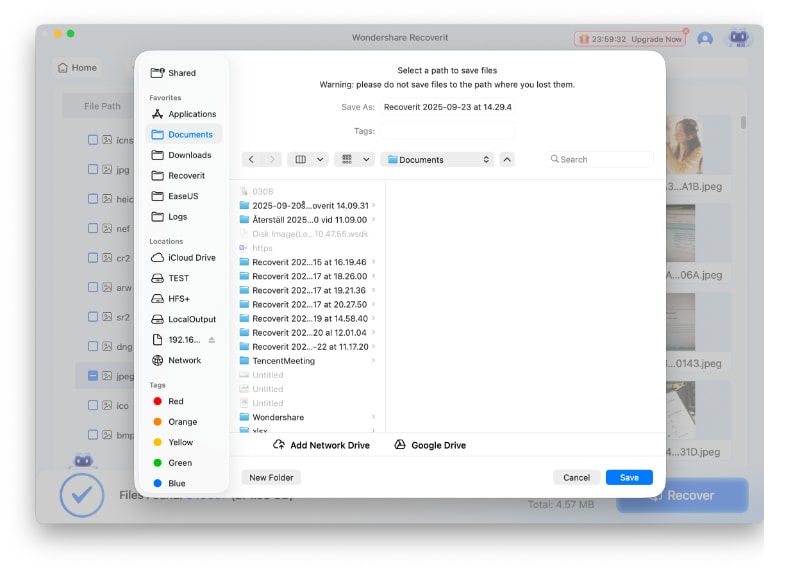
Now that you’ve previewed and are sure that is the file you want, click the ‘recover’ button and choose a new location to save it to. By saving to the same hard drive, there’s a risk of overwriting the data. Therefore, you should choose a new disk to save your file.
Conclusion
If you want to learn how to back up Macbook, there are several ways to do it, as shown in this article. Without backing up your file, you’re at the risk of data loss and many more issues that might occur when trying to upgrade to MacOS 13 Ventura. However, if you follow the above processes, you can easily upgrade without fear of data loss. Additionally, you’ll enjoy the features accompanying the MacOS 13 Ventura without giving up all the files and data before the upgrade.
People Also Ask
- Why did my Mac computer backup fail with Time Machine?
A Time Machine backup can fail for several reasons. Often, it's due to network interruptions if you're backing up to a network drive, or issues with the external drive itself. To fix this, first check your drive's connection and ensure it has enough space for a full Mac computer backup.
- Is iCloud a good option for a full MacBook backup?
iCloud is excellent for syncing photos, documents, and settings across Apple devices, but it is not a complete computer backup solution. It doesn't back up your applications or system files. For a full backup, it's best to use Time Machine or another dedicated Mac computer backup service.
- How often should I perform a computer backup on my Mac?
For optimal data protection, a regular computer backup schedule is crucial. Time Machine automatically performs hourly backups for the past 24 hours, daily for the past month, and weekly for all previous months. If you prefer manual control, backing up your Mac at least once a week is highly recommended.
- What's the easiest way how to back up a MacBook without an external drive?
If you don't have an external drive, the most straightforward method for a partial computer backup is using iCloud Drive. It automatically syncs your Desktop and Documents folders. For a more comprehensive backup without a physical drive, consider using a cloud-based backup service.


