
Jun 03, 2026 • Filed to: Take Data Backup • Proven solutions
We all know how important it is to take a timely backup of our data files. Even though there are plenty of new ways to backup content, nothing can compare with the method of taking a backup of the hard disk via command prompt. It can be implemented even after a system crash, as it takes a backup of files via command prompt and not the Windows native interface.
While it is recommended to backup content on the cloud, users can always backup hard drives from the command prompt directly. It is a secure way to backup your content, even when your system doesn't seem to function properly. It might seem a little tedious, but after following some easy steps, it can be done without much trouble. To help our readers do the same, we have come up with this comprehensive guide on how to backup hard drive from command prompt.
| Command Tool | Best Use Case | Complexity Level |
| Xcopy | Standard file/folder duplication to external drives. | Low (Basic) |
| Robocopy | Large scale, resilient mirrors for massive data. | Medium (Advanced) |
| Wbadmin | Full System Image / Bare Metal server recovery. | High (Expert) |
| Notepad.exe | Emergency GUI-based file copying (No typing needed). | Very Low (Beginner) |
Overview of Windows Wbadmin Backup Command Line
Wbadmin is the command-line utility that is majorly used to backup folders, files, system states, etc. on popular Windows versions (like Vista, 2008, 7, 8, 2012, and more). Besides taking a backup of your content, you can also use it to restore your backup afterward. It is a disk-based backup utility tool that is used to create a "bare metal" backup. This means the backup can be used to restore the operating system to the same or any other hardware.

The backup files that are created by the Wbadmin utility are known as virtual hard disks, with the extension of.VHD. Though, it can also accompany some XML files as well. After opening the command prompt, you can simply provide the "Wbadmin /?" command. It will give you the following options:
- Start backup – to run a one-time backup
- Stop job – to stop running backup/restore operation
- Get versions – to list detail regarding the backup that is associated with the given location
- Get items – to list various items that are included in the backup
- Get status – to report the present status of the operation
Now when you are familiar with Wbadmin command-line utility, let's proceed and learn how to back up files from command prompt in two different ways.

2026 Tech Tip: Identifying Your Drive Letters in CMD
Before starting any backup, remember that drive letters in the Recovery Environment (CMD) often change. Your "C:" drive in Windows might appear as "D:" or "E:" in the command prompt.
The Fix: Always run the diskpart then list volume command first. This allows you to verify exactly which letter is assigned to your External USB Drive and your Internal System Drive. Using the wrong letter in an Xcopy or Robocopy command will result in a "File not found" error or, worse, overwriting the wrong disk.
Method 1. How to Backup Hard Drive from Command Prompt And Notepad?
Using Notepad as a file explorer is the safest method for beginners because it eliminates the risk of typing a destructive command. It is essentially using a hidden graphical interface during a system emergency.
In the first technique, we will boot the computer in command prompt to take its backup. As you know, the method can be used to backup content, even when the system is not functioning in the ideal state. Since we would be manually taking the backup, it will let us save selected content to a respective location. To back up files from command prompt, follow these steps:
- Start by turning on your computer and press the F8 button to enter the advanced booting options.
- After entering the advanced boot option, select the feature of "Repair your computer". This will set your system into recovery mode.
- In case there is no option for "Repair your computer", you need to take the assistance of a system recovery disc. Burn a system recovery disc and select it while booting your PC to perform the recovery operation.
- While using a system recovery disc, you need to make changes in the BIOS settings. As your system will boot via the system repair disc, it will let you know by displaying a "Windows is loading files" message.
- Subsequently, you need to make selections regarding your language, keyboard type, etc. to initiate the setup.
- When the installation wizard would appear, click on the "Repair your computer" option instead of the "Install now" button.
- This will initiate the Windows recovery options as your system will list the operating systems.

- Simply make your selection and click on the "Next" button to get access to various recovery tools.
- From the listed recovery options, select Command Prompt.

- After launching the Command Prompt, type "Notepad.exe" to open Notepad's interface.
- Once the Notepad's interface is opened, go to File > Save as an option to launch a new Window.
- Locate the files you wish to backup and plug in a USB drive (or external storage)
- Select the file you wish to save, right-click it, and send it to your external storage device.

Method 2. How to Backup Hard Disk Using Robocopy Command Line?
Robocopy-Robust File Copy, offers more than 80 command-line parameters and switches for users to make a copy of the files for backup. Follow the instruction below to backup hard disk from Command Prompt using Robocopy Command Line:
Step 1. Type cmd in the search box on your Windows screen, or press Windows + R and type cmd in the search bar to start Command Prompt.
Step 2. Type the command Robocopy in this form: robocopy + space + source path + destination path(take the following example for reference to create your own).
robocopy "D:\test" "E:\test 1"
That refers to copying files from D:\test to E:\test 1.

Step 3. Press "Enter" to start the copy process. Then, all your target files and folders will be copied and backed up to the desired destination, which can be any drive including an external disk.

Method 3. How to Backup Hard Disk from Command Prompt And Xcopy?
Drive letters often shift in the Recovery Environment. Always use the diskpart followed by list volume command first to confirm if your USB drive is currently assigned to E:, F:, or another letter to prevent backing up to the wrong destination.
| Core Feature | Xcopy Command | Robocopy (Strongly Advised) |
| Resumes on Fail | No (Must restart the entire process) | Yes (Restarts only missing fragments) |
| Multi-threading | Not Supported | Supported (Using /MT switch for speed) |
| Empty Folders | Requires /E switch | Included with /E or /S switches |
| Hidden Files | Requires /H switch | Included by default in most modes |
While the above-stated method can let you directly send the files to USB storage, this is a more time-consuming and extensive process. In this technique, we will back up hard drive from command prompt one step at a time via the xcopy command. Follow the above-mentioned steps to launch a command prompt from the system recovery option. Make sure that your external drive is connected to the system.
- Now, instead of opening Notepad, give the "diskpart" command.
- Subsequently, write the "list volumes" command to view if your external drive has been recognized by your system or not.
- Write "exit" to leave this window after making sure that you have noted the number (or letter) allocated to your external drive.
- Now, go to the location of the file that you wish to backup from the command prompt. You can also type the "dir" command to view the directory list.
- Use the "cd <folder name >" command to reach the location of the files you want to save.
- Now, give the command "xcopy <Directory-Path-To-Copy Drive-Letter-To-Copy-Into>/E". For example "xcopy D:\Data E\ /E" will copy the data from D drive to E drive. The suffix "/E" denotes that all folders (including the empty ones) would be copied.
Repeat the same for all the files you wish to backup. Since it is a manual process, it might take a while, but it is a foolproof way to yield the desired result. However, there is another trouble-free and surefire way to help you win backup files or hard drives hands down, that is to backup hard drives with Wondershare UBackit.
Method 4. How to Backup Hard Drive Data with Wondershare UBackit?
Backing up the hard disk data is quite easy with the help of Wondershare UBackit. You can select to back up all the files in your C/D/E/F Drive. Automate the backup process and you needn't worry about data loss and data corruption anymore.
Then how can you backup hard drive data with Wondershare UBackit? Take the following steps.
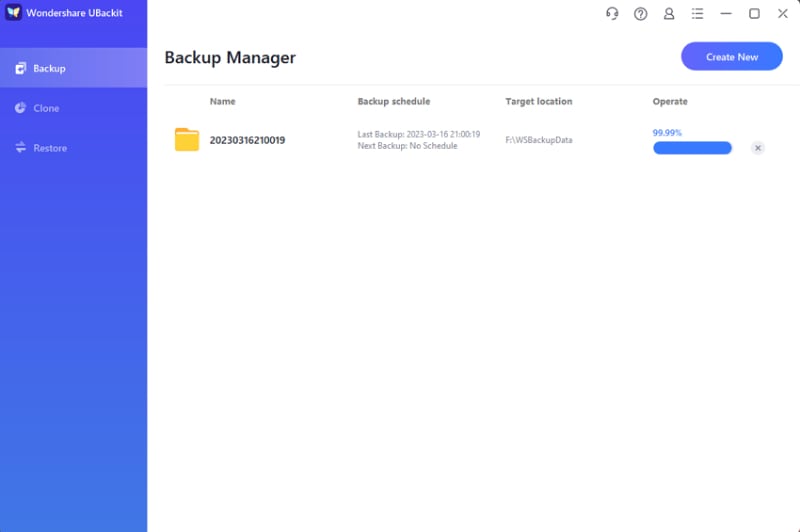
Step 1 Launch Wondershare UBackit
Download UBackit data backup tool and launch it on your computer. Then click Create New, and File Backup to continue.

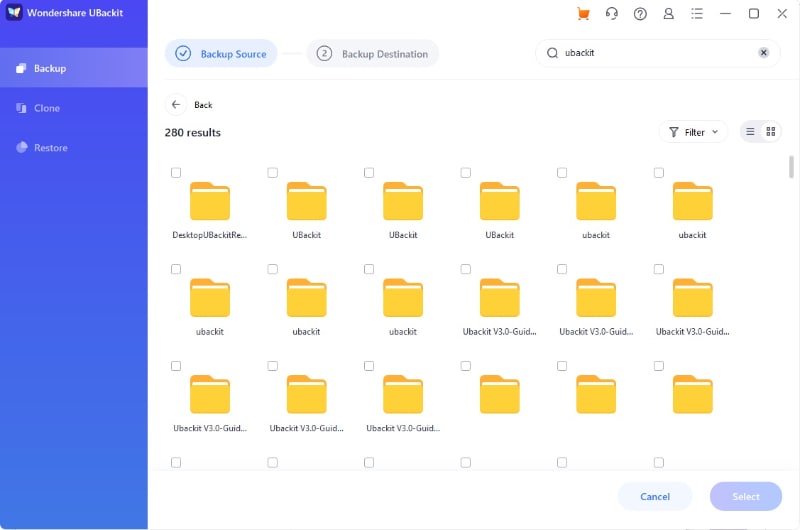
Step 2 Select Files/Folders from Hard Drive
Select the files you want to backup. If you want to back up the whole hard drive or hard disk, you can choose all the files in your C/D/E/F hard drive. And click Select to continue.
Step 3 Choose Backup Destination
Next, select the Backup Destination where you want to save the backup. And click Select to start the backup process.

Step 4 Evoke The Backup Process
After that, you need to wait a few seconds or minutes to let the process completes. You will receive a notification from the program if backup completes.
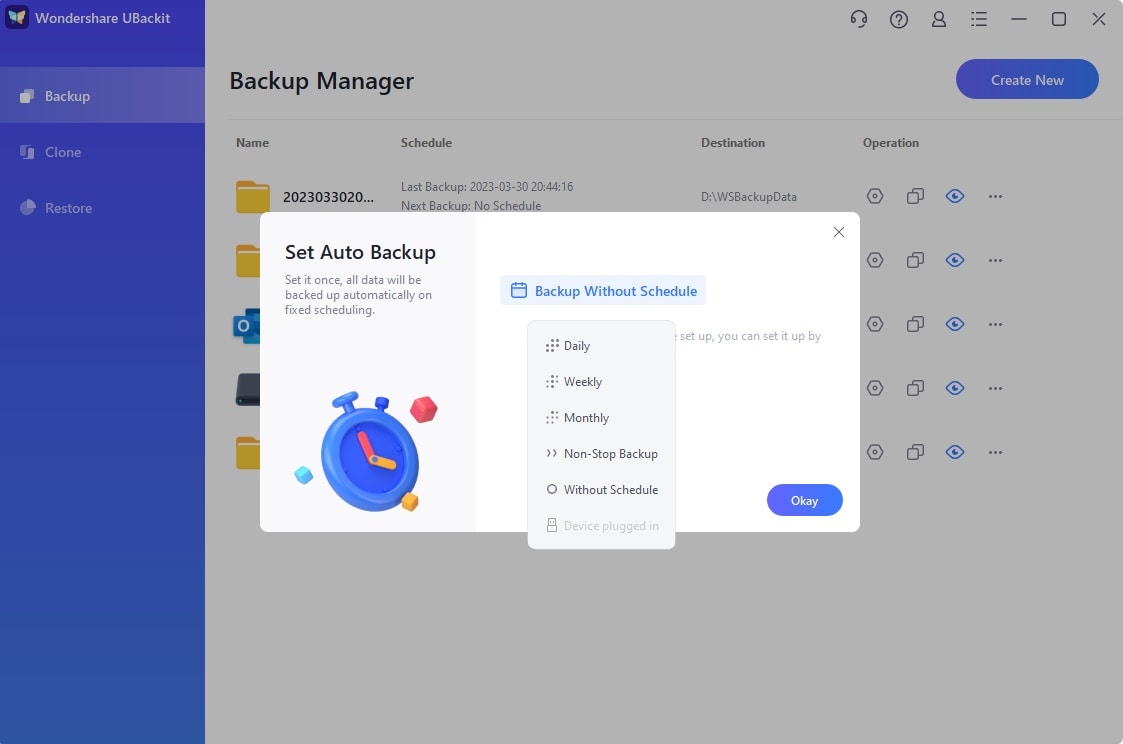
Step 4 Set Automatic Backup
You can see 3 options at the bottom of the backup folder. Press on the "Schedule" option, you can start to backup daily, weekly, monthly or non-stop.
Conclusion
If backing up a hard drive with Command Prompt, you have to do it all by yourself every time although it is a safer way compared to Cloud backup. However, we recommend another secure and convenient way - backup files with data backup software. We are sure that UBackit data backup software will come in handy to you on numerous occasions. It will let you backup your files and save your important data in an unforeseen situation.
Command Line Backup FAQ [2026]
-
Can I use Command Prompt to backup a BitLocker encrypted drive?
Yes, but you must unlock the drive first. In the command prompt, usemanage-bde -unlock C: -RecoveryPassword YOUR-KEY. Without unlocking, commands like Xcopy or Robocopy will see the drive as "Access Denied" or "Invalid Media Type." -
What is the fastest command for a 1TB hard drive backup?
Robocopy is generally the fastest because it supports multi-threaded copying. By adding the/MT:32switch to your command, you allow Windows to copy up to 32 files simultaneously, which significantly reduces the time required for SSD-to-SSD backups in 2026.
Data Backup Services
- Computer Backup
- Windows 10 Backup
- Windows 8 Backup
- Best File Sync Software
- Driver Backup
- SD Card Backup
- Best Incremental Backup
- Onedrive Automatic Backup
- Hard Drive Backup
- Mac Backup
- Cloud Backup


Amy Dennis
staff Editor