How to fix the NTLDR is Missing Error while using Windows Operating System?
Resolving the NTLDR is missing error primarily involves disconnecting removable media, setting the BIOS boot priority to the internal hard drive, or utilizing a Windows Installation CD to restore corrupted bootloader files.
● For systems running Windows XP or 2000, repairing the boot sequence requires booting from the installation CD to access the Recovery Console and execute specific commands like bootcfg /rebuild or to manually copy the NTLDR and NTDETECT.Com files.
● Windows Vista, 7, 8, and 10 utilize BOOTMGR rather than NTLDR; encountering this specific error on these newer operating systems typically necessitates a completely clean Windows installation.
● If system repair commands fail, retrieving trapped data from the unbootable drive requires using a separate working computer to flash a bootable USB recovery drive via Wondershare Recoverit prior to reinstalling the OS.
Ask AI for a summary
The most frustrating experience that one can have as a PC user is when it doesn't start up due to some error. Occasionally, users could be faced with the 'NTLDR is missing' error when they power their desktops running the Windows Operating System. So, before we take up the steps to fix the 'NTLDR is missing' error, it is important we understand the basics surrounding this issue.

Part 1 What are NTLDR files?
Also used an abbreviation of the NT loader, these files happen to be the boot loader for all the releases of the Windows NT Operating System. This is extended up till Windows XP and Windows Server 2003. While the primary hard drive is used to run it, portable storage devices that include a CD-ROM, Flash Drives, Floppy Disk, are also used in order to run it. Alongside, NTLDR offers the capacity to load non-NT-based OS if the appropriate boot sector in a file is present.
This is not all, as NTLDR, at least, requires the following files to be on the system volume for a smooth function.
1) NTLDR, which happens to be the main boot loader file itself.
2) NTDETECT.Com, as it is essential for booting an NT-based Operating System. It can detect the required hardware information that can help in a successful boot operation.
Alongside, the boot.ini file is also required as this contains the boot configuration.
The NTLDR file is launched by the volume boot record of the system partition and it is written to the disk through the functions of Windows FORMAT or SYS command.
Part 2 What causes the 'NTLDR is missing' error in my Computer?
When the computer tries to boot from a hard drive or flash drive that is not rightly configured to be booted from which results in the NTLDR missing error. In addition to this, there are other reasons why this error is caused. Like:
- the bootable volume has its active part set inaccurately
- the wrong boot sector code installed
- or, too many files in the root folder.
The NTLDR file can be found on the first boot drive, which is in the root directory of the active partition. Although, if the NTLDR file is not found or is corrupt, it results in hindrance to the loading process and that leads to the NTLDR missing error to appear on the screen.
Now, if you're wondering how to fix this NTLDR missing error, worry no more. Here are specific methods one can follow to fix the NTLDR missing error. Let's look at them right away!
Part 3 How to fix the 'NTLDR is missing error' by updating your BIOS?
Just like how every function happening on the computer has a reason and method, the NTLDR missing error also has a list of reasons for why and how it occurs. But, here is a list of methods on how to fix this error as well. Almost all the methods are known to be very easy to carry out and are very time-effective.
Method 1: Restart Computer
STEP 1: As the NTLDR missing error pops up, just simply restart your computer.
STEP 2: Press any key on your keyboard to restart. Or, hold the "Power" button until the system shuts down.

Alternatively: Press "Ctrl+Alt+Del' to restart.
Wait for a few minutes to cross-check if the error happens again.
Method 2: Unplug all removable media
If NTLDR missing error is not fixed, then make sure to unplug each removable media connected to the PC. For instance, there should be no floppy disk, CD/DVD, memory card, USB devices or any other removable media installed.
Method 3: Change BIOS boot order
The next solution would be to verify the BIOS have proper boot settings. One should make sure that the BIOS boot isn't loading from any of the external devices instead it should be from the internal drive.
STEP 1: Firstly, shut the PC down and turn it on again.
STEP 2: The few keys that would help in opening the BIOS menu depends on the brand and the model. Although, it would be any of these Esc, Del, F2, F8, F10 or F12
STEP 3: With the help of the arrow keys navigate and get into the "Boot" menu. Now, set the boot drive and make sure the hard drive is on top of the list.

Method 4: Restore NTLDR and Ntdetect.com File
Simply, restore the NTLDR and Ntdetect.com files with the help Windows XP Installation Disc.
STEP 1: Make sure you have the Installation CD of Windows XP. Insert it in the PC.
STEP 2: Shut down the PC and start it up again. Now, to carry out the booting from the CD, press any key.
STEP 3: Wait while the Windows XP begins the setup process. Do not press any function key.
STEP 4: Once you see the Windows Menu, Press "R" to access the Recovery console.
STEP 5: Once this step is done, press "1" to log into Windows by using the administrator password.
STEP 6: Once the command prompt is open, use the commands mentioned below to copy the NTLDR and Ntdetect.com files to the hard disk from the Windows XP Installation Disk.
- copy d:\i386\nt c:\
- copy d:\i386\ntdetect.com c:\
Note: Here, install CD's drive letter is d:\ and the Windows XP partition's drive letter is c:\
STEP 8: The copying might take a while, once it is done safely remove the disc. Make sure your console output is carried out successfully and the mentioned screen appears on your screen.

STEP 9: After the process is carried out, shut down the PC and start it up again.
Method 5: Rebuild boot.ini file
STEP 1: Take the Installation CD of Windows XP and put it in a CD drive.
STEP 2: One will have to boot from the CD to proceed, so first, shut the PC down and restart it. Now, booting from the CD isn't difficult, just press any key to begin.
STEP 3: Once you can see the Windows Menu, Press "R" to access the Recovery console.
STEP 4: To log-into Windows and proceed, press "1" then enter the Administrator's password.
STEP 5: When the command prompt appears, the mentioned command will have to be entered:
STEP 7: A prompt will appear to seek permission to add Windows installation in the boot list. Press "Y" (YES).
STEP 8: You will have to set "Windows XP" as a Load Identifier to proceed. Then, set the "/fastdetect" as OS Load Options to continue further.

STEP 9: Reboot your PC and ensure to remove the installation disk.
Method 6: Try WINDOWS STARTUP REPAIR
STEP 1: Start by downloading Windows 10 ISO and flash it to a USB drive to convert it into a bootable one.
STEP 2: Now, set the flash drive as the first boot device priority. The next step would be restarting the machine.
STEP 3: Press the "F8" key on repeat until the logo of Windows appears.
STEP 4: In the Boot menu, under the "Advanced Boot Options", click on "Repair your Computer" option.

STEP 5: If the "NTLDR is missing error" still pops up, then try again. Keep trying until the error is gone.
STEP 6: Then, select your language, input method, and username with a password.
STEP 7: Now, opt for "Startup Repair" on the Windows System Recovery Options.

STEP 8: The startup repair window will now start fixing things up. Lastly, restart your computer after the process is completed.
Method 7: Change the bootsector code
STEP 1: To begin, put the Windows latest version CD into the drive and boot from the CD.
STEP 2: For that, restart the PC. And press any key to boot from the CD.
STEP 3: To proceed, the system needs basic information of language, date-time, preferred keyboard input. Once that is entered, click on "Repair".
STEP 4: Now, select the Installation drive of Windows, i.e C:\, and hit the "Next" button.
STEP 5: A System Recovery Options box will appear, choose "Command Prompt" and put in the given command followed by the "Enter" key.
If the method is carried out successfully and the boot sector is written correctly, this is how the console output would look like:

STEP 6: Once done, shut down your PC, wait for a while, and start your computer again.
Method 8: Delete excess files from the root folder
Many times, the Windows XP or Windows 2000 are run on older versions. And often, the root folder is overloaded with files that have to be deleted. To repair, one will have to install a Windows Installation disc and further discard old files to fix the NTLDR missing error.
STEP 1: Take the Install CD of Windows XP and put it in the CD drive.
STEP 2: Now, shut the PC down and restart it. Then, boot from the CD just by pressing any key.
STEP 3: Once you see the Windows Menu, Press "R" to access the Recovery console.
STEP 4: Press "1" with further entering the Administrator password will help to log into Windows.
STEP 5: To shift the root folder from the default "C:\Windows" folder, enter the given command when the Command Prompt appears.
STEP 6: You will need to see the files in the root folder now. To view the files, enter the given command.
STEP 7: To carry out the deleting function, enter the given command.
To make sure that the root folder is clean and the excess files are erased, the console output should look like this:

Alternatively: You can use the following command to delete all files except the system files.
STEP 8: Reboot your computer and check if the NTLDR missing error is fixed or not.
Method 9: Reinstall Windows
Opt for this solution when none of the solutions listed above has successfully worked. It is safe to say that reinstallation would completely solve the "NTLDR missing error". But with resolving the error, it will also end up deleting the data on the computer.
STEP 1: Grab the Windows installation disk and plug it into the PC.
STEP 2: Reboot your PC and allow it to boot from the disk. Hit any key on "Press any key to boot from CD" screen.
STEP 3: Now, the Windows Installation screen will appear. Follow the onscreen prompts to reinstall the Windows.
As we studied above, fixing the 'NTLDR is missing' error isn't exactly rocket science. While the issue may occur with users that are striving hard to get the work done on primitive PCs running Windows 2000 or XP, it is always helpful to have this knowledge handy. However, it is important to note that Windows 10, 8, 7, and Vista use BOOTMGR, and if you are faced with the 'NTLDR is missing' error in one of these Operating Systems, we recommend that you start the clean install process from the beginning.
Part 4 How to Recover Lost Data When the Above Methods Failed to Fix the Issue?
You can fix NTLDR missing error with the above methods, however, if the solutions failed to fix the issue, you can also recover the lost data first and then seek for help from the IT specialist. To recover lost files from the unbootable computer, you can have a try the following tool -Wondershare Recoverit. We have to follow the following steps to recover data:
- First of all, we have to download "Recoverit" on a working computer.
- Now first we have to install then open "Recoverit" and click on the data recovery mode. Now as our Windows 10 is not booting up, we should select the "Recover from Crash Computer" mode, now we have to click the "Start" button when the next Window will pop up.

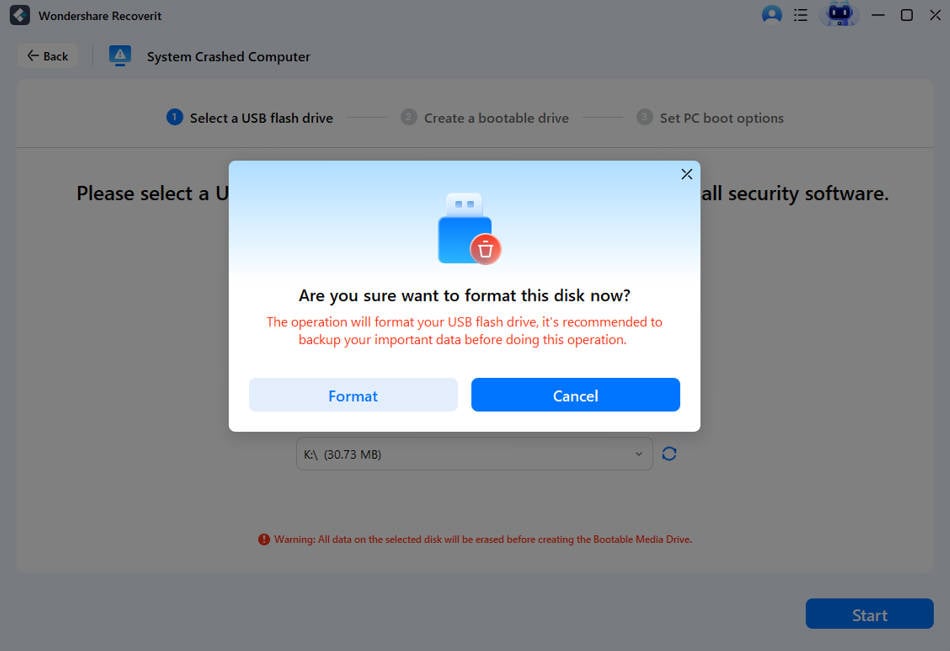
- Now we have to select a mode to create a bootable drive: we can select USB bootable drive. Then click the "Create" button to start.

- The next window will appear and ask us to format the USB drive so we should make sure we have back up our important data. Then click the "Format" button to process.
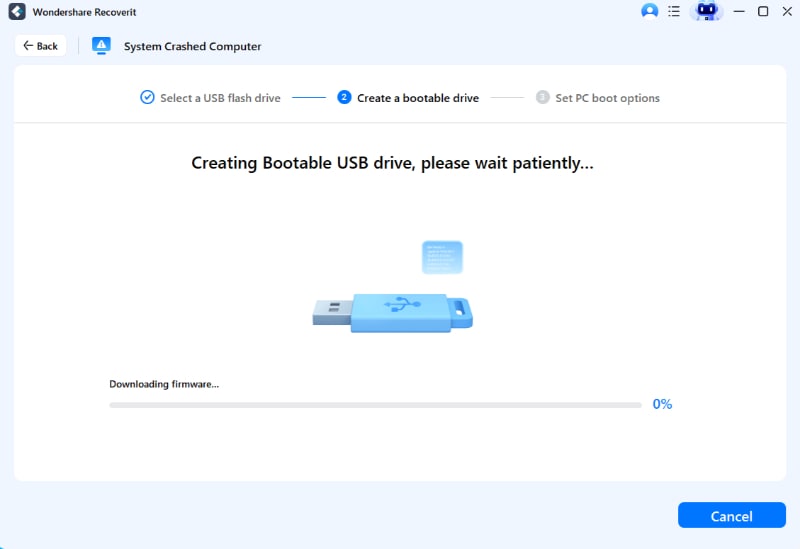
- Now it will start creating a bootable drive, please do not eject the USB drive until the completion of the process. Now we will see the full guide to start data recovery.
- Now we will wait until the bootable drive is created. Now three simple steps about data recovery solution will appear.
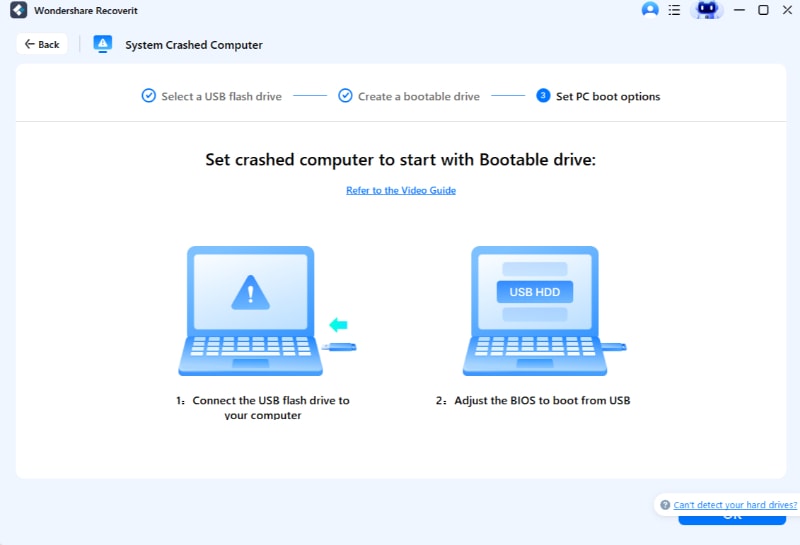
- We have to keep in mind before starting to recover data from unbootable Windows 10, we will need to change our computer boot sequence and set to boot from the bootable media you created just now.
Restart your computer and entry the BIOS with the function key F12. It will be different BIOS entry key between different system. Learn more detail about how to set the computer to boot from a USB drive.

- Once booting from the bootable drive is completed, "Recoverit" software will launch automatically. We can go to copy our data from hard disk or recover lost data from Windows 10.

Computer Data Recovery
- Windows PE
- System problems
- PC Errors


 ChatGPT
 Perplexity
 Gemini
 Claude
 Grok
Grok


David Darlington
staff Editor