Windows System
Recovery
Recover Files from Crashed Windows Computers

What To Do First After a Windows Crash
If Windows will not boot, avoid reinstalling the system or formatting the drive.
Use a bootable recovery workflow first so you can copy important files before any repair or reset changes the original disk.
Microsoft Windows operating system is a family of operating systems designed for personal computers, laptops, tablets, and other devices. It is developed and maintained by Microsoft Corporation and is the most widely used operating system globally.
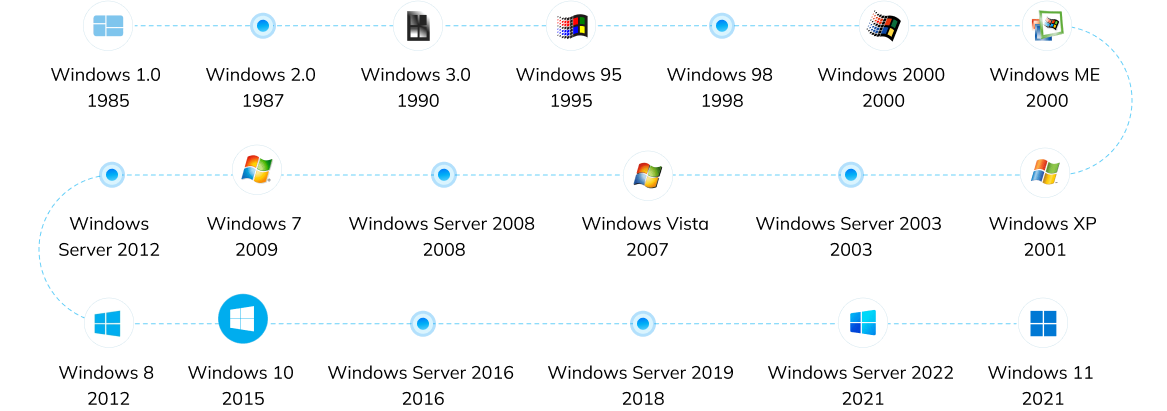
Windows System provides a graphical user interface (GUI), system utilities, and a platform for running various software applications. Some popular versions of Windows System include Windows XP, Windows 7, Windows 8, and Windows 10. And the latest version is Windows 11, released in 2021.
Check the version history of Microsoft Windows
Common Windows Crash Causes and What They Mean for File Recovery
Windows may crash because of driver conflicts, corrupted system files, hardware failure, software conflicts, insufficient resources,
malware, system updates, or operating-system errors. The recovery priority is always the same: copy files first if the drive is still detectable.

Driver Conflicts
If Windows still reaches Safe Mode or a limited desktop, back up important files before updating or rolling back drivers.

Corrupted System Files
When system files are damaged, use a bootable recovery workflow to copy files before trying a repair or reinstall.

Hardware Failures
If the crash points to RAM or drive failure, recover files while the disk is still detectable. If the disk is not detected, software recovery may not be enough.

Software Conflicts
Crashes can occur when two or more software programs conflict with each other. This typically manifests as a particular program not running properly or causing system errors during operation.

Insufficient System Resources
System crashes can happen when system resources (such as memory, CPU usage, etc.) are depleted. This usually occurs when running large programs or multiple programs simultaneously.

Malware or Virus Attacks
Disconnect the machine from unnecessary network activity and rescue important files before cleanup or system reset whenever the drive remains readable.

System Update Issues
If an update triggered the crash, use the bootable recovery workflow to copy files first, then troubleshoot the update problem later.

Operating System Errors
Although less common, there may be errors within the Windows operating system itself that lead to crashes. In such cases, users often have to wait for Microsoft to release a patch to fix the issue.
Common Windows Crash Symptoms and the Safest Recovery Action
Different crash symptoms point to different recovery paths, but the rule is the same:
rescue files first if the system drive can still be accessed.

Blue Screen of Death (BSOD)
If the PC repeatedly shows BSOD, create boot media on another computer and recover files from the crashed system drive before making OS changes.
Check How To Fix Blue Screen of Death
Fixing Blue Screen of Death (BSOD) errors may involve various
troubleshooting steps depending on the cause of the issue. Here's a general guide to help
you resolve BSODs:
1. Note the error code: When a BSOD occurs, an error code and a description
are usually displayed on the screen. Make a note of this information as it can help identify
the cause of the problem.
2. Boot into Safe Mode: If the BSOD persists, try booting your computer in
Safe Mode. Restart your computer and press the F8 key (or the appropriate key for your
system) before the Windows logo appears. Choose "Safe Mode" from the list of options.
3. Update drivers: Outdated or corrupted drivers can often cause BSODs. In
Safe Mode, go to Device Manager, find any devices with yellow warning symbols, right-click
and select "Update driver." You can also visit your hardware manufacturer's website to
download the latest drivers.
4. Run Windows Update: Make sure your operating system is up-to-date by
running Windows Update. This can help fix any known bugs or compatibility issues that may
cause BSODs.
5. Scan for malware: Malware can cause BSODs in some cases. Run a thorough
scan of your computer using a reliable antivirus program to ensure your system is free from
malware.
6. Check hardware: Faulty hardware components, such as RAM, hard drive, or
graphics card, can cause BSODs. Check for any signs of failure or physical damage. You can
also use built-in diagnostic tools, like Windows Memory Diagnostic, to test your
hardware.
7. Uninstall problematic software: If you recently installed new software
before the BSOD started occurring, try uninstalling it to see if the issue is resolved.

Black Screen Of Death
When the computer screen unexpectedly turns black and fails to display content, it may result from display issues, graphics card malfunctions, or various hardware problems. To resolve this, users should check connections, update drivers, and consider seeking professional assistance for a thorough diagnosis and effective solution.
Check How To Fix Black Screen Of Death
1. Check your display connection: Ensure that your display cable is
securely connected to both the computer and the monitor. Try using a different cable or
connecting the display to another computer to rule out cable or monitor issues.
2. Perform a hard reset: If you're using a laptop, remove the battery and
disconnect the AC adapter. Press and hold the power button for about 30 seconds to drain any
residual power. Reconnect the AC adapter, insert the battery, and turn on the laptop.
3. Boot into Safe Mode: Restart your computer and press the F8 key (or the
appropriate key for your system) before the Windows logo appears. Choose "Safe Mode" from
the list of options. If the black screen issue doesn't occur in Safe Mode, it's likely a
software or driver issue.
4. Update display drivers: In Safe Mode, open Device Manager and expand the
"Display adapters" section. Right-click on your graphics card and select "Update driver."
You can also visit your graphics card manufacturer's website to download the latest
drivers.
5. Reinstall display drivers: In Device Manager, right-click on your
graphics card and select "Uninstall device." Restart your computer, and Windows will
automatically reinstall the display driver.
6. Disable integrated graphics (for dedicated graphics card users): In case
you have a dedicated graphics card, disabling the integrated graphics in BIOS/UEFI settings
might resolve the issue. Access the BIOS/UEFI settings during startup (by pressing the
appropriate key, usually F2, F10, or DEL) and locate the option to disable the integrated
graphics.
7. Run Windows in low-resolution mode: Restart your computer and press the
F8 key (or the appropriate key for your system) before the Windows logo appears. Choose
"Enable low-resolution video" from the list of options. If the issue is related to display
resolution, this should allow you to access the desktop and adjust the display settings
accordingly.
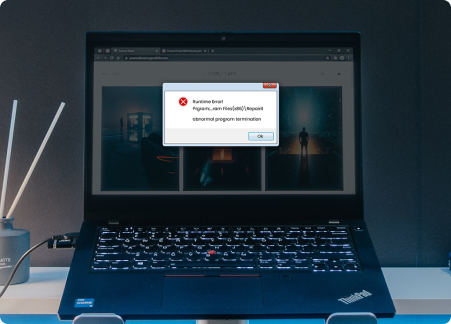
Windows System Freeze
If a computer abruptly turns unresponsive, rendering mouse and keyboard input ineffective, potential causes include insufficient system resources, software conflicts, or hardware failure. To mitigate such issues, users should monitor resource usage, update software, and perform hardware diagnostics to ensure a smooth computing experience.
Check How To Fix Windows System Freeze
1. Close unresponsive programs: Press Ctrl + Alt + Delete to open the Task
Manager, find the unresponsive program, right-click it, and select "End Task."
2. Check for overheating: Ensure your computer is well-ventilated and free
of dust. Overheating can cause system freezes. Clean your computer's air vents and fans, and
consider using a cooling pad for laptops.
3. Update drivers and software: Outdated drivers and software can cause
system freezes. Make sure all your drivers and software are up-to-date.
4. Boot into Safe Mode: Restart your computer and press the F8 key (or the
appropriate key for your system) before the Windows logo appears. Choose "Safe Mode" from
the list of options. If the freeze issue doesn't occur in Safe Mode, it's likely a software
or driver issue.
5. Run a virus scan: System freezes can be caused by malware. Run a
thorough virus scan using a reliable antivirus program.
6. Disable unnecessary startup programs: Press Ctrl + Shift + Esc to open
the Task Manager, go to the "Startup" tab, right-click on unnecessary programs, and select
"Disable." This will prevent them from automatically starting when your computer boots
up.
7. Check disk for errors: Open File Explorer, right-click on your main
drive (usually C:), select "Properties," go to the "Tools" tab, and click on "Check" under
"Error checking." This will scan your hard drive for errors that could cause system
freezes.
8. Free up disk space: Ensure your hard drive has enough free space. Delete
unnecessary files, empty the Recycle Bin, and use the Disk Cleanup utility to remove
temporary files and system files.
9. Check RAM usage: Press Ctrl + Shift + Esc to open the Task Manager and
go to the "Performance" tab. Monitor your RAM usage, and if it's consistently high, you may
need to upgrade your RAM or close memory-intensive programs.

Computer Random Reboots
When a computer restarts unexpectedly without warning, it may result from hardware failure, power issues, or system errors. To address this, users should inspect power connections, perform hardware checks, and update software to maintain system stability and prevent unwanted disruptions.
Check How To Fix Computer Random Reboots
1. Check for overheating: Random reboots can be caused by overheating.
Ensure your computer is well-ventilated and free of dust. Clean your computer's air vents
and fans, and consider using a cooling pad for laptops.
2. Update drivers and software: Outdated drivers and software can cause
random reboots. Make sure all your drivers and software are up-to-date.
3. Run Windows Update: Make sure your operating system is up-to-date by
running Windows Update. This can help fix any known bugs or compatibility issues that may
cause random reboots.
4. Scan for malware: Malware can cause random reboots in some cases. Run a
thorough scan of your computer using a reliable antivirus program to ensure your system is
free from malware.
5. Disable automatic restart: Right-click on "This PC" (or "My Computer")
and select "Properties." Click on "Advanced System Settings," go to the "Advanced" tab, and
click on "Settings" under "Startup and Recovery." Uncheck "Automatically restart" under
"System failure" and click "OK." This will prevent your computer from automatically
restarting when a problem occurs, allowing you to see any error messages.
6. Check the Event Viewer: Press Windows key + X and select "Event Viewer."
Look for any critical errors that might indicate the cause of the random reboots. This can
help you narrow down the issue and find a suitable solution.
7. Check hardware connections: Ensure that all internal and external
hardware components are properly connected. Loose connections can cause random reboots.
8. Test RAM: Faulty RAM can cause random reboots. Run the Windows Memory
Diagnostic tool to check for errors. Press Windows key + R, type "mdsched.exe" and press
Enter. Follow the on-screen instructions to run the test.
9. Check power supply: A failing power supply can cause random reboots. If
you have a desktop, try using a different power supply to see if the problem persists. If
you have a laptop, try using a different power adapter or running on battery power to see if
the issue continues.
10. Update BIOS/UEFI: Updating your computer's BIOS or UEFI firmware can
help resolve compatibility and stability issues that may cause random reboots. Visit your
computer or motherboard manufacturer's website for instructions on updating the BIOS/UEFI.

Windows Computer Not Bootable
A computer that struggles to start normally, potentially freezing on the boot screen or displaying error messages, could be experiencing a damaged operating system, hardware failure, or other complications. To resolve such issues, users can attempt system repairs, hardware diagnostics, and explore various troubleshooting techniques to regain normal functionality.
Check How To Fix Windows Computer Not Bootable
1. Check hardware connections: Ensure that all internal and external
hardware components are properly connected. Loose connections can cause boot issues,
especially for desktop computers.
2. Check power supply: Make sure your computer is receiving sufficient
power from the power supply or adapter. For desktop computers, try using a different power
supply. For laptops, try using a different power adapter or running on battery power.
3. Perform a hard reset: If you're using a laptop, remove the battery and
disconnect the AC adapter. Press and hold the power button for about 30 seconds to drain any
residual power. Reconnect the AC adapter, insert the battery, and turn on the laptop.
4. Use Startup Repair: If your computer is running Windows 7 or later, you
can use the built-in Startup Repair tool to fix boot issues. Restart your computer and press
the F8 key (or the appropriate key for your system) before the Windows logo appears. Choose
"Repair Your Computer" from the list of options and follow the on-screen instructions to run
Startup Repair.
5. Boot into Safe Mode: Restart your computer and press the F8 key (or the
appropriate key for your system) before the Windows logo appears. Choose "Safe Mode" from
the list of options. If your computer boots successfully in Safe Mode, the issue may be
related to a software or driver problem.
6. Check boot order: Access your computer's BIOS/UEFI settings during
startup (by pressing the appropriate key, usually F2, F10, or DEL) and ensure that your
primary hard drive is set as the first boot device.
7. Run System Restore: If your computer can boot into Safe Mode, try
performing a System Restore to revert your system to a previous state before the boot issue
occurred.
8. Repair Master Boot Record (MBR): Boot your computer from a Windows
installation disc or USB drive, and follow these steps:
a. Choose your language and click "Next."
b. Click on "Repair your computer."
c. Select the operating system and click "Next."
d. Click on "Command Prompt."
e. Type "bootrec /fixmbr" and press Enter.
f. Type "bootrec /fixboot" and press Enter.
g. Type "bootrec /scanos" and press Enter.
h. Type "bootrec /rebuildbcd" and press Enter.
i. Close the Command Prompt and restart your computer.
9. Check for hardware issues: Faulty hardware components, such as RAM, hard
drive, or graphics card, can cause boot issues. Check for any signs of failure or physical
damage. You can also use built-in diagnostic tools, like Windows Memory Diagnostic, to test
your hardware.

Computer Performance Degradation
When a computer's performance drastically declines, often accompanied by program crashes or system errors, it may result from insufficient system resources, virus infections, or other underlying issues. Addressing this requires monitoring resource usage, scanning for malware, and implementing optimization measures to restore optimal performance.
Check How To Fix Computer Performance Degradation
1. Restart your computer: Sometimes, a simple restart can help resolve
performance issues.
2. Update Windows and device drivers: Make sure your computer is up to date
with the latest Windows updates and device driver updates.
3. Check for malware: Use Windows Defender or a third-party antivirus
program to scan your computer for malware, which can cause performance issues.
4. Optimize your hard drive: Use the built-in Disk Cleanup tool to remove
unnecessary files and free up space on your hard drive. You can also defragment your hard
drive using the Optimize Drives tool.
5. Disable unnecessary startup programs: Some programs are set to start
automatically when your computer boots up, which can slow down your system. Open Task
Manager, go to the Startup tab, and disable any programs that you don't need to start
automatically.
6. Adjust your power settings: Change your power plan to High performance,
which can help improve your computer's performance. Go to Control Panel > Hardware and Sound
> Power Options to change your power plan.
7. Adjust your visual effects: Windows includes many visual effects that
can slow down your computer. You can adjust these settings by going to Control Panel >
System and Security > System > Advanced system settings > Performance Settings, and
selecting "Adjust for best performance."
8. Uninstall unnecessary software: Remove any programs you no longer use or
need to free up resources. Go to Control Panel > Programs > Programs and Features to
uninstall software.
9. Upgrade your computer's hardware: If your computer is old or has low
system specifications, consider upgrading the hardware, such as adding more RAM, replacing
your hard drive with a solid-state drive (SSD), or upgrading your graphics card.
10. Perform a system reset or clean installation: If all else fails, you
can perform a system reset, which will restore your computer to its factory settings, or a
clean installation of Windows, which will delete all data and applications from your
computer. Make sure to back up your files before doing this.

Unusual Noises Of Computer
A computer emitting abnormal noises, like loud hard drive sounds or fan issues, might be experiencing hardware failure, overheating, or other complications. To tackle this, users should conduct hardware inspections, ensure proper ventilation, and implement preventive maintenance measures to safeguard system performance.
Check How To Fix Unusual Noises Of Computer
1. Identify the source of the noise: To determine which component is
causing the noise, open your computer case (if it's a desktop) or use your ears to locate
the general area of the noise. Common sources of unusual noises include fans, hard drives,
and optical drives.
2. Check the fans: Dust and debris can accumulate on the fan blades,
causing them to become unbalanced and produce noise. Clean the blades with a soft brush or
compressed air. Make sure the fans are functioning properly and not obstructed. If a fan is
damaged or malfunctioning, you may need to replace it.
3. Inspect the hard drive: If the noise is coming from your hard drive, it
could indicate a failing drive. Backup your data immediately, and consider replacing the
drive with a new one. You can also run a diagnostic tool, such as CrystalDiskInfo, to check
the health of your hard drive.
4. Examine the optical drive: If the noise is coming from your CD/DVD
drive, it could be due to a damaged or dirty disc. Remove the disc and clean it with a soft
cloth, or try a different disc to see if the noise persists. If the issue continues, you may
need to replace the optical drive.
5. Check for loose components: Loose screws or components can cause
vibrations and unusual noises. Ensure that all screws are tightened, and that components
such as expansion cards and RAM modules are securely seated.
6. Investigate other hardware: If the noise is still present after checking
the common sources, examine other hardware components, such as the power supply or graphics
card. If you suspect a component is faulty, consider replacing it.
7. Dampen vibrations: If the noise is due to vibrations in the computer
case, you can try using rubber grommets, pads, or foam to dampen the vibrations. Make sure
the case is securely closed and sitting on a stable surface.
8. Update drivers and firmware: Sometimes, unusual noises can be caused by
software issues. Make sure your device drivers and firmware are up to date.

Graphics or Display Issues
When a computer encounters graphical glitches, color abnormalities, or other display-related issues, it may stem from graphics card failure, driver complications, or display problems. To address these concerns, users should update drivers, inspect hardware components, and evaluate display settings to ensure a seamless visual experience.
Check How To Fix Graphics or Display Issues
1. Check your display cables: Ensure that your display cables (HDMI,
DisplayPort, VGA, or DVI) are securely connected to your computer and monitor. Try using a
different cable or connecting to a different display to rule out cable or monitor
issues.
2. Update your graphics drivers: Outdated or corrupted graphics drivers can
cause display issues. Visit your graphics card manufacturer's website (NVIDIA, AMD, or
Intel) to download and install the latest drivers for your graphics card.
3. Adjust your display settings: Right-click on your desktop and select
"Display settings" or "Screen resolution." Make sure your display is set to the recommended
resolution and refresh rate. You can also try different scaling settings if text and icons
appear too small or too large.
4. Change your graphics settings: Open your graphics control panel (NVIDIA
Control Panel, AMD Radeon Settings, or Intel Graphics Control Panel) and adjust the settings
to improve performance or visual quality.
5. Check for hardware issues: If you're using a discrete graphics card,
make sure it's seated correctly in the PCIe slot and that its power connectors are securely
connected. If you suspect a hardware issue, try using a different graphics card or test your
graphics card in another computer.
6. Run Windows troubleshooter: Open the Settings app, go to Update &
Security > Troubleshoot, and run the "Hardware and Devices" troubleshooter. This can help
diagnose and resolve any hardware-related issues.
7. Roll back your graphics drivers: If the issue started after a driver
update, you can try rolling back to a previous version of the driver. Open Device Manager,
right-click on your graphics card under "Display adapters," select "Properties," go to the
"Driver" tab, and click "Roll Back Driver."
8. Reinstall your graphics drivers: Uninstall your graphics drivers using
the "Uninstall a program" feature in the Control Panel or by using a Display Driver
Uninstaller (DDU). Then, reinstall the latest drivers from your graphics card manufacturer's
website.
9. Check for overheating: Overheating can cause display issues. Ensure your
computer is well-ventilated, clean any dust from the fans and heat sinks, and monitor your
system temperatures using a tool like HWMonitor.

Note:
1. Restart your computer: In some cases, a simple restart can fix the issue. Press and
hold the power button to force a shutdown, wait for a few seconds, and then turn your computer back
on.
2. Perform System Restore: If none of the steps above have fixed the issue, try
performing a System Restore to revert your system to a previous state before the BSOD occurred.
3. Reinstall Windows: If all else fails, consider reinstalling Windows. This should be
a last resort, as it will erase all your files and settings. Backup your important data before
proceeding with this step.
4. Seek professional help: If you're unable to resolve the issue on your own, consider
consulting a professional technician or contacting your computer's manufacturer for assistance.
Bootable Recovery for Crashed Windows Computers
You can preview results before recovering them to another location.

35+ Patents for
Data Recovery

Recovery Experts
Since 2003


24 x 7 Free Tech
Support

100% Secure Virus-Free
Guarantee
Recover Common Files from a Crashed Windows System

Video
MP4, MOV, AVI, FLV, M4V, WMV, MXF, AVI, MKV, MPEG, MPEG4, MPG, MTS, AVCHD, BRAW, R3D, etc

Photo
JPEG, JPG, PNG, PSD, RAW, RGB,3FR, ABM, AFX, ANI, ARW, BIZ, BLD, BLEND, BMP, CAD, etc.

Audio
MP3, AAC, FLAC, OGG, WAV, WMA, AA3, AAC, AC3, ACC, AFC, AIF, AIFC, AIFF, AM, AMR, APE, etc.

Document
DOC, DOCX, RTF, DOT, DOTX, DOTM, ODT, WordML, XLS, XLSX, XLTX, PPT, PPTX, PPSX, PDF, PDF/A, etc.

Archive
7Z, ACE, ALZ, ARC, ARJ, BZ, BZIP, CAB, DBS, DEB, GZ, JAR, KRYPTER, LZA, LZH, MSI, PF, PKG, PUP, RAR, etc.

BKL, BKS, BMS, DBX, DCI, EDB, EML, EMLX, MAIL, MBX, MSG, NSF, OEB, PAB, PST, WAB, etc.
Recoverit is a trusted crashed computer recovery tool that can retrieve all file types stored on your crashed computer. Check full tech specs >>
How to Recover Files from a Crashed Windows Computer with Recoverit
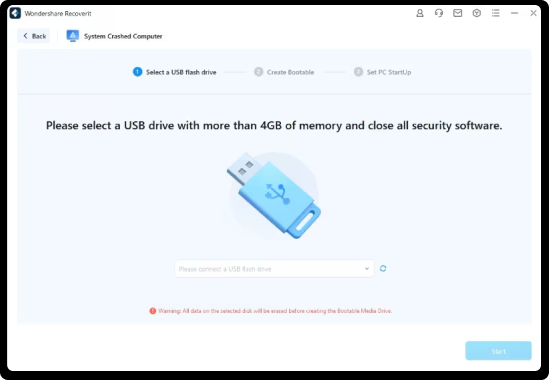
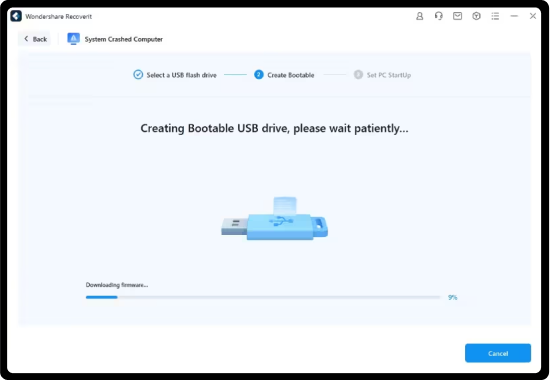
Step 1. Create a Bootable USB Drive
Install Recoverit on a healthy computer, choose the crashed-computer recovery function, and create boot media on a blank USB drive.
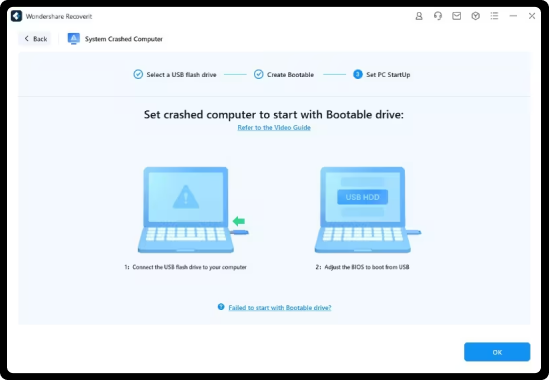
Step 2. Boot the Crashed Computer from USB
Connect the bootable USB to the crashed PC, enter the BIOS or boot menu, and start the computer from the USB drive so you can access the system disk.
Step 3. Recover Files to a Different Location
Preview the recoverable files from the crashed computer, select the files you need, and save them to another drive or external storage. Do not save them back to the original system disk.
See What Our Users Ask Frequently About Windows System Recovery
-
Can I recover files from a crashed Windows computer?Often yes, if the original system drive is still detectable and the lost files have not been overwritten. Use a bootable recovery workflow to access the drive before reinstalling or formatting Windows.
-
What should I do first if Windows will not boot?Do not reinstall Windows or format the drive first. Create bootable recovery media on a working computer and copy important files from the crashed machine before making OS changes.
-
Can Recoverit help after a blue screen or black screen?Yes, if the drive is still detectable. Bootable recovery can help you access the disk and recover files even when Windows itself will not start normally.
-
Can Recoverit recover files if the drive is physically damaged?Software needs readable storage. If the drive is not detected or the hardware is physically damaged, professional recovery is usually safer.
-
Where should I save recovered files?Save them to another drive, partition, or external storage. Saving back to the original disk can overwrite other recoverable data.
-
Can Recoverit recover more than system files?Yes. Recoverit can recover common work files such as documents, photos, videos, spreadsheets, emails, and archives from a crashed Windows computer when the storage remains readable.
-
Can I use the same computer to create boot media?Use a working computer to create the bootable USB. The crashed computer is then started from that USB so you can recover files from its original drive.
-
What size USB drive do I need for bootable recovery?Use a blank USB drive with enough capacity for the boot media. Its contents may be erased when the bootable disk is created.
Helpful Guides for Crashed Windows Recovery