This Device was Reset: Learn How to Bypass Google Account Sign-In from An Android Device
"I was away for some business trip and left my personal Android phone back at home. Upon coming back, when I switched on my device, I got the following message:
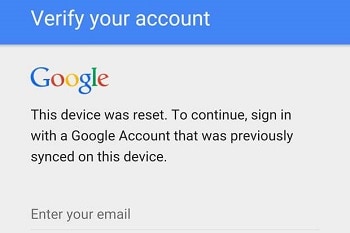
This device was reset. To continue, sign in with a Google Account that was previously synced on this device. Now I am unable to access my phone beyond the startup screen. Is there any way around such an error? Will I be able to open my files again?"
Given the popularity of Android phones and its extreme usage among the masses, the probable occurrence of this error is quite high, and there are exceptionally technical means to fix it. No matter which brand of Android phone you are using, we will show how to bypass the "This device was reset" error with different feasible solutions. If you are unable to open your files under any scenario, then we will also lead you to the method to recover those files instantly.

Part 1: "This device was reset. To continue, sign in with a Google Account that was previously synced on this device." What's the Problem?
This error occurs typically when the Android phone's default Factory Reset Protection (FRP) gets activated, due to some mishap or accidental factory reset. It is a security protocol offered by the Android OS to its user to reset the phone/device outside of the built-in settings feature.
If you wish to acknowledge the reset initiation, then all you are required to do is enter your Google account credentials and start using the Android phone from scratch. But if you wish to keep your settings on the phone intact or forgot your login information, then you can bypass the Google sign-in option through a variety of fixes, which we will discuss in the latter part of the article.
Part 2: How to Bypass "This device was reset. To continue, sign in with a Google Account that was previously synced on this device"?
There are three methods to fix the factory reset protection protocol and bypass the Google account sign-in, which we have stated in the list below:
- Method 1: Fix FRP through the OEM Unlocking feature.
- Method 2: Use FRP Bypass APK to fix Google Account Verification.
- Method 3: Reset the device.
Method 1. Fix FRP through the OEM Unlocking feature:
The OEM unlock feature is a way of breaking an agreement between the user, and the manufacturer, which also enables the user to perform anything on the Android phone through the bootloader. It also allows us to implement a custom recovery on your phone instead of using the default methods which are offered by your Google. If you previously had the OEM unlocking feature activated, then you will be able to fix the factory reset protection immediately.
Method 2: This Device was Reset – Use FRP Bypass APK to fix Google Account Verification:
You can bypass the Google sign-in through the help of a third-party app of the apk format. Here are the steps to perform such a procedure with FRP bypass apk app:
- Download the FRP bypass apk from its official website and copy the downloaded file on your USB flash drive;
- Open your Android device, enter your Google account login credentials;
- Connect an OTG cable with the USB and the Android device;
- You will see a file explorer feature opening on the Android phone; it is the USB folder;
- Locate the FRP Bypass apk file from the file manager and install the apk app;
- Once the installation is complete, tap on open from the Development Settings option;
- Down on the list, tap on "Backup and Reset" option;
- Now tap on the "Factory Data Reset" option and confirm the action;
- That's it. You had successfully fixed the "This Device was Reset" error and bypassed the Google sign-in option.
Method 3: Reset the device:
If you are still unable to bypass the Google sign-in lock and do not remember the login credentials of your Google account, then the logical solution is to perform a hard reset of the device. Follow the instructions below to reset the Android device:
- If you are using a Samsung phone, then press and simultaneously hold the Power button, Volume Up button, and the Home button(located at the bottom of the screen);
- You are required to keep holding the buttons until you see a booting display on the screen;
- Select the "Wipe Data/Factory Reset" option and proceed further;
- Now select the "Yes – Delete all user data" option;
- Select through the power button the option: Reboot System Now.
Part 3: Tips: How to Avoid Being Locked with FRP Again?
Here are the steps to avoid factory reset protection by using the OEM unlocking feature:
- Go to settings of the Android device;
- Tap on the "About Phone" option and tap on "Software info";
- Tap the build number of the device from the menu 7 times, which will activate the Developer Mode;
- Enter Developer options and check whether the OEM Unlock switch is on or off. Turn it ON!
The bootloader on the Android phone will successfully get unlocked, and you will be able to run any unsigned activity on your it, which will also allow you to disable the FRP lock setting, whenever the issue occurs.
Phone Solution
- Phone Tips
- Phone Recovery


 ChatGPT
 Perplexity
 Google AI Mode
 Grok
Grok


David Darlington
staff Editor