How to Upload Photos to Dropbox Automatically
Q: How to upload photos to dropbox automatically?
"I often take photos on my camera and store them to an external hard drive. I have heard a lot about dropbox. So, is there any way for my photos to get automatically uploaded to dropbox? Can you recommend an alternative to the camera uploads method?"
If you enjoy taking photos, you can easily access them from various devices such as a computer when you upload them to cloud services. Dropbox is an excellent service for this as it allows you to automatically upload photos to dropbox.
To share items from your device to another, such as a computer or online, a photo synchronization feature on the Dropbox app will be useful. When you activate the feature, all your photos from the specific device are copied and uploaded to a Dropbox folder. The Dropbox desktop app automatically syncs files and saves photos from your devices. Below is an insight on how to save photos from your camera to the dropbox.
Part 1: Why Do You Need to Upload Photos to Dropbox?
Dropbox allows you to store and share your media files on the internet from anywhere. Being a cloud service, you save the photos in the cloud and share them when needed. Why is storing photos and files on a hard drive not practical? The primary reason is, you may need to access them while on the go, and if they are on a hard drive, this will not be possible. It will also not be possible to share files and even work on specific tasks with other people.
Dropbox is compatible with Windows, Mac, and Linux systems. It can be used to store, retrieve, and manage media files considering that it can be downloaded on smartphones. There is a multitude of reasons why photos should be uploaded to dropbox.
1. If You Have an Internet Connection, You Can Access Files Anywhere
One advantage of using Dropbox is that you have access to your photos and other files anywhere. Whether you are using any simple android or iOS tablet or smartphone, you can access and work on files as long as they have the Dropbox app. It is not necessarily that you do so from a specific device since you can access the files from any internet-enabled device.
Here, the first thing that you need to do is download the app on your PC and other devices. Once you open the application, you can opt to download or upload files. By doing so, whenever you log in to your Dropbox account, you will have access to your file's latest versions.
2. Dropbox Gives 2GB Free Storage to Users.
Free storage space comes in handy for every user. Every Dropbox account registration comes with 2GB (gigabytes) worth of free storage space. Dropbox camera upload becomes easy and free. To add icing to the cake, you do not need to make upfront or additional payments to use it. To add 2 TB of storage space, you can opt for one of the paid plans available. These plans give you more space to store your hard drive's multiple backups.
3. You Can Also Free Up Some Precious Space on Your Hard Drive
It is essential to have sufficient space in your hard drive. Well, this is easy when you have a dropbox account. For the large files on your PC, you can learn how to upload photos to dropbox and then delete them from the hard drive. It will create more storage space.
Besides, it is not only workable on computers since you can do the same to free up some space on a smartphone. That makes it easy to take more photos, and you can continue uploading them to Dropbox.
4. You Can Avoid Data Loss
Things are unpredictable, and disasters can strike at any time. Thus, for this reason, it makes sense to keep copies of your essential data and files in different locations. It will ensure that you can still access them if the device fails to start or is corrupted. In case your smartphone is lost, or the PC has crashed, all you need to do to access your files is log in to your Dropbox from any other device with internet. So, it is an excellent option for file and photo backup.
AOMEI Backupper and camera uploads are the two approaches you can use in this case. It all depends on your preferences.
Part 2: Installing the Dropbox Desktop App
If you opt for this option, you need to download the Dropbox desktop app and install it. Once this is completed, you should sign up. Here are simple steps to follow.
Step 1: Go to the official Dropbox website and download the application.

Step 2: To start the installation, open the downloaded file and then double-click the Dropbox icon.
Step 3: Once the installation has been completed, there is a prompt to create a new account or sign in to the existing one. To sign in, insert the email address and password you used to create the account.
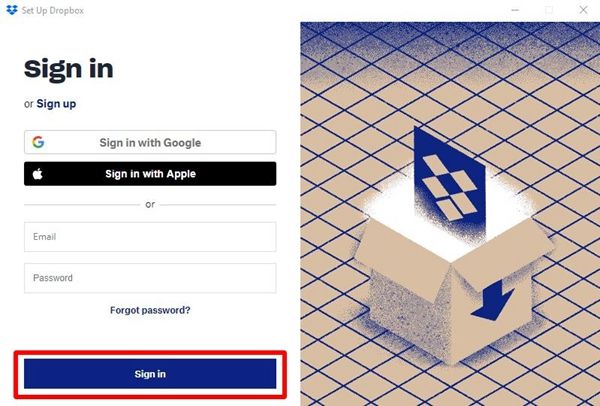
Step 4: On the last step, select "Open my Dropbox" and then "Get Started." When this is done, you are done with the installation part, and you can start using your account.
Part 3: How to Upload Your Photos to Dropbox Via Camera Uploads?
Another useful feature in Dropbox is camera uploads. Whenever you plug in your camera to a computer, you automatically upload photos to dropbox. But first, you should enable this feature. By doing this, all your photos will be sent to your Camera Uploads in the Dropbox account. Below here are simple steps to do it successfully.
Step 1: In your system tray, select "Dropbox," and then the gear icon.
Step 2: From the displayed list, select "Preferences."
Step 3: Check on the "Import" and then the box adjacent to "Enable camera uploads for."
Step 4: Now, here you need to choose the "Photos only" option. After that, you can click "Apply."
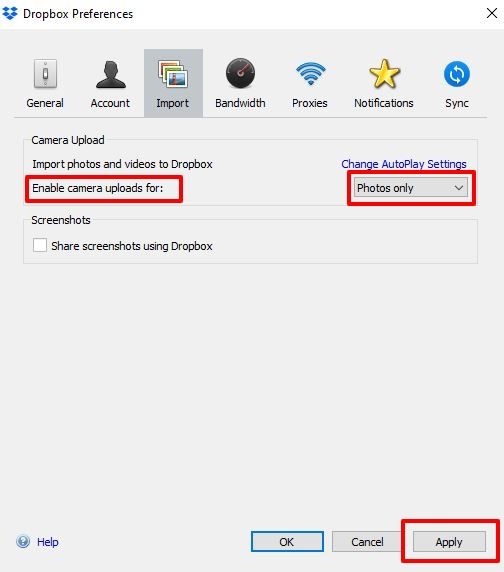
Step 5: The final step involves connecting your camera to the PC. It will lead to an automatic Dropbox camera upload.
There are a couple of things you should keep in mind about this feature. This method is not compatible with other devices as it only works for cameras. The other thing is that there are challenges such as photos not uploading automatically to Dropbox. Most users troubleshoot the problem by opening the desktop application and refreshing it. To overcome these two issues, experts recommend the below solution.
Part 4: How to Send Your Photos to Dropbox with the Best Freeware?
Well, AOMEI Backupper is a handy, free backup solution that is convenient for your use. Using this tool, syncing photos to Dropbox and other cloud drives is simple as it has a file sync feature. This freeware supports a wide range of storage devices, making it possible to back up external hard drives to Dropbox.
You can set up a daily, weekly, or monthly automatic sync when you use the freeware as an auto-sync software. Besides, it is free of charge, user-friendly, and there are no restrictions on usage.
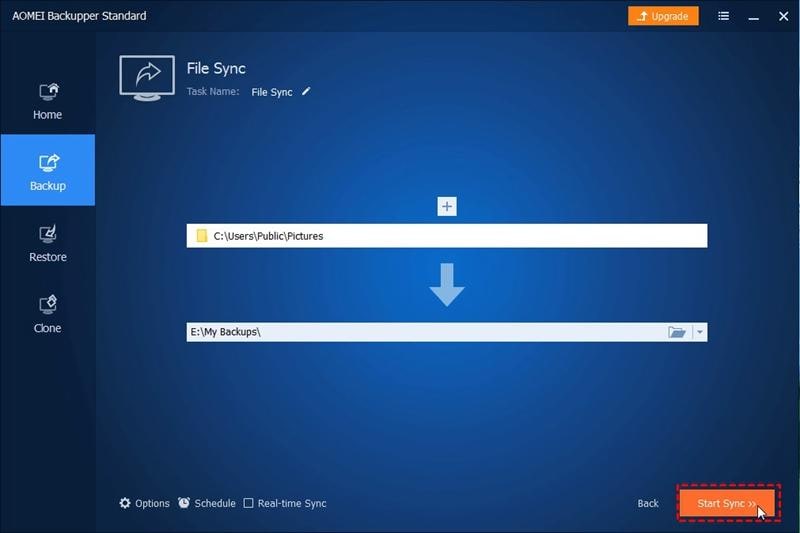
To automatically upload photos to Dropbox, there are five simple steps as below. The first thing you need to do is to install the AOMEI Backupper and then open it.
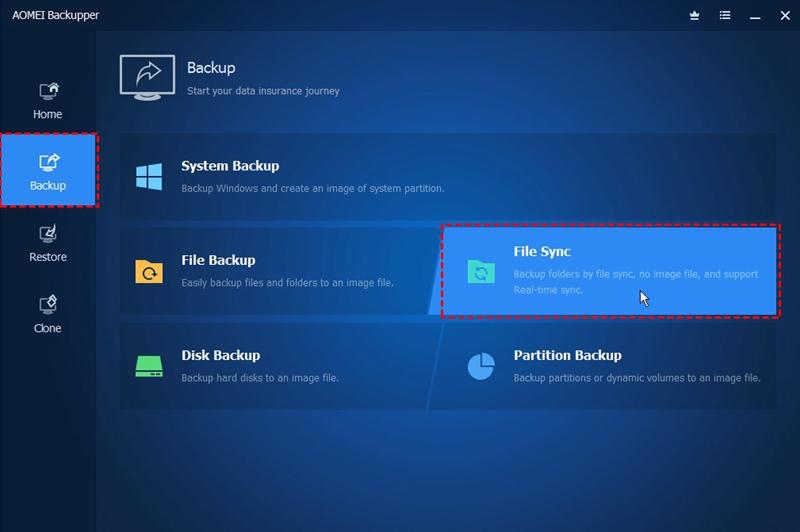
Step 1: Go to Backup Tab
On the "Backup" tab, select "File Sync."
Step 2: Select and Add Folder
In this step, you can modify the "Task Name" as per your preference. Select "Add Folder." To pick the folder that should be synced, click "Browse" and click "OK."

Step 3: Selecting a Cloud Drive
Here, you can notice a drop-down menu. So, click "Select a cloud drive." Select "Dropbox" and "OK" subsequently.

Step 4: Scheduling the Task
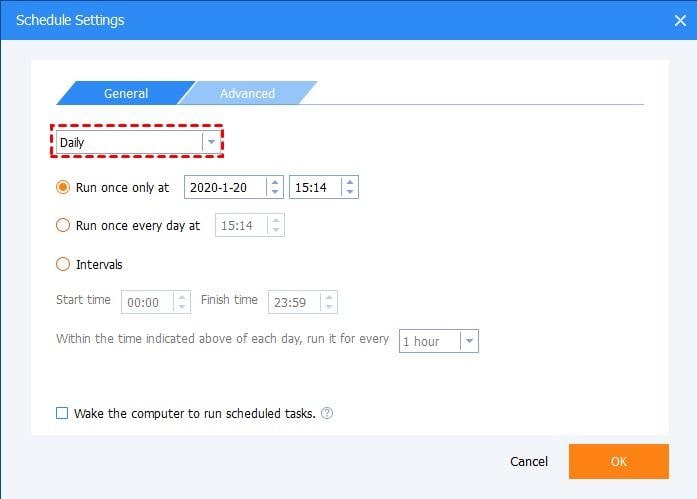
At the bottom of this page, you can click "Schedule." A popup window will be displayed and you can choose how often you want photos to be automatically be synced. There is an option for daily, weekly, or monthly backup. Once this is selected, click "OK."
Step 5: Start the Process
Confirm all is in order and click the "Start Sync" option. Well, this is how to upload photos to dropbox.
Things to keep in mind:
- To get additional features, consider upgrading your freeware to a Professional edition. Some of the benefits include being able to set up auto sync based on USB plugin, Event triggers, or Real-time Sync.
- From the "Home" tab, it will be easy to manage all sync tasks.
- To avoid issues of the program not being able to sync anymore, the folder name of the source should not be changed after syncing.
- Lastly, to view the photos that you have just synced, log in to Dropbox's official website using your account.
Conclusion
Although Dropbox is commonly used to backup and sync files, it is vital in storing photos with ease. To keep your media files safe, you should automatically upload photos to Dropbox using one of the above methods. If your preferred cloud storage service is Dropbox, you should automatically upload your videos and photos using Dropbox's camera uploading.
To sync photos automatically and save time while doing it, you should opt for AOMEI Backupper, which makes things easier for you. This freeware will be of significant help if you want to back up the computer to OneDrive or Dropbox. Storing and accessing your photos from any internet-enabled device will not be a problem.
Data Backup Services
- Computer Backup
- Hard Drive Backup
- Mac Backup
- Cloud Backup


Amy Dennis
staff Editor