How to Backup Your OS in Windows?
If you are planning to reset your Windows 10 PC or just troubleshoot an issue, then you should consider taking a Windows 10 backup in advance. For instance, with the help of a Windows 10 image backup, you can even save your system files and reinstall the OS. In this way, you can restore the entire system, including its OS after troubleshooting the PC. Without much ado, let’s quickly learn how to create a disk image in Windows 10 and restore it easily.

How to Back up Windows OS with its System Image Tool?
You might already know that Windows 10 has an inbuilt option to create a system image backup. To do this, you can use any other dedicated source (like an external hard drive) where the Windows 10 image backup would be stored. If you want, you can manually select the OS or any other drive to back up and can later restore the Windows 10 backup on your computer.
The best part is that the System Image tool is an inbuilt utility application in Windows 10 that is available for free. Therefore, if you also want to create a disk image in Windows 10, then follow these basic steps:
Step 1 Launch the System Image Recovery Option
To create a backup image in Windows 10, you can just go to its Settings > Update & Security > Backup option. From the provided options, just go to More Backup and Restore settings under the “Looking for an Older Backup” field.
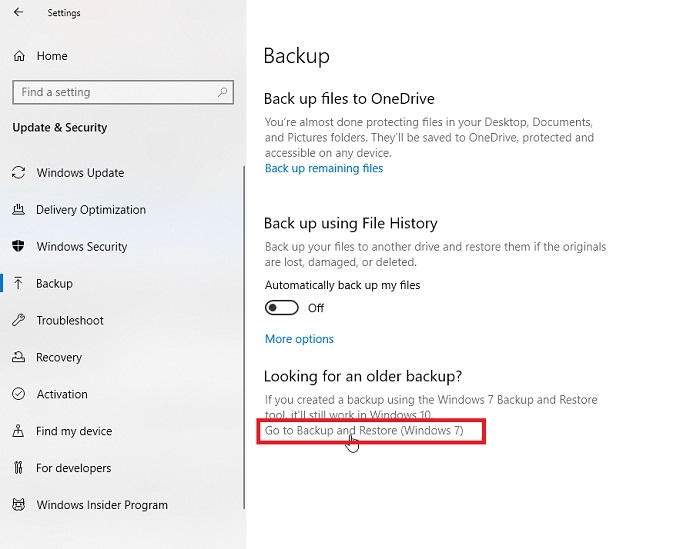
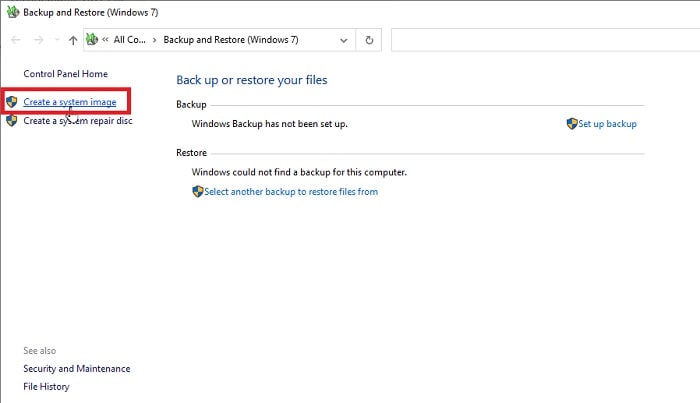
This will launch a new interface that provides system backup and restore options for Windows 7, 8, and 10. You can now go to the sidebar and click on the “Create a System Image” button to get things started.
Step 2 Select a Destination to Store the System Image
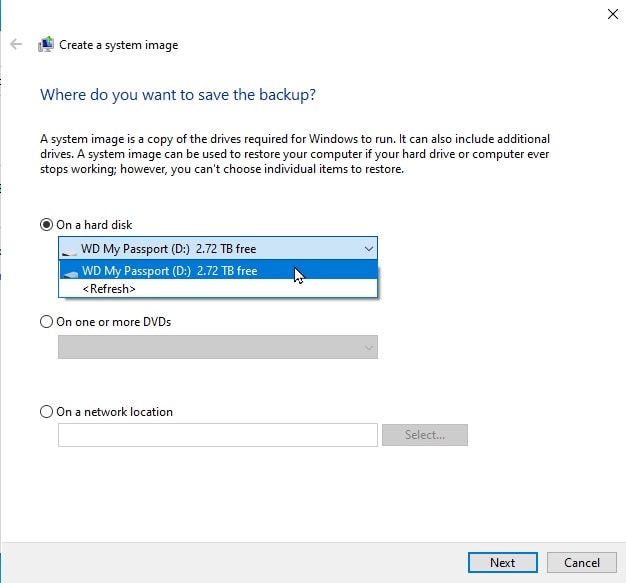
As the dedicated Windows System Image wizard would be launched, you can select a destination where the image file would be saved. I would recommend connecting an external hard drive and selecting it to store the entire Windows 10 backup.
Step 3 Select the Windows OS Drive to Back up
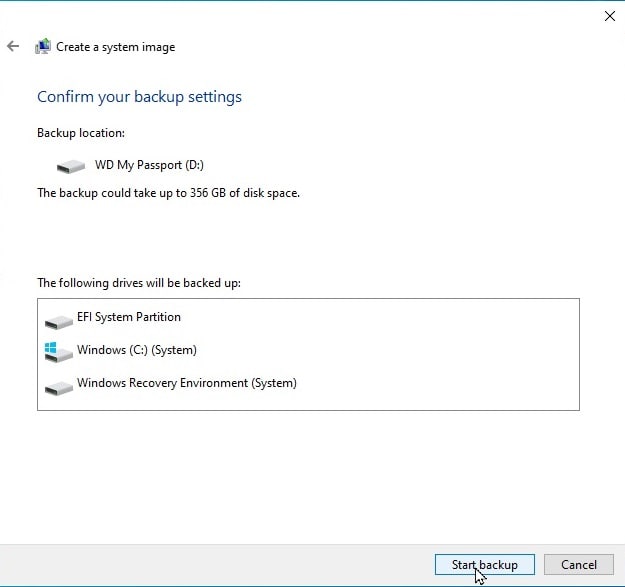
Once you have selected a destination to store the Windows 10 image backup, the wizard will ask you to select a partition/drive from your PC. You can just choose the Windows OS or any other drive from here and click on the “Start Backup” button. Afterward, you can sit back and wait for a few minutes as it would maintain a system image backup of Windows 10 on the connected disk.
How to Crete a Windows 7/8/10 Backup Image using AOMEI Backupper?
Since the above-listed solution to maintain Windows 10 backup can be a bit complicated and only supports new Windows versions, you can consider using an alternative. For instance, you can use AOMEI Backupper that can maintain an entire Windows 10 image backup at any preferred location.
You can use the application to maintain the backup of the entire system or the selected disk. It also has a scheduled backup feature to automate the process and save your time for creating a regular system image backup on Windows 10. To learn how to create a disk image of Windows 10/8/7 with AOMEI Backupper, follow this drill.
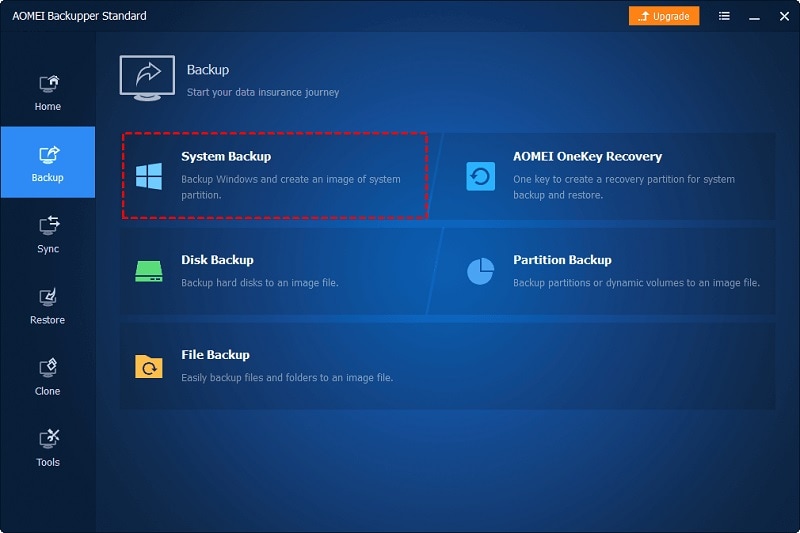
Step 1 Open the System Backup option of AOMEI Backupper
At first, you can just launch the AOMEI Backupper application on your computer and connect an external hard drive to it. From the various backup modules on its home, click on the “System Backup” feature.
Step 2 Select the OS Drive to Back up
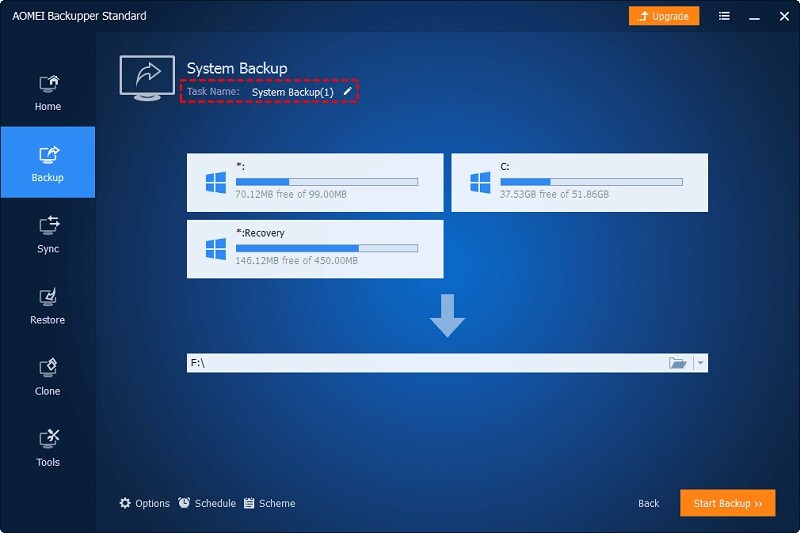
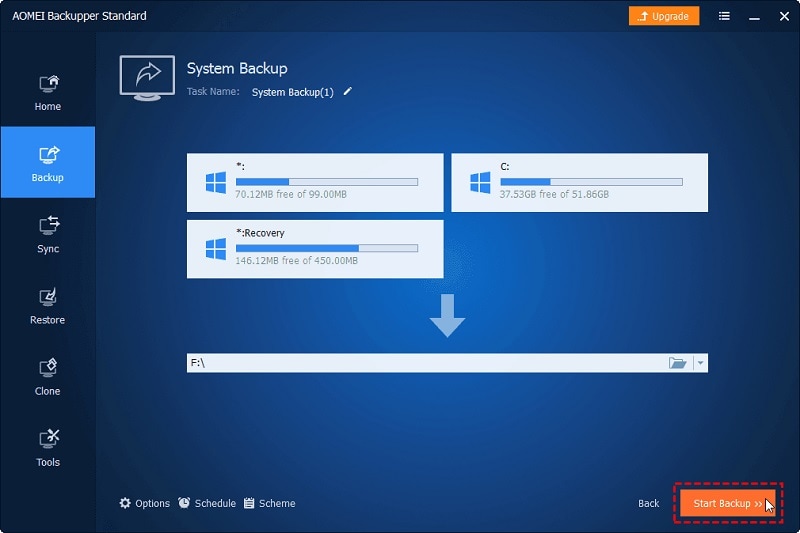
As the System Backup tool would be launched, you can give the present task a name and choose the drive to back up. To create a backup image of the Windows 10 drive, you can just select the OS partition (which is C in most cases).
Step 3 Choose a Destination to Save the System Backup
Once you have selected the Windows drive, you can click on the destination option where the backup would be stored.
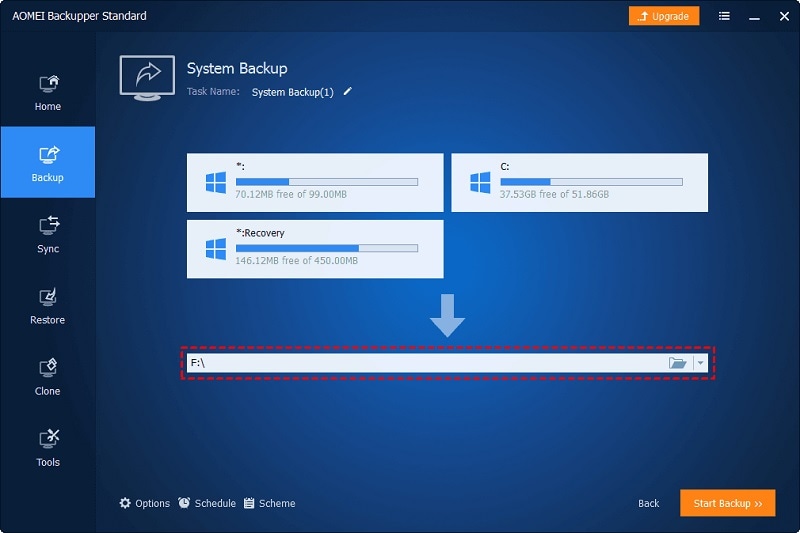
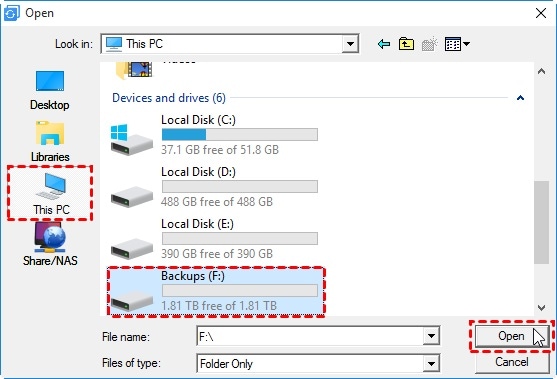
This will open a dedicated browser window, letting you select the external hard drive (or any other location) to save the Windows 10 image backup.
Step 4 Create the System Image Backup for Windows 10
After selecting the destination to store the Windows 10 backup, you can go to its more options from the bottom. Here, you can set up a preferred schedule to automate the Windows 10 image backup process and set up different settings for the backup.
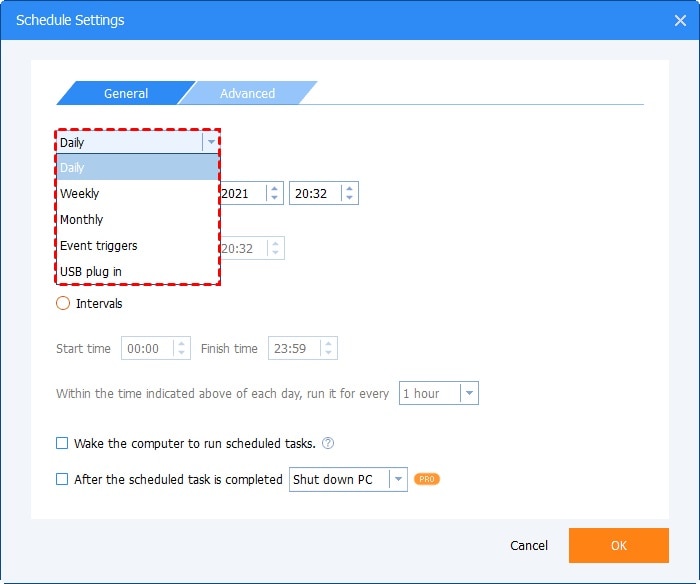
In the end, you can just click on the “Start Backup” button and wait for a few minutes as AOMEI Backupper would create a disk image for Windows 10 successfully.
Later, you can connect the same destination to your computer and take the assistance of AOMEI Backupper to restore the Windows 10 backup to a preferred location.
How to Restore a System Image Backup on Windows 10?
By now, you can easily create a disk image of Windows 10 using its inbuilt tool or any other reliable application. Let’s consider that you have maintained a Windows 10 image backup using the system image tool of Windows. Now, if you want to restore this Windows 10 backup or troubleshoot any issue on your device, then you can follow these instructions.
Step 1 Perform an Advanced Startup on your Windows PC
If your Windows system is already functioning, then you can go to its Settings > Recovery > Advanced Setup and simply restart your computer (to perform an advanced boot).
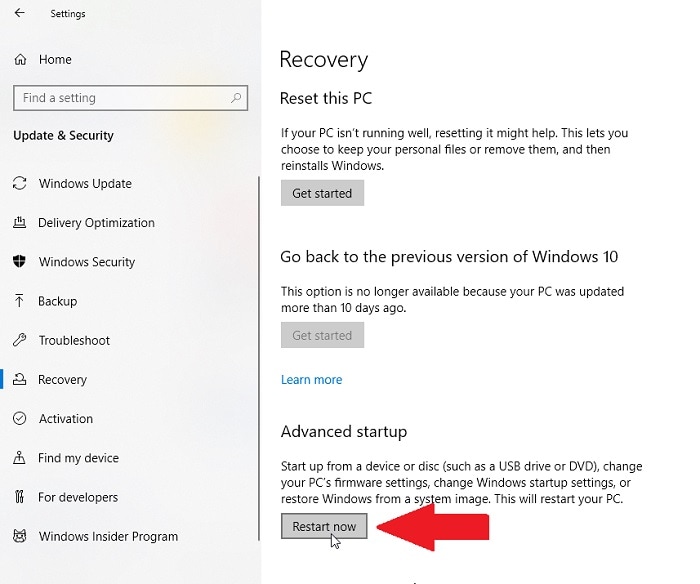
In case your system is malfunctioning, then you can restart it the usual way, and press the Advanced Booting key continually. Please note that the Advanced Boot key can vary from one system to another (can be DEL, ESC, F2, F10, and so on).
Step 2 Initiate the System Image Restoring Option
Once the system would restart, make sure that the external hard drive (where the Windows image is present) is connected to the system. As it would load the initial wizard, you can simply choose to repair the system.
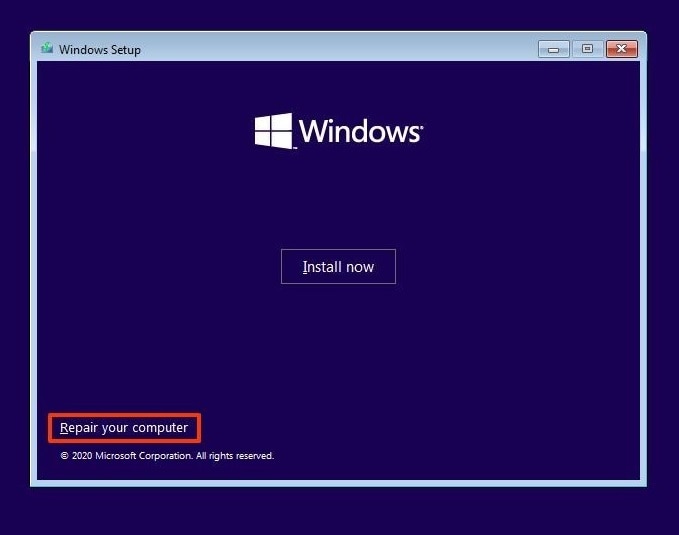
This will open dedicated system repairing options on the screen, letting you go to the Troubleshooting > Advanced Setup feature. From the provided options, just select the “System Image Recovery” field here.
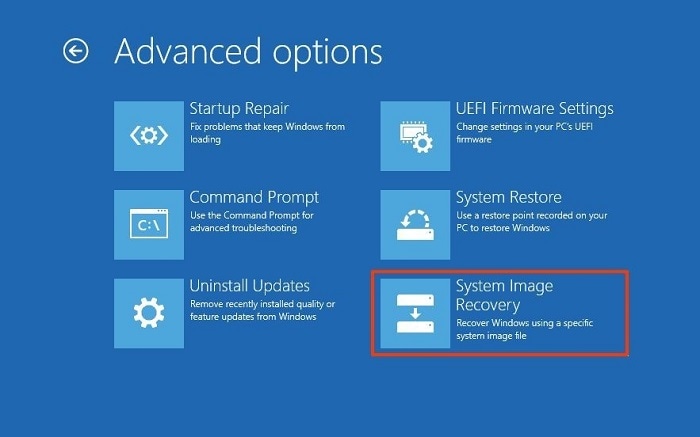
Step 3 Restore the Windows 10 Image Backup
Now, you can just choose to restore an existing Windows 10 backup to your system. All you need to do is follow a simple click-through wizard, where you can select the destination drive to restore the Windows 10 backup and its respective version.
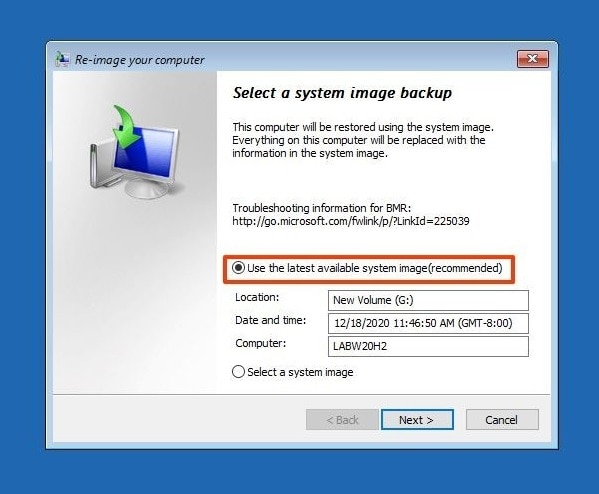
Once the Windows 10 image backup would be restored, the wizard will inform you, letting you restart your computer in the normal mode.
Pro Tip: Restore Deleted Data without Any Existing Backup On Windows
As you can see, it is pretty easy to create a disk image on Windows 10 using AOMEI Backupper or the Windows inbuilt tool. Though, if you have lost some important files from your computer and you don’t have a prior backup, then don’t worry. You can still retrieve your lost or deleted files using Wondershare Recoverit Data Recovery.
The application is extremely easy to use and can help you get back your lost/deleted/inaccessible photos, videos, documents, and other file types. You can select any location to scan and even preview your recovered files on the native interface of Recoverit Data Recovery. Apart from your Windows internal drive, you can also restore your data from any USB drive, SD card, external hard disk, and other sources in a jiffy.

I’m sure that after reading this guide, you would be able to create a backup image for Windows 10 using its inbuilt tool or AOMEI Backupper. Besides that, I have also provided a smart solution to restore an existing Windows 10 image backup to your computer. Though, in case you have deleted your files by mistake, or they are corrupted, then you can use Wondershare Recoverit Data Recovery to retrieve them in almost every possible scenario.
Data Backup Services
- Computer Backup
- Hard Drive Backup
- Mac Backup
- Cloud Backup


Amy Dennis
staff Editor