Solved: SD Card Tap Here to Transfer Media Files Error
Resolve the recurring "Tap Here to Transfer Media Files" SD card notification on Android devices like the Samsung Galaxy S7 by wiping the system cache partition via the startup recovery menu or entering Safe Mode to remove incompatible applications.
● To safely isolate faulty third-party apps without immediately uninstalling them, boot into Safe Mode by switching on the phone and continuously holding the volume down button once the startup logo appears.
● Performing a factory reset is the final software troubleshooting step; if the error persists while observing the device with no new apps installed, the issue stems from hardware or OS damage requiring service station repair.
● Formatting the unmounted SD card via a PC card reader causes complete data loss, requiring either a pre-existing backup or data recovery software like Wondershare Recoverit to scan and retrieve lost text, image, and video files.
Ask AI for a summary
In the digital era of technology, the error is prone to its inevitability. This article will overcome one of the problems that occur in the android phones by users in the SD Card "Tap Here to Transfer Media Files" Error. This problem is encountered by many of the Galaxy S series users. While going through the web, I found various ways to overcome this problem. Here I am going to share one method which was resolved the issue.
Let's take the example of the Samsung Galaxy S7; this solution will work for all. There are few things which we can do to fix the phone.
Part 1. How to fix SD card tap here to transfer media files error
After putting in the SD card, you get a notification for SD to either explore or reject. You can wipe away the notification to ignore it. However, the message might appear again and again until you resolve the issue. It won't be delightful.

You can try formatting the SD card to not run into such an annoying situation again. Below are a few steps to perfume the format operation on SD cards.
- Firstly you have to get rid of the system cache of your device.
- Go to the settings-Storage-SD card.
- There will be an option to un-mount or format.
- Format SD card.
If you still see the error message, click on the Explore SD card and following the different approach.
1Clear the system cache on Android phone:
Sometimes, updating the apps may result in a discreditable system cache. The Group of provisional files responsible for loading the applications as fast as possible is the system files' main error-prone areas. Thus, downloading the updates for apps means modifying the system cache, so there is a chance that the problem you are facing is the issue that occurred by the wrong manipulation of the system cache. To ensure the rectification, the system is said to be in normal working mode. To do so, you can clear the cache partition storage area. Here are the detailed steps:
- Switch off your device.
- Now switch it on again by press and hold the power button on the side.
- When a start-up screen appears on the screen, i.e., the Samsung Galaxy S7 on the screen, release the Power button but continue pressing the Home and Volume Up buttons.
- When the device startup, it will show the android logo. At that time, you can relax the pressed keys and leave the device in that condition for half a minute or so.
- You can select the options to follow forward by using the volume key to lower volume and select the option with "wipe cache partition" using the power key.
- When you reach the mentioned zone, you may hold the Power button to select it.
- The last step is to select the option with the label "YES" and press the power key to confirm the selection.
- You have to be patient until the device is done with completing the Master Reset. Once it is done, select the 'Reboot system now' and hold on to the Power button.
- The device will now restart, taking more than usual time.
2Update all apps and remove incompatible apps
Even if you first establish that your android system is up to date doesn't ensure that all your apps are updated. Keeping that in mind, if you have made it certain that your android version is entirely caught up and updated, but some apps or an app is not in a synchronized manner with that updated version, you may witness a problem or anomaly. Your SD error is hence justified because not all apps are ready with their updated versions the moment yet another potential version of android kicks in and are not testified to show their efficiency in all of updated android operating systems hence proving their systems to be erratic and interfere with the error as well. As a layman with technology in hands, we have no better way to know than repent and be the sufferer of the repercussions when the harm is already done. If you have ensured that all your applications are up to date and your Android version and the situation persists, uninstalling some third-party application provided by a platform instead of the person who manufactured it may help reverse the situation back to normal. The error may stop being displayed on your screen, and we know now what was the perpetrator and root cause of your problem.
3Boot the phone to safe mode
Entering into a safe mode does not allow any third party application mentioned above to function, and therefore, if a third party app is responsible for an SD card error that is recurring on the screen of your phone, delegating into safe mode can be a much better route to detect the interference of such third-party apps by analyzing the functionality of the phone under safe mode. It can also be implied that using this approach can be an effective scapegoat from the hassles of uninstalling and letting go of some third-party apps that are useful and beneficial to you just for the sake of restoring the doubts of the interference. Following these simple steps, one can easily enter or boot the phone into the safe mode:
- Turn off your Android phone with a long pressing power button.
- Switch on your phone using and holding the same key.
- Once the starting logo of your android phone is showcased on the screen, let go of the Power button and simultaneously long-press the volume down button.
- Wait until the phone is done with and finished with the booting process.
- Pressing the volume down button until the phone is undergoing the booting process makes the phone enter safely. The same can be ensured by ascertaining "SAFE MODE" written on your phone screen's bottom-left corner. Once that is done, you're now into safe mode and can let go of the hold on the volume down button and carry on with checking the functionality of your phone.
4Factory reset the phone
When all of the above options don't work out well, you can also restore your device's default settings by the factory reset option. You have to keep your device in a running state for a few hours to observe any difference and avoid installing any new apps during the observation time. The issue is supposed to be resolved now while observing the device performance. Still, if the problem persists, even after there are none of the device's apps, then that means the root cause of the issue must be something related to the hardware components or in the operating system. The only option now is to contact the companies service station to get it repaired.

Part 2. How to recover lost data from SD card encountering errors
You can now unmount the SD card from the slot, format it on the PC using a card reader, and re-insert the SD card. This will lead to the loss of the data stored on your card. If the data is already backed up, then you are good to go. Else, there are few recovery methods to recover the lost data. One of those methods is by using Recoverit data recovery. Recoverit data recovery software is owned by Wondershare, the most efficient and trusted software by users worldwide. One can also download this software for free from its official websites, or any third-party websites are providing useful software online.
High-end recovery software works to get back your deleted files from the recycle bin, formatted drive, lost partition, or flash drive. The best part is that it supports tons of file formats (text, web browsing data, image, and video formats).
How to recover lost data from SD card encountering errors with 3 simple steps to do so:
Step 1. Select an SD card device. Go to the SD Card section, and select the device where you lost the data. Click Scan to start the process.
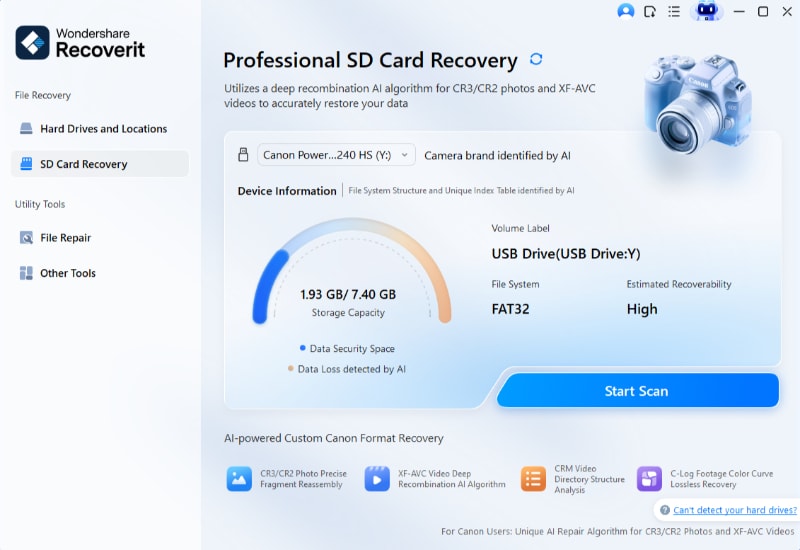
Step 2. Scan Your Device/Computer. Wait for the scanning process to complete.
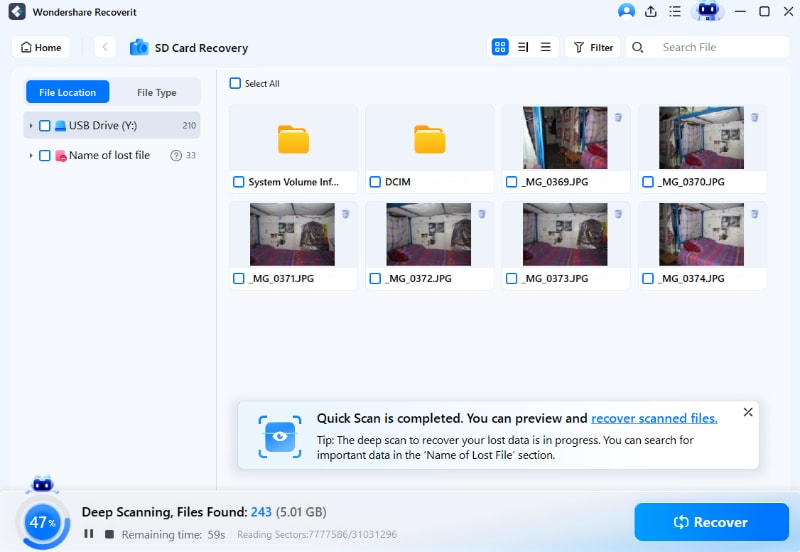
Step 3. Preview and recover your lost files. This step helps you to recover only the needed files.

Hope the above solutions will be helpful!
SD Card Recovery
- Recover Card Data
- Repair Card Errors


 ChatGPT
 Perplexity
 Gemini
 Claude
 Grok
Grok


Eleanor Reed
staff Editor