"I want to delete some large chunk of data from my Gmail account. Can someone tell me where is the trash folder in Gmail and how to empty it?"
If you are also a regular Gmail user and are going through a similar situation, then this would be a perfect guide for you. While Gmail is one of the most popular and secure email service providers out there, it does have a major limitation. It only provides a free space of 15 GB to its users. This is why people often look for ways on how to empty trash in Gmail and free up more space on their account. In this guide, we will teach you how to do the same quite easily.
Just like every other mailing service, Gmail also stores the deleted emails. Yes – when you delete a mail, it isn't erased from the Gmail service or your account right away. Instead, it is transferred to a "Trash" folder. By default, Gmail stores the deleted messages for the duration of 30 days. Once the 30-day mark is over, the emails are automatically deleted from your Gmail account. Therefore, in case if you have accidentally deleted something from your Gmail inbox, you can still find it in the Trash folder within 30 days.
Part 2. How to Empty Trash in Gmail
As you know, when we delete a mail from our inbox, it is moved to Trash. Though, it will still keep occupying your Gmail storage. Therefore, it is recommended to get rid of your trash folder every once in a while. But where is the trash folder in Gmail and how to empty trash in Gmail? Let's find out by following these quick steps.
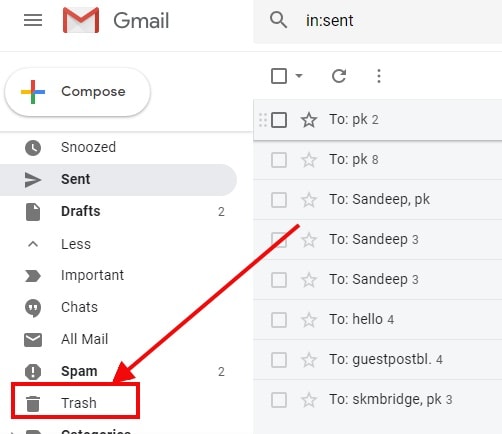
To start with, open any browser on your Mac and go to your Gmail account. Go to the left panel where all the folders are listed and click on the "More" option. From the extended list of folders here, click on the "Trash" tab.
This will open the trash folder where you can view all the deleted messages in Gmail.
You can simply select one or multiple emails here and click on the delete button to erase them. If you want to empty the entire folder at once, then just click on the "Empty Trash Now" option on the top.
Gmail will display a confirmation, asking whether you wish to delete all the Trash messages or not. Confirm your choice by clicking on the "Ok" button and wait for a few seconds as Gmail would empty your trash folder.
Part 3. How to Delete Messages from Gmail?
The Trash folder can only store messages that are deleted in the last 30 days. In order to get more space in your Gmail account, you should know how to delete emails from your inbox as well. Here are some easy ways to delete messages from Gmail and get more space on your account.
Delete a Single Message
This is the easiest way to delete a message from Gmail. Too often, we get an email in our inbox that is no longer relevant to us. Ideally, you should make a habit of deleting unwanted emails immediately so that it won't pile up.
Simply select the email, by clicking on the checkbox next to it.
Now, click on the delete/trash icon on the toolbar and confirm your choice.
If you want, you can select multiple messages and delete them together as well.
Mass Delete Emails with Select all conversations
One of the best things about Gmail is that it allows us to perform a mass deletion of emails as well. For instance, you can go to the Social or Promotions tab and delete all emails at once. This will help you create a substantial amount of free space on your Gmail account.
Firstly, visit your Inbox or any other folder/category on Gmail and select all conversations. To do this, you need to mark the "Select all" checkbox from the toolbar.
Once all the messages from the page are selected, you will get an option if you wish to select all conversations in that category or folder as well. If you want, you can click on that option for the mass selection.
After selecting all the mails, just click on the delete icon on the toolbar and confirm your choice as Gmail would move the selected emails to the Trash folder.
Delete Bulk Messages with Search Criteria
Gmail also provides a more selective way to delete messages in bulk as well. Apart from selecting all conversations at once, you can also look for specific messages on the search bar. For instance, you can look for messages exchanged with a certain contact, view messages for a specific duration, and so on.
Simply open Gmail on your Mac via any browser and go to the search bar. Here, you can type a relevant query for getting results related to contacts, time duration, specific keywords, and so on.
Once the results are displayed, you can mark emails by selecting them one at a time. For a bulk deletion, you can select all messages at once too. Just click on the select all checkbox on the toolbar.
Gmail will notify you with a prompt that all messages from the conversation are selected. Afterward, just click on the delete (trash) icon on the toolbar to get rid of all the selected messages.
Undelete Emails from the Trash
Sometimes, we accidentally delete a message from the inbox and send it to the trash folder. Since Gmail stores all the messages in the trash for 30 days, you can easily get them back. Simply follow these easy steps to undelete a message from the trash.
Firstly, visit the Trash folder of your Gmail account on your Mac and select the mails you wish to get back. You can mark multiple conversations at a time.
After making the appropriate selections, click on the folder ("Move to") icon on the toolbar.
This will display a list of locations where you can move the selected emails. From here, select the "Inbox" folder and wait as your marked messages will be moved from the Trash to Inbox folder.
Part 4. Bonus Tips for Managing Gmail Trash
By now, you would be able to teach anyone how to empty trash in Gmail on Mac or Windows. In order to manage your Gmail trash, you can also consider following these smart tips.
Where Is the Trash Folder in Gmail?
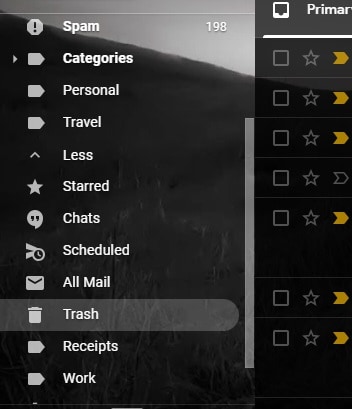
This is one of the most common queries of Gmail users. If you want to learn how to empty trash in Gmail, then you first need to know where is the trash folder in Gmail. To find it, go to the left panel, where all the folders are listed in different categories. Now, click on the "More" option to expand the list. Here, you can view the "Trash" label along with other categories like All Mails, Travel, Personal, etc. Simply click on the "Trash" button to view emails stored in the trash bin of Gmail.
How to Change the Gmail Trash Settings
Ideally, Gmail does not provide us any direct solution to customize Trash settings. That is, you can't change the behavior of the Trash folder as of now or change its 30-day default duration. Nevertheless, you can visit the Settings page on your Gmail by clicking on the gear icon at the top right corner to explore Gmail features and options in detail.
How to Recover Gmail Local Files on Mac?
A lot of people also configure Gmail with the local Mail app on Mac. In this way, the Gmail data would be stored on your local Mac storage instead. In case if you have deleted this data and would like to get it back, then you can take the assistance of Recoverit Data Recovery Mac. It is a highly advanced and sophisticated data recovery tool that is available for both Mac and Windows. It can recover data under different scenarios and from numerous locations. The tool is extremely user-friendly and features an intuitive interface.
To learn how to recover deleted photos from Gmail trash using your Mac, follow these steps:
Step1: Select the location:
Firstly, install and launch Recoverit Data Recovery on your Mac to get back the lost Gmail local files. From its home, you need to mark a location to scan. Preferably, select the drive where your Gmail data was originally stored and start the scan.
Step2: Scan selected location:
Simply wait for a while as the application would scan the selected location and help you get back any lost or inaccessible Gmail content. You can view the progress from an indicator on the interface so that you would know the status of the recovery.
Step3: Preview and Recover the Email:
When the scan is completed, you can view the retrieved content. Just select them and click on the "Recover" button to restore them to a secure location. In case if you are not satisfied with the results, then you can perform a deep scan as well. Click on the "All-around recovery" to do this, which will produce more extensive recovery results.
Important Notes:
Please note that the latest Mac version doesn't allow third-party apps to access its native partitions. Therefore, you can boot your Mac in the recovery mode first, go to the Terminal and type the command "csrutil status" to turn off its System Integrity Protection.
Video Tutorial on Mac File Recovery
Conclusion
I'm sure the guide would have helped you understand things like how to empty trash in Gmail or where is the trash folder in Gmail. In this way, you would be able to make enough free space for your Gmail account and manage your inbox like a pro. Feel free to follow this tutorial and even share it with others to teach them how to recover deleted emails from Gmail trash. If you also have some tips and tricks about Gmail, then feel free to share it with our readers in the comments below.
Effortlessly retrieve lost or deleted files from 2000+ storage devices, including HDDs, SSDs, external hard drives, USB drives, SD cards, NAS servers, and more. No matter how you lost your files, our software recovers all types of data with ease and confidence.


Sue Wayne
staff Editor