

 TL;DR:
macOS Disk Utility's Restore function creates an exact volume-to-volume copy that completely erases the target drive, but it does not guarantee a fully bootable whole-system clone for modern Macs.
● To prevent accidental data loss, strictly select the destination volume in the Disk Utility sidebar first before clicking Restore and choosing the source volume from the pop-up menu.
● Use APFS as the destination file system for Mac-only storage on macOS 10.13 or later, reserving Mac OS Extended only for legacy macOS workflows.
● For goals beyond a point-in-time data copy, use Migration Assistant to transfer files to a new Mac, or install macOS directly onto the external storage to create a supported bootable environment.
Ask AI for a summary
 ChatGPT
 Perplexity
 Gemini
 Claude
 Grok
Grok
You can use the Restore function in macOS Disk Utility to copy one volume to another. Apple describes the result as an exact copy of the source volume, but the destination volume is erased first. On modern Macs, that is not the same as guaranteeing a fully bootable clone of the entire startup disk, because macOS uses APFS volume groups and additional startup-security components.
⚡Quick Fix: Clone a Mac Drive Without Mixing Up Source and Destination
● Select the destination first: In Disk Utility, choose the volume that will be erased, click Restore, and then select the source volume from the Restore menu.
● Back up the destination: Disk Utility Restore deletes everything already stored on the destination volume.
● Use APFS for modern Mac-only storage: APFS is the default Mac file system for macOS 10.13 or later; do not automatically force Mac OS Extended on every modern clone target.
● Do not assume the copy will be bootable: If your real goal is migration, versioned backup, or an external startup system, choose the workflow designed for that job.
In This Article
Part 1. Can You Clone a Mac Drive With Disk Utility?
Yes, but it helps to define what Disk Utility is actually doing. Current Apple documentation describes Restore as a volume-to-volume copy operation, so the safest way to use it is to think in terms of copying a selected source volume to a selected destination volume rather than assuming every physical disk, recovery component, and boot dependency is automatically duplicated.
What Disk Utility Restore Actually Copies
Apple's current Disk Utility Restore instructions state that restoring one volume from another creates an exact copy of the original volume. The critical detail is that the volume selected in the sidebar is the destination: it is erased and then replaced with the contents of the source volume you choose in the Restore menu.
This makes Disk Utility useful when you want to duplicate a data volume, prepare a replacement volume, or make a point-in-time copy before storage changes. It is more precise than dragging visible folders in Finder because Restore is designed to reproduce the source volume rather than just copy the files you can see.
Important: Avoid describing this as a guaranteed sector-by-sector or block-by-block clone unless a current Apple source explicitly says so. Apple's current documentation supports the claim that Restore creates an exact copy of the source volume, which is the accurate scope for this guide.
Is a Disk Utility Clone Bootable?
Do not assume it will be. Modern macOS startup storage is more complex than a single traditional HFS+ volume. Apple explains that macOS is installed on an APFS volume group that includes a system volume and a separate data volume. Apple also notes that restoring a disk image on macOS 11 or later does not reinstall macOS.
If your goal is specifically to create an external startup disk, Apple's supported route is to install a compatible macOS on that external storage device and then select it as a startup disk. If your goal is to move apps, accounts, files, and settings to a new Mac, Migration Assistant is usually the more direct workflow.
| Your Goal | Better Mac Tool | Why |
| Make a point-in-time copy of a volume | Disk Utility Restore | Creates an exact copy of the selected source volume on the destination volume. |
| Keep versioned backups over time | Time Machine | Maintains automatic historical backups instead of repeatedly overwriting one clone target. |
| Move to a new Mac | Migration Assistant | Transfers apps, user accounts, files, folders, and settings without replacing the new Mac's operating system. |
| Run macOS from an external drive | Install macOS on the external drive | Apple documents this separately from Disk Utility Restore and bootable installer creation. |
Part 2. Before You Clone a Mac Hard Drive
The biggest cloning mistakes happen before the copy starts: choosing the wrong target, erasing a drive that still contains needed files, or using an inappropriate file system. A short pre-clone check is safer than trying to recover from an avoidable erase afterward.
Choose the Right Destination Drive
Connect the external HDD or SSD directly to the Mac when practical, especially for a large transfer. The destination needs enough usable capacity for the source volume's data. If the destination already contains files you care about, move or back them up before continuing.
- For an external SSD: APFS is normally the appropriate Mac-only choice on macOS 10.13 or later.
- For an older Mac workflow: Mac OS Extended (Journaled) can still be relevant for older macOS versions or specific legacy requirements.
- For a Mac-and-Windows data drive: ExFAT supports cross-platform file storage, but that is a different goal from creating a Mac startup copy.
Back Up the Destination Before Restore
This step is not optional when the destination has important content. Apple explicitly warns that restoring one volume to another erases all files on the destination volume. Copy anything you need from that destination to a different healthy location before you click Restore.
It is also worth keeping an independent backup of the source if the data is irreplaceable. A clone is useful, but a single source-to-destination operation is not a substitute for a broader backup strategy.
Choose APFS or Mac OS Extended Correctly
The older version of this article told every user to format the destination as Mac OS Extended (Journaled). That is no longer a safe blanket recommendation. Apple says APFS is the default file system for macOS 10.13 or later and supports both bootable and data volumes on those systems.
If you need to initialize a new external drive, Apple's current workflow is to choose “View > Show All Devices,” select the physical storage device, click Erase, choose GUID Partition Map as the scheme, and then choose the appropriate file system. Because erasing deletes the destination's contents, do this only after the destination has been backed up.
Part 3. How to Clone a Mac Drive With Disk Utility
The Restore workflow is short, but the direction matters. Follow the current Apple sequence below and keep one rule in mind throughout: the volume you select before clicking Restore is the destination that will be erased.
Open Disk Utility and Show All Devices
Step 1. Connect the destination drive and wait for macOS to recognize it.
Step 2. Open Disk Utility from Applications/Utilities or search for Disk Utility with Spotlight.
Step 3. Choose “View > Show All Devices.” This makes the device, container, and volume hierarchy easier to distinguish so you do not accidentally act on the wrong item.
Prepare the Destination Drive if Needed
If the destination is already healthy, visible, and using an appropriate format, you may not need to erase it separately before Restore. If it is new, incorrectly partitioned, or needs reinitialization, use Apple's current initialization process.
Step 1. In Disk Utility, make sure “Show All Devices” is enabled.
Step 2. Select the physical destination device at the top of its hierarchy and click Erase.
Step 3. Choose GUID Partition Map, select the appropriate file system such as APFS for a modern Mac-only target, enter a name, and click Erase.

Warning: This step is destructive. Do not erase the source drive, and do not erase a destination that still contains the only copy of important data.
Restore the Source Volume to the Destination
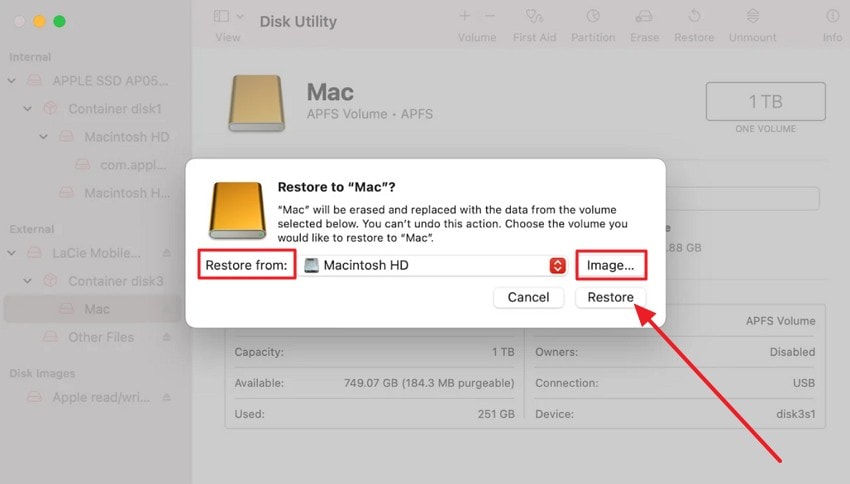
Step 1. In the Disk Utility sidebar, select the destination volume that you want to replace.
Step 2. Click Restore.
Step 3. Open the Restore from pop-up menu and choose the source volume you want to copy.
Step 4. Recheck both names before proceeding: the sidebar selection is the destination that will be erased; the Restore menu selection is the source that will be copied.
Step 5. Click Restore, wait for the operation to finish, and then click Done.
Apple also allows Disk Utility to be used from macOS Recovery. That can be useful when working with a startup-related volume that cannot be handled normally while macOS is running.
Verify the Copy Before You Rely on It
A Restore operation completing without an error is encouraging, but verification should happen before you erase, repurpose, or retire the original drive.
- Mount and open the destination: Confirm it appears in Finder and can be read normally.
- Spot-check critical folders: Open several important documents, photos, videos, project files, and archives instead of checking filenames only.
- Compare expected data: Confirm that the major folders and data sets you intended to copy are present.
- Keep the source intact temporarily: Do not erase the original drive until the destination has been checked and any separate backup plan is complete.
If you expected the destination to start up macOS, do not treat file verification alone as proof of bootability. Test the startup behavior separately and use Apple's supported external-startup guidance for your Mac model.
Part 4. Disk Utility vs. Time Machine vs. Migration Assistant
“Clone Mac drive” can describe several different goals, and using the wrong tool often creates extra work. Disk Utility is strongest for a direct volume copy, while Time Machine and Migration Assistant solve different backup and migration problems.
| Method | Best For | Destination Erased? | Automatic History? | Key Limitation |
| Disk Utility Restore | One-time volume-to-volume copy | Yes | No | Do not assume it creates a complete bootable clone of a modern startup disk. |
| Time Machine | Ongoing backup and recovery | Backup disk is dedicated/configured for Time Machine | Yes | It is a backup history, not a simple clone. |
| Migration Assistant | Moving to another Mac | No | No | Transfers your information without replacing the new Mac's operating system. |
| Third-Party Cloning Software | Specialized copy, scheduling, or vendor-specific clone workflows | Depends on the tool | Depends on the tool | Bootability and Apple silicon support vary by product and macOS version. |
Apple's current Time Machine documentation says automatic backups are kept hourly for the past 24 hours, daily for the past month, and weekly for previous months until the backup disk fills. That is different from the old article's description of Time Machine as “real-time” backup.
If you bought a new Mac, Apple's Migration Assistant can transfer applications, user accounts, files, folders, and settings from another Mac, a Time Machine backup, or another startup disk. It does not erase the old Mac or replace macOS on the new one.
When Mac Cloning Software Makes Sense
Dedicated Mac cloning software can make sense when you need features that Disk Utility does not provide conveniently, such as scheduled replication, incremental copying, vendor-specific disk migration, or a documented bootable-clone workflow for a specific macOS and Mac model.
Before using any program that claims to produce a bootable clone, check its current documentation for your exact macOS version, Apple silicon or Intel architecture, and destination type. Boot behavior changed significantly with APFS, signed system volumes, Apple silicon, and T2 security, so older “bootable clone” tutorials should not be treated as universal instructions.
Part 5. Why Disk Utility Restore Fails
Most Restore failures fall into a few predictable categories: the wrong source or destination was selected, the destination is not prepared correctly, the startup disk's modern APFS layout complicates the job, or the hardware itself is unstable. Diagnose the least destructive possibilities first.
Source and Destination Are Reversed
This is the most important correction to the old instructions. In Apple's current workflow, you first select the destination volume in the sidebar. That selected volume is erased. Only after clicking Restore do you choose the source volume from the Restore menu.
If the two names are similar, rename the external destination clearly before starting. Stop before clicking Restore if you are not certain which volume contains the only copy of your data.
The Destination Is Not Ready
If the target does not appear correctly, enable “View > Show All Devices,” reconnect the drive directly, check the cable and port, and confirm that Disk Utility can see the physical device. If the device is new or has an unsuitable partition map, initialize it only after confirming there is nothing on it you need to preserve.
Apple's external storage initialization guide uses GUID Partition Map for Mac initialization. Choose the file system based on the actual use case rather than blindly selecting Mac OS Extended.
The Startup Disk Uses a Modern APFS Volume Group
On current macOS systems, Macintosh HD is part of an APFS volume group rather than a single old-style startup volume. Apple documents a system volume and a separate Macintosh HD - Data volume. That is one reason a simple Restore operation should not be marketed as a guaranteed whole-system boot clone.
Disk image workflows have additional limitations. Apple's current disk-image documentation notes that Disk Utility cannot create images of individual APFS volumes and cannot create images of APFS containers on Macs with Apple silicon or an Apple T2 Security Chip. Apple also states in its disk-image Restore guide that restoring a disk image on macOS 11 or later does not reinstall macOS.
If your actual goal is an external startup environment, follow Apple's current instructions for installing macOS on external storage instead of trying to force a Restore operation into a bootable-clone workflow.
The Drive May Be Physically Failing
Stop the cloning attempt if a mechanical drive makes unusual clicking or grinding noises, repeatedly disconnects, disappears from Disk Utility, smells burnt, or has suffered liquid or impact damage. Repeated scans, erases, and Restore attempts can make a physically unstable device worse.
For severe physical damage, use a professional data-recovery service. Software-based cloning and file recovery are intended for devices that remain sufficiently detectable and stable for the operating system or recovery environment to access.
Part 6. Recover Files Missing After Cloning or Erasing
If the wrong destination was erased or files are missing after a failed cloning attempt, recovery priority matters more than another clone attempt. Stop writing new data to the affected drive, then check for an intact source or backup before scanning the damaged or erased device.
Check the Intact Source or Time Machine First
If the original source drive still contains the files, copy them from that source rather than running recovery software. If you have a recent Time Machine backup, check it next. A known-good copy is preferable to recovering deleted data from storage that may already have been overwritten.
Do not erase or reformat the affected drive again while deciding what to do. Every new write can reduce the amount of deleted data that remains recoverable.
Recover Missing Files With Recoverit
If files were accidentally deleted, erased, formatted, or made inaccessible and no usable backup exists, Recoverit for Mac can scan a detectable Mac storage device for recoverable data. No software can guarantee recovery after overwrite, and physically failing drives should be handled by a professional lab rather than repeatedly scanned.
Step 1. Select the affected drive
Launch Recoverit and select the drive or location where the files were lost. Current Recoverit for Mac specifications list support for macOS 10.15 through macOS 26 and Mac storage including HDDs, SSDs, external hard drives, and APFS/HFS-family file systems.
Step 2. Scan the selected location
Start the scan and avoid writing new files to the affected source while the scan runs. Use search and filtering when available to narrow the results.

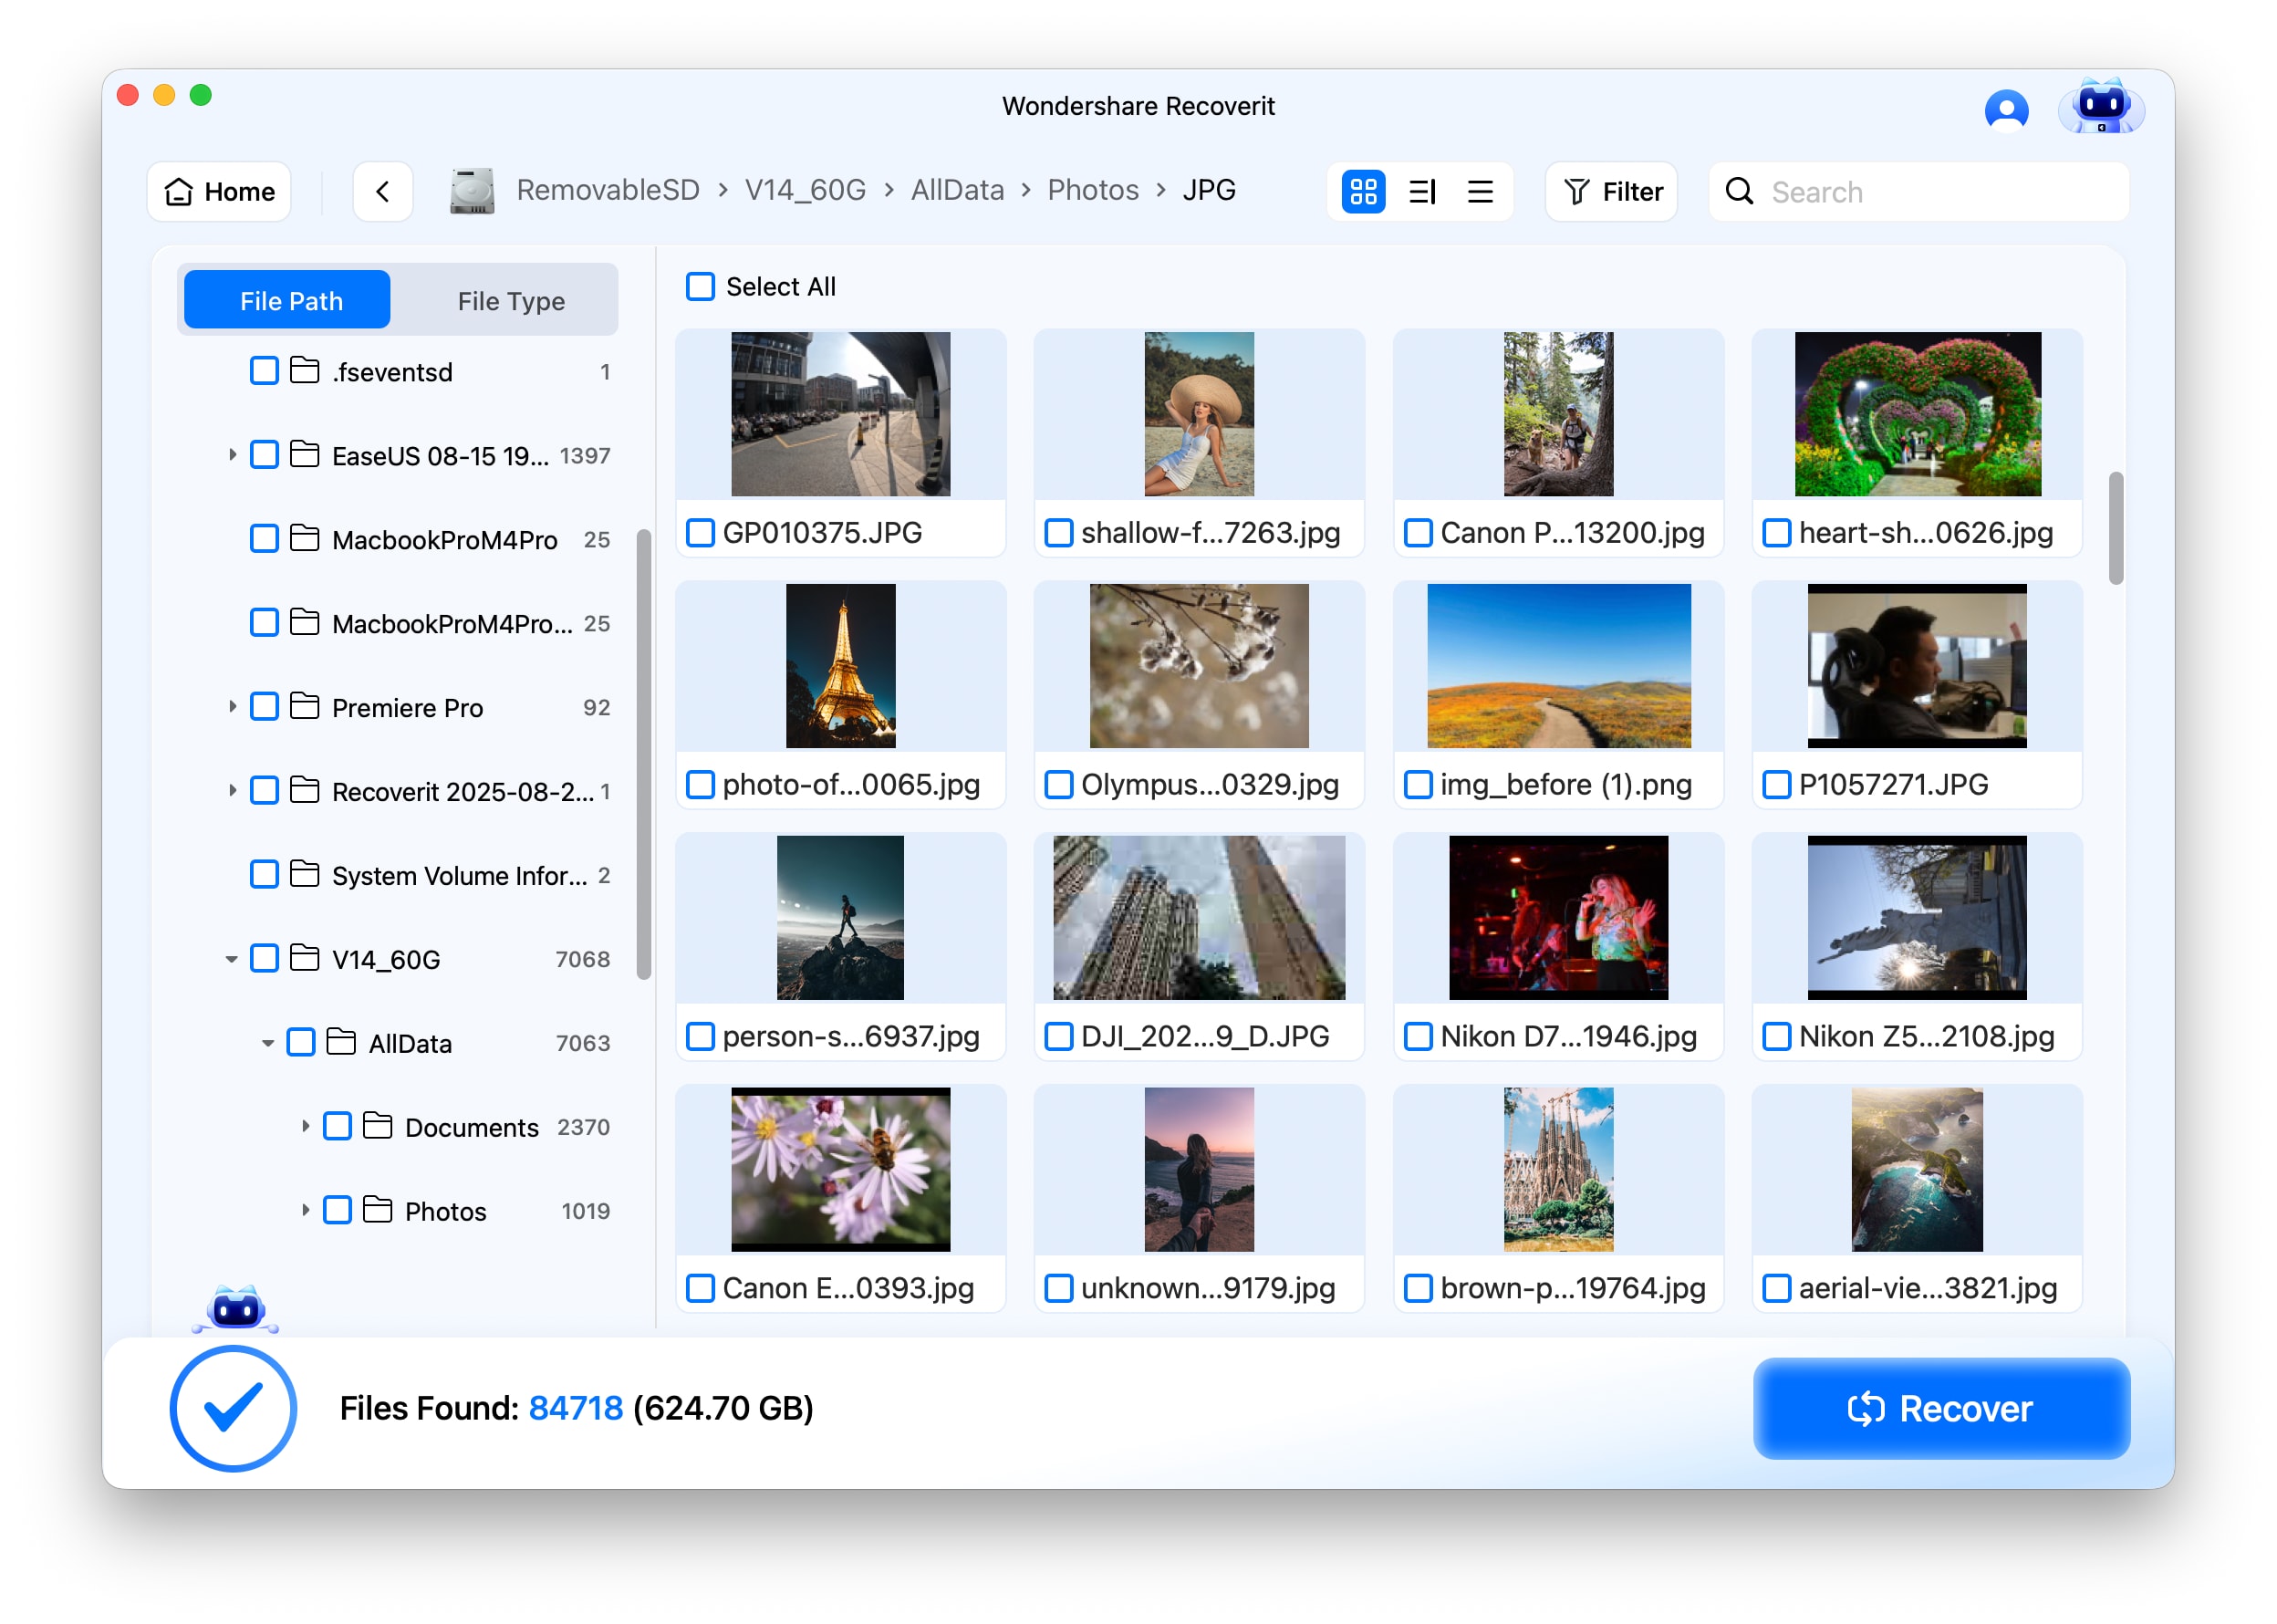
Step 3. Preview and recover
Preview the files you need when preview is available, select the recoverable items, and click Recover.
Step 4. Save to a different healthy drive
Choose a destination that is different from the affected source. Saving recovered files back to the same location can overwrite other deleted data that has not yet been recovered. For the current product workflow and limitations, see the Recoverit for Mac guide.
Conclusion
To clone a Mac drive with Disk Utility safely, treat Restore as a volume-to-volume copy: back up the destination, choose the right file system, select the destination first, and then choose the source from the Restore menu. On modern Macs, do not assume that a copied volume is automatically a complete bootable duplicate of the startup disk. Use Time Machine for versioned backups, Migration Assistant for moving to a new Mac, and Apple's external-startup workflow when the real goal is to run macOS from another drive.
Recover Files Missing After Cloning or Erasing
 Security Verified. Over 7,302,189 people have downloaded it.
FAQ
-
Can I clone a Mac hard drive with Disk Utility?
Yes. Disk Utility Restore can create an exact copy of one volume on another volume. The destination volume is erased first, so confirm the source and destination carefully before you start. -
Does Disk Utility create a bootable clone of a Mac?
Not automatically in every modern Mac configuration. Current macOS startup disks use APFS volume groups and additional boot components. If you need an external startup disk, Apple's supported method is to install a compatible macOS on the external storage device and then select it as a startup disk. -
Should I use APFS or Mac OS Extended when cloning a Mac drive?
For a modern Mac-only destination using macOS 10.13 or later, APFS is normally the appropriate format. Mac OS Extended remains relevant to some older macOS and legacy workflows. Choose the format for the actual system and purpose rather than applying one format to every Mac. -
Can I clone a MacBook hard drive to an external SSD?
You can use Disk Utility Restore to copy a source volume to a volume on an external SSD, provided the destination is prepared correctly and large enough for the data. If your goal is to boot macOS from that SSD, follow Apple's external-startup installation guidance instead of assuming a Restore copy is bootable. -
Is cloning a Mac drive better than Time Machine?
They solve different problems. Disk Utility Restore makes a point-in-time copy of a volume, while Time Machine keeps automatic historical backups so you can return to older file versions. For ongoing protection, Time Machine usually offers more useful backup history. -
Does Disk Utility Restore erase the destination drive?
Yes. Apple states that the destination volume is erased and becomes the exact copy of the source volume. Back up anything important on the destination before using Restore. -
Do I need third-party Mac cloning software?
Not for every copy job. Disk Utility can handle a direct volume Restore, Time Machine handles ongoing backups, and Migration Assistant handles moves to another Mac. Specialized cloning software is most useful when you need a documented feature such as scheduled replication, incremental copying, or a vendor-supported clone workflow for your exact macOS and Mac model.


