Fixed: macOS Could Not Be Installed on Your Computer
"I have tried to install macOS on my system, but nothing seems to work out. Can someone tell me what to do if macOS could not be installed?"
This is one of the many queries that we have received lately from our macOS users. While macOS is certainly one of the most secure and popular operating systems globally, it does have some pitfalls. For instance, there are times when users are not able to install certain macOS updates. A while back, my own macOS Sierra installation was stuck and I had to reset Mac manually. If your macOS Sierra won't install or you face the same problem with other versions, then don't worry. In this guide, we will teach what to do when macOS could not be installed on your computer.
Why macOS Could Not Be Installed on Your Computer?
Before we discuss ways to fix macOS could not be installed, it is important to understand the reasons behind it. The following are some of the common problems associated with this unwanted situation.
- Make sure there is enough free space on the system to complete the installation.
- The problem may arise if you are trying to install a pirated or corrupt version of the operating system
- There might be some clash with the existing OS or software profile on the computer.
- A network setting could block the installation or download of the update from its server.
- The bootstrap program or the boot-loading settings could have been compromised.
- There could be some problems with the default date and time of the system.
- If the system already has multiple users, then there might be some problem with the installation.
- The storage unit of the system could be corrupt, insufficient, or infected by a virus.
Method 1. Restart and Reinstall Mac
Sometimes, the simplest of the solutions can fix even the most critical issues with macOS installation. In case of macOS could not be installed, then try to restart your system once. Afterward, reinstall the operating system and try to fix this problem. If you are lucky, then this simple fix would be able to resolve the macOS installation problem seamlessly.
- Firstly, you need to restart your system. If you are already using it, then just go to the main menu and click on the "Restart" button.
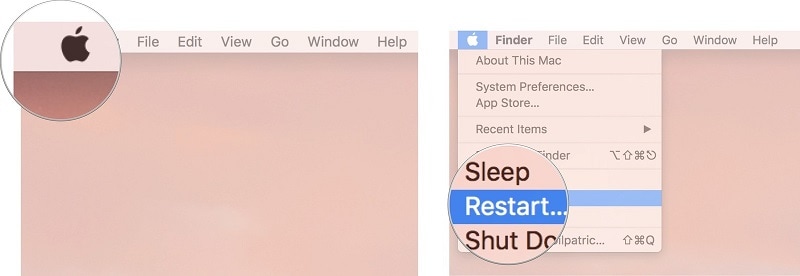
- In case if the system is not responding, then you can press and hold the Power button forcefully to turn it off. Press it again to turn on Mac.
- As you would hear the startup chime on Mac, press the Command + R keys at the same time. Keep holding them until your system boots in the recovery mode.
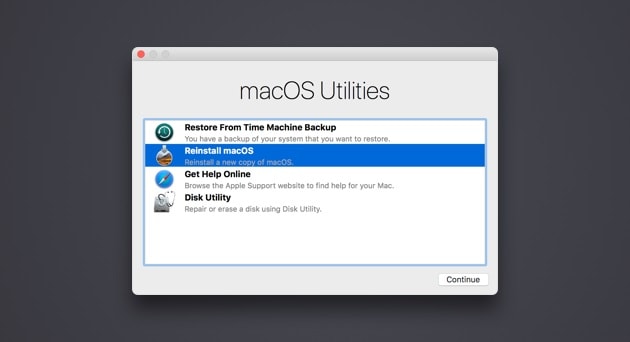
- This will launch the macOS utility window on the screen. Just click on the "Reinstall macOS" option and follow the simple on-screen instructions to complete the installation.
Method 2. Check Mac Date & Time
This is a rookie mistake that a lot of people make while installing macOS updates on their computers. If your system's default date and time are wrong, then it can clash with the latest update. For instance, some updates would check the present date and time to ensure that the system would yield compatible results or not. Here's a quick method to do the same and fix macOS Sierra won't install a problem. It can also fix the same issue for other macOS versions too.
- Simply click on the Apple menu on the top-left corner of the screen and visit System Preferences > Date & Time.
- This will open the Date & Time settings on your system. Here, you can manually set the present date and time on your Mac or can enable the automatic feature as well.
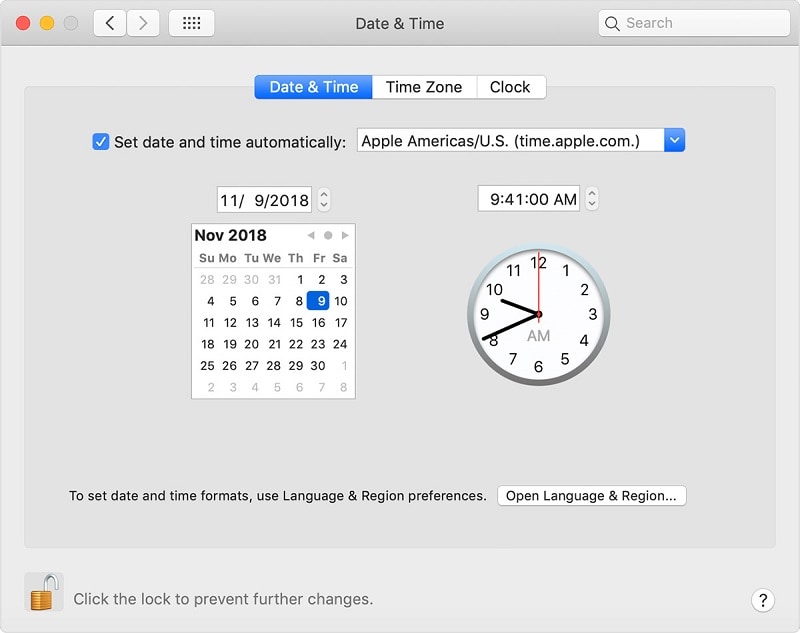
- There is also a section for "Time Zone" here so that you can select the relevant timezone for your location.
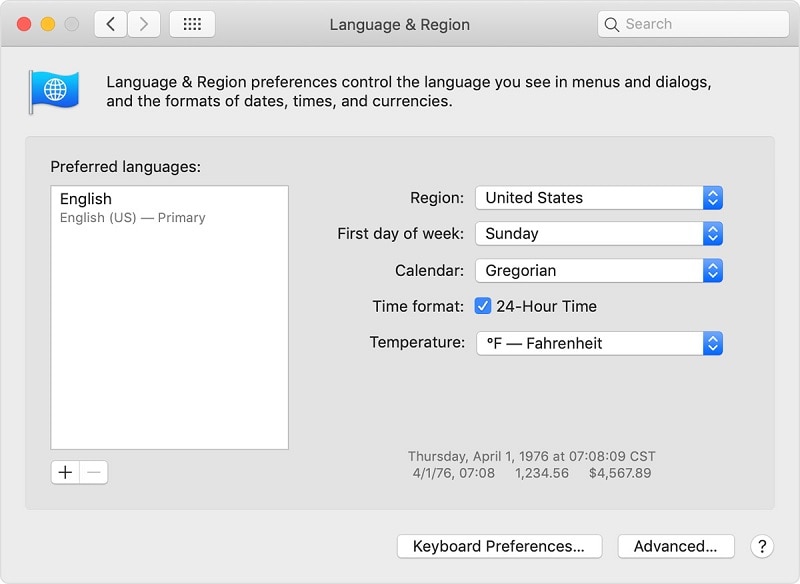
- To make further changes, you can click on the "Open Language & Region" feature from here.
- Now, specify the region you belong to or switch the calendar you follow. We recommend keeping the Georgian calendar for its universal appeal.
Method 3. Free Up Mac Space
If your Mac system is running low on storage, then you might encounter a similar issue as well. Before you install a new macOS update, make sure that there is free space on the system. In this way, the system can download the update without any trouble and take the needed actions.
- To check Mac storage, go to the Apple menu from the top and click on "About This Mac".
- A dedicated window will open with details about the system. Go the "Storage" tab from here to view details about the partitions and Mac storage.
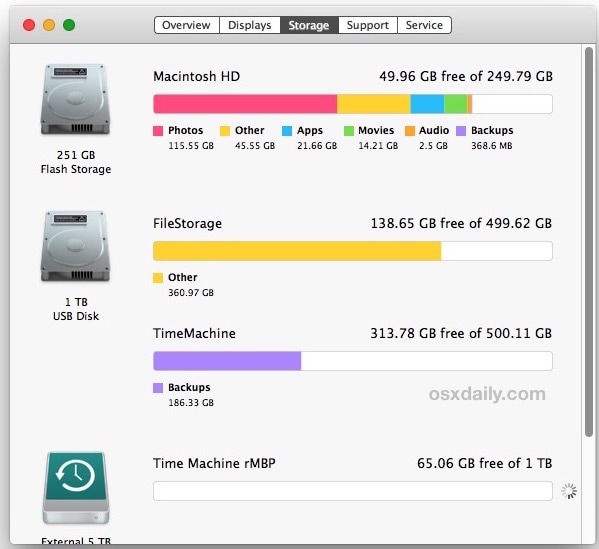
- Here, you can view what kind of data (photos, videos, backup, etc.) has occupied space on Mac's storage.
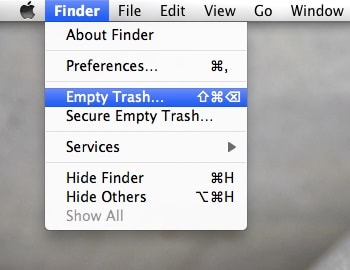
- Subsequently, you can get rid of any unwanted data from your Mac. Just select any file and move it to Trash. Afterward, you can empty the trash as well.
- Make sure that you remove cache and temporary files too. There are also tons of third-party tools that can help you make more space on your Mac.
Method 4. Reset the NVRAM
NVRAM is the non-volatile segment of RAM in a computer that stores vital information related to its booting, OS, and other components. Sometimes, a stored detail in NVRAM can clash with the installer, making macOS could not be installed on your computer. To fix this, you can take these steps and reset the NVRAM on your Mac.
- Firstly, restart your system the way you like. If it is not responding, then long-press the Power button and wait for it to turn off. Afterward, press it again and restart it.
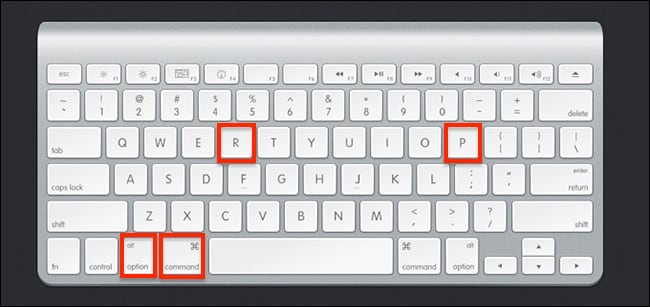
- Now, press the Command + Option + P + R keys at the same time as soon as the system would start.
- Keep holding them for a while (at least 10 seconds) and let them go once you hear the startup chime again. This would automatically reset the NVRAM on your Mac.
Method 4. Reset the NVRAM
NVRAM is the non-volatile segment of RAM in a computer that stores vital information related to its booting, OS, and other components. Sometimes, a stored detail in NVRAM can clash with the installer, making macOS could not be installed on your computer. To fix this, you can take these steps and reset the NVRAM on your Mac.
- Firstly, restart your system the way you like. If it is not responding, then long-press the Power button and wait for it to turn off. Afterward, press it again and restart it.
- Now, press the Command + Option + P + R keys at the same time as soon as the system would start.
- Keep holding them for a while (at least 10 seconds) and let them go once you hear the startup chime again. This would automatically reset the NVRAM on your Mac.
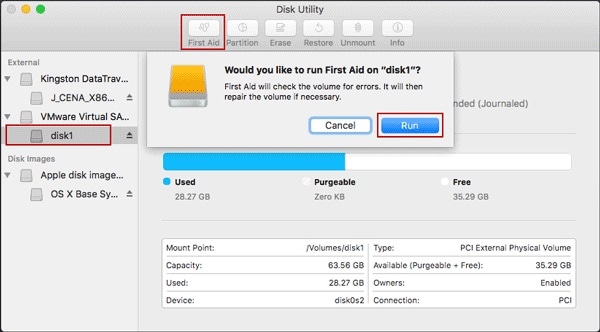
Method 5. Run First Aid on Mac's Disk
In case if there is a problem with Mac's storage itself, then it can also halt the installation in between. To resolve the macOS could not be installed due to this problem, take the assistance of its Disk Utility. It is an inbuilt feature in Mac that can help you repair its storage or any partition in no time.
- If your Mac is already running, then you can go to its Applications > Utilities > Disk Utility to open it.
- Another way to access it is via Mac's Recovery Mode. Just restart Mac and press Command + R keys during the startup process. From the available macOS Utilities, click on "Disk Utility".
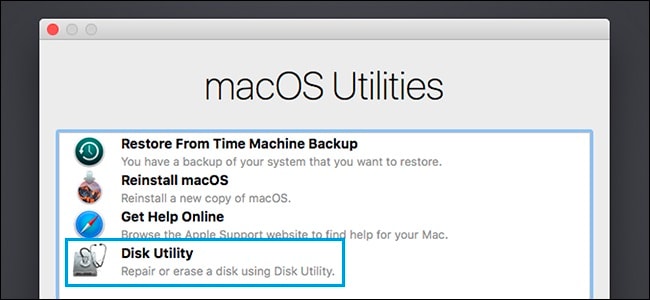
- This will launch a dedicated section with details about Mac's internal hard drive and its partition. You can select the storage unit from the left panel and view its details on the right.
- Now, click on the "First Aid" option on the toolbar to repair the disk and confirm your choice by clicking on the "Run" button again.
- This will start repairing the selected disk on your Mac so that you can move past the macOS Sierra installation stuck.
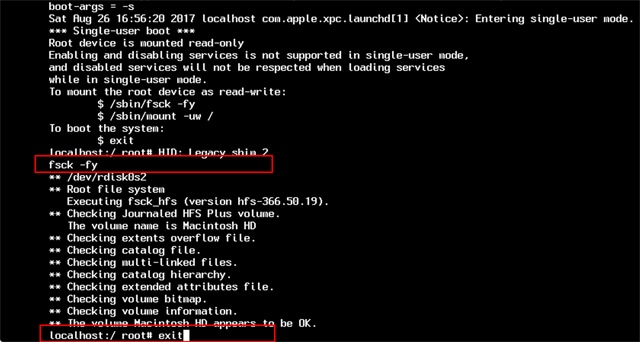
Method 6. Use Single User Mode
A lot of Mac users end up creating multiple accounts that can backfire during the installation process. One of the best ways to resolve this is by booting your system in single-user mode. This will open its Unix Shell, letting you directly pass the needed commands to the system. Here's how you can also fix macOS could not be installed on your computer problem via single-user mode.
- To start with, turn on your system. If it is already on, then you can restart it.
- Hold the Command + S keys while it turns on for a few seconds. This will boot your Mac in a single user mode with a Unix Shell screen.
- Once it is done, use the File System Check (fsck) command to scan the directory and repair it. Ideally, type the "fsck –fy" command and press enter.
- Mac will automatically scan the storage unit and would try to repair it. In the end, you can just type the "exit" command and restart Mac in the normal mode.
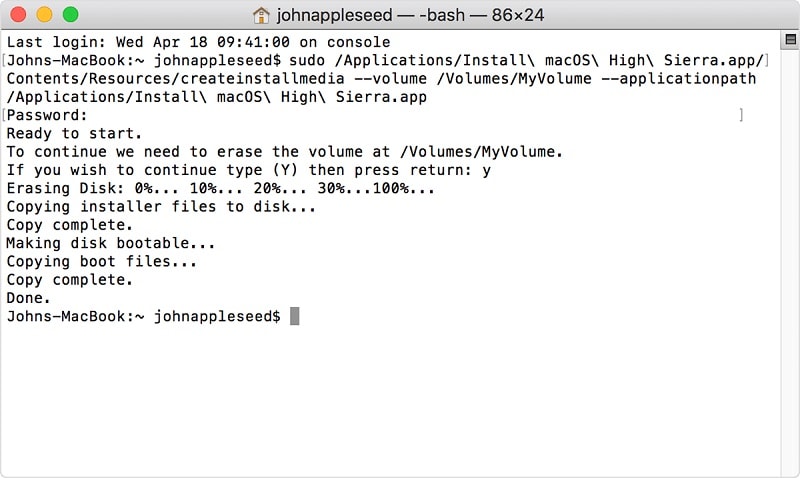
Method 7. Create a Bootable Installer
If there is a serious issue with your system, then you can consider this approach. While it is a bit complicated and time-consuming, it will most-likely fix macOS could not be installed problem. In this, we will take the assistance of an external source (like a USB drive) to create a bootable media. Later, we will take its assistance to install macOS on the system. To fix macOS could not be installed on your computer, follow these steps:
- To begin with, download the macOS installer on your system. You can visit its official website to do the same.
- Once you have the installer handy, connect an external source to create bootable media. Make sure it has at least 12 GB of free storage. Also, take its backup beforehand as it would be formatted by Mac.
- After connecting the source, go to your Mac's Applications > Utilities and launch Terminal.
- Now, you need to type certain commands in Terminal to create a bootable media. The exact commands would differ according to the macOS version you have.
- For Mojave:sudo /Applications/Install\ macOS\ Mojave.app/Contents/Resources/createinstallmedia --volume /Volumes/
- High Sierra:sudo /Applications/Install\ macOS\ High\ Sierra.app/Contents/Resources/createinstallmedia --volume /Volumes/
- For Sierra:sudo /Applications/Install\ macOS\ Sierra.app/Contents/Resources/createinstallmedia --volume /Volumes/ --applicationpath /Applications/Install\ macOS\ Sierra.app
- For El Capitan:sudo /Applications/Install\ OS\ X\ El\ Capitan.app/Contents/Resources/createinstallmedia --volume /Volumes/ --applicationpath /Applications/Install\ OS\ X\ El\ Capitan.app
Here, the string should be replaced by the current volume in Mac where the installer is present.
- Once you are done typing, press enter and confirm your choice. You would have to enter the administrator account details to authenticate the process.
- In the end, you will be notified that the bootable media is created. Just quit the terminal and unmount the media. Later, you can take the assistance of Mac's Startup Manager or Disk Preferences to boot it from the connected media.
Bonus Tip. Recover Data from Unbootable Mac
If your Mac has been crashed and you can't seem to extract its data back, then don't worry. You can take the assistance of Wondershare Recoverit Data Recovery Mac for Mac to do the same. It is a dedicated data recovery tool that allows us to extract all kinds of data from Mac's storage. The Ultimate version of the tool can even create bootable media. In this way, you can perform data recovery on a crashed or malfunctioning Mac. Recently, the firm has come up with the latest update of the software – Recoverit 8.0 which is equipped with tons of high-end features.
Recoverit - The Best Word File Recovery Software
- Recover Word documents from all storage devices like Mac.
- Recover 1000+ types and formats of files in different situations.
- Scan and preview the files before you recover them from MacBook hard drive.
To learn how to create a bootable media using Recoverit 8.0, simply take these basic steps:
Step 1: Select a Location
Launch the software and select the drive from where the data files are lost. If you don't know which drive to search, tap on the "I can't find my partition" option, and hit the Start button.

Step 2: Scan the Location
Typically, the software will run an All-Around Recovery scan and search for the lost and deleted files on the entire drive.

Step 3: Preview and Recover
When the scan completes, the files will be listed on the screen. The software will sort out the files according to format to make the search easier. You can select multiple files at a time and have a preview at them.

Conclusion
That's it, folks! This concludes our informative guide on how to fix macOS could not be installed. A while back, when my macOS Sierra installation was stuck, I followed the same drill and easily fixed this issue. Furthermore, if you have lost some of your important data due to a crashed Mac, then use Recoverit 8.0. The latest release of the data recovery application can create bootable media in no time. You can take its assistance to boot a malfunctioning Mac and extract all the vital content from it seamlessly.
What's Wrong with Mac
- Recover Your Mac
- Fix Your Mac
- Delete Your Mac
- Learn Mac Hacks


Sue Wayne
staff Editor