


 TL;DR:
Recovery HD is the legacy term for a hidden recovery volume on many Intel Macs. On newer Apple silicon Macs, use the startup options screen to enter macOS Recovery. From there, you can use Time Machine, Disk Utility, Reinstall macOS, Terminal, Startup Security Utility, or Share Disk when supported. These tools can repair or restore a system, but they do not guarantee recovery of deleted files.
- Shut down the Mac and enter macOS Recovery using the correct hardware-specific method.
- Check Time Machine or another backup before changing the startup disk.
- Use Disk Utility to determine whether the volume is detected and mounted.
- Use First Aid only after important data is protected.
- Use Share Disk, an external recovery environment, or professional help when the Mac cannot boot normally.
Ask AI for a summary
 ChatGPT
 Perplexity
 Gemini
 Claude
 Grok
Grok
If your Mac will not start, shows system errors, or cannot access its startup volume, you may need macOS Recovery. On older Intel Macs, this environment is commonly associated with a hidden Recovery HD volume. On Apple silicon Macs, recovery tools are provided through the Mac's startup options and recovery environment rather than the same legacy partition layout.
macOS Recovery can help you start from a recovery environment, restore from Time Machine, check or repair a detected disk, reinstall macOS, change startup security settings, and transfer files. It is not a general deleted-file recovery tool, and Disk Utility First Aid cannot replace a data recovery scan.

This guide explains what Recovery HD means, how to enter macOS Recovery on Intel and Apple silicon Macs, and how to choose a safe data recovery path.
Try Wondershare Recoverit to Perform Data Recovery
 Security Verified. Over 7,302,189 people have downloaded it.
What Is Macintosh Recovery HD and macOS Recovery?

macOS Recovery is a recovery environment that starts separately from the normal macOS installation. On many Intel Macs, it is associated with a hidden Recovery HD volume. On Apple silicon Macs, the recovery environment is integrated into the startup options and the APFS-based system architecture, so the user experience and available steps differ.
Depending on the Mac model and macOS version, the recovery environment may include:
- Restore From Time Machine: Restore files or a system state from an existing backup.
- Reinstall macOS: Install macOS again after confirming that important data is protected.
- Safari: Open Apple Support or other documentation when network access is available.
- Disk Utility: View, mount, inspect, erase, or run First Aid on detected storage.
- Startup Security Utility: Adjust supported security policies on Intel Macs with a T2 chip.
- Terminal: Inspect or manage the system with command-line tools when you understand the risk.
- Share Disk: Transfer files from a supported Apple silicon Mac to another Mac.
- Startup Disk: Choose an available startup system.
- Recovery Log: Review recovery process information when available.
Macintosh HD vs. Macintosh HD - Data
On modern macOS versions, an APFS startup volume group commonly separates the read-only system volume from the writable data volume. In Finder or Disk Utility, you may see names such as Macintosh HD and Macintosh HD - Data.
| Volume | Typical Role | Recovery Caution |
| Macintosh HD | System files and macOS components | Do not erase it while trying to recover personal files |
| Macintosh HD - Data | User files, applications, and writable data | Erasing it removes personal data and may prevent normal startup |
| APFS container | Holds related volumes and free space | Container-level changes affect multiple volumes |
Reinstalling macOS can often preserve user data when performed from the correct recovery workflow, but it is not a substitute for a backup. Do not erase Macintosh HD, Macintosh HD - Data, or the APFS container unless you have confirmed that the data is backed up or no longer needed.
Which Recovery Tool Should You Use?
| Your Goal | Recommended Tool | Important Limit |
| Restore files from an existing backup | Time Machine or cloud backup | Only works if a usable backup exists |
| Check whether a disk is detected or mounted | Disk Utility | Detection does not mean all files are recoverable |
| Repair some logical file-system errors | Disk Utility First Aid | Not a deleted-file recovery tool |
| Transfer files from a supported Apple silicon Mac | Share Disk | Requires a compatible second Mac and connection |
| Extract files when normal startup fails | External recovery environment or recovery software | Source disk must be accessible and destination must be separate |
| Recover from physical or severe controller failure | Professional recovery service | Software may not detect the device |
Recovery HD Missing? How to Access or Recreate macOS Recovery
A missing recovery volume or unavailable recovery option can result from disk changes, a damaged startup structure, an incomplete macOS installation, or hardware problems. First protect important files. Reinstalling macOS may recreate the recovery environment, but it does not guarantee recovery of files that were already deleted.
Update or Upgrade macOS
- Open Apple menu > System Settings or System Preferences.

- Open General > Software Update on supported newer macOS versions.

- Install a compatible update or upgrade and restart the Mac.

Credit to Apple
Reinstall macOS on an Apple silicon Mac
- Choose Apple menu > Shut Down.

- Press and hold the power button until startup options appear.
- Choose Options > Continue.

- Choose Reinstall macOS and follow the on-screen instructions.

Reinstall macOS on an Intel Mac
- Restart the Mac.

- Immediately hold
Command + Rto start from local macOS Recovery when available.
- Use
Option + Command + Rfor Internet Recovery and the latest compatible macOS, orOption + Shift + Command + Rfor the original compatible version when supported.
- Connect to a network if prompted, choose Reinstall macOS, and follow the instructions.

How to Restore Your Mac with macOS Recovery
macOS Recovery can help you restore from a backup, inspect the startup disk, repair some file-system problems, or reinstall macOS. Choose the least destructive option first.
Apple silicon Mac
- Choose Apple menu > Shut Down.

- Press and hold the power button until startup options appear, then choose Options > Continue.

- If a backup exists, choose Restore From Time Machine and follow the instructions.
- To transfer files to another Mac, choose Utilities > Share Disk when available.

- To inspect the disk, open Disk Utility and choose View > Show All Devices.

- Select the lowest-level volume first and run First Aid only after important data is protected.

- Repeat checks at the appropriate volume or container level, quit Disk Utility, and restart.

Intel-based Mac
- Restart the Mac.

- Immediately hold
Command + Rto start from local macOS Recovery.
- Choose Restore From Time Machine if a backup exists, or open Disk Utility to inspect and repair a detected volume.

- Use Reinstall macOS only after reviewing the data protection implications.
How to Troubleshoot macOS Recovery Problems
Recovery may fail because the startup disk is encrypted, unmounted, damaged, unavailable, or affected by a hardware or security setting. Do not erase the disk simply because a volume is locked or greyed out.
When the Startup Volume Is Locked or Unmounted
- Open Disk Utility in macOS Recovery.
- Select View > Show All Devices.
- Select the volume and choose Mount if available.

- If prompted, unlock the volume with the authorized password or FileVault recovery key.
- If the volume is detected but files are important and missing, stop before First Aid or Erase and use a recovery path.
When First Aid Fails
A failed First Aid result does not mean that formatting is the only option. Record the error, protect the data with a backup, disk image, Share Disk transfer, external recovery environment, or professional service, and only then consider erasing and reinstalling macOS.

FileVault and Startup Security
If Disk Utility asks for a password to unlock Macintosh HD, it may require the authorized user password or FileVault recovery key. On supported Intel Macs with a T2 chip, Startup Security Utility may also affect external startup and recovery options. Do not bypass security controls by erasing the source when data is still needed.
When Recovery HD or macOS Recovery Is Missing
A missing recovery option may indicate a damaged startup structure, a changed partition layout, an incomplete installation, or a hardware problem. On Apple silicon Macs, use the power-button startup options rather than looking for a legacy Recovery HD partition.
- Check whether the Mac can enter startup options or Internet Recovery.
- Check Disk Utility to determine whether the internal disk and volumes are detected.
- Use Time Machine, Share Disk, or another backup path to protect files.
- Use an external recovery environment or compatible recovery software if the Mac cannot boot normally.
- Do not erase the disk until important files are safe.
How to Recover Files When macOS Recovery Is Not Enough
Wondershare Recoverit may help scan an accessible Mac startup disk or connected storage when files are deleted, formatted, or inaccessible. It is intended for file recovery, not for recreating the Recovery HD or macOS Recovery environment.
Use the recovery environment or a bootable recovery workflow when the Mac cannot start normally. Recovery depends on whether the disk is detected, whether encryption credentials are available, and whether new data has overwritten the missing files.
Recover Files from an Accessible Mac Disk
- Install or launch Recoverit from a healthy Mac volume or supported recovery environment.
- Open Hard Drives and Locations and select the detected Macintosh HD or external storage.
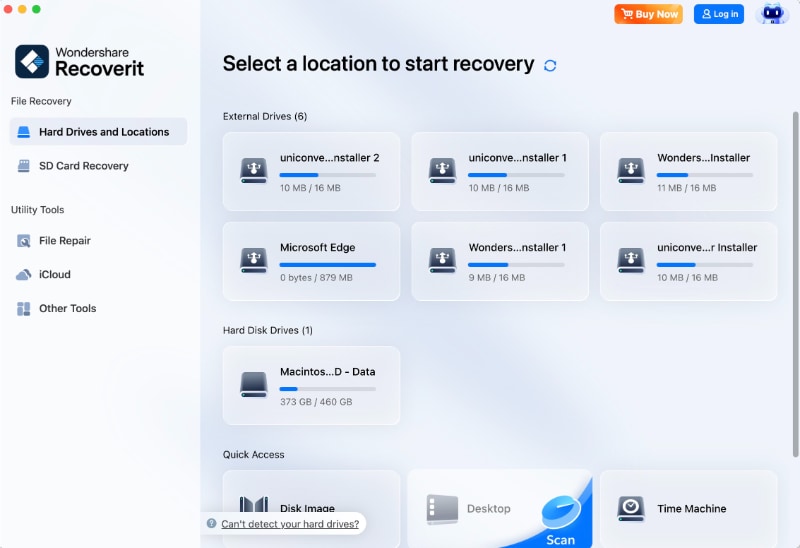
- Run the scan and avoid disconnecting or repairing the source while it runs.
- Filter results by file type, size, status, or path where available.
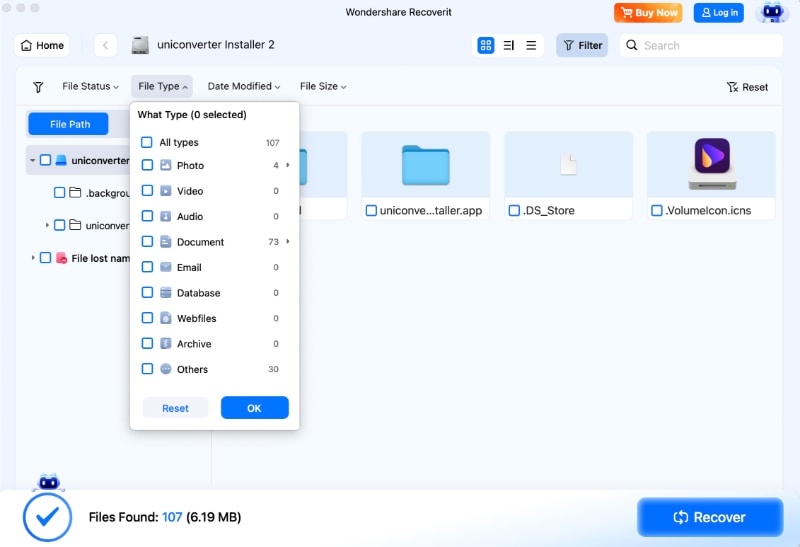
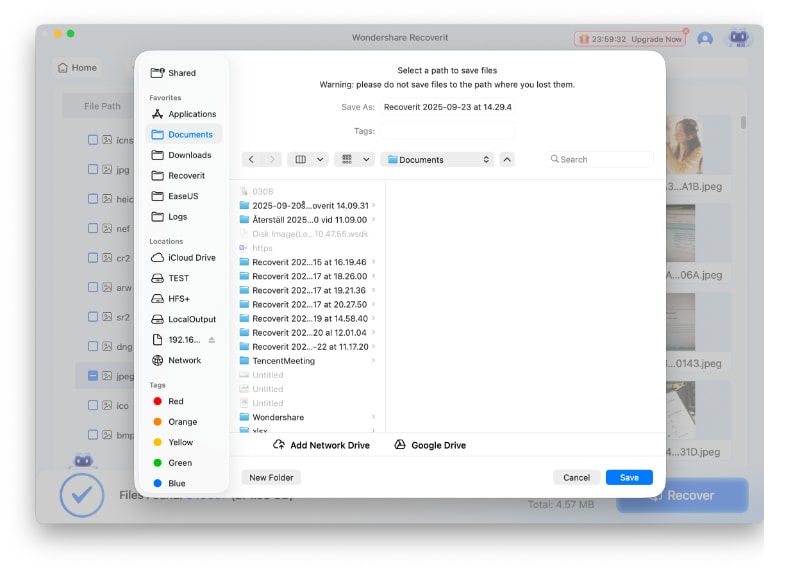
- Preview supported files and select the items to recover.

- Save them to another healthy drive, never back to the source volume.
Conclusion
Macintosh Recovery HD is a legacy recovery-volume concept, while modern Macs provide macOS Recovery through hardware-specific startup options. Recovery can help you restore a backup, inspect a disk, repair some file-system errors, transfer files, or reinstall macOS.
Protect data before using First Aid, Erase, reinstall, or partition tools. If macOS Recovery cannot access the disk, use Share Disk, an external recovery environment, compatible recovery software, or a professional service. File recovery and recreation of the Recovery environment are separate tasks.
FAQ About Macintosh Recovery HD
-
How do I enter macOS Recovery on an Apple silicon Mac?
Shut down the Mac, press and hold the power button until startup options appear, choose Options, and then click Continue. -
How do I enter Recovery HD on an Intel Mac?
Restart the Mac and immediately hold Command + R to start from local macOS Recovery when available. -
Should I run First Aid before recovering missing files?
No. First Aid is a repair feature and may modify or unmount a volume. Protect or recover important data first. -
What should I do if Macintosh HD is locked in Recovery?
Try Mount and provide the authorized password or FileVault recovery key. Do not erase the volume while important data is missing. -
Can Share Disk replace data recovery software?
Share Disk can transfer accessible files from a supported Apple silicon Mac to another Mac. It does not recover overwritten or inaccessible data. -
When should I use a professional recovery service?
Use one when the disk is not detected, physically damaged, encrypted without valid credentials, or contains critical data that software cannot access.


