

If you need to format a USB to FAT32 on Mac, macOS gives you two built-in options: Disk Utility for a graphical workflow and Terminal for an explicit FAT32 command. The important catch is that formatting erases the selected USB drive, so copy any files you still need before you begin. Apple currently recommends MS-DOS (FAT) for Windows-compatible disks of 32 GB or less and ExFAT for disks over 32 GB.
Quick Answer:
- Use Disk Utility for the simplest method: Choose View > Show All Devices, select the physical USB drive, click Erase, and choose MS-DOS (FAT). For broad Windows and legacy-device compatibility, Master Boot Record is commonly required by the target device.
- Use Terminal when you need FAT32 explicitly: Run
diskutil listfirst, verify the USB identifier, then usediskutil eraseDisk FAT32 USB_NAME MBRFormat /dev/diskN. - Protect files before formatting: If the USB is readable, copy its files elsewhere. If files are already missing or inaccessible, stop writing to the USB and attempt recovery before erasing it.
- Know the FAT32 limit: A single FAT32 file cannot exceed 4 GiB, so exFAT is usually a better choice for modern large files when the target device supports it.
In This Article
Part 1. When Should You Format a USB Drive to FAT32 on Mac?
FAT32 is still useful when a USB flash drive must work with older hardware, embedded devices, some cameras, TVs, car stereos, game systems, or other equipment that explicitly lists FAT32 as a supported file system. macOS can read and write Windows-compatible FAT volumes through Disk Utility, so no third-party formatter is required for the normal workflow.
Do not choose FAT32 only because a USB drive is not showing up or is behaving strangely. A missing or unstable USB can also point to a port, cable, hardware, partition, or file-system problem. Formatting should be a deliberate compatibility choice, not the first troubleshooting step when important data is still on the drive. For a broader look at APFS, exFAT, and other choices, see Recoverit's guide to formatting USB and external drives on Mac.
Before choosing a format, compare what each file system is designed to do. That makes it easier to avoid using FAT32 when exFAT or APFS is a better fit.
FAT32, exFAT, or APFS: Which Format Should You Choose?
Apple's current Disk Utility guidance treats MS-DOS (FAT) and ExFAT as Windows-compatible formats. Apple recommends MS-DOS (FAT) for Windows-compatible disks of 32 GB or less and ExFAT for disks over 32 GB. APFS is Apple's current Mac file system for macOS 10.13 or later. Microsoft documents a 4 GiB maximum size for an individual file on FAT32.
| File System | Best Fit | Important Limitation or Note |
| FAT32 / MS-DOS (FAT) | Older devices and cross-platform hardware that specifically requires FAT32 | Individual files are limited to 4 GiB. Apple recommends MS-DOS (FAT) for Windows-compatible disks of 32 GB or less. |
| exFAT | Modern USB drives shared between macOS and Windows, especially with files larger than 4 GiB | Some older cameras, TVs, consoles, and embedded devices may not support it. |
| APFS | Mac-focused storage on macOS 10.13 or later | Not the right choice when the USB must work broadly with Windows or legacy non-Mac hardware. |
You can confirm the current file-system recommendations in Apple's Disk Utility file-system guide and the FAT32 file-size limit in Microsoft's file-system comparison.
Part 2. Before You Format: Protect the Files on Your USB
Formatting is destructive. Apple explicitly warns that formatting a disk or volume erases the files on it, so the safest workflow depends on whether your USB data is still accessible. Handle the data first, then erase the drive.
Use the situation that matches what you see on the Mac. The two paths below keep a simple formatting task from becoming an avoidable data-loss problem.
If the USB Opens Normally
If Finder can open the USB and the files are intact, copy everything you want to keep to your Mac, another healthy external drive, a NAS, or another verified backup location. Open a few copied files before formatting so you know the backup is usable.
- Copy first: Move important documents, photos, videos, installers, and project files off the USB.
- Verify the copy: Open representative files from the destination rather than assuming the transfer completed correctly.
- Then format: Only continue to Disk Utility or Terminal after the files you need are safely stored elsewhere.
If the files cannot be copied normally, do not keep retrying destructive operations. That situation needs a recovery-first path instead.
If the USB Is Unreadable or Files Are Already Missing
If the USB is still detected by macOS or recovery software but important files are deleted, missing, formatted, or inaccessible, try to recover them before formatting. Stop saving new files to the USB because new writes can overwrite data that might otherwise remain recoverable.
Recoverit for Mac can scan a computer-detectable USB flash drive for recoverable files. The safe sequence is to select the affected USB, scan it, preview the files you need, and save recovered files to a different healthy drive. Recovery is not guaranteed, especially after overwriting, severe physical damage, or unstable hardware. If the USB repeatedly disconnects, overheats, smells burned, or is physically damaged, stop repeated software scans and consider a professional recovery service.
For the USB-specific workflow, see USB flash drive recovery on Mac. You can also check the current Recoverit for Mac user guide for the product interface and scanning steps.


Part 3. How to Format USB to FAT32 on Mac With Disk Utility
Disk Utility is the best starting point for most users because you can verify the physical USB drive, format, and partition scheme before the erase begins. Apple's current instructions also use View > Show All Devices, which helps prevent confusion between a physical disk and one of its volumes.
Follow the erase steps carefully, then verify the result before copying files back. Selecting the correct physical USB is the most important safety check in this method.
Format the USB With Disk Utility
Step 1. Back Up the USB
Copy any files you still need to another healthy storage location. Do not continue until the backup is verified.
Step 2. Connect the USB and Open Disk Utility
Connect the flash drive directly to the Mac. Open Applications > Utilities > Disk Utility, or search for Disk Utility with Spotlight.
Step 3. Show the Physical Devices
Choose View > Show All Devices. This displays each physical disk and its child volumes.
Step 4. Select the Physical USB Drive
In the sidebar, select the USB device itself, not just the indented volume below it. Confirm the drive name and capacity before you proceed.
Step 5. Click Erase
Click Erase in the toolbar. Disk Utility will show the name, format, and scheme controls for the selected device.
Step 6. Choose the Format and Scheme
Enter a volume name, choose MS-DOS (FAT) from Format, and choose the partition scheme required by the device that will use the USB. Apple's current Boot Camp support workflow specifically uses Master Boot Record with MS-DOS (FAT), while Apple's general Disk Utility guidance lets you choose a scheme based on your use case. If a TV, camera, console, car, or other device specifies FAT32 plus MBR, follow that manufacturer's requirement.
Step 7. Erase the USB
Click Erase, wait for Disk Utility to finish, then click Done. Do not unplug the USB while the erase is in progress.
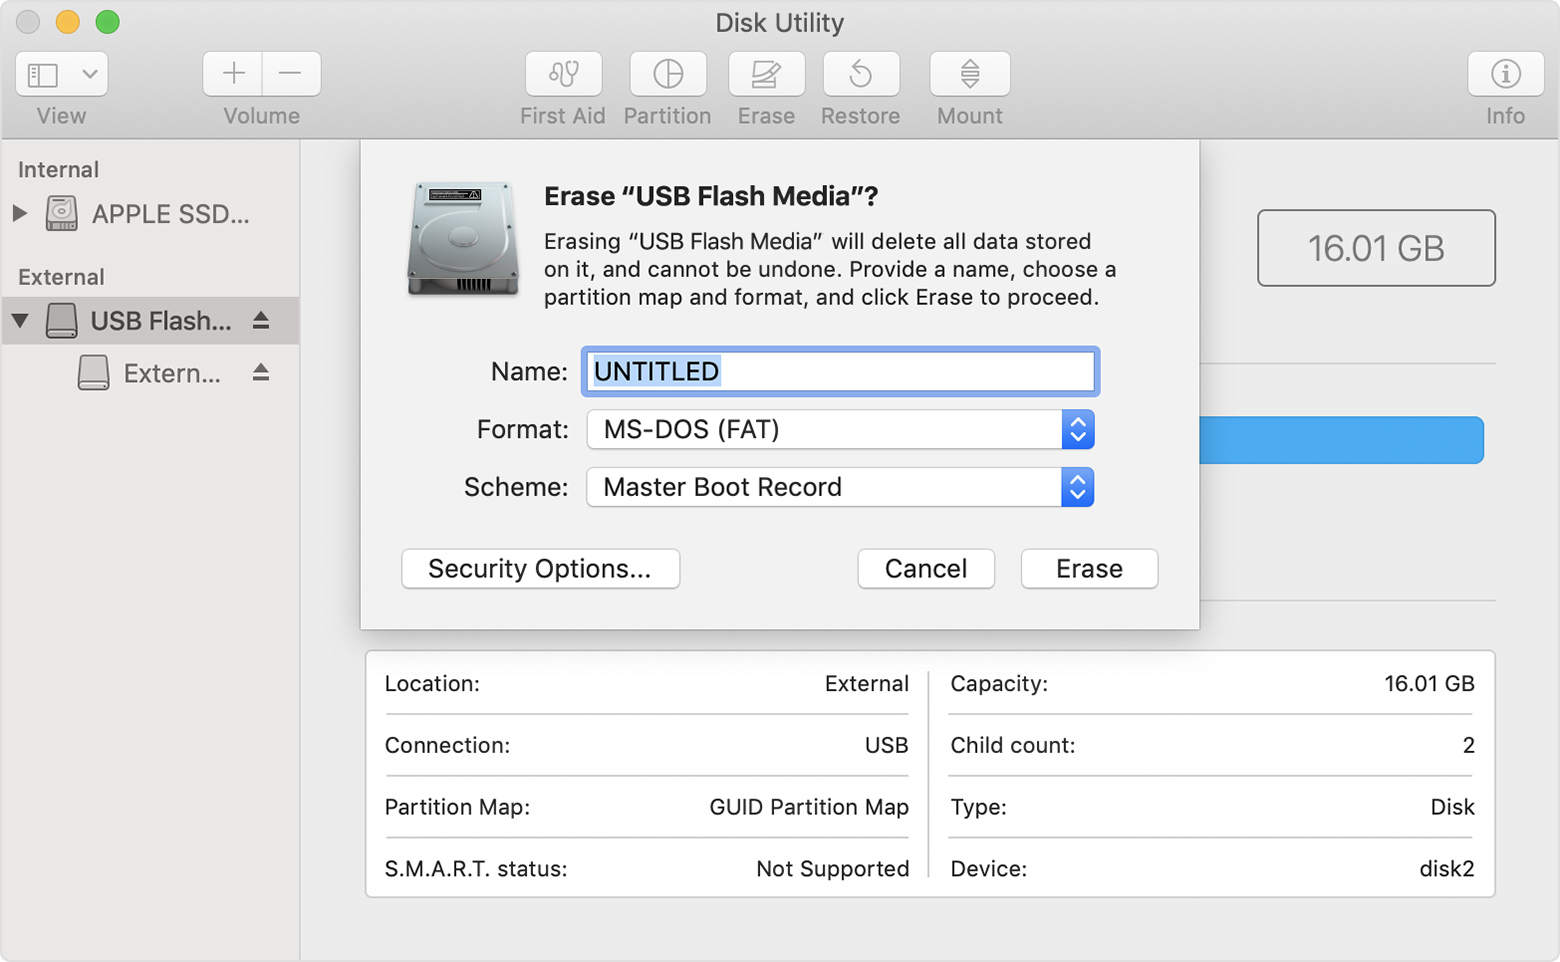
Apple's current USB formatting instructions use the same MS-DOS (FAT) and Master Boot Record combination for a USB flash drive. For the broader Disk Utility workflow, Apple also documents formatting a disk for Windows computers on Mac.
The erase completing successfully is a good sign, but the final check is the file system that macOS actually created. Verify it before using the USB in the target device.
Verify the USB File System
Keep the USB connected and select it in Disk Utility. Review its format information, or select the drive in Finder and choose File > Get Info. If the target hardware explicitly says it requires FAT32, confirm the resulting format before copying files back.
Important: The Disk Utility menu label is MS-DOS (FAT), not a separate option named FAT32. For a larger or device-specific USB where you need to request FAT32 explicitly, use the Terminal method below and verify the result afterward.
Part 4. How to Format a USB to FAT32 on Mac With Terminal
Terminal is useful when you need to specify FAT32 directly or when the graphical workflow does not expose the exact result you need. It is also less forgiving: the erase command operates on the disk identifier you type, so using the wrong identifier can erase the wrong disk.
The safest Terminal workflow has three stages: identify the USB, erase only after you have checked the identifier, and then verify the new file system.
Find the Correct USB Disk Identifier
Step 1. Open Terminal
Open Applications > Utilities > Terminal.
Step 2. List Connected Disks
Run:
diskutil list
Step 3. Identify the External Physical USB
Find the entry that matches the USB by connection type, name, and capacity. It may appear as /dev/disk2, /dev/disk3, or another number. Do not copy an example identifier blindly.
Once you have checked the disk identifier twice, you can build the erase command with your own USB name and disk number.
Erase the USB as FAT32
Step 1. Build the Command
Use this pattern, replacing USB_NAME and /dev/diskN with your own values:
diskutil eraseDisk FAT32 USB_NAME MBRFormat /dev/diskN
Step 2. Run the Command
Press Return. If macOS reports that administrator privileges are required, rerun the same verified command with sudo at the beginning and enter your Mac administrator password when prompted.
Step 3. Wait for the Erase to Finish
Terminal should report the unmount, partition-map creation, formatting, and remounting stages. Do not disconnect the USB during this process.
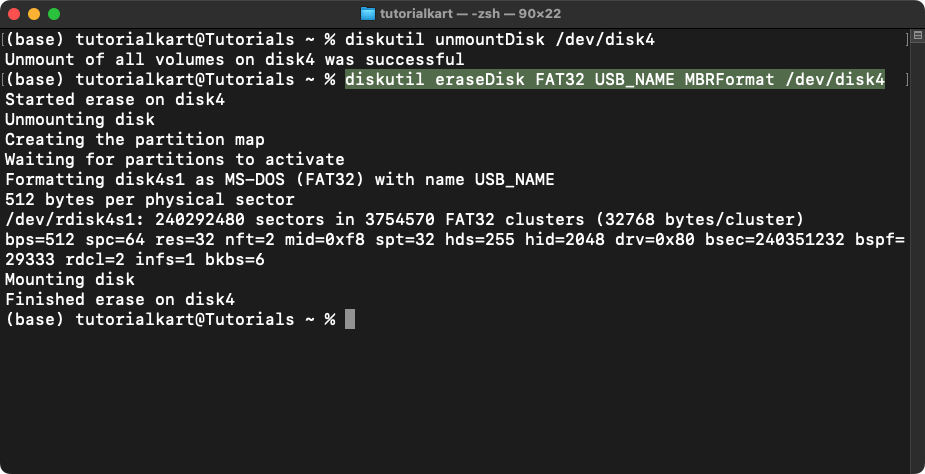
The command syntax is also demonstrated in this diskutil Terminal walkthrough. The screenshot above is a third-party example; the disk number on your Mac will often be different.
After the command finishes, check the output rather than assuming the requested format was applied correctly.
Verify the FAT32 Format
Run diskutil list again and locate the same external disk. A successful FAT32 result is typically shown as an MS-DOS/FAT32 volume in the disk listing. You can also inspect the USB in Disk Utility or Finder's Get Info panel.
If the volume does not show the expected format, do not repeat erase commands at random. Recheck the USB identifier, target-device requirements, and drive capacity first.
Part 5. Why Can't I Format USB to FAT32 on Mac?
Most FAT32 formatting problems on macOS come from selecting the wrong level of the disk hierarchy, expecting the GUI to display the word FAT32, trying to force FAT32 onto a use case better served by exFAT, or dealing with a failing USB. The fix depends on which symptom you see.
Use the matching section below rather than repeatedly erasing the drive. Repeated destructive attempts are especially risky if the USB still contains data you have not recovered.
FAT32 Is Missing From Disk Utility
Disk Utility does not normally show a menu item literally named FAT32. Apple's current interface labels the Windows-compatible FAT option MS-DOS (FAT). Choose View > Show All Devices and select the physical USB before opening Erase.
If your target device specifically requires FAT32 and you want to request that format explicitly, use the verified Terminal workflow in Part 4.
The Scheme Menu Is Missing
The Scheme menu can disappear when you select only a volume instead of the physical storage device. Apple advises using View > Show All Devices and selecting the storage device at the top of its hierarchy before erasing it.
After selecting the physical USB, open Erase again and check whether the Scheme menu is available.
The USB Is Larger Than 32 GB
Apple recommends ExFAT for Windows-compatible disks over 32 GB. That recommendation matters if your goal is simply to move modern files between Mac and Windows, especially because FAT32 cannot store an individual file larger than 4 GiB.
If a specific camera, TV, console, car stereo, firmware updater, or other device explicitly requires FAT32 on a larger USB, check that device's manual for both maximum capacity and partition-scheme requirements. Terminal can request FAT32, but that does not guarantee the target hardware accepts every USB size or partition layout.
Disk Utility or Terminal Fails to Erase the USB
First confirm that you selected the external USB rather than an internal disk. Then reconnect the USB directly to the Mac, try another known-good port or adapter, and close apps that may be using the drive. If the USB is still readable and you need its files, protect the data before running more erase or repair operations.
If the drive repeatedly disconnects, vanishes from Disk Utility, becomes unusually hot, or shows other signs of physical instability, stop repeated formatting attempts. A software formatter cannot repair failing flash memory or a damaged USB controller.
The FAT32 USB Still Does Not Work in the Target Device
FAT32 alone does not guarantee compatibility. Some hardware also requires Master Boot Record, a specific partition count, a maximum drive capacity, a particular cluster size, or a specific folder structure. Check the manufacturer's current instructions for the exact device rather than reformatting repeatedly.
If the USB works normally on the Mac but not in another device, test a smaller known-good USB and compare that device's file-system and capacity requirements. This helps separate a formatting mismatch from a hardware problem.
Part 6. FAT32 vs. exFAT on Mac: Which Is Better?
Neither FAT32 nor exFAT is universally better. FAT32 remains valuable for legacy-device compatibility, while exFAT is usually more practical for modern cross-platform storage because it supports files larger than 4 GiB and Apple recommends it for Windows-compatible disks over 32 GB.
| Question | Choose FAT32 | Choose exFAT |
| Does the target device explicitly require FAT32? | Yes | No, unless the device also supports exFAT |
| Do you need to store individual files larger than 4 GiB? | No | Yes |
| Is the USB mainly for current Mac and Windows computers? | Works, but has the 4 GiB file limit | Usually the more practical cross-platform option |
| Is the disk over 32 GB and Windows compatibility is the goal? | Use only when the target hardware requires FAT32 and supports that capacity | Apple's recommended Windows-compatible format for disks over 32 GB |
If you are formatting only for modern Mac computers, APFS may be more appropriate. If you are formatting for a specific non-computer device, that manufacturer's file-system requirement should take priority over a generic recommendation.
Part 7. What If You Formatted the Wrong USB by Mistake?
If you accidentally erased the wrong USB, what you do next matters more than trying to reverse the format immediately. New writes can overwrite data that may still be recoverable, so avoid copying new files back to the formatted drive.
- Stop using the formatted USB: Do not save, copy, download, or install anything onto it.
- Keep the connection stable: If the drive is detected normally and is not physically failing, connect it to a working Mac without writing new data to it.
- Check an existing backup first: A verified backup is safer than scanning the source when it already contains what you need.
- Scan the USB if needed: Use a recovery tool only while the source remains computer-detectable and stable.
- Recover to another drive: Save restored files to a different healthy storage device, not back to the formatted USB.
For a dedicated walkthrough, see recovering files from a formatted USB flash drive. No recovery software can restore data that has already been overwritten, and physically failing USB drives may require professional service rather than repeated scans.
Conclusion
To format a USB drive to FAT32 on Mac, start with Disk Utility when the GUI provides the format and scheme you need, or use Terminal when you need to request FAT32 explicitly. The safest order is always the same: protect important files first, verify the physical USB, format only the intended disk, and confirm the result before putting the drive back into service.
For modern cross-platform storage, remember that Apple recommends MS-DOS (FAT) for Windows-compatible disks of 32 GB or less and exFAT for disks over 32 GB. If a specific TV, camera, console, car, or other device requires FAT32, follow that device's own capacity and partition requirements as well.
FAQ
-
Does macOS support FAT32?
Yes. macOS can read and write FAT-formatted storage. In Disk Utility, Apple presents the Windows-compatible FAT option as MS-DOS (FAT). If a device explicitly requires FAT32, verify the final format after erasing or use the Terminal FAT32 command. -
Is MS-DOS (FAT) the same as FAT32 on Mac?
MS-DOS (FAT) is the label Disk Utility uses for the FAT-family Windows-compatible option. Because a target device may specifically require FAT32, do not rely on the label alone when exact FAT32 compatibility matters; verify the resulting volume or use Terminal to request FAT32 explicitly. -
How do I format a 64 GB USB to FAT32 on Mac?
Apple recommends exFAT for Windows-compatible disks over 32 GB. If your target hardware explicitly requires FAT32 on a 64 GB USB, first confirm that the device supports that capacity, then use Terminal with the FAT32 eraseDisk command and verify the result afterward. -
What partition scheme should I use with FAT32 on Mac?
Use the scheme required by the target device. Master Boot Record is common for Windows and legacy-device compatibility, and Apple currently uses MS-DOS (FAT) plus Master Boot Record in its USB formatting workflow for Windows support software. For Mac-focused storage, other schemes may be more appropriate. -
Does formatting a USB to FAT32 on Mac erase everything?
Yes. Apple's Disk Utility documentation warns that formatting a disk or volume erases its files. Back up readable data first. If files are already missing or inaccessible, recover them before formatting and save recovered files to a different healthy drive.


