


Using a flash drive on a Mac is usually plug-and-play: connect the USB drive, open Finder, select the drive under Locations, then drag files to or from it. On newer MacBooks with USB-C or Thunderbolt ports, you may need a USB-C flash drive or adapter. On Apple silicon Mac laptops, macOS may also ask you to approve a new USB accessory before it becomes available.
⚡Quick Fix: Use a USB Flash Drive on Mac
● Connect it correctly: Plug the flash drive into a compatible USB or USB-C port, using an adapter if the connector does not fit.
● Open it in Finder: Click Finder and choose the USB drive under Locations.
● Copy files safely: Drag files between your Mac and the flash drive, then verify important copied files before deleting the originals.
● Eject before unplugging: Wait for transfers to finish, click the Eject button beside the drive in Finder, and unplug it only after the drive disappears.
In This Article
Part 1. Connect a Flash Drive to a Mac or MacBook
The first step is matching the flash drive connector to the ports on your Mac. Do not force a USB-A plug into a USB-C/Thunderbolt port; use a compatible adapter or hub when needed.
Check Whether You Need USB-A, USB-C, or an Adapter
Apple's current Mac guidance confirms that external storage can connect through USB, USB-C, or Thunderbolt, and that an adapter may be needed when the connector does not fit your Mac. See Apple's guide to connecting and using external storage on Mac.
Step 1. Look at the connector on the flash drive. A traditional USB-A connector is wide and rectangular; USB-C is smaller, oval, and reversible.
Step 2. Look at the ports on your MacBook, iMac, Mac mini, Mac Studio, or Mac Pro. If the connectors do not match, use a compatible USB-C adapter, hub, or dock.
Step 3. Insert the flash drive firmly but gently. If it does not fit easily, stop and check the connector orientation or adapter instead of forcing it.
Allow a USB Accessory on an Apple Silicon MacBook
On Mac laptops with Apple silicon, macOS can require approval before a new or unknown USB accessory is allowed to connect. This is a security control, not a sign that the flash drive is broken.
Step 1. Unlock the MacBook and connect the flash drive or adapter.
Step 2. If the “Allow accessory to connect?” alert appears, confirm that the attached device is yours and click Allow.

If you previously clicked Don't Allow, reconnect the accessory and approve it when asked again. Apple also lets you review the setting under “Apple menu > System Settings > Privacy & Security > Accessories.” The current behavior is documented in Apple's USB accessory security guidance.
Part 2. Find and Open a USB Flash Drive in Finder
Once macOS recognizes the drive, Finder is the main place to open it and manage its files. On current macOS versions, removable storage normally appears in the Finder sidebar under Locations.
Open the Flash Drive Under Locations
Step 1. Click the Finder icon in the Dock.
Step 2. In the Finder sidebar, look under Locations for the name of the USB drive.
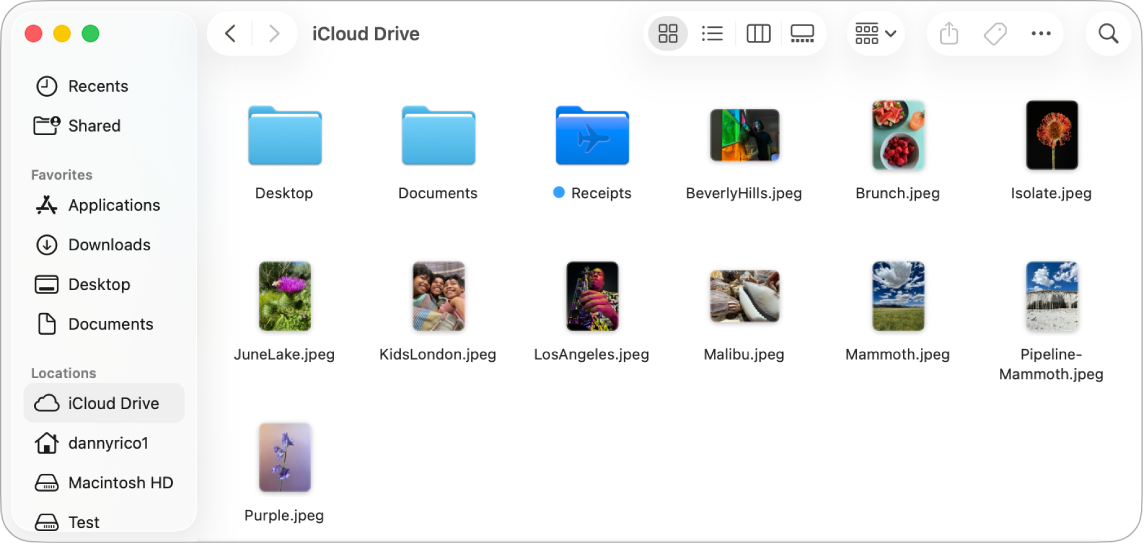
Step 3. Click the drive name to view its folders and files. You can now open compatible files directly or copy them to your Mac.
Tip: If you prefer to show external disks on the desktop as well, Finder settings can control which connected devices appear there. Finder remains the more consistent place to access a USB drive.
Show the Drive if It Is Missing From Finder
If the flash drive is connected but you cannot see expected items in Finder, check the sidebar before assuming the USB is unreadable.
Step 1. With Finder active, choose “View > Show Sidebar” if the sidebar is hidden.
Step 2. Choose “Finder > Settings > Sidebar” and review which items are shown. Apple documents the current Finder sidebar controls in its Finder sidebar troubleshooting guide.

If the flash drive still does not appear in Finder, continue to Part 6 rather than formatting it immediately.
Part 3. Transfer Files Between a Mac and a Flash Drive
After the drive opens normally in Finder, transferring files works much like moving files between folders. The safest workflow is to copy first, verify the destination copy, and only then delete an original if your goal is to free storage.
Copy Files From Mac to USB
Step 1. Open one Finder window showing the files on your Mac and another showing the USB drive.
Step 2. Select the files or folders you want to copy.
Step 3. Drag the selected items onto the USB drive in Finder. You can also use Command-C, open the USB drive, and press Command-V.

Step 4. Wait until the copy operation finishes before ejecting the drive.
Copy Files From USB to Mac
Step 1. Open the USB drive under Locations in Finder.
Step 2. Select the files you need and drag them to a folder on your Mac, such as Documents or Desktop. You can also copy and paste them with Command-C and Command-V.
Step 3. Open the copied file from the Mac to confirm it works before removing the only other copy from the flash drive.
Verify Important Files Before Deleting Originals
A completed progress bar only confirms that macOS finished the copy operation. For documents, photos, videos, project files, and other important data, open a few copied items from the destination and confirm they are readable before you delete originals or erase the flash drive.
If a file refuses to copy because the USB is read-only, do not format the drive yet. Check the file system first in Part 5.2.
Part 4. Safely Eject a USB Drive From Mac
Proper ejection tells macOS to finish pending access to the drive before you physically disconnect it. This is especially important after copying, renaming, deleting, or editing files on the USB.
Eject the USB in Finder
Step 1. Make sure all file transfers have finished and close files that are open directly from the flash drive.
Step 2. In Finder, locate the USB drive under Locations and click the Eject button beside its name.
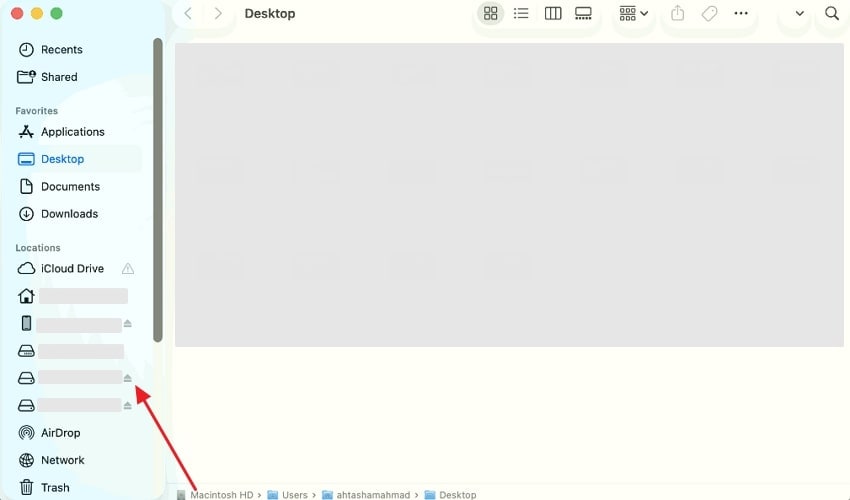
Step 3. Wait for the USB drive to disappear from Finder, then unplug it. Apple also supports choosing “File > Eject” or dragging a desktop disk icon to the Trash/Eject area.
For more ejection options, see the dedicated Recoverit guide on how to eject a USB on Mac.
What to Do if the USB Will Not Eject
If macOS says the disk is in use, do not simply pull it out.
- Close open files: Quit documents, photos, videos, or apps that are using files on the USB.
- Wait for transfers: Let copy, sync, backup, or indexing activity finish.
- Try Eject again: Use the Finder Eject button after closing the app that was accessing the drive.
Apple notes that an app or another user may be using files when a storage device cannot be ejected. Avoid force removal while writes are still active.
Part 5. Does a Flash Drive Need to Be Formatted for Mac?
Usually, no. If the flash drive already appears in Finder and you can read and write files, there is no reason to erase it just because you connected it to a Mac. Formatting becomes relevant only when you need a different file system, the drive is new and incompatible with your intended use, or you have already protected any important data and are deliberately rebuilding the volume.
Choose a File System Based on How You Use the Drive
Apple's current Disk Utility documentation lists APFS as the Mac file system used by macOS 10.13 and later, while MS-DOS (FAT) and exFAT are Windows-compatible formats. The practical choice depends on where you need to use the USB.
| Use Case | Typical Format | What to Know |
| Use mainly with current Macs | APFS | Designed for modern macOS; not the best choice if the drive must also work natively with Windows. |
| Move files between Mac and Windows | exFAT | Apple lists exFAT as Windows-compatible and recommends it for Windows volumes larger than 32 GB. |
| Small legacy cross-platform volume | MS-DOS (FAT) | Apple recommends MS-DOS (FAT) for Windows volumes 32 GB or less. |
| Existing Windows NTFS drive | NTFS | macOS may be able to read it but not write to it without additional software or reformatting. |
See Apple's current file system format guide for the official format descriptions.
Warning: Formatting erases the files on the selected volume. Apple explicitly tells users to save needed files elsewhere before formatting. If the USB contains files you cannot access or have accidentally deleted, recover or copy them before erasing the drive.
If you actually need to reformat the USB, use the dedicated Recoverit tutorial on formatting an external or USB drive for Mac rather than treating formatting as a routine first step.
Why an NTFS USB Can Be Read-Only on Mac
If you can open files on the flash drive but cannot add, rename, or delete them, check the format before assuming the drive is damaged.
Step 1. Select the USB drive in Finder.
Step 2. Choose “File > Get Info” or press Command-I.
Step 3. Check the listed Format. Apple states that Disk Utility does not support NTFS and that a Mac might be able to read an NTFS drive without being able to write to it. See Apple's guidance for a Mac that cannot save to an external drive.
If you need the USB to work natively on both Mac and Windows, copy or recover any important files first, then consider exFAT. Reformatting is destructive, so it should not be the first response to a read-only drive that still contains valuable data.
Part 6. Flash Drive Not Showing or Not Working on Mac
When the USB does not behave normally, start with detection and connection checks. Repair and formatting come later because they can modify the source and are unnecessary when the problem is only a port, adapter, accessory approval, or Finder visibility setting.
Check the Connection and Finder Before Repairing Anything
- Reconnect the USB: Remove it only after any current activity stops, then connect it again firmly.
- Try another compatible port or adapter: A faulty hub, loose adapter, or damaged port can prevent detection.
- Approve the accessory: On Apple silicon MacBooks, respond to the USB accessory approval prompt if it appears.
- Check Finder: Open Finder and look under Locations; make sure the sidebar is visible.
- Check another computer if practical: This helps separate a Mac-side connection issue from a failing flash drive.
If the drive is still not recognized, use the dedicated Recoverit guide for Mac not recognizing a USB flash drive rather than expanding this beginner guide into advanced repair procedures.
Protect Data Before First Aid or Formatting
If the flash drive contains files you still need, copy accessible files to a healthy location first. If files are missing or inaccessible but the drive is still detected, recover the files before formatting or other destructive changes.
Disk Utility First Aid can check and repair file-system structures, but it writes changes to the storage device. Formatting goes further and erases the selected volume. For important data, the safe order is: preserve or recover files first, verify the recovered copies, then repair or reformat the USB if needed.
If the drive repeatedly disconnects, has a cracked connector, is water-damaged, smells burnt, or is not detected on any computer, stop repeated DIY scans and consider a professional data-recovery service.
Part 7. Recover Lost Files From a USB Flash Drive on Mac
Recoverit belongs in this workflow only when data is actually missing, deleted, formatted, or inaccessible. It is not required for normal USB use. If the flash drive is still detectable by macOS and has no severe physical damage, a software scan may help locate recoverable files that have not been overwritten.
Stop Writing to the USB First
Do not copy new files to the flash drive, format it, or keep editing files on it after important data disappears. New writes can overwrite deleted file content and reduce what recovery software can find.
Recoverit's current USB flash drive recovery guide also separates logical data loss from physical damage and recommends saving recovered files somewhere other than the original USB.
Scan the Flash Drive With Recoverit

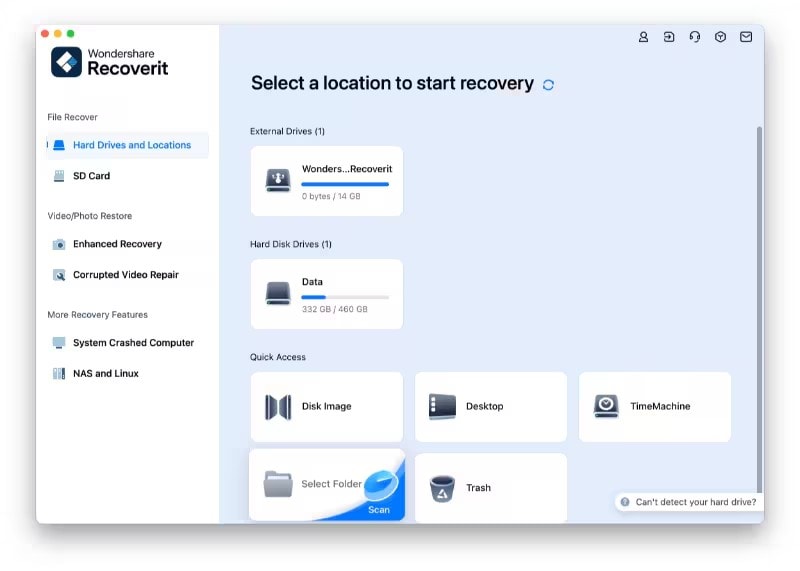
Step 1. Select the external USB drive
Connect the flash drive to the Mac, open Recoverit, and select the USB as the target external device. Make sure you choose the original USB volume rather than your Mac's internal disk.
Step 2. Scan the USB for lost files
Start the scan and keep the flash drive connected. You can use search and filtering controls to narrow the results while the scan runs.
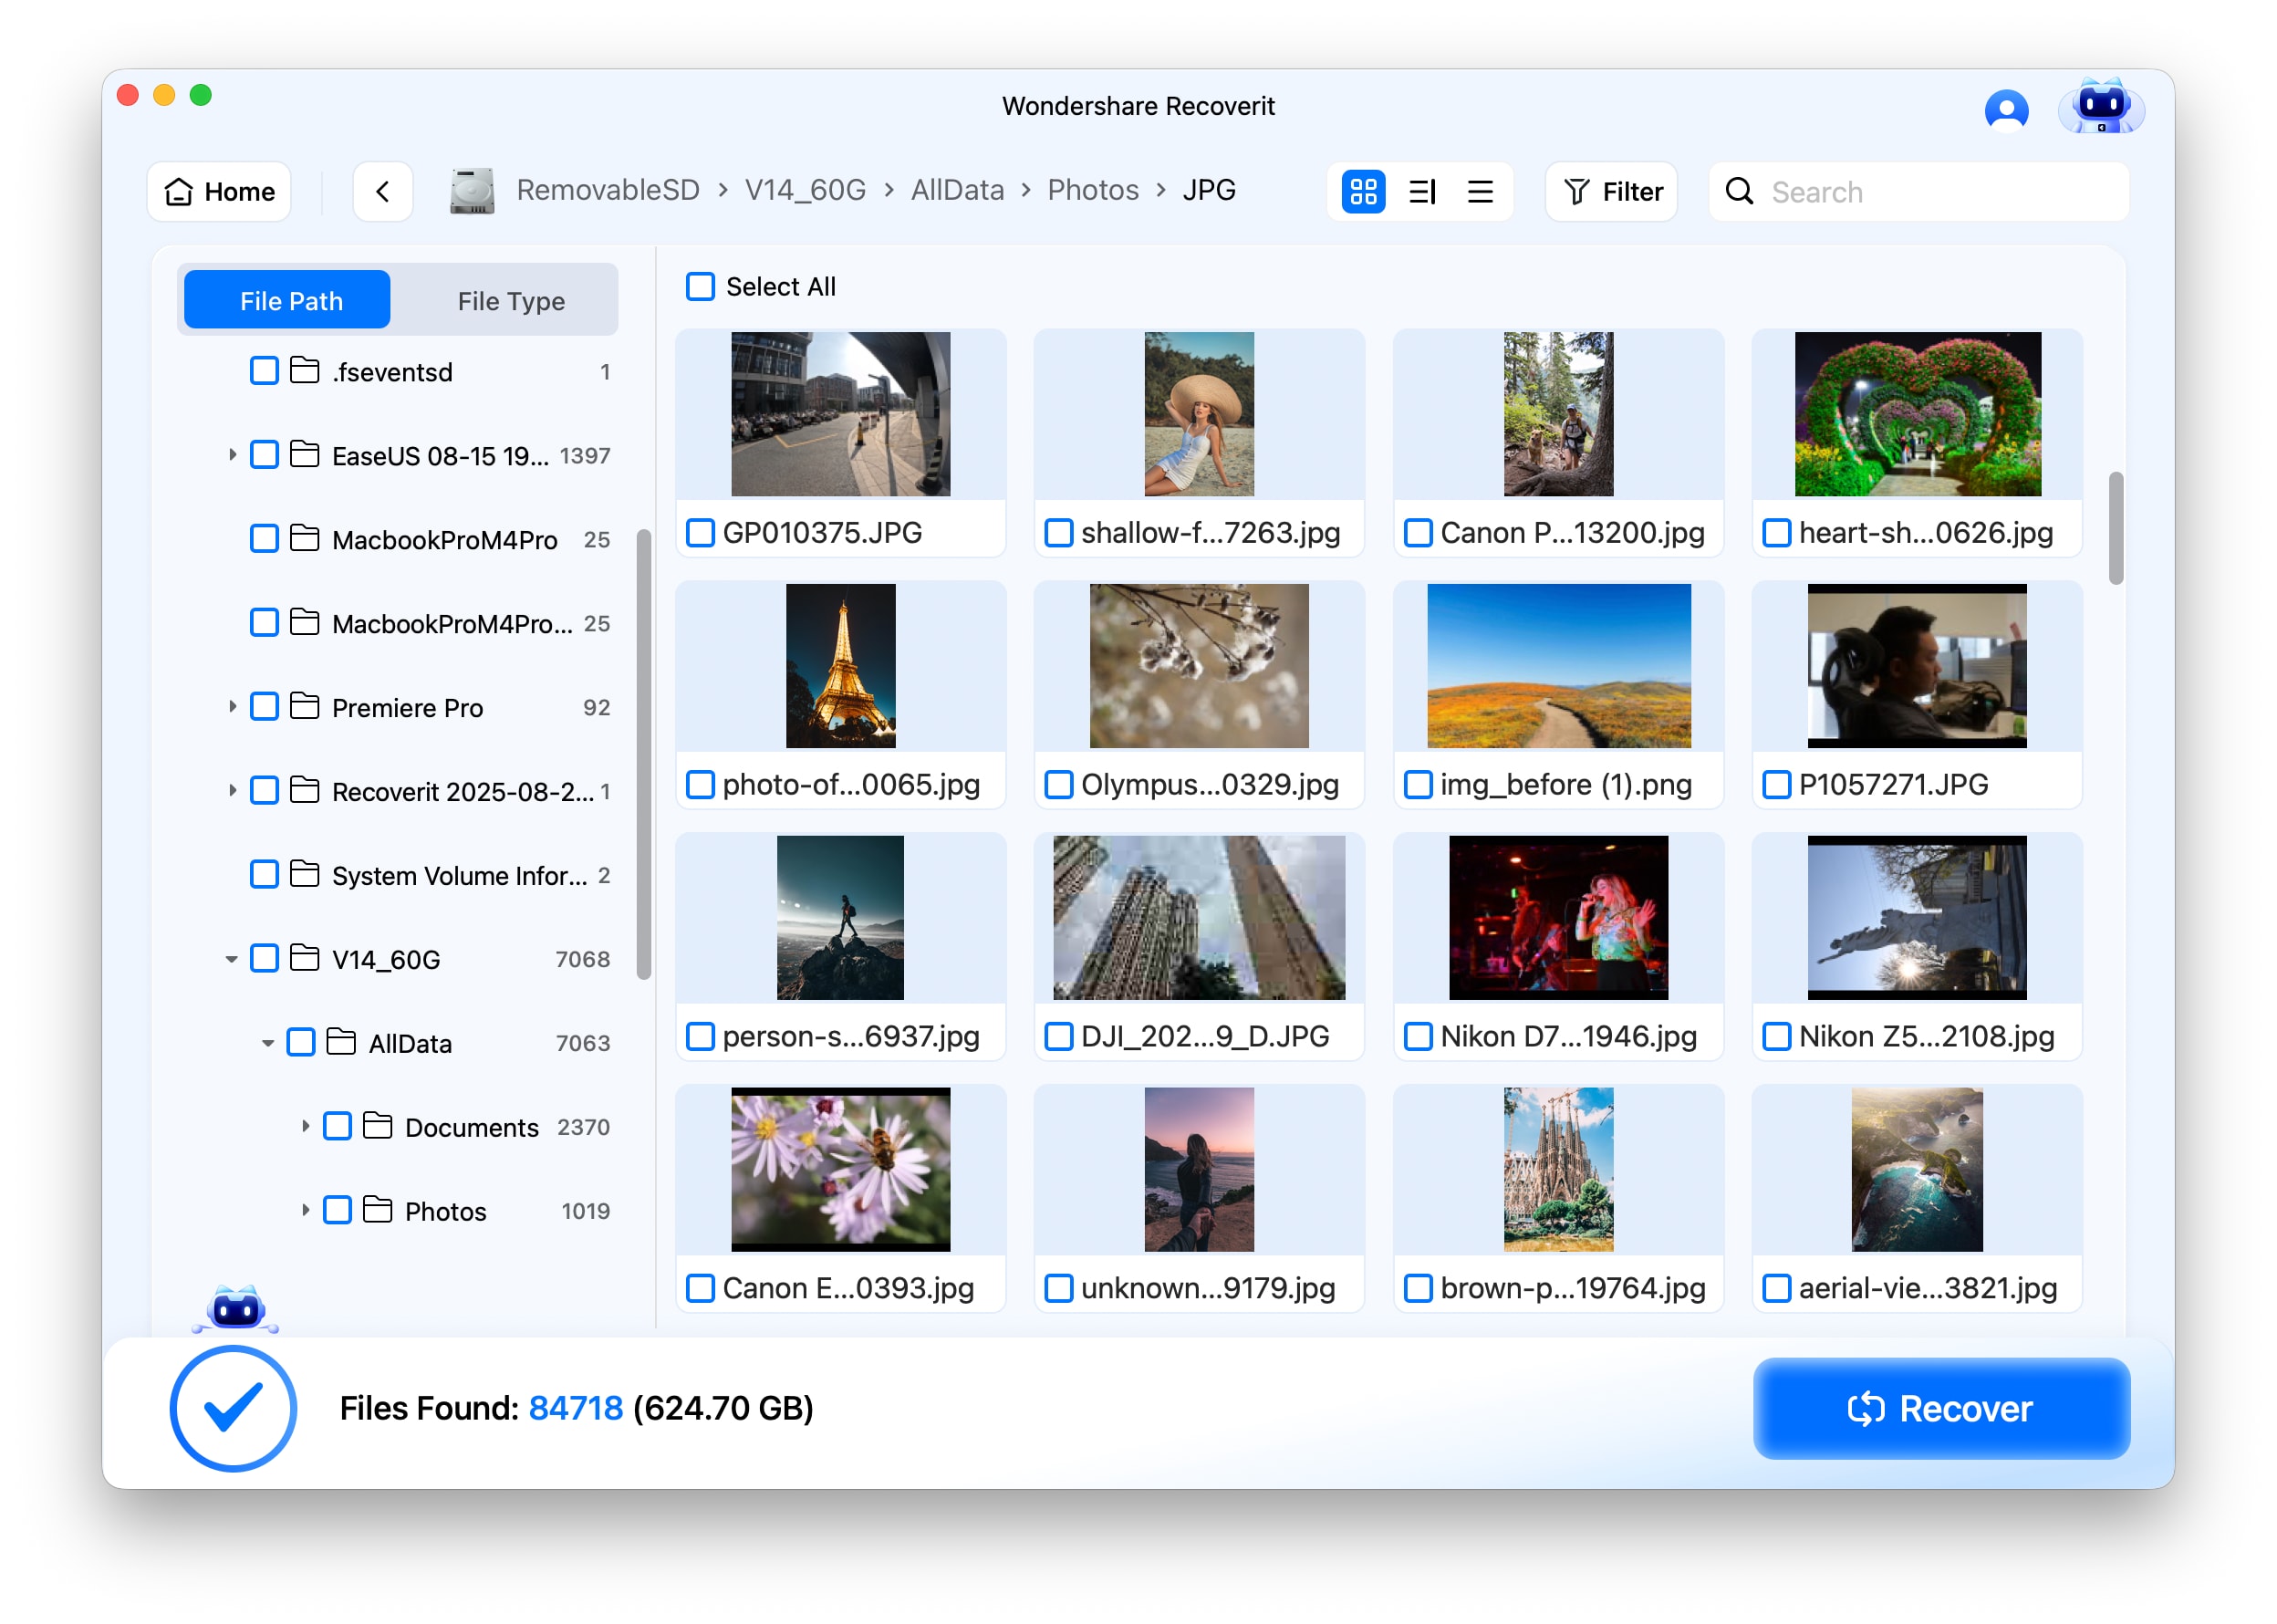
Step 3. Preview the files and save them elsewhere
Preview recoverable photos, videos, documents, and other supported files when preview is available. After choosing what you need, click Recover and select your Mac or another healthy drive as the destination.
Do not save recovered files back to the same USB while recovery is still in progress because doing so can overwrite other recoverable data.
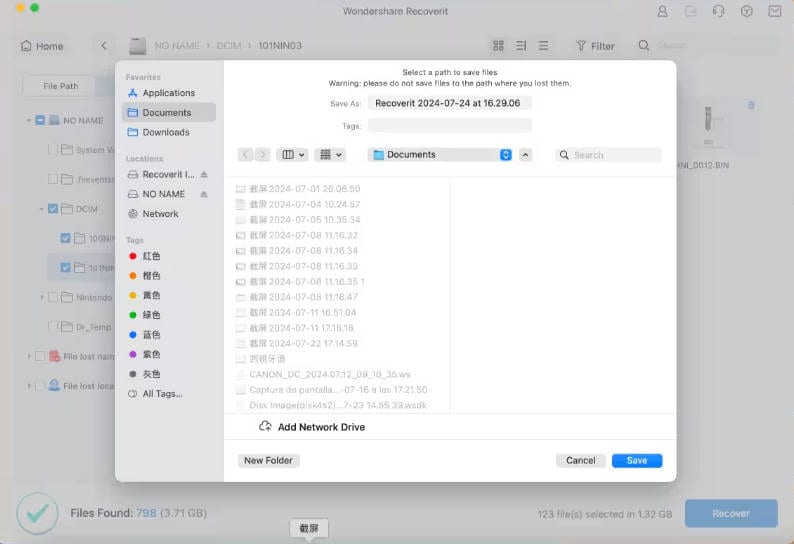
The current Recoverit for Mac user guide documents the external-device workflow as select the external media, scan it, preview the files, and recover them to a safe destination.
Recover Lost Files From a USB Flash Drive on Mac
 Security Verified. Over 7,302,189 people have downloaded it.
Conclusion
To use a flash drive on a Mac or MacBook, connect it with the correct USB or USB-C connection, approve the accessory if macOS asks, open the drive under Finder > Locations, copy files in either direction, verify important copies, and eject the drive before unplugging it. Do not format a working USB just because you connected it to a Mac. If the drive is read-only, check its file system first; if files are already missing, protect the source before repair or formatting.
FAQ
-
How do I open a flash drive on a Mac?
Connect the flash drive, open Finder, then click the USB drive under Locations in the Finder sidebar. If it is missing, make sure the Finder sidebar is visible and check Finder settings before assuming the drive is damaged. -
Can I use a USB flash drive with a MacBook?
Yes. The flash drive needs a connector that fits the MacBook directly or through a compatible adapter or hub. Many recent MacBooks use USB-C/Thunderbolt ports, so a traditional USB-A flash drive may need a USB-C adapter. -
How do I transfer files from a Mac to a USB drive?
Open Finder, select the files on your Mac, and drag them onto the USB drive under Locations. You can also copy with Command-C and paste with Command-V. Wait for the transfer to finish before ejecting the USB. -
Why can I read a USB drive on Mac but not copy files to it?
The drive may be full, have permission restrictions, or use NTFS. Apple notes that macOS might read an NTFS drive without being able to write to it. Check the drive with Finder > File > Get Info before reformatting anything. -
What format should a USB drive use for Mac and Windows?
exFAT is a common cross-platform choice because Apple lists it as Windows-compatible and macOS can read and write it. Formatting erases existing files, so back up or recover anything important before changing the format. -
How do I safely remove a flash drive from a Mac?
Wait for file transfers to finish, close files that are open from the USB, then click the Eject button next to the drive under Finder > Locations. Unplug the flash drive only after it disappears from Finder.


