

 TL;DR:
Downgrading your Mac from macOS 13 Ventura to macOS 12 Monterey is a manual process that requires completely wiping your hard drive, making a full system backup essential to prevent permanent data loss.
● You can perform the system rollback using a pre-existing macOS 12 Time Machine backup, macOS Recovery Mode, or by creating a bootable USB installer using a drive with at least 16GB of available storage.
● If opting for the bootable drive method, you must download the macOS Monterey installer directly from the Mac App Store before Apple stops signing the older operating system version.
● Once you erase your startup disk and successfully restore macOS 12, files or applications that were specifically designed or updated for macOS 13 may experience compatibility issues and require manual reinstallation.
Ask AI for a summary
 ChatGPT
 Perplexity
 Gemini
 Claude
 Grok
Grok
"My Mac runs slow after updating to MacOS 13. Can I go back to MacOS 12?"
This is a common question many Mac users ask. They want to downgrade Mac to a previous version. The new MacOS Ventura brings many features. But it also brings problems for some users.
A lot of users regret upgrading their Mac to the latest macOS. They run into glitches, sluggish performance, and frequent app failures. Some software becomes incompatible with the new version. Battery drains faster, and storage fills up quickly. These problems often push users to revert back to macOS 12 Monterey for a smoother experience.
The upside is that moving from macOS 13 back to macOS 12 is possible. However, it’s not a quick or easy task. You’ll need to plan carefully, back up your files, and be comfortable with some technical steps.
This guide is designed to walk you through the process safely. We’ll explain how to restore your Mac to macOS Monterey with clear, step-by-step instructions.
Table of Contents
Part 1: Why Users Downgrade MacOS?
Many users choose to roll back their Mac operating system for a variety of reasons. While macOS 13 Ventura introduced new features and design changes, it also caused issues for some people.
Here are the main reasons people choose to downgrade Mac OS version.
- Performance Issues: MacOS 13 runs slowly on older Macs. Apps take longer to open. System freezes happen more often.
- App Compatibility Problems: Some apps don't work with MacOS Ventura. Professional software may crash. Old apps stop running completely.
- Battery Life Decline: Many users report worse battery life. Laptops drain faster than before. Power management seems broken.
- Storage Space Issues: MacOS 13 takes more disk space. System files grow larger. Free space disappears quickly.
- User Interface Changes: Some users dislike the new design. They prefer the old MacOS 12 interface. Menu changes confuse them.
- Stability Problems: System crashes happen more often. Kernel panics occur. Apps quit unexpectedly.
- Feature Removal: Apple removed some features users loved. Useful tools disappeared. Workflow gets disrupted.
- Hardware Compatibility: Older Macs struggle with MacOS 13. Graphics cards show problems. Peripherals stop working.
Is it simple to switch from macOS 13 back to macOS 12?
Downgrading from macOS 13 (Ventura) to macOS 12 (Monterey) isn’t exactly a one-click process. It requires some preparation and caution. Apple doesn’t offer a built-in downgrade option, so you’ll need to erase your current system and reinstall macOS 12 manually.
This involves backing up your data using Time Machine or another method, creating a bootable installer for macOS Monterey, and then wiping your Mac’s drive before installing the older OS. It’s doable, but not “easy” in the casual sense—especially if you’re not familiar with disk utilities or bootable media.
Time is a critical factor when you want to downgrade operating system Mac. Apple stops signing older MacOS versions after some time. Once Apple stops signing older macOS versions, you can’t download or install them through official methods. That means downgrading becomes much harder—or even impossible—without a saved installer. If you’re thinking about rolling back, it’s important to act fast after updating.
Part 2. Downgrade with Recovery Mode
There are many risks when you downgrade MacOS to an older version. In addition, there are different methods you can explore. One of them is the recovery mode. You must first leave the beta program to use the recovery mode. Doing this doesn’t translate to downgrading your MacOS. However, it informs the beta program you’re not looking for more updates to your system.
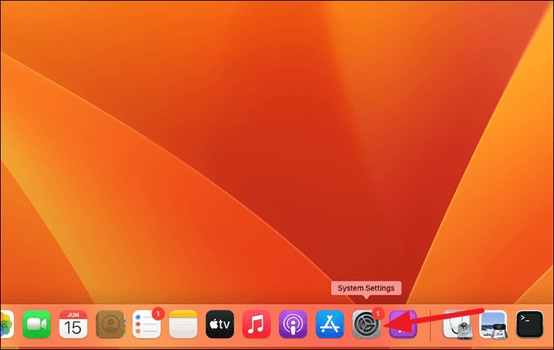
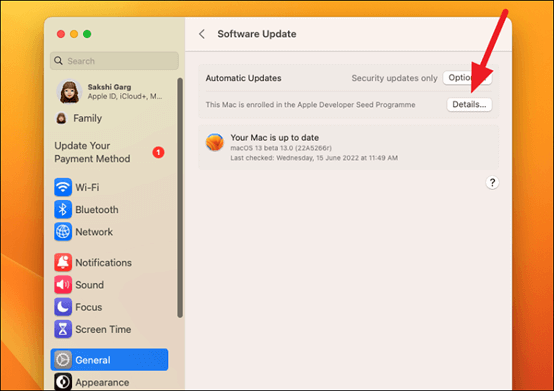
You must go through your system settings to leave the beta program. One of the upgrades that come with macOS 13 Ventura is the upgrade of ‘system preferences’ to ‘system settings.’ Follow the steps below to unenroll from the beta program.
- Step 1. Firstly, open the 'system settings' on your Mac.
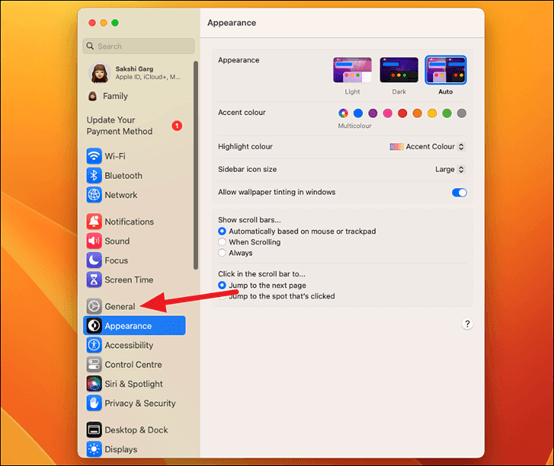
- Step 2. Now, navigate to General; you can find it on the left sidebar.
- Step 3. Choose the option ‘Software Update’ from the options provided.
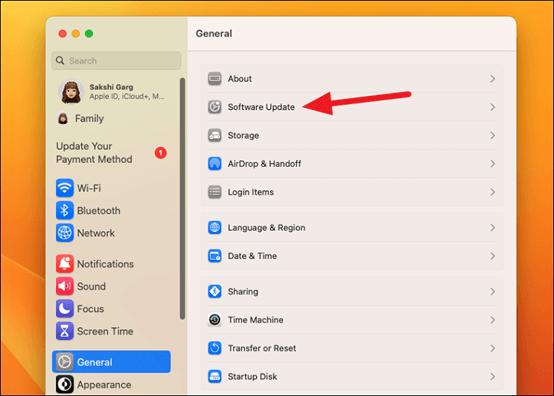
- Step 4. When this loads, the message ‘this Mac is enrolled in the Apple Developer Seed Programme’ will appear on the screen. Choose ‘details’ on the right corner to proceed.
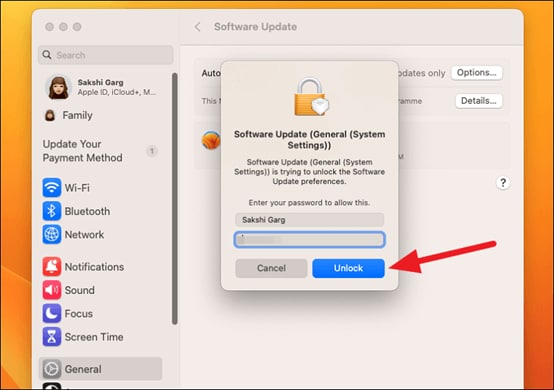
- Step 5. A dialog box will appear, and all you have to do to stop receiving beta updates is click ‘Restore Defaults.’
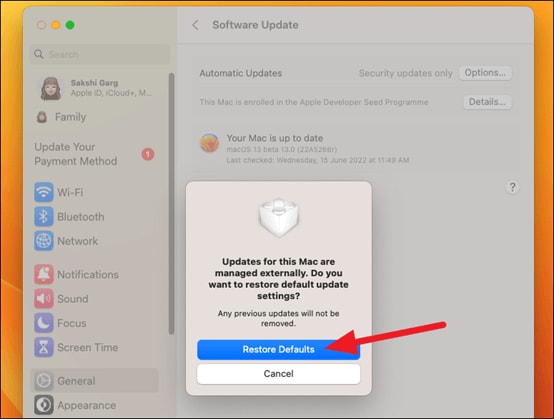
- Step 6. You’ll have to enter your Mac user account password to enable this option. Then, Apple will unenroll you from the program after a few minutes.
However, there are many risks involved that you need to know. First, it will wipe your hard disk; all you’ll have left is a MacBook with no data. Then, after that, it would be back to the factory settings.
That’s why you should always back up your files in an external storage device before you downgrade your mac. It would help if you also had a steady internet connection because your Mac will download and install the macOS 12 Monterey on your device after downgrading. Follow these steps to downgrade MacOS 13 Ventura using the recovery mode.
Now, you can downgrade MacOS 13 Ventura to MacOS 12 using the recovery mode.
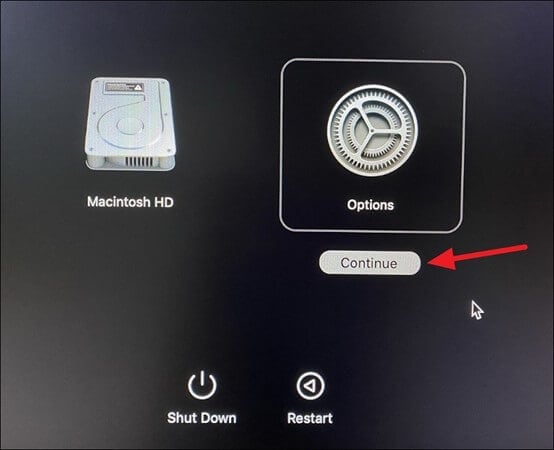
- Step 1. Firstly, you must enter the recovery mode; the process differs depending on your Mac. If you’re using an M1-based Mac, you must hold the power button until the ‘loading startup options’ screen appears. Choose options from the screen and then select ‘Continue’ to proceed to the recovery mode. If you’re using an Intel-based back, all you have to do is hold down the Options+Command+R keyboard buttons till the Apple logo appears.
- Step 2. This shortcut will allow you to downgrade to the recent stable MacOS. You can also utilize the keyboard shortcut Shift+Option+Command+R to downgrade to the MacOS it shipped with.
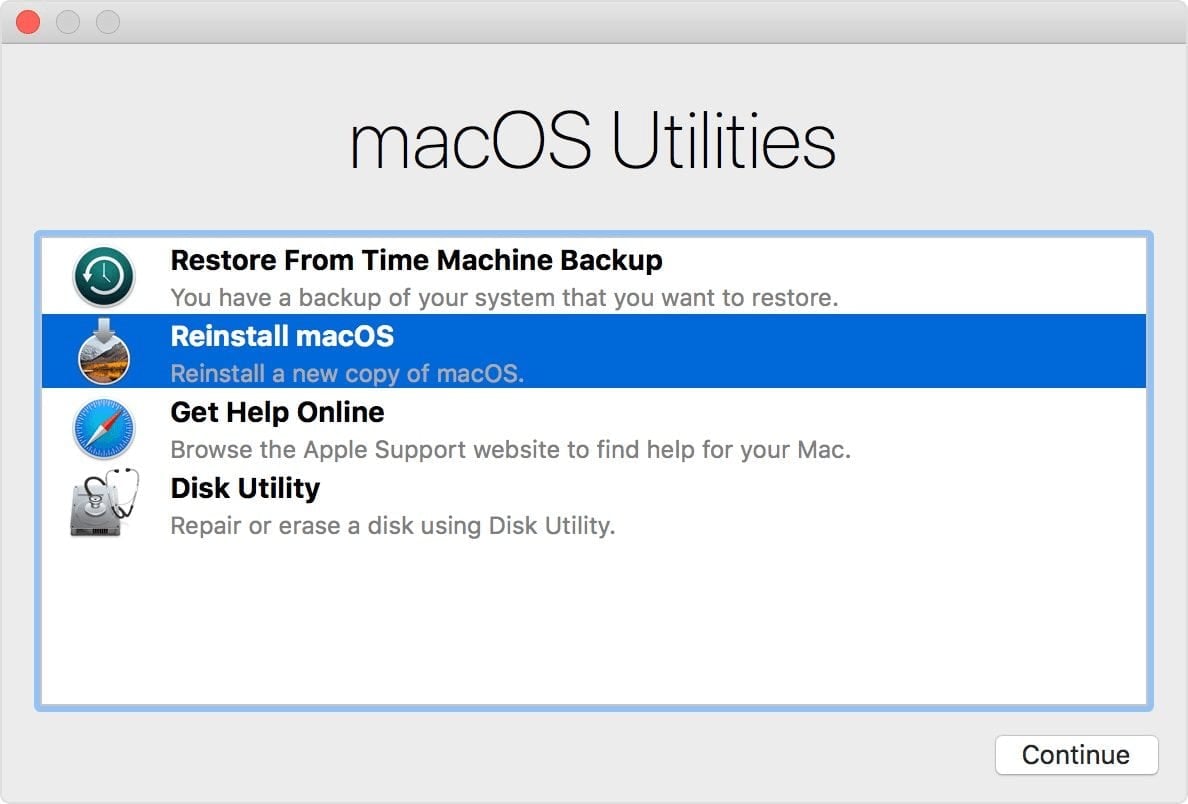
- Step 3. On the screen that appears nest, you’ll see an option to ‘Reinstall/MacOs’ or to ‘Reinstall macOS Monterey.’ Choose the option that appears.

- Step 4. Next, follow the guide on your screen, and Recovery will install it on your system.
- Step 5. Ensure you keep your system and internet connection until the installation is complete.
- Step 6. The chances are that your system could restart many times while the new MacOS is installing.
- Step 7. Once the process is complete, your system will restart on its own.
Part 3. Downgrade with Time Machine Backup
Another option you have to downgrade MacOS 13 Ventura is Time Machine. The best part about this is that you can create a backup and then use that backup to downgrade your Mac OS. In such a case, it will easily downgrade the MacOS 13 to MacOS 12 Monterey and ensure that all your data is safe.
- Step 1. To get started, attach the Time Machine hard drive to your MacBook.
- Step 2. Next, click the Apple icon and select ‘Restart.’
- Step 3. Now, navigate to the boot selection screen. If you’re using the Apple Silicon Mac, press down the power button till you see the startup screen, select ‘Options,’ and choose ‘Continue.’ However, if it’s an Intel-based Mac, hold down the Command+R button till the Apple logo appears or you hear the startup chime.
- Step 4. Now, choose ‘Restore from Time Machine Backup’ and then hit ‘Continue’ to proceed.
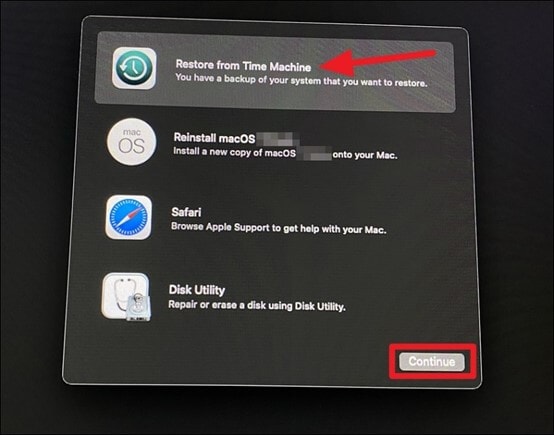
- Step 5. Read through the process if you want, and click ‘Continue.’
- Step 6. Select the backup source, and click ‘Continue’ to proceed.
- Step 7. Choose the recent MacOS Monterey backup and click ‘Continue.’
- Step 8. It might take a while to downgrade MacOS 13 Ventura to MacOS 12 Monterey. Once the downgrading process is complete, users can start utilizing the PC.
Part 4. Use a Bootable Drive to Downgrade MacOs
If you don’t want to use Time Machine or the recovery mode, you can utilize the bootable drive to install the MacOS 12 Monterey. When using this method, you should create a backup of your important files so that you’ll always have access to it. The steps to it are simple, so you should take your time to follow them. However, if you follow the steps carefully, you’ll have MacOS Monterey installed on your MacBook in no time. Below are the steps you need to take to use a bootable drive to install MacOS 12 Monterey.
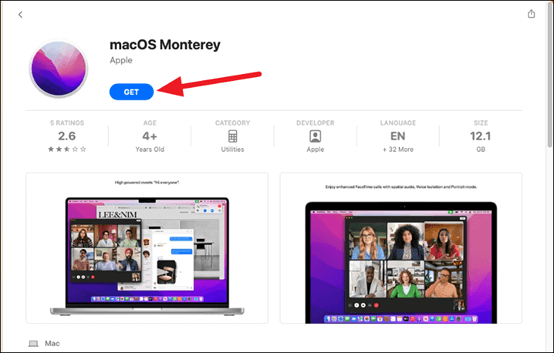
- Step 1. Download the MacOS Monterey Installer on your Mac from the Mac App Store. Finding the older version could be difficult but once you locate it, click the ‘Get’ button to download it. Don’t open the file till you’re ready to use it.
- Step 2. Next, prepare an external drive that you would use to make a bootable drive. Ensure you format the external drive you plan to use. You can simply move on to the next step if the drive is already formatted. Note that at least 16GB of storage must be available on the external storage device.
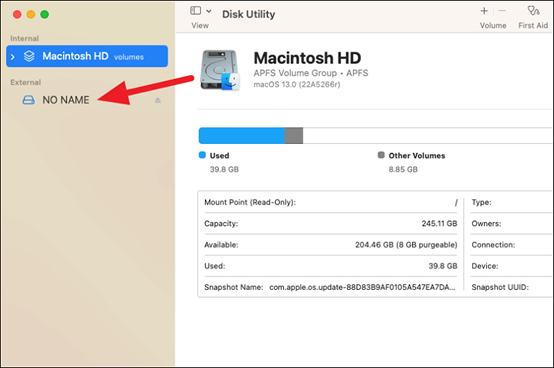
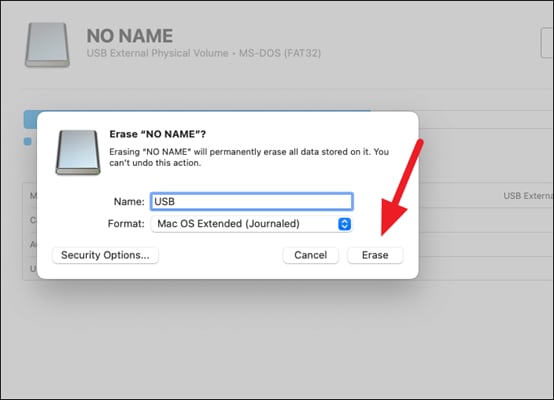
- Step 3. To format the drive, connect the device and select it from the left taskbar on the ‘Finders’ dialog box. Next, choose ‘Erase’ from the toolbar available at the top.
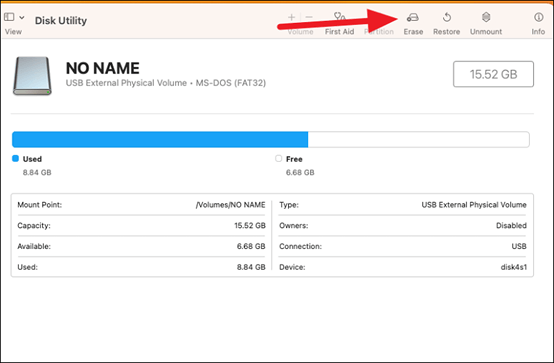
- Step 4. A dialog box on your PC will pop up, allowing you to change the drive name.
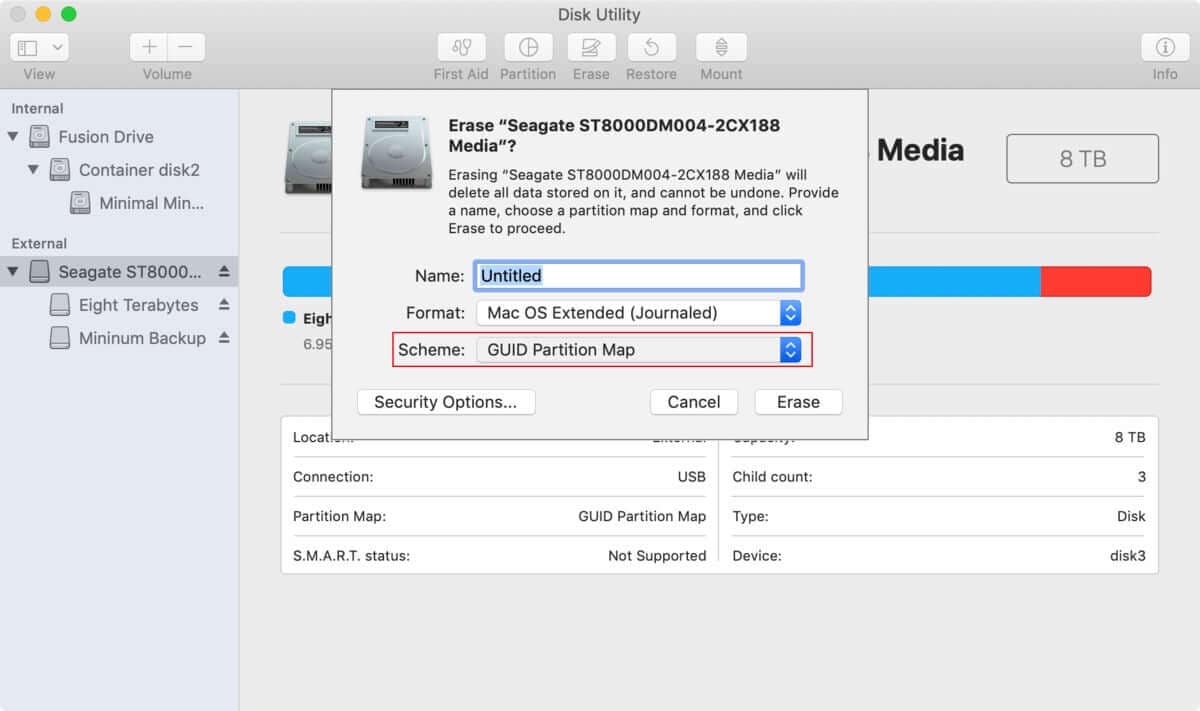
- Step 5. Now, click format and choose ‘MacOS Extended’ to proceed. Additionally, select ‘GUID Partition Map’ if it is an available option.
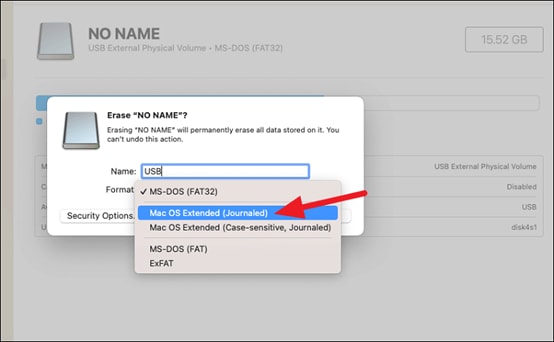
- Step 6. Finally, select ‘Erase’ to proceed, and it will do that.
- Step 7. Now, you can proceed to create the bootable installer drive needed to downgrade macOS 13 to macOS 12. It’s quite easy to open the terminal on your Mac and choose the utilities folder or Spotlight.
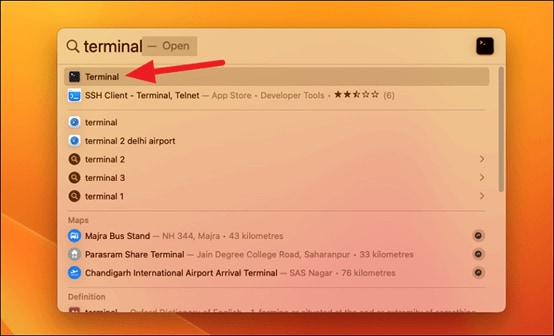
- Step 8. Now, paste the command below in the terminal; ensure you keep the syntax correct:
sudo /Applications/Install\ macOS\ Monterey.app/Contents/Resources/createinstallmedia --volume /Volumes/USB

- Step 9. Press the ‘enter key,’ and the terminal will request your user account password.
- Step 10. After entering the password, the terminal will start erasing your device. You might need to enter the ‘Y’ command if it requests your permission to continue. Also, press OK if it requests your permission to access the drive.
- Step 11. Automatically, it will begin copying the macOS Monterey installation file to the external drive. It all depends on the writing speed of your USB. Once the process is complete, Mac will ask you to install media available at (device name) on the terminal.
Close the terminal, and you can proceed to the next step of using the booting disk to install MacOS Monterey.
- Step 1. First, you have to erase the startup disk by restarting your Mac. While in Startup, boot your PC in the recovery mode following the steps we shared above.
- Step 2. Next, choose ‘Disk Utility’ from the options that appear.
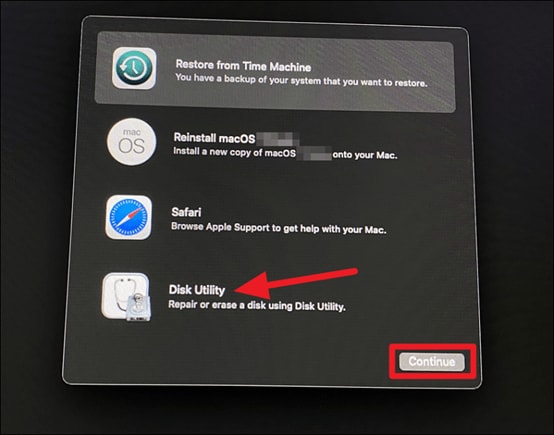
- Step 3. Choose your Startup disk with the MacOS Ventura installed and select ‘erase’ to continue.
- Step 4. Now, choose ‘APFS’ from the available format options. Additionally, you can select ‘GUID Partition Map’ for the scheme.
- Step 5. Now, proceed by choosing ‘erase volume group’ and wait for the process to complete. Quit Disk Utility afterward.
- Step 6. Restart your Mac again. If it is an Intel-based Mac, hold down the ‘option’ key at Startup. The process is similar for the M1-based Mac; press the power button until options appear.
- Step 7. When the startup manager pops up, your bootable drive will be amongst the options, choose it and select ‘continue.
- Step 8. Select the drive you would like to install the MacOS Monterey from and choose ‘next.’
- Step 9. Mac will show you the option to ‘install MacOS Monterey,’ select it and click ‘continue.’
- Step 10. The installation process will begin, and once it is complete, your system will boot while running the MacOS Monterey.
Read More:
Part 5: Step-by-Step Guide: Downgrade from MacOS 13 to MacOS 12
This section shows you how to downgrade Mac from MacOS 13 to MacOS 12. The process is complex but doable. You need to follow each step carefully. One mistake can cause data loss or system problems.
Before starting, know that this process erases everything on your Mac. All files, apps, and settings will disappear. Make sure you have backups of important data. Also, ensure you have enough time. The whole process takes several hours to complete.
Step 1: Back up your Mac
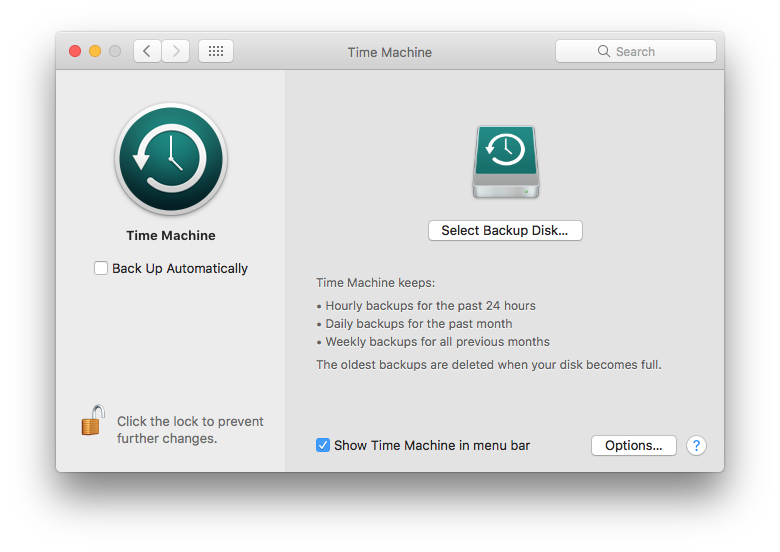
Backing up your Mac is a must before starting the downgrade process. If you skip it, you risk losing all your files for good. Time Machine is a trusted option for making complete backups. It safely stores your apps, files, and system settings so you can restore them later without hassle.
Plug in an external drive to your Mac. Go to System Settings. Choose Time Machine. Enable Time Machine. Pick the drive for backup. Let the process run—it might take hours if you have a lot of data.
Step 2: Create a bootable installer
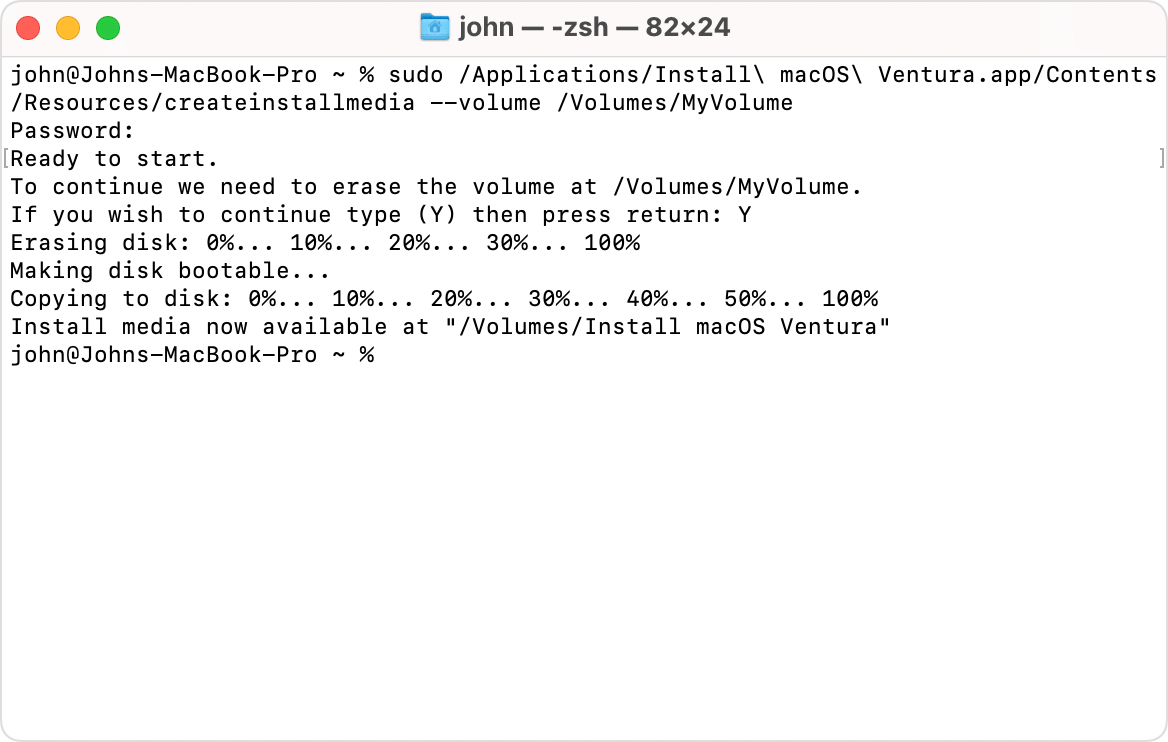
To switch your Mac back to an earlier macOS version, you'll need a bootable installer. This tool lets you erase the current system and install the older OS manually. Download MacOS 12 Monterey from Apple's website. You'll also need a USB drive with at least 16GB of space.
During this process, the USB drive will be completely wiped. Make sure to back up any important files before using it as a bootable installer.
Open the Terminal app on your Mac. Type the command to create the installer. Replace "MyVolume" with your USB drive name. The process takes 20-30 minutes. Don't interrupt it, or your installer won't work properly.
Step 3: Boot from the installer
To begin the downgrade, restart your Mac and hold down the Option key. This will bring up the boot menu. From there, choose your USB installer. Your Mac will then start up using the USB drive instead of its built-in system.
Wait for MacOS Utilities to load. This screen shows several options for installing MacOS. Don't click Install MacOS yet. You need to erase your drive first in the next step.
Step 4: Erase the hard drive
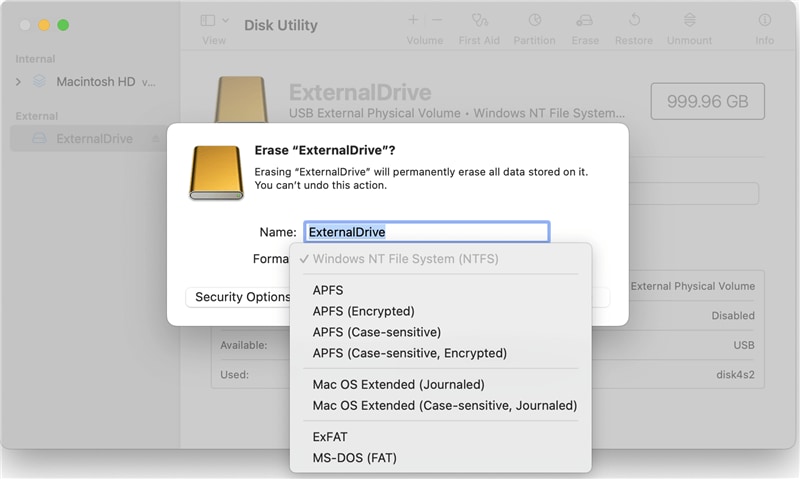
Click Disk Utility from the MacOS Utilities menu. Select your internal drive from the sidebar. Click the Erase button at the top. Choose Mac OS Extended format for better compatibility.
Give your drive a name and click Erase. This step removes MacOS 13 completely. It also deletes all your files and apps. Make sure you have backups before doing this step.
Step 5: Install MacOS Monterey
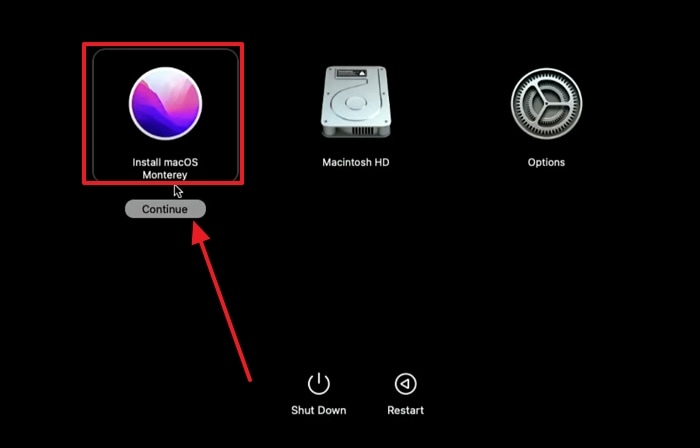
Close Disk Utility and return to MacOS Utilities. Click Install MacOS option. Select your erased drive as the destination. Click Continue to start the installation process.
The installation takes 30-60 minutes, depending on your Mac model. Your Mac will restart several times during installation. Don't turn off your Mac or remove the USB drive until installation completes.
Step 6: Restore from backup (optional)
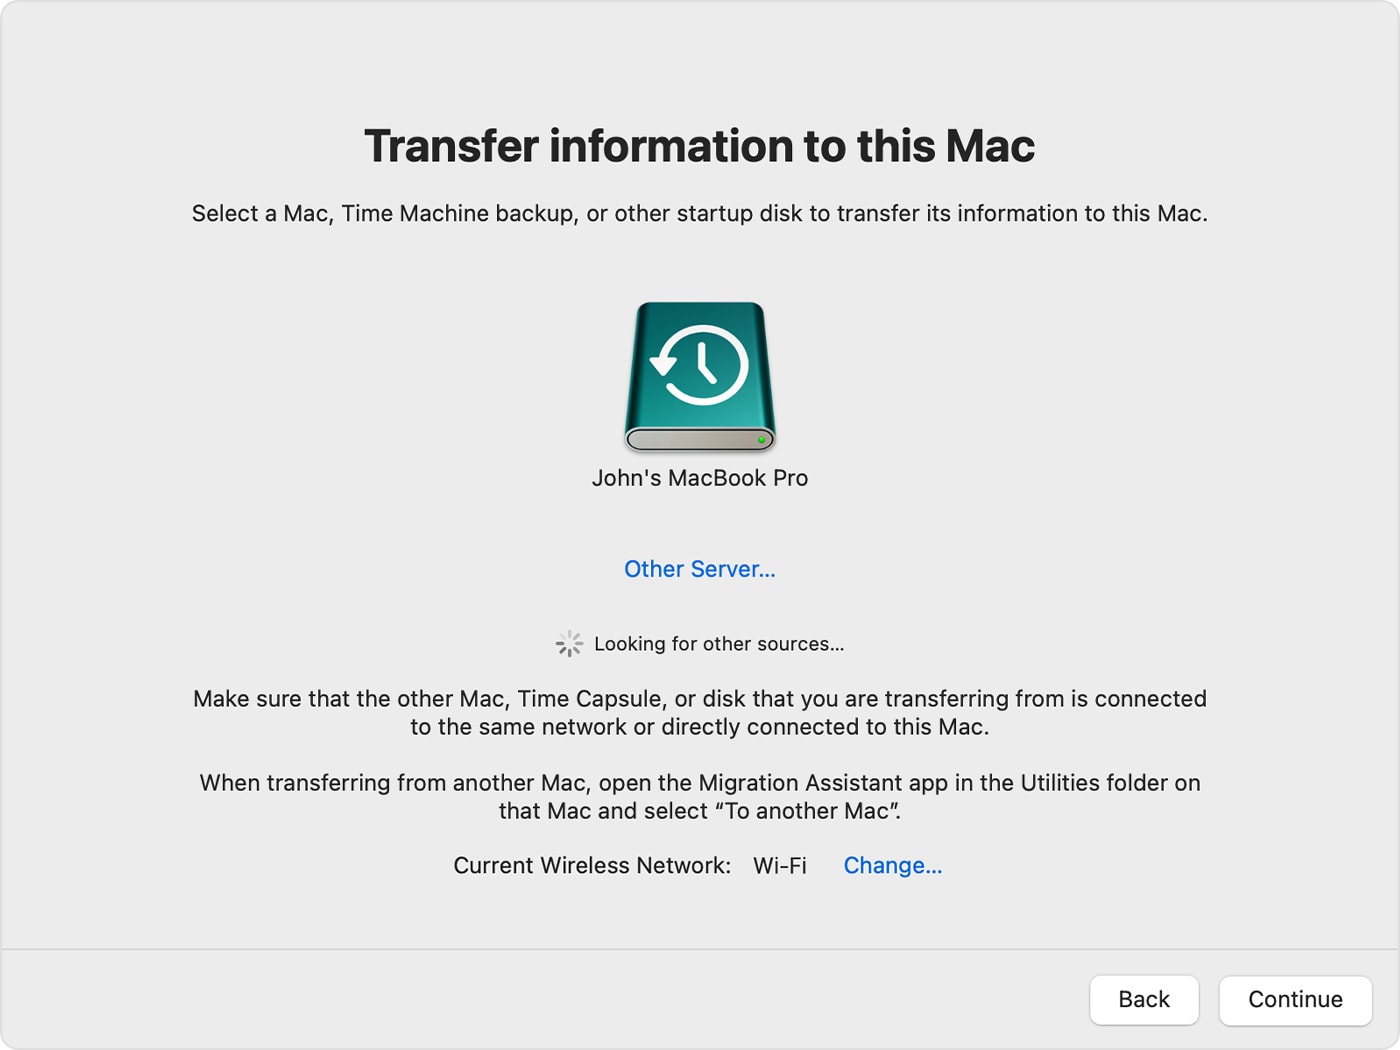
After installing MacOS 12, you can restore your data. The Setup Assistant will ask about restoring from a backup. Choose your Time Machine backup if you want your files back.
Remember that some apps might not work after restoring. Apps designed for MacOS 13 may have issues. You might need to reinstall some applications manually.
Part 4: Lost Data After Downgrading MacOS? Use Recoverit for MacOS Today!
Sometimes data gets lost when you downgrade MacOS 13 to MacOS 12. Files disappear during the process. Important documents vanish. Photos and videos get deleted accidentally. Don't panic if this happens to you.
Recoverit for MacOS is a powerful data recovery tool. It can recover lost files after a Mac OS version downgrade. The software scans your drive deeply. It finds deleted files that seem gone forever. Professional and home users trust this tool worldwide.
The tool works in many scenarios. It helps when backup fails. It recovers files from corrupted drives. It finds data after accidental deletion. Here are common situations where Recoverit helps:
- Files deleted during the MacOS downgrade process
- Corrupted Time Machine backups that won't restore
- Accidentally formatted drives during installation
- System crashes that cause data loss
- Failed downgrade attempts that erase data
- Missing files after MacOS installation
- Corrupted user accounts after OS change
Step 1: Download and install Recoverit for MacOS. Launch the application on your Mac. Select the drive where you lost data. Click the Start button to begin scanning. The software scans your drive thoroughly. This process may take time depending on the drive size.

Step 2: Preview recovered files in the results window. Recoverit shows thumbnails of photos and videos. You can check file quality before recovery.

Step 3: Select the files you want to recover. Choose a different drive to save recovered files. Click the Recover button to restore your data.

Video Tutorial: How to Recover Emptied Trash on Mac?
Part 6: Pro Tips to Downgrade MacOS Successfully
Planning is key when you want to downgrade the Mac operating system. Rushing the process leads to mistakes. Take time to prepare properly. Follow these expert tips to avoid common problems.
- Check app compatibility first: Make sure your apps work with MacOS 12. Some newer apps won't run on older systems.
- Download MacOS 12 installer early: Get the installer while Apple still signs it. Save it to an external drive for future use.
- Use multiple backup methods: Don't rely only on Time Machine. Use cloud storage and external drives too.
- Test on external drive first: Install MacOS 12 on the external drive to test compatibility before downgrading the main system.
- Document your current setup: Write down installed apps, settings, and configurations. This helps during restoration.
- Have recovery tools ready: Download data recovery software before starting. Keep it in separate storage.
- Allow plenty of time: Don't rush the process. Plan for a full day when you have no urgent work.
- Keep installation media safe: Store your bootable installer safely. You might need it again in the future.
Conclusion
Downgrading from MacOS 13 to MacOS 12 is possible but challenging. You can downgrade Mac if you follow the right steps. The process requires careful preparation and technical knowledge. Most importantly, you must back up your data first.
Remember that downgrade Mac OS without losing data isn't guaranteed. The process erases your drive completely. Only proper backups can save your files. Time Machine works well for most users. But consider additional backup methods for extra safety.
Think carefully before you downgrade Mac operating system. Make sure the benefits outweigh the risks. Consider that your problems with MacOS 13 might have other solutions. Sometimes a clean install of MacOS 13 fixes performance issues. But if you must downgrade, this guide helps you do it safely.
FAQs
Can I downgrade MacOS 13 to MacOS 12 without losing data?
You cannot downgrade the Mac OS version without erasing your drive completely. The downgrade process requires formatting your hard drive. This removes all data, including files, apps, and settings. However, you can restore your data from a Time Machine backup after installation. Make sure to create a complete backup before starting the downgrade process. Some users try to preserve data by cloning their drive, but this method often causes system conflicts and stability issues.
How long does it take to downgrade from MacOS 13 to MacOS 12?
The complete rollback Mac update process takes 4-8 hours, depending on your Mac model and data size. Creating backups takes 2-4 hours for most users. Making a bootable installer needs 30 minutes. The actual MacOS 12 installation requires 1-2 hours. Restoring from backup adds another 2-4 hours. Plan for a full day when you have no urgent work. Older Macs take longer than newer models. The amount of data you're backing up and restoring also affects total time.
What should I do if the downgrade process fails?
If your attempt to revert Mac to the previous OS fails, don't panic. First, try restarting the installation process from the bootable USB drive. Make sure your installer is created correctly and your USB drive isn't corrupted. If MacOS 12 won't install, your drive might have issues. Use Disk Utility to repair disk errors first. In worst cases, you might need to reinstall MacOS 13 and try again later. Keep your Time Machine backup safe throughout the process. Consider seeking help from Apple Support or a professional technician if problems persist.


