
Jun 22, 2026 • Filed to: Recover Files • Proven solutions
 TL;DR:
A beeping hard drive usually signals an internal mechanical failure or insufficient power supply, requiring you to immediately stop running the drive to prevent permanent physical damage and data loss.
● Resolve potential power supply issues without disassembling the drive by clearing port dust, replacing the USB or SATA cable, connecting to a different computer, or utilizing a USB Y-cable.
● If Windows fails to recognize the connected drive, force detection via the Disk Management utility (diskmgmt.msc) or troubleshoot by running the CHKDSK command-line tool as an administrator.
● When extracting lost files using software like Wondershare Recoverit, you must save the retrieved data to an alternative storage device or your computer instead of the failing hard drive.
Ask AI for a summary
 ChatGPT
 Perplexity
 Gemini
 Claude
 Grok
Grok
External hard drives produce various noises depending on what activity is running. When you boot up your hard disk or are searching/storing files, there will be a slight whirring sound which is normal. However, a beeping sound could be due to an internal problem. When the mechanical components of your hard drive malfunction, it will produce an unusual sound.
Another issue could be that the hard drive cable is not supplying enough power to the spindle motor inside your hard drive resulting in a beeping noise, so make sure to check if the cable is attached to the hard drive properly.
In this article, we will take you through the risks of hard drive beeping and ways to fix the issue.
Part 1: What are the risks when your hard drive beeps?
🔊 Hard Drive Acoustic Diagnostic Matrix
Mechanical hard disk drives (HDDs) communicate structural stability through sound. Use this diagnostic reference grid to identify your drive's physical health status:
| Sound Pattern | Indicated Hardware State | Structural Risk Level | Recommended Immediate Action |
| Slight, Smooth Whirring | Normal operational spindle motor acceleration and file caching. | Safe / Normal | No action required; drive is functioning within design parameters. |
| Continuous Rhythmic Beeping / Buzzing | Spindle motor power starvation or internal head slider stiction on the platter. | Critical Risk | Disconnect drive immediately. Upgrade power supply cable or check connectivity. |
| Repetitive Metallic Clicking | Read/write head actuator arm assembly failure (The "Click of Death"). | Severe Physical Damage | Power down drive to prevent platter scratching. Seek cleanroom file extraction. |
| Silent / Complete Absence of Vibration | Blown Printed Circuit Board (PCB) diode or dead motor controller chip. | Electrical Failure | Inspect power lines or scan logic gates; do not attempt DIY board swaps. |
Part 2: 5 Low-Voltage Power Fixes for Beeping External Hard Drives
If your hard drive is beeping due to an electrical supply drop rather than a physical head crash, adjusting the power delivery setup can fix the problem. These non-destructive steps do not require taking the drive enclosure apart.
- Purge Dust Contamination from Interface Connections (Clean the physical port contacts)
Unplug your external hard drive. Inspect the USB/SATA connection ports and cable pins for dust or debris. Use a can of compressed air to clear out the ports on the cable, the external drive enclosure, and your computer. - Replace the Primary Interface Connection Cable (Rule out internal wire degradation)
USB cables can degrade over time, leading to higher internal resistance that drops the voltage below the 5V threshold needed by mechanical drives. Swap your current cable with a shorter, high-quality replacement wire to ensure clean power delivery. - Bypass Front Case Ports for Motherboard Root Hubs (Maximize current draw channels)
External front-panel ports on desktop computers often route through long internal wires that bleed power. Plug your hard drive cable directly into the rear USB ports on the back of your computer, which are soldered straight to the motherboard root hub. - Deploy a High-Amp USB Y-Cable Link (Draw current from dual system nodes)
If your computer ports are limited to 500mA, a standard cable may cause your drive to beep from power starvation. Connect your drive using a USB Y-Cable. This specialized wire plugs into two system ports at once, combining their power to supply up to 1000mA of steady current to the drive motor. - Route Connectivity Through a Powered External Hub (Isolate device power lines)
Plug your external drive into a USB hub that uses its own dedicated wall outlet power adapter. This provides steady, independent voltage to your drive, protecting it from power drops caused by other devices plugged into your computer.
You may also be interested in: How to fix MacBook beeping 3 times
Part 3: Extracting Files from an Unstable Beeping Hard Drive
When a hard drive is beeping but still showing up in Windows administrative utilities, its internal components are unstable. You need to act quickly to get your files off the drive before it fails completely.
Method 1. Check Drive Visibility in the Virtual Disk System Registry
If your drive does not show up in "This PC," check if the Windows operating system can still see the drive controller chip at a lower level.
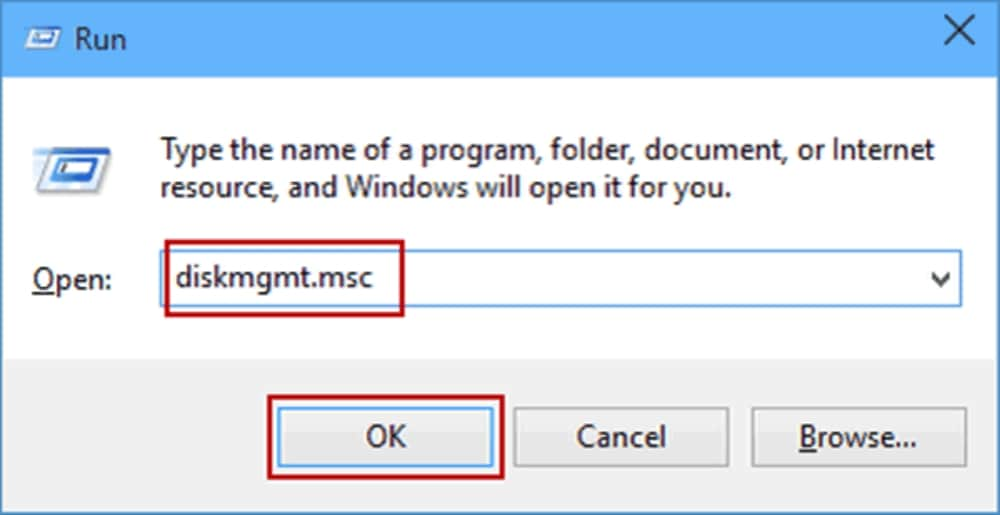
- Launch the Windows Disk Management Extension (Access system partition tables)
PressWindows + Rto open the Run window dialog box. Typediskmgmt.mscinto the search field and click OK to open the disk layout tool.
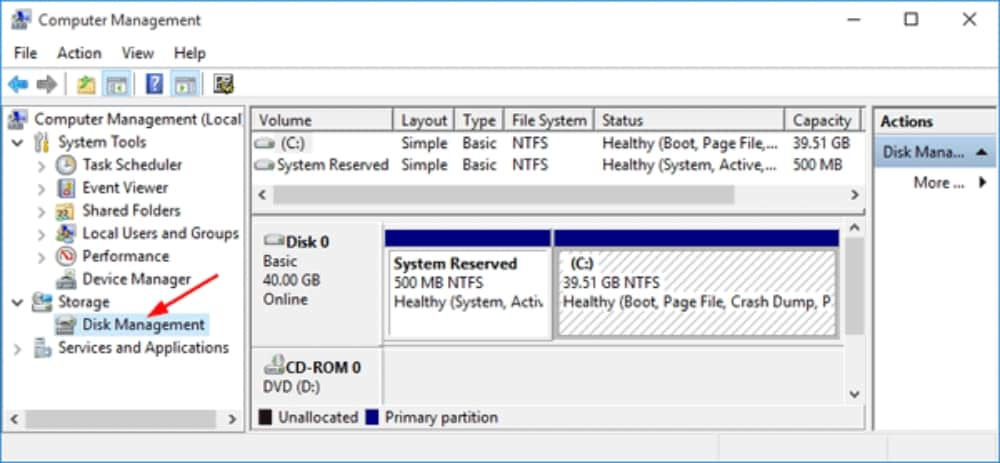
- Inspect the Mounted Drive Interface Array (Scan for unlettered or RAW file blocks)
Look through the bottom scroll list for your drive's total storage capacity. If it shows up here but lacks a drive letter or reads as RAW, the system sees the hardware but the file allocation index is corrupted.
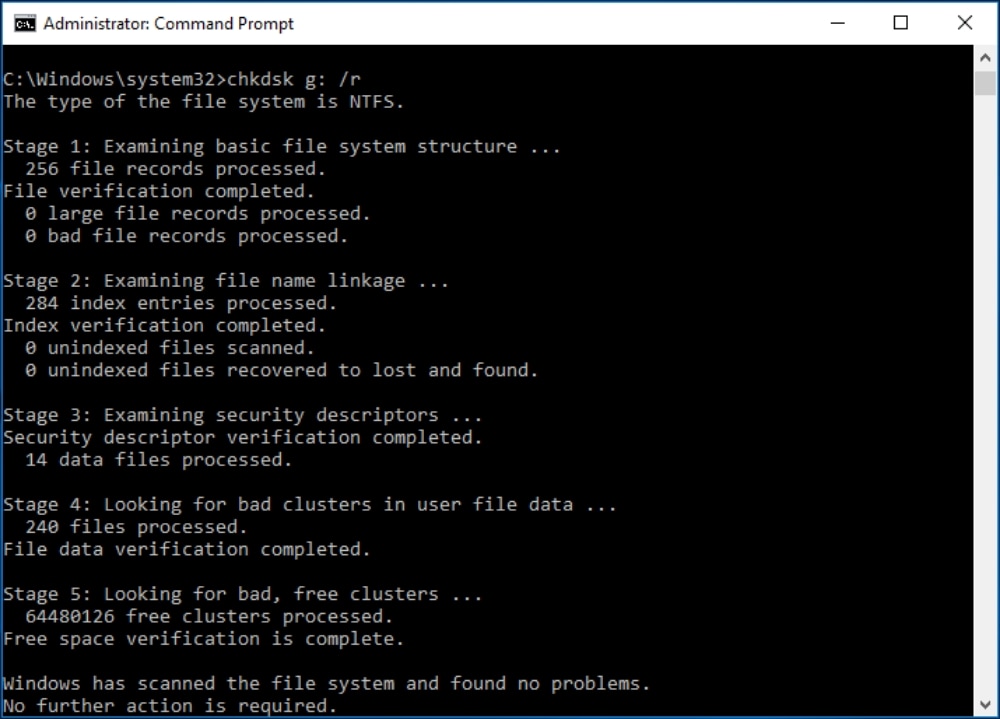
Method 2. Safe Low-Level Error Correction via Command Line (CHKDSK)
If your drive is visible in Disk Management but unreadable, use the command line to repair minor file allocation table issues.
Only run CHKDSK if your drive is beeping occasionally from soft sector errors. If the drive is making loud, constant metallic scratching noises, turn it off immediately to avoid permanent platter damage.
- Open an Elevated Administrator Command Window (Launch system console tools)
PressWindows + S, typecmd, right-click Command Prompt from the results, and select Run as administrator. - Run the Target Volume Allocation Sector Repair (Execute structural validation paths)
Type the following command into the console window, replacingG:with the actual drive letter assigned to your external hard drive, and press Enter:
Thechkdsk G: /f /r/fswitch tells Windows to fix errors on the disk, while the/rswitch locates bad sectors and recovers readable information.
Method 3: Direct Sector Extraction with Wondershare Recoverit
When a mechanical drive shows signs of physical instability, running heavy Windows repair tools can stress the drive and cause it to fail. The safest approach is to copy your files off the drive immediately.
Wondershare Recoverit is engineered to perform low-stress sector scans on unstable storage devices. It bypasses broken logical files and reads your data with minimal disk wear, allowing you to salvage your files safely.
To recover data on a computer using Wondershare Recoverit, follow these three steps:
Step 1. Isolate and Target Your Unstable External Storage Device
Connect your drive to the computer and open Wondershare Recoverit. Select your drive under the Hard Drives and Locations section, or find it listed under External Devices if it is a portable drive. Click Start.

Step 2. Run the Non-Destructive Raw File Read Scan
The software will safely scan the drive's memory sectors. You can use the left-hand file type filters to sort through your files by type (such as images, documents, or videos) while the scanner runs.

Step 3. Preview and Extract Your Found Files
Browse through the found files. Double-click an item to view it in the preview window and check its quality. Check the boxes next to the files you want to keep, click Recover, and choose a folder on an external drive or separate partition to save them safely.

The bottom line
A beeping hard drive can be nerve-wracking due to the possibility of permanent damage or data loss. It's also possible to accidentally delete important data which can be costly to the user.
The methods above should help you fix your beeping hard drive, detect an unrecognizable hard drive in your PC and recover lost data. A data recovery software such as Wondershare Recoverit will recover most types of files even if you had not backed up your data. With options such as Data recovery, video repair, and data backup, Wondershare Recoverit is reliable in restoring lost or deleted files.
People also ask
Why is my Seagate HDD beeping and not working?
This can be due to insufficient electrical power or an issue with the internal mechanical components. If the issue persists, get in touch with your hardware provider to fix or replace the hard drive. To check your Seagate hard drive, use the CHKDSK command-line tool by Windows. If your hard disk is not recognized by your PC, use method 3 under part 1 above to detect your hard disk. The CHKDSK command will help troubleshoot and help identify any issues within your hard drive. For the CHKDSK command, follow these steps:
Step 1. Connect your external hard drive to your computer
Step 2. Search CMD in the search box and right-click on the tool to run the Command Prompt as an admin.
Step 3. Type the command "chkdsk g:/r" and click enter
Why is my WD external hard drive beeping?
Similar to Seagate HDDs, the WD HDD can also experience insufficient power supply resulting in a beeping sound. Try using a different USB cable, USB port, or a different PC. Another issue could be the spindle motor's head is stuck on the platter. This results in a beeping sound because the motor is trying to continue spinning. In this case, get in touch with data recovery professionals to secure your data.
How do I recover data from WD external hard drive?
To recover data from an external hard drive, got to the Wondershare Recoverit software and select "External Devices Recovery" to start the data recovery process. This will take you to the "select a location to start recovering file" window where you will select your drive under the external devices section. Once selected, start the scanning process. In the end, data detected on your WD external hard drive will be displayed in the software's window. You can choose to preview or directly "recover" to save the files to your computer.
Rescue & Fix Files
- Recover Document Files
- Repair Document Files
- Recover & Repair More
- Permanently Deleted Files
- Delete Files Command
- Restore Sticky Notes
- Undo Deleted Files
- Get Back Laptop Files
- Cut&Past Files Loss Issue
- Undelete User Profile
- Clear & Delete File


Theo Lucia
chief Editor