
 TL;DR:
To securely erase an SD card, you must match your chosen software or physical sanitisation method to the 2025 NIST SP 800-88 data sensitivity levels, utilizing a basic file system format for personal reuse, a full-sector overwrite for resale, or physical shredding for regulated compliance data.
● Standard methods like Android Settings, Windows Quick Format, and in-camera formatting only rewrite the master boot record, leaving the underlying data fully recoverable by forensic tools if pre-format sectors are not overwritten.
● To safely transfer ownership of a card without leaving recoverable data, you must run Windows Diskpart clean all to write zeros across every sector, or utilize the macOS Disk Utility Most Secure 7-pass overwrite.
● Avoid applying SSD-specific secure-erase commands such as ATA hdparm or NVMe formats; SD cards operate on the SD protocol rather than ATA, causing these commands to fail or permanently brick the hardware.
Ask AI for a summary
 ChatGPT
 Perplexity
 Gemini
 Claude
 Grok
Grok
Quick answer: To securely erase an SD card, pick a sanitisation level first. For ordinary photos on a card you will keep reusing, the Android Settings → Storage → Format SD card option is enough. For a card with business data you are about to sell, use Windows Diskpart clean all or macOS Disk Utility's Security Options. For confidential data NIST SP 800-88 Rev. 2 (2025) recommends Purge — combination of cryptographic erase and full overwrite — or Destroy via physical shredding. If you clicked Format by accident, stop using the card and run Wondershare Recoverit before any other write touches it.
Quick format is not wipe. Windows Quick Format rewrites the master boot record and marks the volume as empty, but the underlying sectors still hold the old data — recoverable with free forensic tools. NIST's SP 800-88 Rev. 2 (Guidelines for Media Sanitization), updated in 2025, sorts sanitisation techniques into three families — Clear, Purge, Destroy — and the level you need depends on the data, not the device.
This guide matches the right method to the right scenario so you do not over-wipe a card you will reuse, or under-wipe a card you will sell. Every method here works in 2026 on Windows 10/11, macOS Sonoma/Sequoia, Samsung One UI 6/7/8.0 (Android 14/15/16), and Canon / Sony / GoPro cameras that take microSD.
In This Article
Part 1. Pick the Right Sanitisation Level First
The first mistake most SD card erase guides make is recommending one method for every scenario. The 2025 NIST framework makes that mistake easy to avoid — match the data sensitivity to one of three sanitisation levels.
NIST SP 800-88 Rev. 2 Framework for SD Cards
NIST's revision 2 of SP 800-88, published in 2025 and now the reference cited by HIPAA / GDPR / CCPA data-destruction clauses, defines three sanitisation categories. Sktes's compliance guide summarises them as follows:
- Clear. Apply traditional overwrite or block-erase so the recovery is infeasible through keyboard attacks. Sufficient for personal photos on a card you still own.
- Purge. Apply cryptographic erase, vendor firmware sanitize, or multiple-pass overwrite such that even laboratory-level recovery is infeasible. Required for confidential business, medical, or financial data on a card leaving your control.
- Destroy. Render the media unusable — render, shred, disintegrate, pulverise. Required for classified, litigated, or breach-impact data.
For SD cards specifically, NIST 800-88r2 notes that Purge often cannot be achieved by ATA Secure Erase (which SSDs accept but most SD controllers do not). The realistic Purge option on a flash memory card is a full-disk overwrite using the host controller's write path, plus, where supported, the SD specification v9.1's Secure Erase Unit (CMD38 + ERASE_UNIT) for cards that advertise it.
Why SSD Secure-Erase Commands Do Not Work on SD Cards
Many "securely erase" guides online recommend SSD commands like hdparm --security-erase or NVMe format for SD cards. They do not work — SD cards do not implement the ATA security command set; they speak the SD protocol, not ATA. Misapplied ATA commands on an SD card reader typically return an error or, worse, silently trigger a brick in counterfeit cards. The Purge path on a microSD is therefore a multi-pass overwrite + vendor firmware erase, not a single SSD command.
Part 2. 5 Methods by Use Case
Pick the method that matches the scenario. Use the decision matrix in Part 3 if you are unsure.
Method 1. Android Settings → Format SD Card (Personal Reuse)
The case: you still own the card and want to keep using it. Personal photos, downloaded music, podcasts. Nothing business-sensitive. You want to clear the slate so storage management starts fresh after Android 15 or 16 reorganised your storage tiers.
Step 1. Open Settings → Battery and device care → Storage (or Settings → Storage on older One UI versions).
Step 2. Tap the SD card section. Tap Format. Confirm by tapping Format SD card in the warning dialog.
Step 3. Wait for the on-screen progress to reach 100%. The phone remounts the card automatically.
Sanitisation level: Clear. The phone rewrites the master boot record and the visible directory. Old sectors are still recoverable with forensic tools; for personal reuse at home this is fine. Google's Android Help community confirms this is the standard reset path.
Method 2. Windows Disk Management Quick Format (Office Reuse)
The case: you have a Windows PC, the SD card came from a personal camera or a Nintendo Switch, and you want to wipe it before passing to a family member. No classified information on it — just vacation photos and clips.
Step 1. Insert the card. Press Win + R, type diskmgmt.msc, hit Enter to open Disk Management.

Step 2. Find the SD card in the lower pane. Right-click the volume and choose Format.

Step 3. Pick the file system — exFAT for cards over 32 GB, FAT32 for cards 32 GB or below, leave Quick Format checked, and click OK.

Step 4. Wait for Windows to confirm the format completed. The card now appears as a healthy FAT/exFAT volume.

Sanitisation level: Clear. Same scope as a Quick Format in File Explorer. Microsoft's Tech Community thread on wiping camera SD cards confirms Quick Format is the right level for personal reuse. For something stronger before giving away, use Method 3.
Method 3. Windows Diskpart clean all (Selling or Donating)
The case: the card leaves your hands — gifting, resale, donation, or a swap into another employee's device. Quick Format leaves the data recoverable; you need a real overwrite that hits pre-format sectors.
Step 1. Insert the SD card. Press Win + X and choose Terminal (Admin) (Windows 11) or Windows PowerShell (Admin) on Windows 10.

Step 2. In the elevated terminal type diskpart and press Enter. Then run the following commands one at a time:
list disk
select disk X (replace X with the SD card number from list disk)
clean all (writes zeros across every sector)
exit
Step 3. Once Diskpart reports Diskpart succeeded in cleaning the disk, remove and reinsert the card. Right-click the unallocated space in Disk Management and create a new simple volume as exFAT or FAT32.

Sanitisation level: Clear-to-Purge approaching NIST. clean all writes every sector — from the user's perspective, the old data is gone. Microsoft's community thread on completely wiping an SD card documents this exact path. For genuine NIST 800-88 Purge on confidential data, run clean all twice, or combine with vendor-provided Secure Erase via the card's firmware.
Sanitisation discipline: Aclean(withoutall) on Diskpart only marks the partition as empty; sectors are untouched. Useclean allevery time you erase for transfer. If the card holds personally identifiable health or financial data, repeat the command or shred the card instead.
Method 4. Mac Disk Utility with Security Options (Creative Pros)
The case: you shoot on a Mac, you shoot in RAW, and the card has client work, not just personal photos. macOS exposes a multi-pass overwrite option in Disk Utility that drives the SD controller through a full volume wipe.
Step 1. Insert the SD card via a USB-C card reader or the built-in SD slot on MacBook Pro 14" / 16". Open Disk Utility from Applications → Utilities.
Step 2. Select the SD card volume (the indented entry under the SD device, not the device entry) in the sidebar.
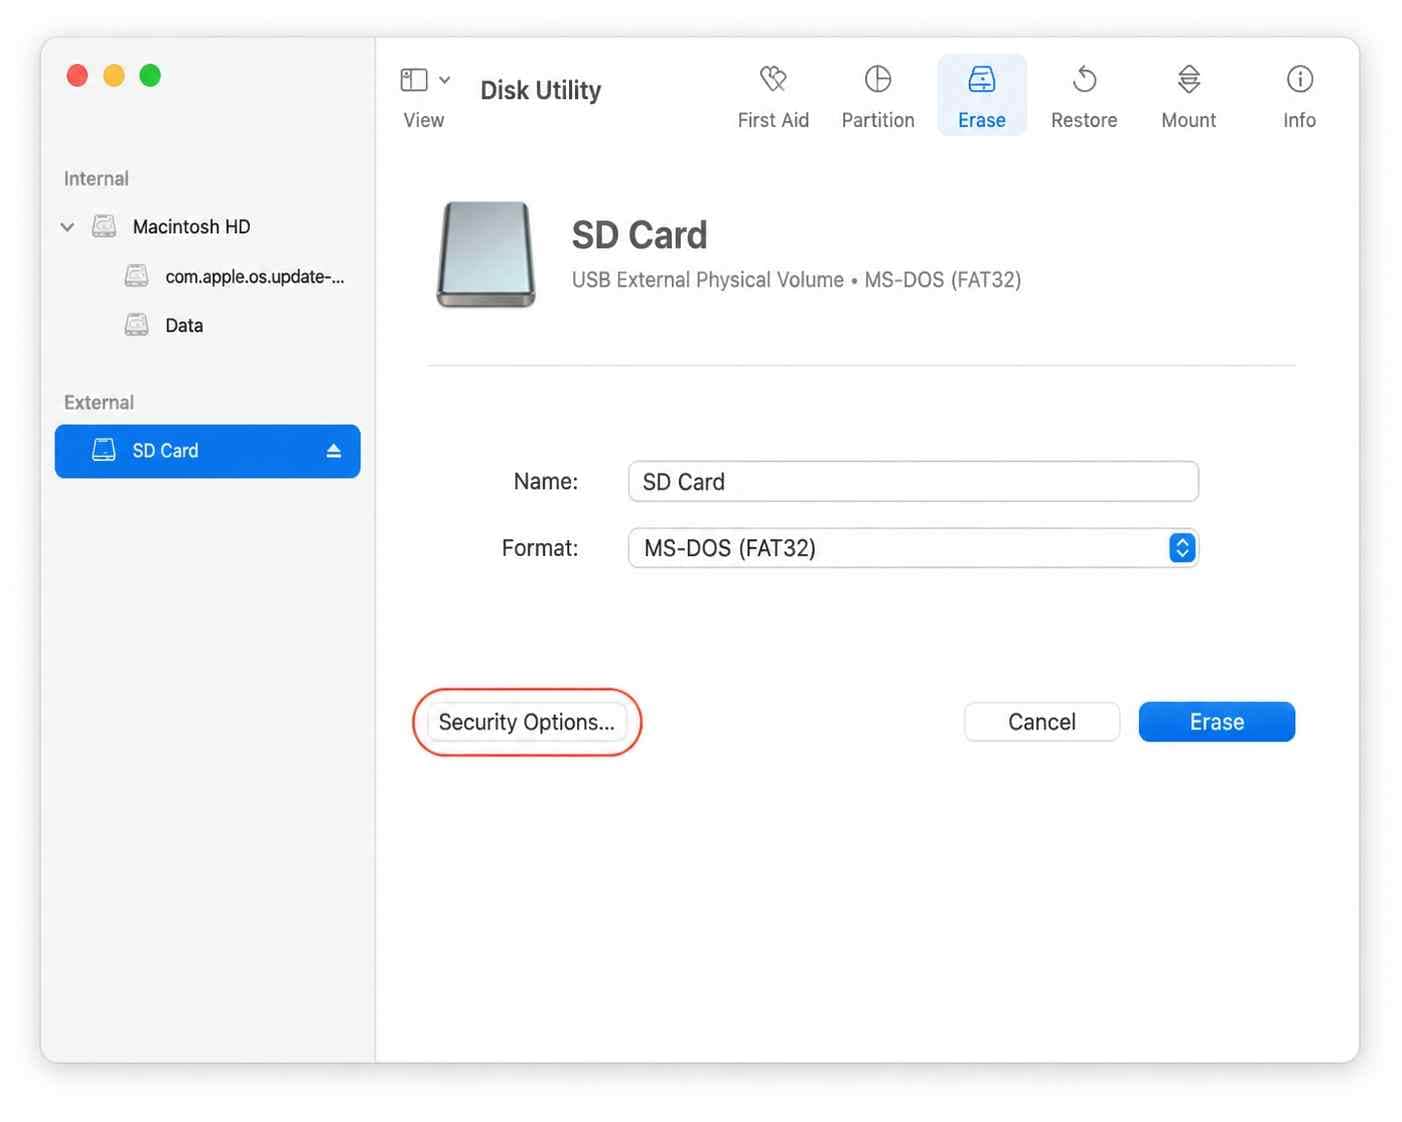
Step 3. Click Erase at the top of the window. In the format dropdown pick MS-DOS (FAT) for cards ≤ 32 GB or ExFAT for cards > 32 GB. Click Security Options….
Step 4. Move the slider one notch toward Most Secure. Click OK. Click Erase. Disk Utility runs a 7-pass overwrite and confirms when the volume is ready.
What the slider means on macOS: "Fastest" is a single-pass zero fill; "Most Secure" is a 7-pass DoD-style overwrite. For SD cards the 7-pass pass is real NIST 800-88 Clear-to-Purge — enough for client work and encrypted card dumps. Apple Discussions thread 256272232 confirms Disk Utility as the standard macOS path.
Sanitisation level: Purge when the slider is set to Most Secure; Clear when set to Fastest. For confidential client work, always slide to Most Secure.
Method 5. In-Camera Format (Canon / Sony / GoPro)
The case: the card lives in a camera and you want to wipe it the way the camera manufactures intend — through the same write path the camera will use to write the next shoot. In-camera format also rebuilds the card's File Allocation Table cleanly, which is useful when the card had been used in a different camera.
- Canon EOS / PowerShot. MENU → Setup wrench → Format card → OK. The camera writes a fresh FAT/exFAT volume before mounting the card back as available storage.
- Sony Alpha / ZV. MENU → Setup → Format → OK. Sony offers a "Low Level Format" toggle that runs a full overwrite instead of a quick format.
- GoPro Hero 12 / 13. Preferences → Reset → Format SD card → Confirm. GoPro's in-camera wipe is the same Quick Format that ships with a brand-new card.
Sanitisation level: Clear. Built-in camera format does not run a multi-pass overwrite, but it does rebuild the file system cleanly, which is what photographers need to prevent "card error" mid-shoot. Photographers selling old gear with the card inside should pair in-camera format with Method 3 on a PC first.
Part 3. NIST SP 800-88 Decision Matrix for SD Cards
Use this table to pick the right method before you start. The wrong method either over-engineers the wipe or, more commonly, under-engineers it.
| Scenario | Data on the card | NIST level | Method to use | Verification needed |
| Card stays with you, personal reuse | Personal photos, music, podcasts | Clear | Method 1 (Android Settings) or Method 2 (Windows Quick Format) | Check the volume mounts cleanly |
| Card leaves the family, no business data | Vacation / event photos | Clear | Method 2 (Disk Management) + Method 5 (in-camera) | Reinsert in any reader, scan with antivirus |
| Card gifted or sold to a stranger | Mixed personal, possible-ID photos | Purge | Method 3 (Diskpart clean all) twice or Method 4 (macOS Most Secure) | H2testw readback without errors |
| Card contains business work / client PII | Client documents, contracts, scans | Purge | Method 4 (macOS Most Secure) or vendor firmware erase | H2testw + cryptographic erase verification |
| Card contains medical, financial, or breach-impact data | HIPAA / GDPR / CCPA-controlled | Destroy | Physical shredding via ITAMG ITAD guide | Certificate of destruction |
| Card is counterfeit, faulted, or unreadable | Unknown | Destroy | Shred with the rest of e-waste | Certificate of destruction |
Part 4. If You Formatted Too Early: Recover First
Clicking Format on the wrong card is one of the most common data-loss triggers in 2026. The card's directory is empty, but the underlying sectors still hold your photos and videos until something else writes over them. Wondershare Recoverit reads those sectors before the wipe completes them.
Recommended Path: Wondershare Recoverit
Wondershare Recoverit reaches below the file-system layer on freshly formatted SD cards. The official Recoverit SD card workflow lists every supported file type and previews files before recovery, so you confirm a recovered photo or video is intact before committing.
- Reads pre-format sectors. Recovers files from a card that was just Quick Formatted before any other overwrite reached it.
- Pauses / resumes on long scans, useful for 256 GB+ cards.
- Writes recovered files to a different drive, keeping the source untouched.
- Recognises encrypted and corrupt-card volumes the OS shows as RAW.
What Recoverit Recovers From a Quick-Formatted SD Card
- Photos and videos in the original shoot's directory before the format ran.
- Documents the Quick Format cleared from view but that still sit in pre-format sectors.
- Audiobooks, podcast downloads, and alarm ringtones stored on the SD card.
- Files from apps that wrote to the SD card and were not backed up before the format.
- Camera RAW formats (NEF, CR3, ARW) from in-camera format scenarios.
3-Step Recovery Workflow
Insert the freshly formatted SD card via a USB card reader before anything else writes to it.
Step 1. Pick the card in Recoverit. Install Recoverit on the host PC (NOT on the SD card you just formatted), launch it, and choose the SD card volume under Hard Drives and Locations.

Step 2. Scan. Click Scan. Recoverit's Deep Scan reads below the file-system layer and recovers files the Quick Format removed from the directory but did not overwrite.

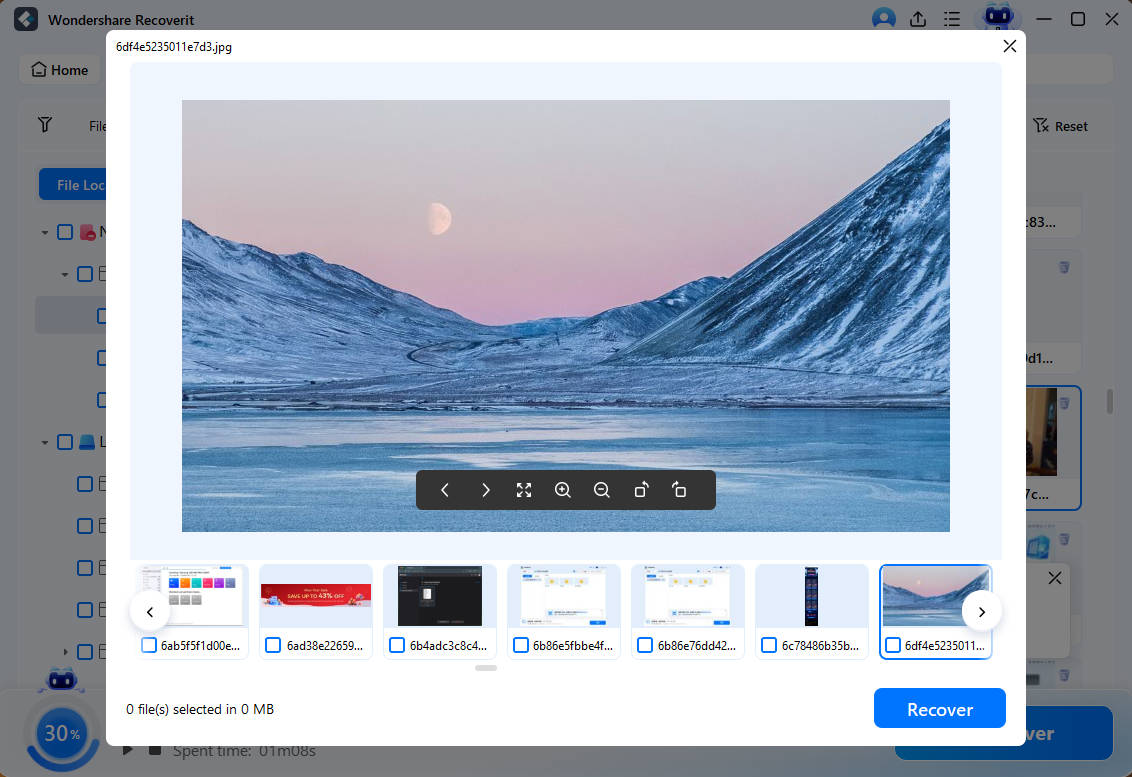
Step 3. Preview and save. Preview supported file types, select the files you want to keep, click Recover, and save them to a separate drive—not the SD card. Open each recovered file before deleting the original copy.

Part 5. Verify the Erase Before Reusing the Card
For any method except physical destruction, verify before reuse. Three checks together catch every common post-wipe mistake:
- H2testw run. The German free tool H2testw writes known patterns to the card and reads them back. A pass means the card has its advertised capacity and zero bad sectors — that the SD controller is healthy and the wipe did not expose a counterfeit-capacity issue.
- Write-protect latch. On full-size SD cards, slide the small switch on the side from Lock to Unlock before inserting in any device. The cameras and Recoverit's SD write-protection guide confirm a card left in the Lock position shows as empty even after a successful wipe.
- Cross-device mount. Insert in a different reader, phone, or camera. If the card mounts cleanly in three different devices, the wipe rebuilt the file system in a way the host reader accepts.
Part 6. After Erase: What to Do With the Old Card
Once the erase is verified:
- Reuse inside the family. Reformat via Method 1 for continued household use.
- Donate through a certified R2 / e-Stewards recycler. Their certificate of destruction is the audit trail your compliance team needs.
- Sell on the secondary market. Format via Method 3 twice; the second pass catches the small number of blocks the controller wear-level table reserved from the first.
- Smash and recycle if the card contains regulated data. NIST 800-88 Destroy section recommends disintegrating cards smaller than 2 mm particle size.
- Avoid the temptation to "just Quick Format and resell" — Reddit's r/photography thread on selling gear documents multiple cases where buyers recovered the previous owner's photos with free tools.
Conclusion
Securely erase an SD card by picking the right sanitisation level for the data on it. For personal reuse the Android Settings path or a Windows Quick Format is enough. For cards leaving your hands, run Discpart's clean all twice or macOS Disk Utility's Most Secure slider for a NIST 800-88 Clear-to-Purge. For HIPAA / GDPR / CCPA controlled data, shred. If you accidentally formatted the card before the erase, run Wondershare Recoverit on it before any other device writes over the sectors.
FAQ
-
Is Quick Format the same as securely erasing an SD card?
No. Quick Format rewrites the SD card's master boot record and marks the volume as empty, but the underlying sectors still hold the old data. Free forensic tools can read those sectors and recover deleted files. For resale or donation, run Discpart clean all or macOS Disk Utility's Most Secure slider instead. -
How do I securely erase an SD card on Windows 11?
Insert the card via a USB reader. Press Win + X, choose Terminal (Admin). Run diskpart, list disk, select disk X (the SD card), then clean all. The clean-all step writes zeros across every sector; a normal clean without all only rewrites the partition table. For confidential data, run clean all twice or pair with a full overwrite tool. -
Does the SD Association's Secure Erase command work on every SD card?
No. SD specification 9.1 introduced a Secure Erase Unit via CMD38, but most consumer SD cards do not advertise it. Industrial cards and some recent Samsung and SanDisk models do. Run a vendor firmware test before assuming your card supports CMD38. -
What does NIST 800-88 say about erasing SD cards?
NIST SP 800-88 Rev. 2 (2025) groups media sanitisation into Clear, Purge, and Destroy. SD cards typically support Clear via overwrite. Purge for flash storage needs cryptographic erase plus a multi-pass overwrite. Destroy requires physical shredding. The revision clarifies that ATA Secure Erase, which works for SSDs, does not work on SD cards. -
Should I encrypt the SD card before erasing it?
Yes for confidential data. Encrypt the full volume first (BitLocker on Windows, FileVault on macOS, or the phone's built-in encrypt storage), then wipe the card. The wipe effective becomes a cryptographic erase—NIT 800-88 Purge level—even if the underlying block erase is not perfect. -
Can I recover files after Diskpart clean all?
No. clean all writes zeros across every sector of the volume, which is NIST 800-88 Purge level. No consumer tool, including Recoverit, can recover files after this step. The only recovery path is a backup. Recoverit is useful only against Quick Format or accidental Format performed before any other overwrite. -
How do I securely erase a counterfeit SD card?
Do not try to “erase it”; physically destroy it. Counterfeit cards have hidden reserved sectors that the controller wear-levels around, so any software wipe leaves the original data recoverable. Shred or disintegrate the card following your local e-waste rules. -
Is it safe to throw away an SD card that was photos only?
For non-identified photos, Quick Format is enough before recycling. For photos that include faces, license plates, school IDs, or location EXIF data, the safer path is a Clean-then-Purge overwrite; for medical or child-related photos, Destroy via shredding. In doubt, treat the data as Purge-level.


