Different Solutions to Delete All Videos from Chrome and Computer
Doesn't matter whether you are using Mac or Windows, deleting files safely and securely is essential. This article explores how to delete all videos from Google Chrome and Computer step-by-step.
Part 1. How to Delete Videos on YouTube?
YouTube has become an addictive platform for many people nowadays. It captivates the user's attention and collects data to recommend related content that is mainly tough for you to resist. Whether you watch YouTube feel entertained, or relax, just follow our guide that will tell you how you can erase all videos on YouTube.

1. Consequences of Deleting YouTube Videos
On a computer, you can delete your videos using the YouTube Studio tool on the YouTube website. After learning how to delete a video from the YouTube channel, and proceeding with it, you will come across the following consequences:
- Permanently deletion of a YouTube video that has been shared will now have a "video not found" message.
- It also deletes all of the votes and comments.
Thus, if you upload the video again, you'll be starting all over again.
2. How to Delete A Video on YouTube?
You can remove the YouTube video quickly on the desktop version. Under each YouTube video, you will find a toolbar with buttons that perform diverse actions, with a Flag icon appearing on the right. This flagging tool will help you to report a video to YouTube staff for review. You just need to click it and offer the details of why you want to remove the video.
If the video is against YouTube's Community Guidelines, they will remove it immediately. However, if the staff does not found any violation, the video will not be removed, regardless of how often it is flagged. For such scenarios follow the steps below to delete an unwanted YouTube Video:
Step 1: Go to the YouTube homepage in the browser window and sign in with your Google account.

Step 2: Click on your profile icon located in the upper right-hand corner.
Step 3: Now, click on the 'our Channel' option from the menu. It will let you see all of your videos live.
Step 4: After that, click on the YouTube Studio button found under your profile picture in the middle of the screen. Here, you can see all of your analytics of the channel, including your top YouTube videos by clicking the Analytics option from the left pane.

Step 5: Then hit Contents, and you will see all your previous uploads. Tick the box beside the video that you want to delete and then hover over the title. When hovering the mouse, you will find the analytics, details, and comments button.
Step 6: You need to look for the "options" button. It will look like three vertical dots that will pop up.
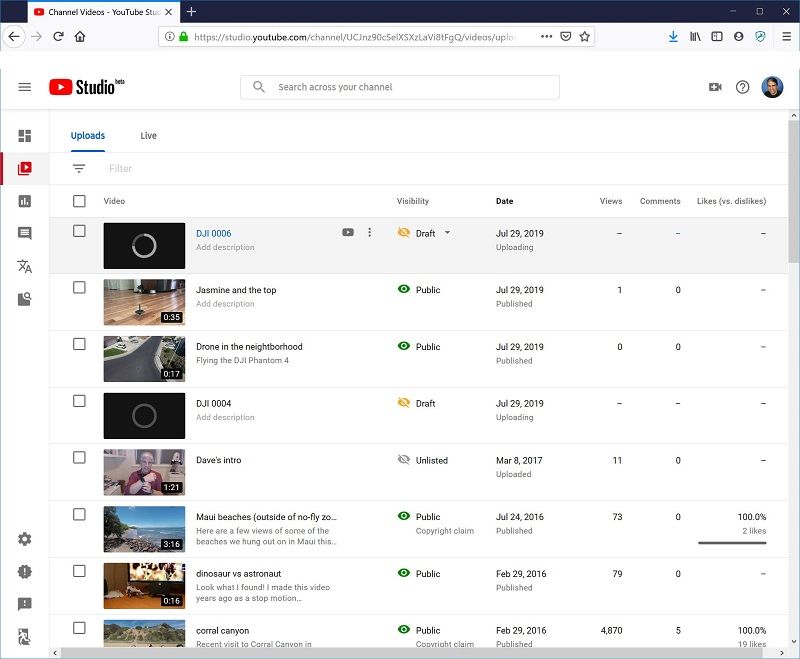
Step 7: Click that three dots and Hit the menu icon and then on Delete.
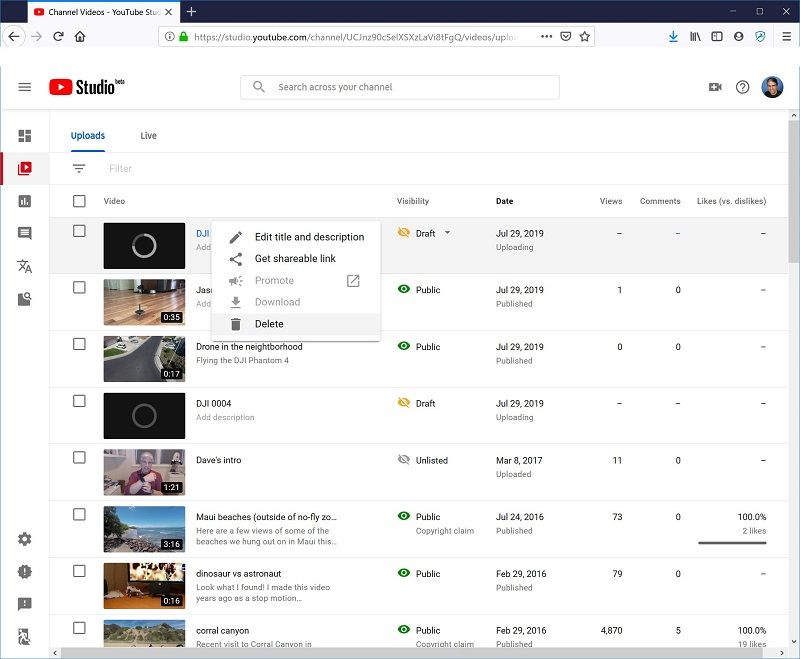
Step 8: Finally, tick the confirmation box and then hit the Delete Forever button to delete your selected video. YouTube will prompt you to confirm this decision. If you are sure about the decision, just go ahead and confirm. Once the final step is completed, you are done with the process.
Note: If you would like to save your video for your records before your final deletion, you can choose "download" and then save it on your desktop or an external drive. After that, you can go ahead with the steps mentioned above.
3. How to Delete All Videos on YouTube?
To delete multiple YouTube videos and that too the same time, follow the steps below:
Step 1: Sign in to YouTube Studio.
Step 2: From the left menu, choose Content, and then click Videos
Step 3: Tick the boxes located next to the videos that you would like to delete.
Step 4: Now, choose More actions > Delete forever to delete YouTube videos permanently.
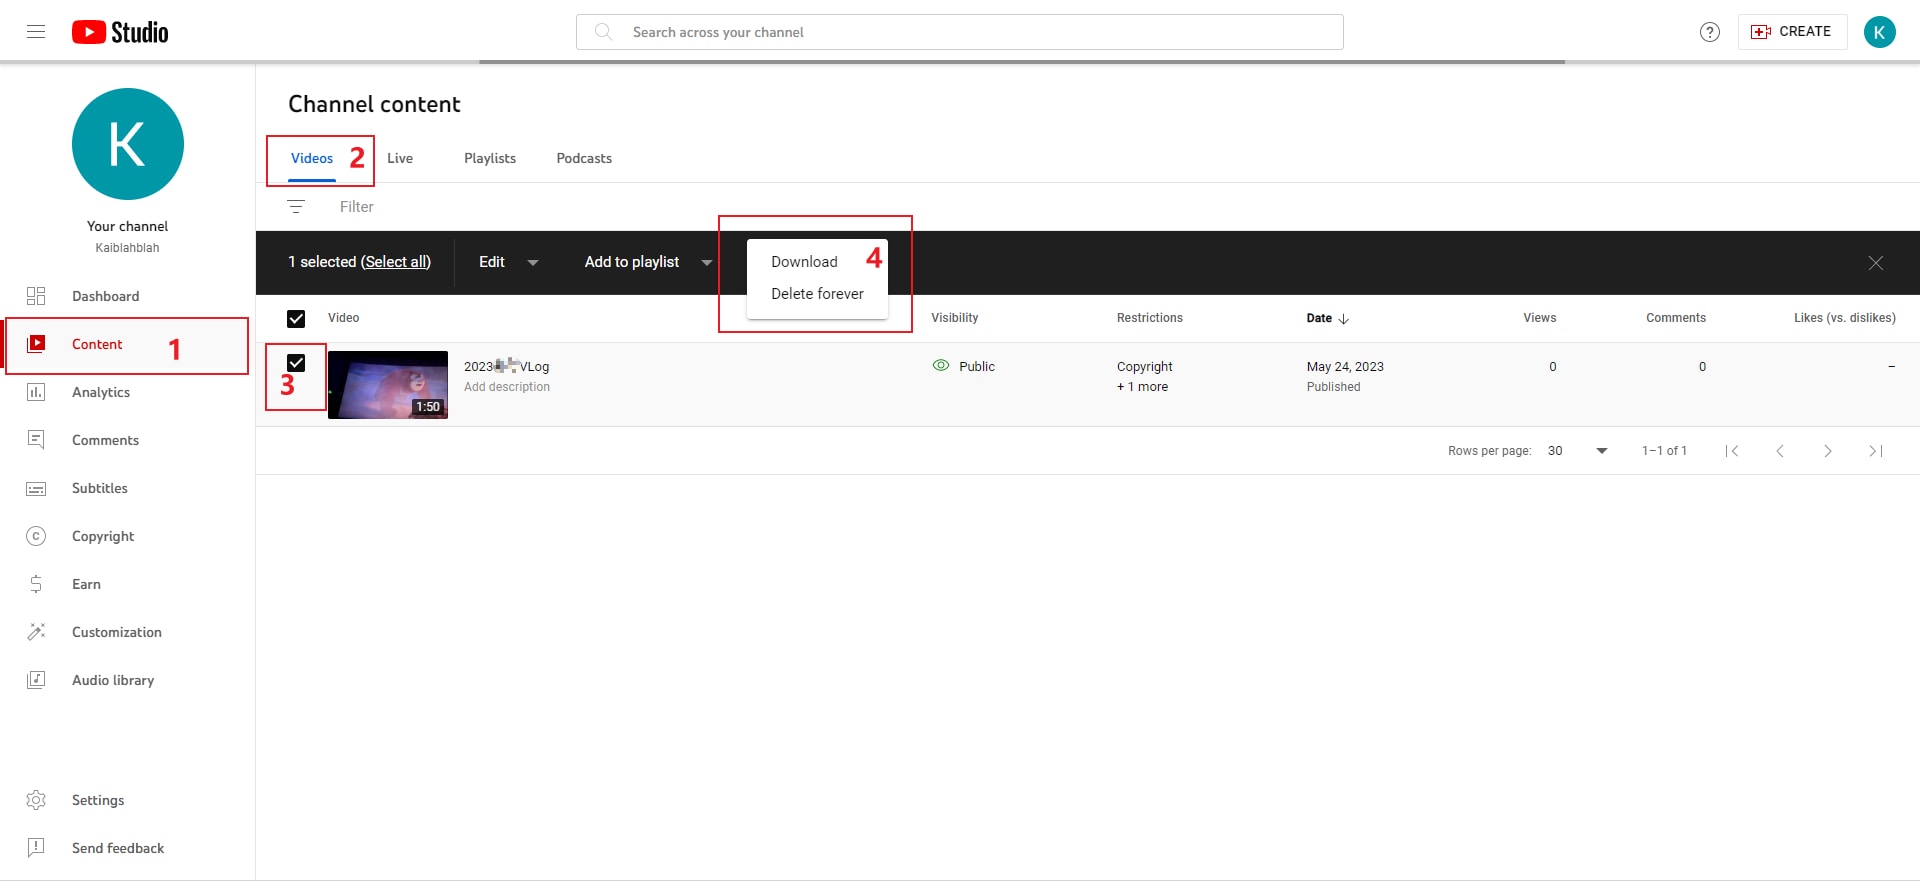
Note: You can hide the video without deletion. To do it, click Private or Unlisted.
After you delete a video, the video URL and title will no longer be visible on YouTube. It means it gets permanently deleted and you can't recover it via YouTube. However, if you would like to watch the video in the future, ensure that you have a backup saved.
4. How to Delete All Videos in YouTube History?
All the videos you watched will be saved in the History tab. If you need to find one video you just watched and uncollected yet, you could find it in the History section. However, if you would like to delete all videos in watch history, here is the guide:
1. Open YouTube and find History option from the left pane.
2. From the options listed on the right sidebar, you will find the Clear all watch history option.
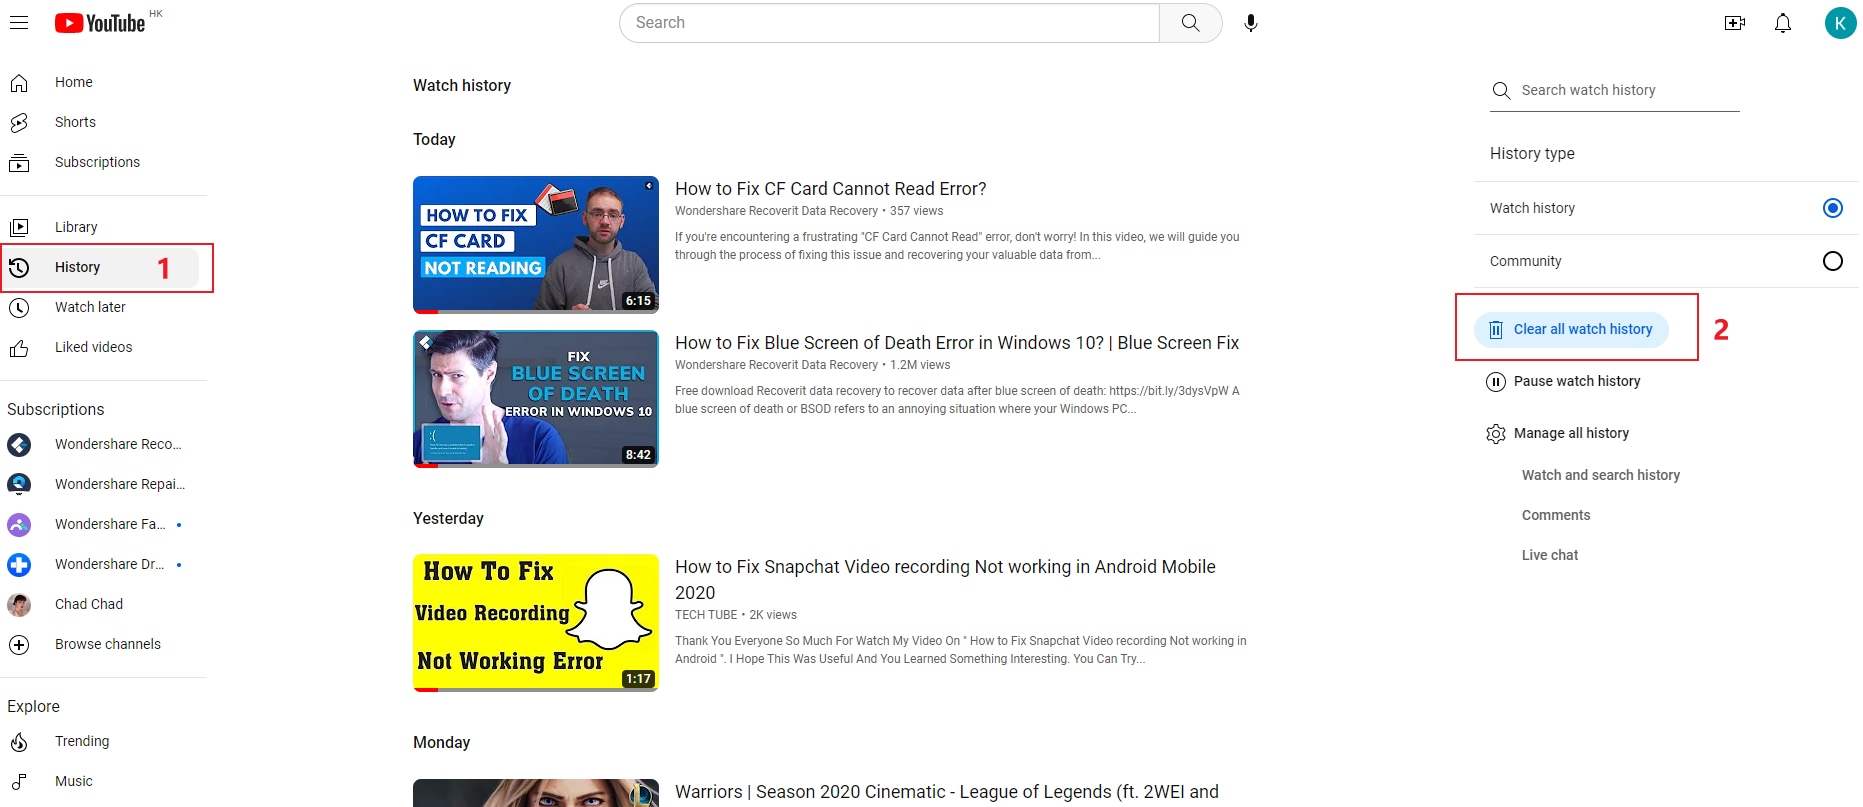
3. Tap on it, then all the watch history will be removed clearly.
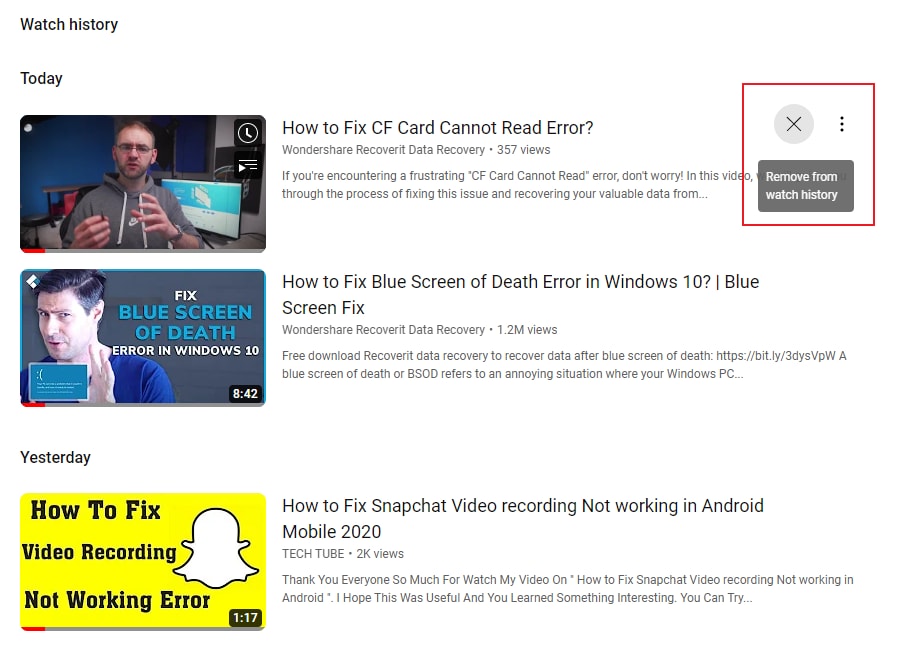
To remove one video only, you can move the mouse to the corresponding video, then you will find a cross icon at the right corner. Tap on it, then this video will be deleted from the history list.
5. How to Delete Watch Later on YouTube?
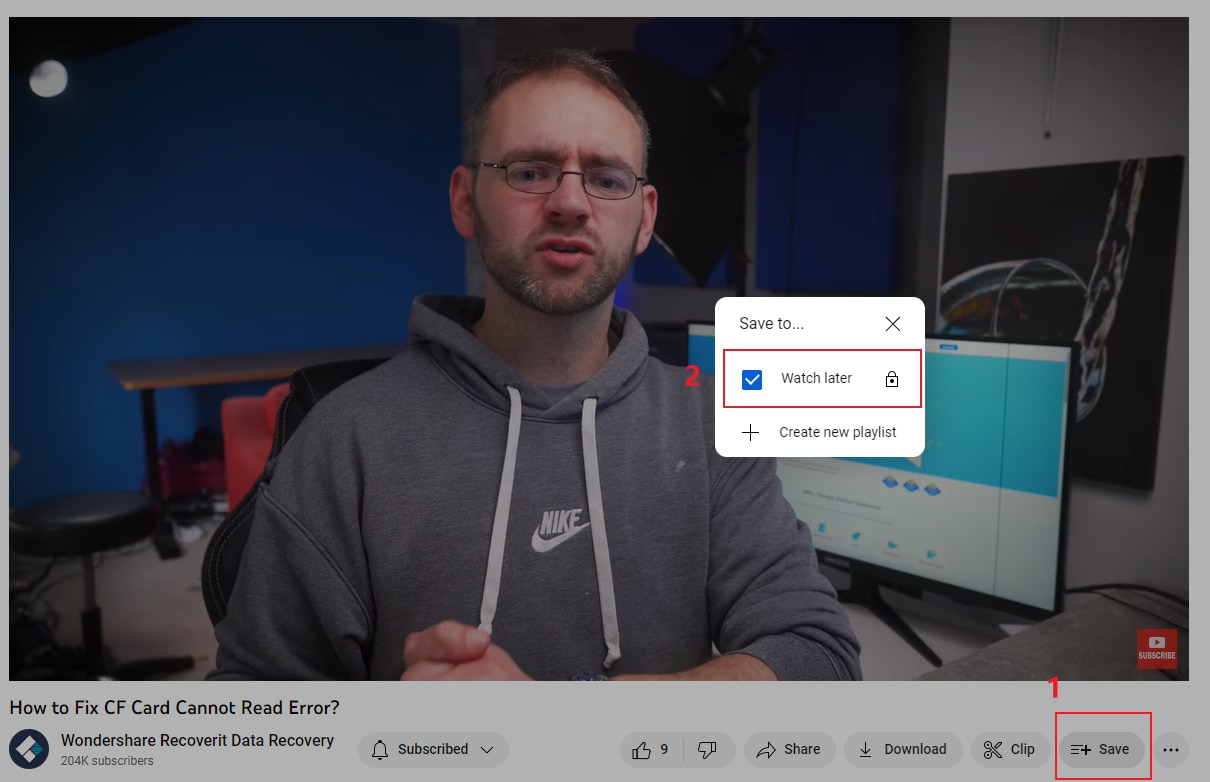
If you find some videos that you’re interested in, but don’t want to watch at this moment, you can click the Save option at the bottom of the video. Then here will be a popup. You can check the Watch later box, then the video will be saved and you can find the video easily in the Watch Later section.
If you want to delete Watch Later video in YouTube, you can follow this way:
1. Go to YouTube and find the Watch later tab from the left pane.
2. Move the mouse to the video you wish to delete, then here will be a three-dot icon appearing at the right corner.
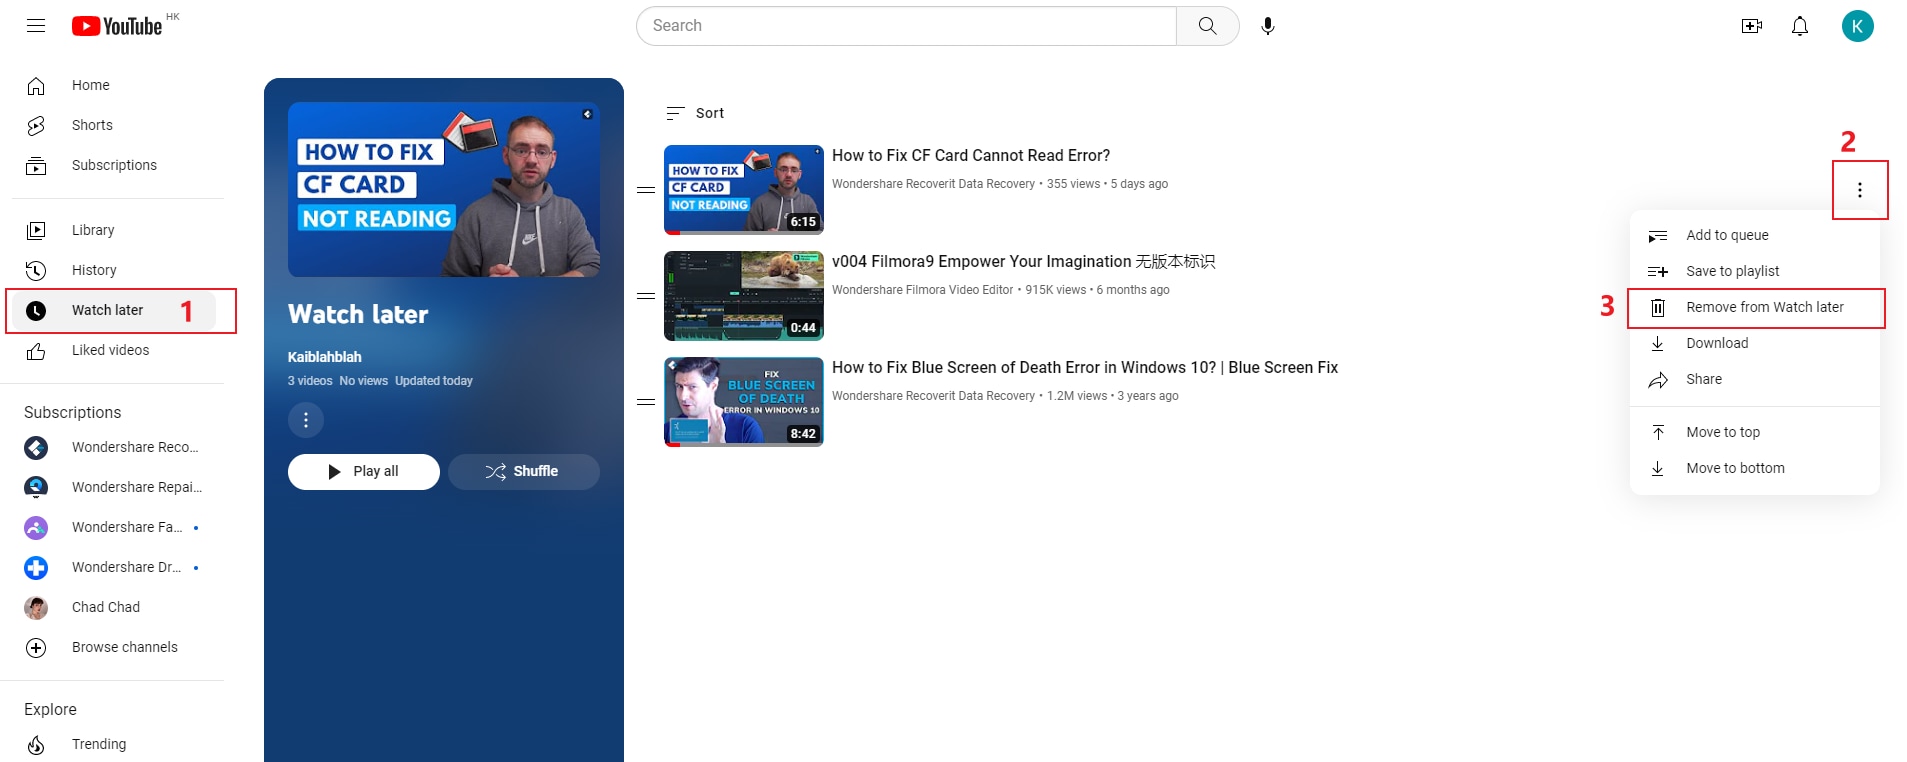
3. Click it, then click Remove from Watch later.
Part 2. How to Clear All Videos on Computer?
Do you have a video on your computer that you want to obliterate? Well, it will take a lot more than dragging and dropping it into the trash can at the desktop. The trash bin only removes a video file from your desktop.
When you delete any file from your Computer using the basic 'Shift+Delete keys,' it continues to stay on the hard drive, even after you empty it from the Recycle Bin. Thus, when you sell it to someone else, it allows them to recover and access files. There are many effective ways to remove that video file once and for all without any trouble.
This will not only help to free up disk space to store more important files but also boost the performance. When you delete all the videos from the Computer, it also lowers the chances of problems in the future.
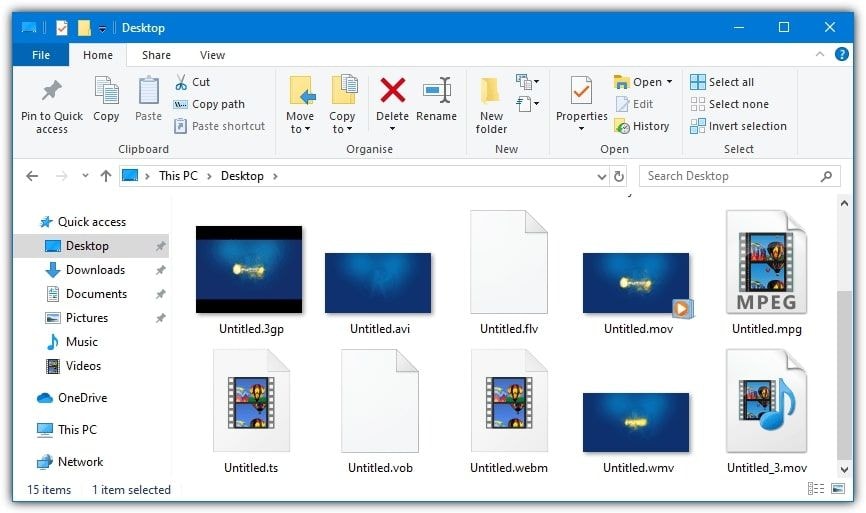
1. Benefits of Erasing Videos on Computer
Too much clutter on the hard drive not only takes a lot of space but also makes your PC function harder to find the files you require. If you are running out of space, what's better than deleting unwanted videos and other files.
Deleting unused or unnecessary videos from your Computer offer the following perks:
- Free up disk space on your computer to store more essential files
- Keep the PC working at its best
- Keep your files organized
- No one can access them
2. Different Methods to Delete Computer Videos
Below are the different methods by which you can delete computer videos on both Mac and Windows:
For Windows
a) Send Videos to the Trash
Trash (aka Recycle Bin in Microsoft Windows) is temporary storage for the files that the user has deleted. These files are not yet permanently erased from the file system.
Since Microsoft Windows uses just 10% of available disk space, this means that you can always browse through them and restore them as long as deleted items remain in there.
Note: If you have a backup of your video before deleting it, it will remain in the Trash for sixty days. To delete videos permanently on your computer, you need to make the Trash empty. For this, follow the steps below:
Step 1: Go to my Computer and then 'Trash.'
Step 2: Right-click 'Trash' in the sidebar.
Step 3: Now choose the videos that you want to delete.
Step 4: Click delete permanently and hit the delete button to empty Trash.
You can delete a video permanently without sending it to the Trash first. Just follow the steps below:
Step 1: Choose the videos from your computer that you want to delete.
Step 2: Press and hold the 'Shift' key.
Step 3: Then, hit the 'Delete' key on your keyboard.
As you can't recover the videos, you will be asked to confirm that you want to delete them.
For Mac
Whether you want to free up storage, remove personal videos, or get rid of duplicates, Mac makes it easy to delete one or multiple videos in just a few steps.
Here is how you can delete videos on Mac:
a) Using the Photos App
If you are using iCloud Photo Library, any file you delete on Mac will also get deleted on all other iCloud Photo Library based devices, including the iPad and iPhone.
You can recover the deleted pictures and videos on Mac for up to thirty days (unless you have zero storage on your system).
Step 1: Launch the Photos app on Mac.
Step 2: Choose the video or videos that you want to delete.
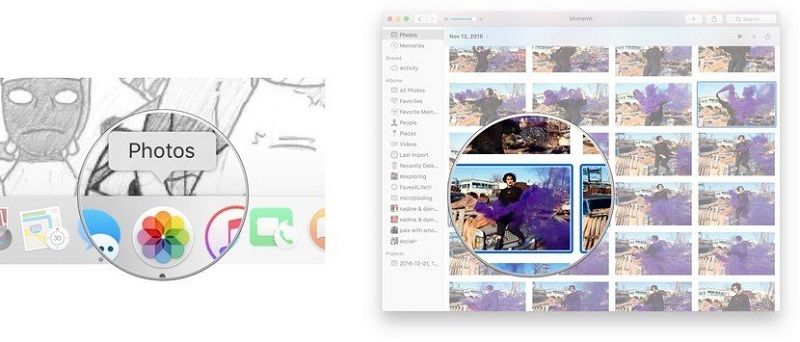
Step 3: Right-click on the video and click Delete (You can also press Command + delete to skip the confirmation dialog.)
Step 4: Click Delete to confirm the deletion.
b) Use Third-Party Tools
If you want to delete videos on Mac permanently, the simple and effective method is to use third-party software. Simply follow the guide properly. Furthermore, once the videos get permanently deleted from your Windows or Mac, they can be recovered. Therefore, please make sure you back up all your important videos to any secondary hard drive.
Part 3. Follow Tips When Deleting All Videos
If you do not want a video file anymore and want to delete it, just keep the following tips in mind.
1. Tips When Clearing All Videos
- When you delete a video from your computer, it is sent to the Trash folder, where it stays till you empty it.
- Even if you empty the 'Trash bin', it just deletes the virtual path. It means the video file is still saved in your hard drive, but it's now tough to access.
- Change the settings of the recycle bin, to delete videos permanently without sending them to the recycle bin.
- Take a backup of your data, to avoid the loss of any important files.
2. Recover Accidentally Erased Videos on YouTube
Below are the various methods that help you recover your deleted videos from YouTube:
Method 1: Contact Help Support
Step 1: Sign to your YouTube channel and click 'Help' at the page bottom.
Step 2: Click on "Need more help" and then proceed to "Get Creator Support."
Step 3: Now select your problem and click on the option Email Support.
Method 2: Using Internet Archive Way Back Machine
Here are the steps that will you to recover your deleted YouTube videos from the option archive.org (Way Back Machine):
Step 1: Log in to your YouTube email account and get data about previously uploaded YouTube videos.
Step 2: Open the deleted URL of YouTube videos by clicking on the video information.
Step 3: Now, head to archive.org and then paste that URL on the search field and then tap on the 'browse history.'
Step 4: When you have all the data about deleted YouTube videos, download or upload it again.
3. Recover Accidentally Deleted Videos on Computer
Whether you deleted videos by accident or else format storage media, use the Recoverit tool. This data recovery software to recover deleted or lost videos on both Windows and Mac without any hassle. Here are the steps to use the software for revering lost or your deleted YouTube videos:
Step 1: Select the Location to Recover Video
The first step here is to select a location where you have lost your videos. Now "Start" to begin the scanning on the selected location.

Step 2: Scan the Selected Location
The Recoverit tool will begin the all-around scan, and it will take a few minutes to finish it. Remember, during scanning, you can even toggle between different video files that you wish to recover.

Step 3: Preview and Recover Videos
Choose the target videos and hit the 'Recover' button to retrieve them back. However, it's best to avoid saving the files to the location where you have deleted or lost the videos.
Remember, before recovering videos from your Computer, you can even preview them. It will help you know that the videos you are recovering are exactly what you exactly want. A preview window will pop up after hitting the "Preview" button.
Moreover, when you click on any video file, it will give you information about the file size, file path, the modified date, and much more.

Note: If you have big-sized and complex videos that you want to recover, use Advanced Video Recovery.
Closing Words
You uploaded a video on YouTube a long time ago, and now it is outdated. Or you have too many video files on your computer and want to know how to delete the video permanently.
Just follow our guide properly, and you are ready to delete all of your videos from Mac or Windows permanently.
If you have deleted any important video accidentally, use the Recoverit tool to recover deleted videos and other data on your computer. You can click on the download link on their official website. Recoverit download will start automatically after a few seconds. The software works securely and faster than other data recovery software on the market.
Solve Media File Problems
- Recover & Repair Photos
- Recover & Repair Videos
- Recover & Repair Audio
- Recover & Repair Cameras



 ChatGPT
 Perplexity
 Google AI Mode
 Grok
Grok


Eleanor Reed
staff Editor