Is your video's audio out of sync, ruining your viewing experience? This is a common problem, especially with MP4 or MKV files on Mac and Windows. This guide provides 5 proven methods to fix audio sync issues, from quick adjustments in VLC to permanent file repairs.
In this article
Part 1: What is the Video Sound Out Of Sync Problem?
For any multimedia content, one of the most crucial parts is the audio video sync during the playback. It ensures that the audio component in the file is synchronized with the video for smooth playback. But sometimes audio and video are out of sync due to any error or issue, resulting in audio video sync problems. This type of issue can be very annoying since everything else works, but the inconsistent audio and video playback can disturb your focus, preventing you from focusing on the content.
You can typically experience two types of audio video sync issues when watching a video. The audio is ahead of the video, which means it plays before any visuals appear on the screen. The other situation occurs when there is an audio delay while the video content is playing on the screen without any sound.
Part 2: How to Fix Audio Video Sync Problems
Following the various reasons that cause audio and video are out of sync problem, here are some of the effective solutions to fix it. Choose the right solution depending on the operating system you use and the reason behind the out of sync issue.
Solution 1: Sync using Windows Media Player
If you are a Windows OS user, then you can use Windows Media Player to fix audio video sync problems by modifying its built-in features. It will automatically sync any timestamp difference between audio and video not syncing by itself during the video playback.
Follow the below steps to resolve the audio and video are out of sync issue using Windows Media Player:
- Launch the Windows Media Player on your PC and open the audio video sync issue video file on it.
- Click on the “Organize” option at the top and select “Options..” from the drop-down menu.
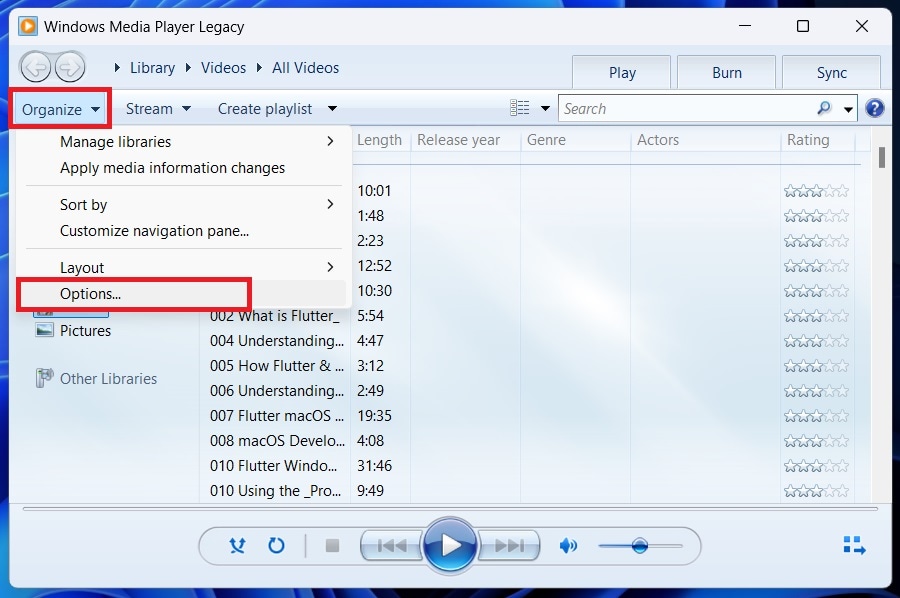
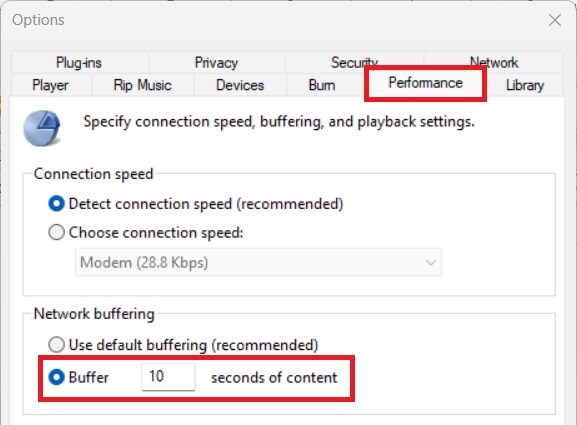
- On the new pop-up window, select the "Performance" tab option from the list at the top.
- Now, under the "Network buffering" section, enable the "Buffer" option and set it to 10 seconds. This allows the media player to load the network videos properly before playing them.
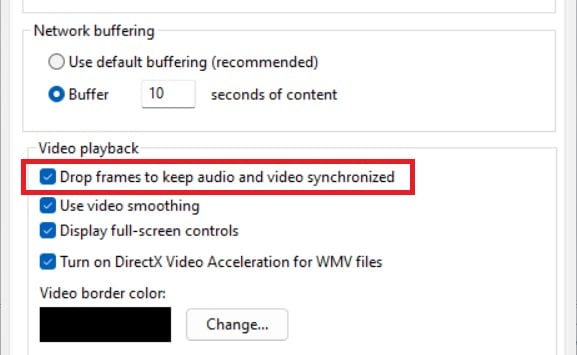
- Next, under the “Video playback” section, enable the “Drop frames to keep audio and video synchronized” checkbox option. This will allow the media player to drop unwanted frames to make sure audio and video are in sync.
- Save the new settings by clicking on the "Apply" button and then "Ok" button.
Solution 2: Fix Audio Sync in VLC (For Mac & Windows)
Another easy solution to fix audio video sync problems is by using a VLC Media player. Whether you are Windows or Mac, the free media player is available and supports almost all video file formats. Using its Track Synchronization functionality, you can easily modify the audio and video timestamps to align with each other and automatically fix any lag between them.
Follow the below steps to fix the video and sound not in sync issue using VLC Media Player:
1. Using Keyboard Shortcut Keys
For Windows: As a quick fix for Windows, after you face audio and video not in sync trouble, you can simply press the “J” if the audio plays before the video or the “K” key if it plays after the video during the playback. These two keys are predefined hotkeys to instantly adjust the audio of the video file by 50 milliseconds to correct the lag in the VLC player.
For Mac: Similarly, for Mac, press the "G" key to slow the audio if it is ahead of the video and press the "F" key to speed up the audio if it is lagging behind the video.
2. Using Track Synchronization Feature
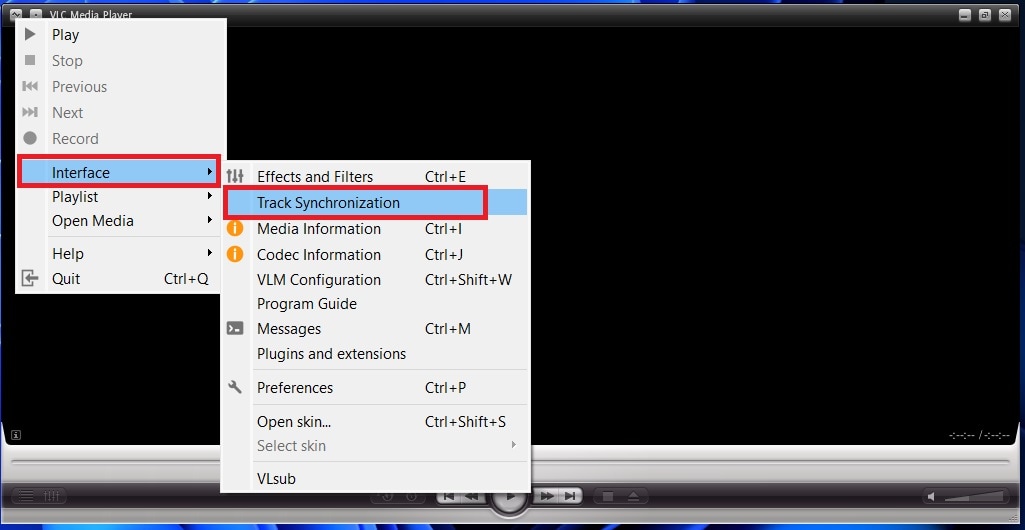
- If the hotkeys did not resolve the issue correctly, you can customize it in the settings. First, open the video file you have an issue in the VLC player and click on the "Menu" button at the top left corner of the player.
- Select the "Interface" option from the drop-down menu and click on the "Track Synchronization" option.
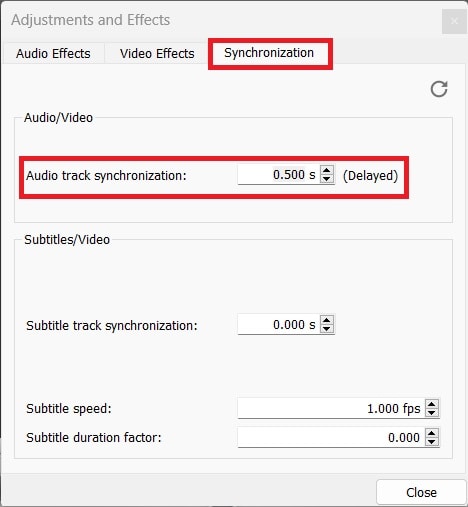
- On the new window, select the "Synchronization" tab at the top. Now, under the “Audio/Video” section, adjust the delay of the audio depending on the lag situation. If the audio of the video file is ahead of the content, then add delay to the file by clicking the up arrow button. If the audio is lagging behind the video of the file, then click on the down arrow to delay the audio.
Solution 3: Sync using Adobe Premiere Pro
Alternatively, you can also use professional video editing software such as Adobe Premiere Pro to fix video and sound not in sync problems. Along with fixing sync issues, you can also use it to enhance and modify your videos to the next level using the program.
Here are the steps to follow to fix audio and video not syncing issues using Adobe Premiere:
- Launch the Adobe Premiere Pro program on your system and create a new project by clicking on the "New Project" option.
- Next, load the audio out of sync video file to the "Project panel".
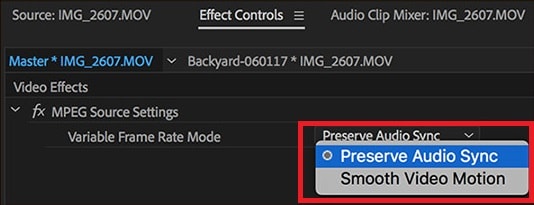
- Open the video file in the Source Monitor and switch to the "Effect Controls" panel.
- Here, under the "MPEG Source Settings" section, change the "Variable Frame Rate" mode to "Preserve Audio Sync" from the "Smooth Video Motion" option. The Preserve Audio Sync option will add or remove video frames so that audio and video remain in sync, whereas the Smooth Video Motion option breaks down all frames in the video.
- Finish the editing process and save the video file in the new location.
Solution 4: Fix Out of Sync Audio on Mac with iMovie
If you are a Mac user, then you can use its built-in iMovie video editing application to solve the audio and video not in sync problem. Although it provides comprehensive video and audio editing options to improve your videos, you can also use it to solve out of sync issues.
Here are the steps to fix audio and video not in sync issues using iMovie:
- Launch the iMovie application on your Mac and click on the "File" option at the top.
- Select the "Import Media" option from the drop-down menu and add the audio video out of sync file to the app timeline.
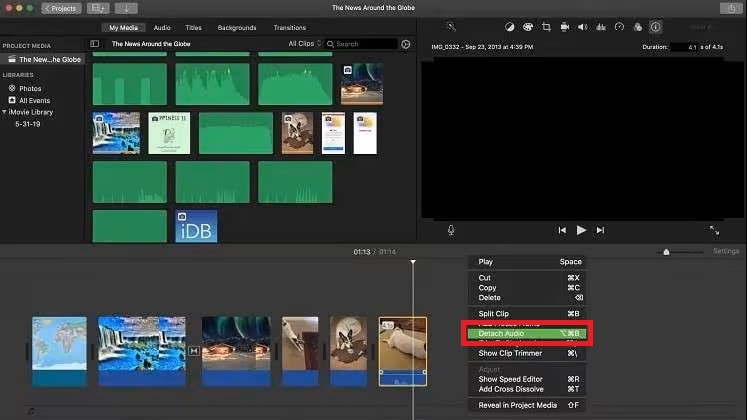
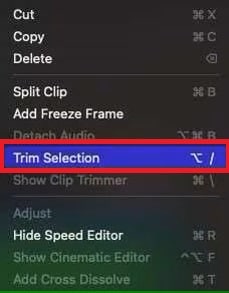
- Right-click on the video in the timeline and select the "Detach Audio" option.
- Next, click on the audio file on the timeline and select the "Edit" option.
- Click on the "Trim Selection" and move the audio to fit the video timeline.
- Lastly, click on the “File” at the top and select the “Save” option to save the fixed video file.
Solution 5: Fix Using Video Repair Tool
If none of the above solutions help you fix audio video sync problems, then you can use a third-party video repair tool such as Recoverit Video Repair. The app can fix corrupted videos due to logic, storage, application, or any other related issue. It offers two video repair modes - quick and advanced, to fix almost any video file, irrespective of its size and format. You can repair video file formats in MOV, MP4, M2TS, MKV, MTS, 3GP, AVI, FLV, and more. In addition, it also has a batch video repair option to fix multiple videos at the same time.
Here is how to fix audio video sync problems using Recoverit Video Repair on your system:
- First, download and install the Recoverit Video Repair program on your computer. Make sure to install the application on a different drive than the corrupt video file location.
- Launch the application and select the "Corrupted Video Repair" option on the left side panel on the main screen.
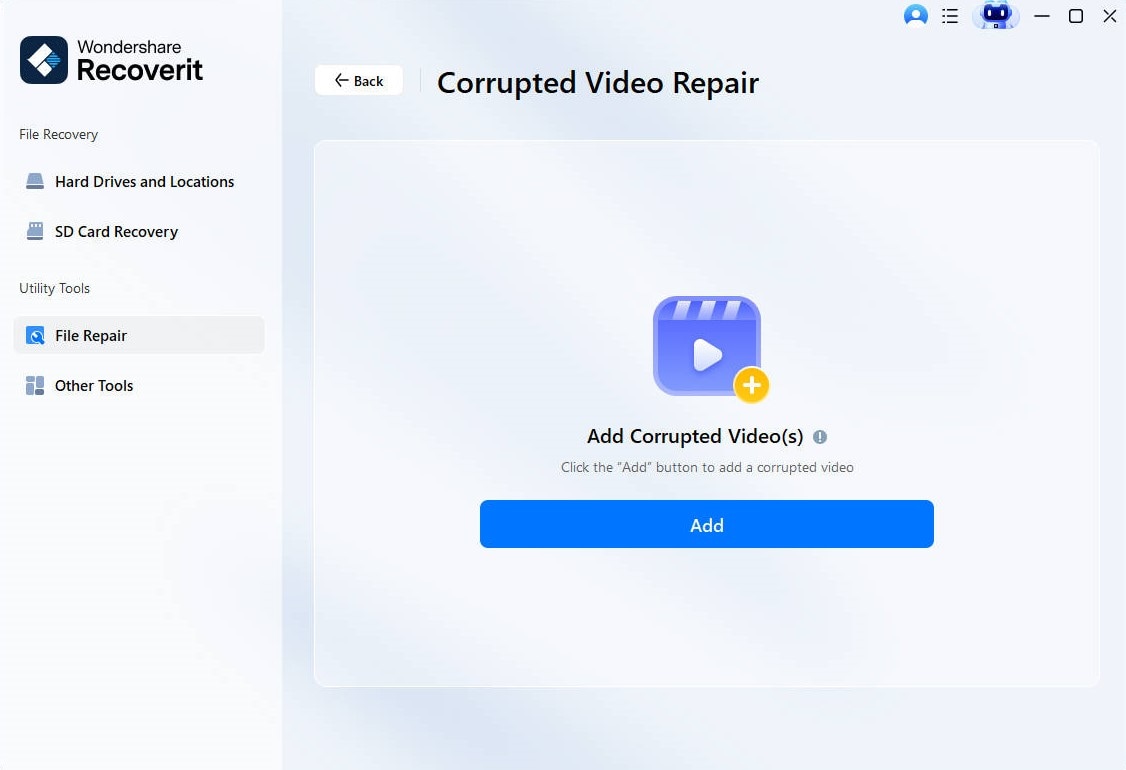
- Click on the "Add video" option and browse to the location of the damaged video files to add.
- After adding the corrupt video files, click on the "Repair" button at the bottom to begin the repair process.
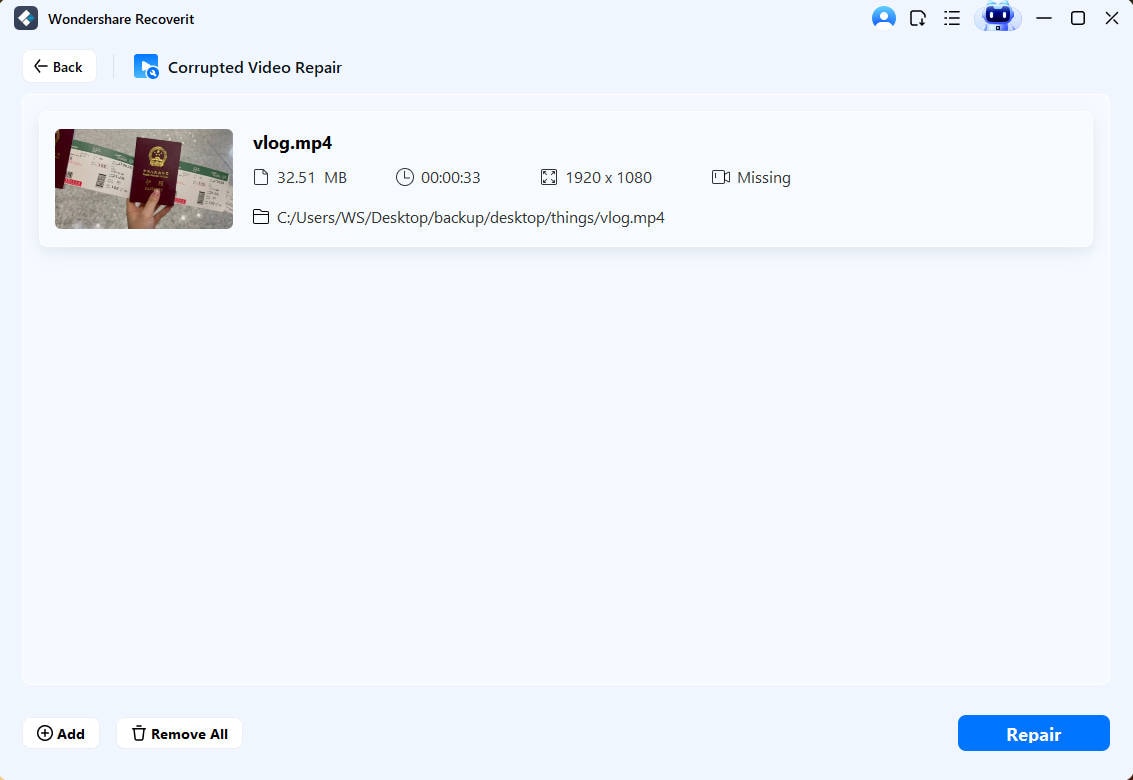
- Wait until the process is completed and the successfully repaired message is displayed. Click on the "Ok" button.
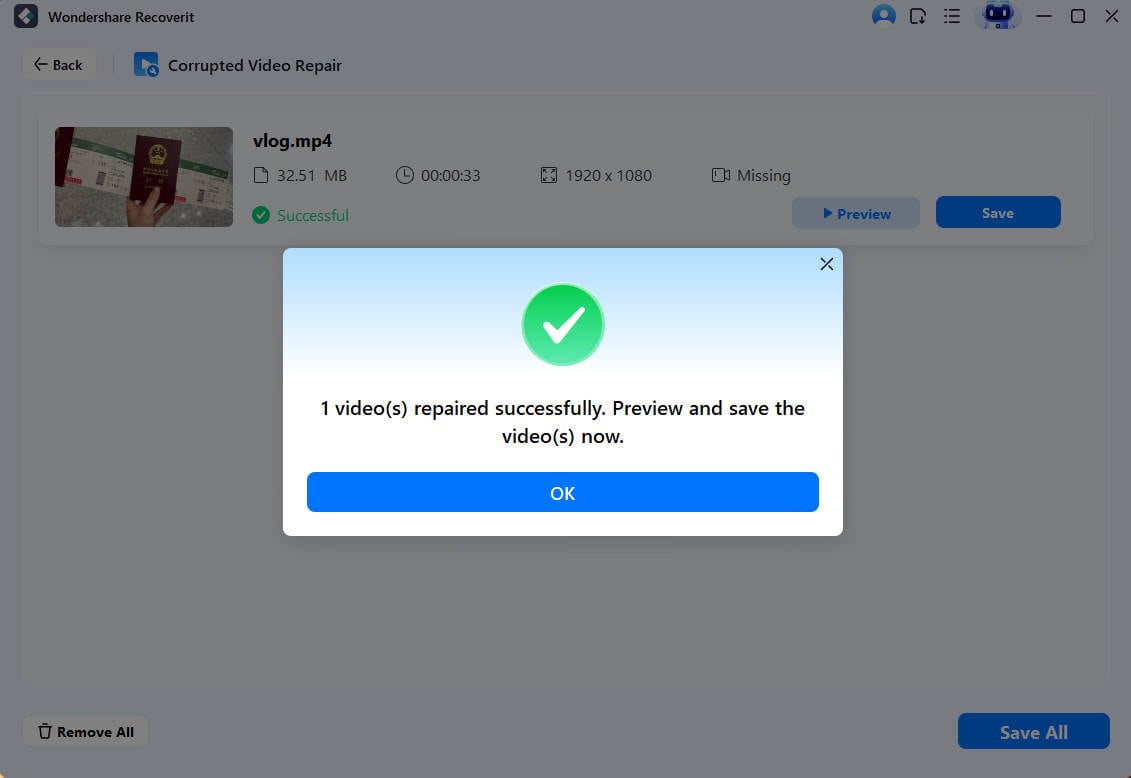
- Click on the "Preview" option after the repair process is over to check if the audio video sync issue is fixed. If the issue is fixed, click on the "Save" option to select the location to save the repaired video file.
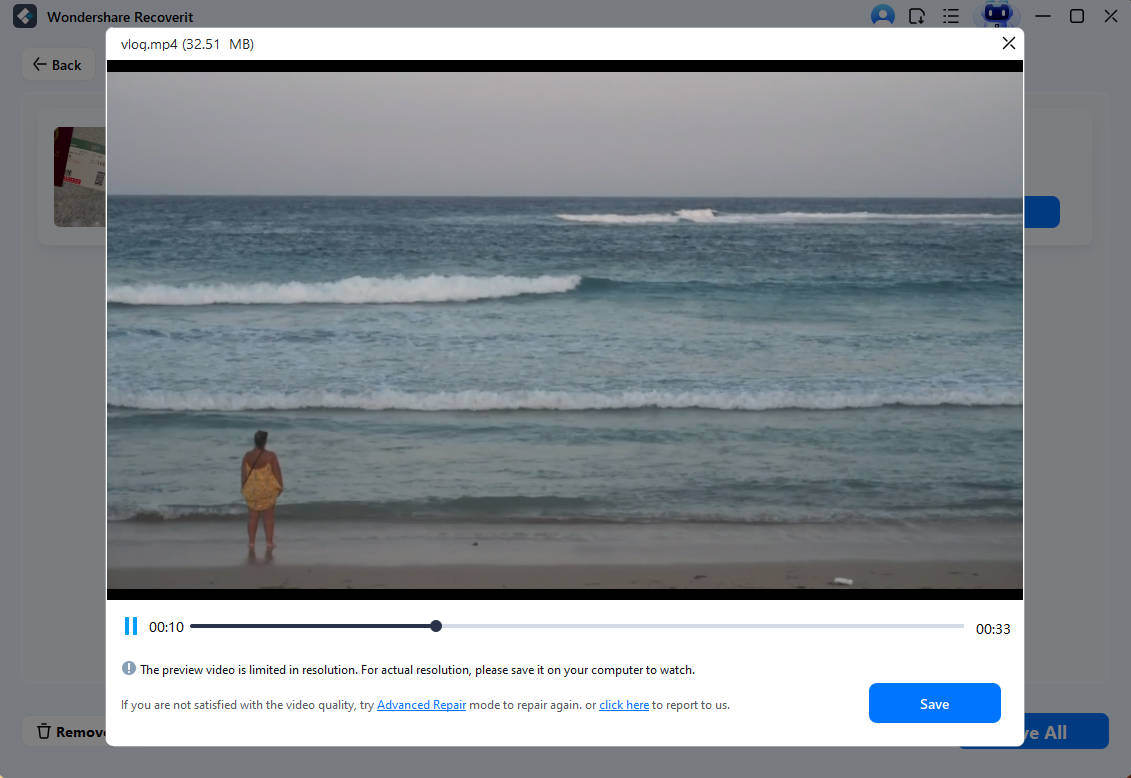
- If the regular scan did not fix the issue, select the "Advanced Repair" option instead.
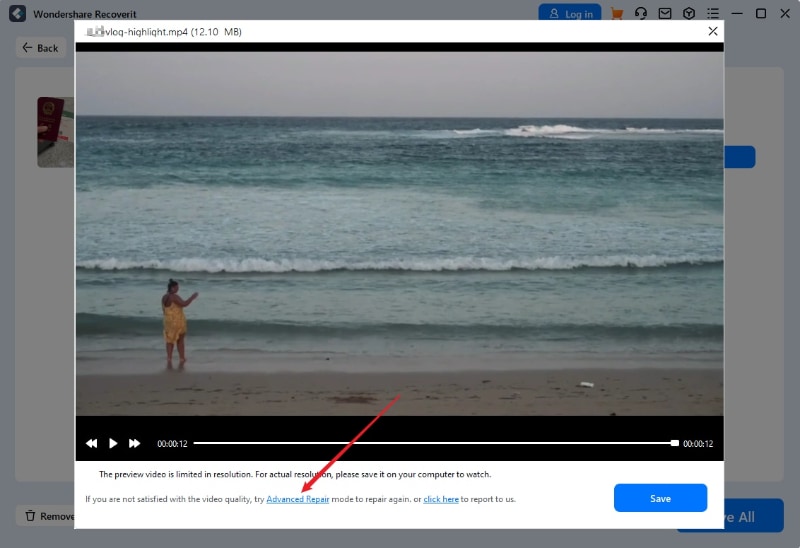
- After the advanced repair process is over, preview the result file and click on the "Recover" button. You can save the repaired video file in your preferred location.

Related Video on How to Fix Audio Video Out of Sync on Mac & Windows (MP4, MKV)
Part 3: Reasons For Video Sound Out Of Sync Issues
Now that you know about video audio sync issue, it is also important to understand the reasons behind it to apply the relevant solution. There can be many reasons for audio video sync issues while watching your content. Often this happens while playing video content from an old CD or DVD, due to incompatibility issues. Or, it also occurs when you try to play a video file on a corrupt media player or faulty website.
- Here are some of the most common reasons for audio video sync issues to occur:
- If there is a hardware malfunction, both audio and video will be out of sync. So, ensure that your hardware is up to date.
- While recording or editing, both the audio and the video experience various processing delays, which might result in audio and video out-of-sync issues.
- If you have downloaded corrupt or damaged video files from online sources can also result in audio and video not in sync problems.
- In case the timestamp of the audio and video are different in the video file, a sync issue occurs.
- The video file is infected with a virus or malware, causing it to delay the audio while playing.
- The video file might be damaged during the encoding process, resulting in the video and sound not in sync issues.
- The media player does not support the video file format, causing it to play only audio or video instead of together.
- Wrong playback settings on your system while running the video file on the media player can also cause audio video sync issues.
- Outdated audio drivers on your system can also cause the audio not to sync.
- If you are playing the video file on an outdated media player with old audio codecs, results in audio and video not syncing.
Part 4: Tips to Avoid Audio And Video Not in Sync Issues
Although now you know how to fix audio and video not in sync issues, it is better to prevent the problem by applying a few helpful tips. Here are some of the basic points to keep in mind to avoid audio and video not in sync issues:
- You should keep your audio drivers on your system up to date to avoid device audio issues.
- Consider avoiding downloading videos from unknown sources or using untrustworthy browser plugins that could interfere with the file.
- Avoid connecting or copying videos from unreliable USB drives, as they can damage your media files on the system.
- While transferring videos from one place to another, aim never to stop the process in the middle.
- Do not alter the metadata or timestamps of the video file unless you know how to perform without error.
- Do not view the video on a media player that you do not recognize. Always use reliable applications such as Windows Media Player or VLC Player.
Conclusion
It can be highly frustrating to watch your favorite video content with out of sync audio. Thankfully, by following the above given solutions, you can fix audio video sync problems effectively with simple steps. Whether you use Windows or Mac, you can choose the right solution depending on the reason for the out-of-sync problem. However, you can use Recoverit Video Repair as a comprehensive tool to fix all kinds of video-related issues.
FAQ
-
1. Why is my video lagging behind my audio?
There can be many reasons why your video is lagging behind the audio during the playback. However, some of the common reasons include corrupted files, virus infection, incorrect recording or editing, wrong playback settings, and encoding issues. -
2. How do I auto sync audio and video?
You can automatically sync audio and video either using the Track Synchronization feature on VLC Media Player or using the Preserve Audio Sync functionality in Adobe Premiere Pro. If you want to fix the audio and video that are out of sync automatically, use the Recoverit Video Repair tool. -
3. How do I fix audio out of sync?
To fix the audio out of sync issue on your video file, you can use the Windows Media Player buffer feature if you are a Windows user or the iMovie video editing tool if you are a Mac user. However, you can automatically fix the issue using the Recoverit Video Repair tool effortlessly.


 ChatGPT
 Perplexity
 Google AI Mode
 Grok
Grok


