Mac Stuck on Loading Screen, Fix and Restore
Mac stuck on the loading screen is a common issue that can soccer due to several reasons. The fix does exist but it will take a few minutes of your time. Learn how to solve it once for all and how you can continue using your computer once again. Below are the detailed steps of all the things you must do and also explanations why you should use them. At the moment, all we can say is that this problem occurs as a side effect when the operating system finds an error.
Part 1. Causes of Mac Stuck Loading Screen
There are several reasons why the Mac computer can display a loading screen and cannot pass it. The reasons are explained below.
- A corrupted operating system is the most common problem. This happens when some files are missing from the hard drive and the operating system can’t locate them. As such, it won’t be able to complete the checks and boot.
- A damaged hard drive is another common cause. In this case scenario, a hard drive might be damaged and it will have bad sectors. Files on those sectors will be unavailable which brings us back to the precious cause.
- The third cause is an unsuccessful system upgrade. In rare cases, a system will fail to update all the apps and all drivers which will cause the Mac to freeze on the loading screen.
- In some cases, this issue can appear as a side effect of damaged hardware. Usually, peripherals are the ones that are damaged and not working properly. OS won’t be able to boot in order to prevent further damage.
- RAM module failures are known to cause this problem as well. In this case scenario, a RAM module will have to be replaced or both, if both are malfunctioning.
Part 2. How to Restore Mac Stuck on Loading Screen
Mac not responding is probably the first phrase you are going to search with Google. Before you rush to the Apple repair center, make sure you have tried all of the steps included below. Chances are high that one of them will work and your Mac will be ready to be used within minutes and you can continue with your usage.
1. Restart the Mac
When this issue occurs you won’t be able to shut down Mac. The solution is to hold the power button for a few seconds until the computer shuts down. Once you are done, turn it back on and see if the problem is solved. If it is still there, you can move to the next step.

2. Reboot into Safe Mode
Another way to fix the Mac Stuck on loading screen issue is to reboot it into Safe Mode. To start Mac in safe mode:
- Press and hold the Shift+Power button till your Mac reaches the loading screen.
- Navigate to the safe mode option, and select it. Then run the computer.
On this way, your Mac will boot into safe mode and the being stuck on loading screen problem can be solved.

3. Reset Mac SMC
The SMC can also cause Mac stuck on loading screen. In this case, you can reset the Mac SMC to fix the issue.
- Press and hold the Shift+Control+Option button for 10 secs.
- Then, turn on the computer.
- This will reset the Mac SMC settings.

4. Reset NVRAM/PRAM
If your Mac is stuck on the Apple logo or you see a progress bar but there is no actual progress, try resetting the NVRAM. This reset usually fixes the problem.
- Turn off the computer.
- Restart the computer immediately by holding the Option+Command+P+R button at the same time to reset NVRAM/PRAM.
- This will reset NVRAM/PRAM and solve the Mac stuck on loading screen problem.

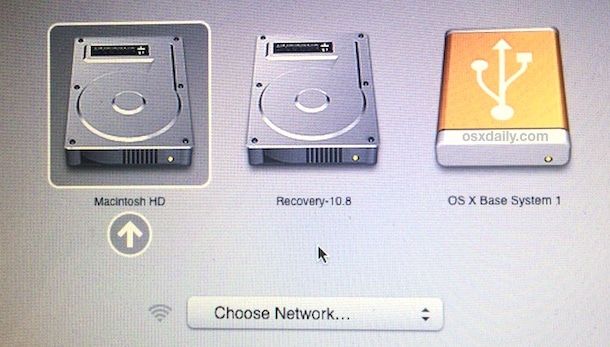
5. Reboot in Recovery Mode
To start mac in recovery mode, all you have to do is to hold the command and R buttons and turn on the computer. It will start in recovery mode and offer you several options that can be used to resolve the main problem. The process is the same for all Mac computers.

6. Reboot in Single User Mode
This type of booting is helpful when the Mac computer is stuck at the progress bar at 100%. To boot into sign-user mode:
- Press the Command+S button and turn on the computer.
- Release the buttons once the computer starts booting.
MacBook Pro stuck on the loading screen can usually be fixed with this process.

7. Reinstall Mac OS X
If nothing else works, you will have to reinstall the operating system. To do that:
- Press the Command and R keys while turning on the computer.
- You will see the Utility options on the screen.
- Choose the Reinstall Mac OS and follow the steps. In order to install it, you will need an internet connection.
- Reboot the Mac to check if the issue is fixed when the installation completes.
The computer will download the operating system from the official servers and install it. The time for this process depends on the version of the operating system your computer will download (it will always download the latest supported OS) and the speed of your internet connection.

8. Reselect the start-up disk
If you booted your computer from an external device before, it can also cause the Mac stuck on loading screen problem. In this case, you need to manually select the start-up disk for your computer.
- Boot your Mac into recovery mode.
- Select the Apple icon and navigate to the Start Up Disk.
- Select the disk according to your need.
- Type in the password if the disk is encrypted.
9. Repair the start-up disk
If it still doesn’t work after changing the start-up disk, then there might be some error in the booting disk. In this case, you need to fix the error to solve the problem.
- Boot into Repair Mode.
- Press and hold the power button till you see the start-up options.
- Select Option and click Continue.
- After you have restarted the computer, choose Disk Utilities, then First Aid.
- Then the Disk Utility will repair the hard disk for you.
10. Downgrade Mac OS
Another possible reason for the Mac stuck on booting screen could be that the Mac OS version is not compatible with your computer, especially when you just upgraded your system. In such a case you may need to downgrade to the older version to make your computer works normally.
(Noted: MacOS downgrade can cause you lose all the data from your hard drive, don’t forget to make a data backup.)
- Restart your computer, and press and hold the Command+Options+Shift+R button.
- Then, your Mac computer will start to install its original OS version.
- Once it completes, restart your Mac to check if the Mac stuck on booting screen problem disappears.
Video Tutorial on How to Fix MacBook Stuck on Apple Logo
Part 4. How to Recover Data from Frozen Mac
If you have mac stuck on startup, it means that the system is damaged, the hard drive is malfunctioning, or something else. Yes, reinstallation of the entire OS can fix the problem but your files will be lost. The situation is even more severe if you know that all your files and data will be permanently lost!
To prevent that, before reinstalling the operating system you should use Recoverit Mac Data Recovery software and recover your files. After you are done, you can reinstall the Mac OS and move or copy the files back on the computer. In order to use the Recoverit Data Recovery, you should follow the steps mentioned and explain below.
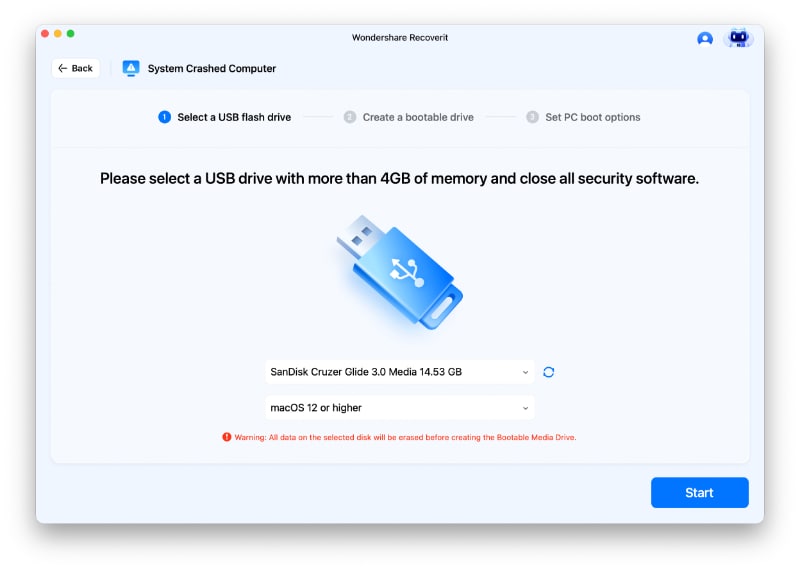
1. Create a bootable USB drive
The first step is to actually create a bootable USB drive. You can use a DVD or CD as well, but USB is a bit easier and works with more computers. Open the Recoverit Data Recovery and click on "Recover data from system crash". Insert the USB into the USB port.
This is the same type of process you create when you want to install the operating system from a USB drive. A drive must be created using a special process. Just copying the files on it won’t be successful.
2. Click start
Choose the USB drive you want to use and click create. The software will move to the next screen and you will need to confirm. Don’t pull the USB at this point. If you remove it, the drive won’t work and you won’t be able to recover your files. The situation is the same if you use a CD or DVD disc.
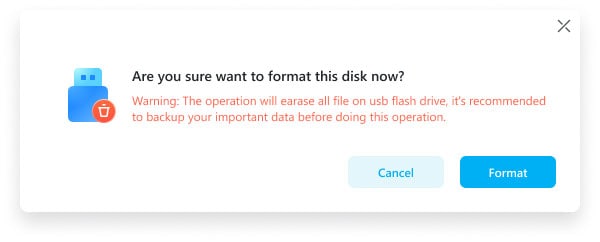
3. Confirm USB drive formatting
Click on format now to delete all the files from the USB drive. This step may take a few seconds, depending on the size of the drive and the computer itself. Keep in mind that formatting will remove all the files and change the name of the drive. This is perfectly normal. We recommend you to use a blank USB drive or a drive with irrelevant data.
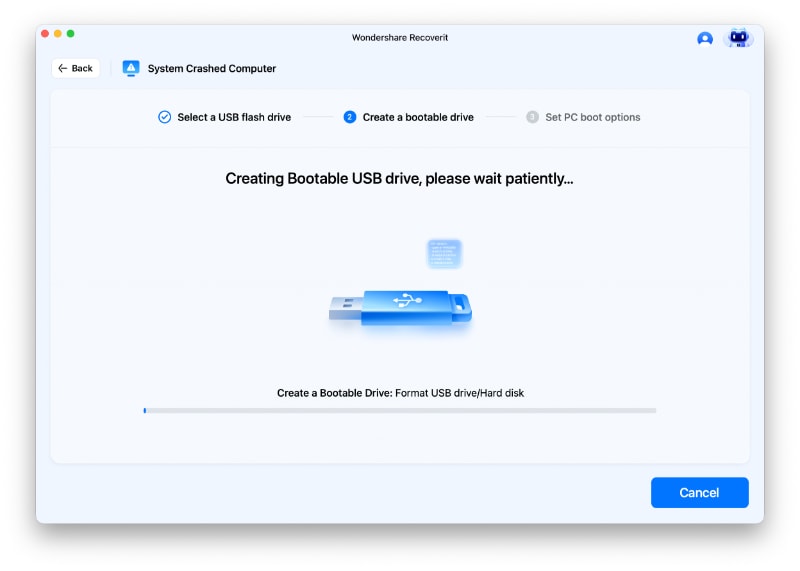
4. Wait for the process to complete
On this screen, you can see the entire process and how it is advancing. There is no need to tell you that you should reach 100% and then the process will be done. If you have an old computer you should give it more time to complete the process. Also, make sure you don’t play games or using advanced software during the creation of a bootable USB drive.
5. The process is completed
This is the last step for creating the bootable USB drive and you can see that it was created successfully. Once this screen is presented to you, be free to remove the USB drive. Now you are also ready to move to the next section which will help you extract the data from a failing Mac computer.
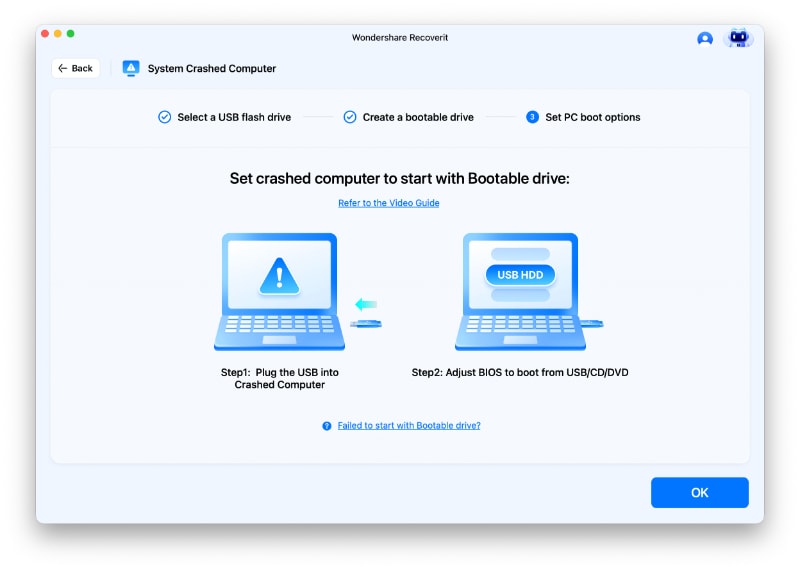
6. Boot from USB
At this point, all you should do is to boot from the USB drive or the CD/DVD you just created. To do so on a Mac, turn it on, and when you hear the sound, press the options button. You will see the screen as in the picture above. Select the USB or drive and confirm your selection. Wait a few seconds.
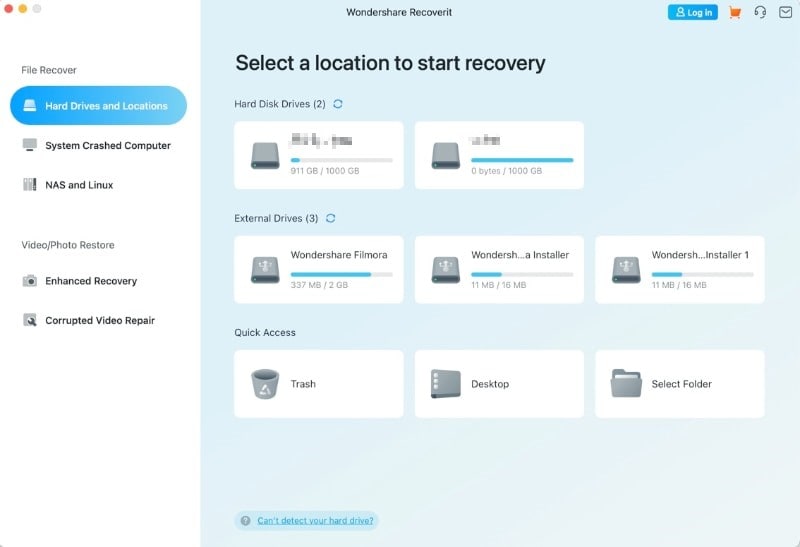
7. Select Deleted Files Recovery and the drive where the files were located
Select the drive where your files are located. You can select the main drive or a specific partition according to your needs. A useful addition is the list of all available hard drives and also the size and free space of each one.
This can give you insight into which partition is the one that contains your files. Once you are done, click on start and move to the next step. In addition, you can scan all partitions or just one, see the files available and go back and scan another one until you find the data you want to recover.
8. Scan the files you want to recover
Now you should select the files you want to recover. There is no limit on how many files you can recover and you can choose all of them if needed. If a file or files that you need are not displayed here, click on Deep Scan (lower left corner) and the software will scan the hard drives again in order to find all the files that can be recovered. This provides you a more complete list.

9. Preview the files you want to recover and confirm
All you have to do in this step is to preview the files you want to recover. Select the ones you want and click Recovery. The software will complete the task and your files will be recovered. Depending on the size of the files this step may require a few minutes. Be patient and don’t cancel it.

Mac stuck on a loading or white screen is more common than you may believe. The fix is relatively easy and you will need a few minutes of your time. The ultimate fix is to reinstall the operating system. Before doing so, use Recoverit and make sure all important files are safe and sound. Once you install a new OS, the hard drive will be wiped from all files.
People Also Ask
-
Why is my Mac stuck on the booting screen?
There can be several reasons why your Mac is stuck on the booting screen:
1. Software issues, such as incompatible or corrupt startup items or system files.
2. Hardware problems like faulty peripherals, memory issues, a failing hard drive.
3. Incompatible Mac OS can also cause the Mac to get stuck during the boot process, and so on.
-
Why does my Mac sometimes take a long time to boot up?
If your Mac is taking a long time to boot up, it could be due to having too many startup items, low disk space, outdated firmware, or a failing hard drive. To improve the boot time, you can remove unnecessary startup items, upgrade your hard drive or SSD, or perform routine maintenance and updates to keep your Mac running smoothly.
-
Can a failed macOS update cause my Mac to be stuck on the booting screen?
Yes, a failed macOS update can cause your Mac to be stuck on the booting screen. The update process may have corrupted system files or left incompatible software behind, leading to booting issues. In this case, you can try booting into Safe Mode, uninstalling the update, or performing a clean installation of macOS.
What's Wrong with Mac
- Recover Your Mac
- Fix Your Mac
- Delete Your Mac
- Learn Mac Hacks


Sue Wayne
staff Editor