How to Recover Mac data under macOS High Sierra (macOS 10.13) or Above
"I have lost some of my important documents while working on my Mac, but now I can't seem to get them back? Is there any working Mac Sierra recovery solution that I can try?"
If you are also undergoing a similar situation, then this would definitely be the last guide that you will read. Released in 2017, macOS High Sierra 10.13 is one of the most popular operating systems developed by Apple. While it is pretty secure and reliable, users of High Sierra (or above versions) often complain of unwanted data loss.
To be honest – anyone can suffer from data loss as it is an unavoidable situation. The good news is that you can disable SIP on Mac and later perform MacOS High Sierra recovery. Sounds complicated? Read on this in-depth post and get to know about Mac data recovery in no time.
Part 1: Overview of Mac Data Recovery
If you are a regular Mac user, then you might already know how secure the OS is. The new releases like macOS 10.13 or 10.14 are even more advanced and secure. Nevertheless, there are times when users end up suffering from an unwanted loss of their data. Ideally, there could be all kinds of reasons or triggers for data loss on Mac. Following are some of these common scenarios:
- Accidental deletion of data is one of the common causes in which users end up deleting something by mistake.
- An entire drive could be formatted by mistake as well. Additionally, you could have formatted the hard disk intentionally to resolve some issues.
- A bad sector on the hard disk or a corrupted unit can also lead to unwanted data loss.
- Sometimes, the mishandling of certain files by the system or any third-party application also makes it unavailable.
- Your Mac can get infected by a virus or malware, leading to the corruption of your files or the storage system.
- Apart from that, driver trouble, firmware glitch, memory allocation table issue, or any other software-related problem can also trigger the same.
As you can see, there could be all kinds of reasons for causing data loss in Mac. The good news is that we can take the assistance of working Mac Sierra recovery tools to get the lost data back.
In order to make these applications work, we first need to disable the System Integrity Protection feature on Mac. Let's learn how to disable SIP on Mac in the next section.
Part 2: How to Recover Data from MacOS High Sierra?
Step 1. Disable the System Integrity Protection on Mac
Before we get into the details and learn how to perform Mac Sierra recovery, it is important to cover this. Ideally, if SIP (System Integrity Protection) feature is enabled on your Mac, then you can't use a third-party tool to perform data recovery. Therefore, you should get to know about its use and how to disable System Integrity Protection beforehand.
What is SIP on a Mac?
In a nutshell, System Integrity Protection is a security feature that restricts third-party apps to access the "root" of the system. It was introduced in macOS 10.11 (El Capitan) to make the system less vulnerable to security threats and malware attacks. SIP has been implemented at the kernel-level of the OS to restrict the root account access.
If SIP is disabled, then an application or user can access the OS root, which leads to access of the entire system. Therefore, when SIP is enabled, we can't access the System, Bin, or secure User folders. As a result, malware or a malicious entity can't access the root or infect the entire system.
To check if SIP is enabled on your system, just launch the Terminal and try to access the Bin or System folder. If you get a prompt stating "Operation not permitted", then it implies that SIP has been enabled on your Mac.

How to Disable SIP on Mac?
While SIP is a crucial security feature on Mac that should be turned on, there are times when we need to disable it. For instance, to perform Mac Sierra recovery, we need to use a data recovery application, which is a low-level utility tool. Since SIP would block access to a low-level system, we need to turn it off beforehand. Here's how to disable System Integrity Protection on Mac.
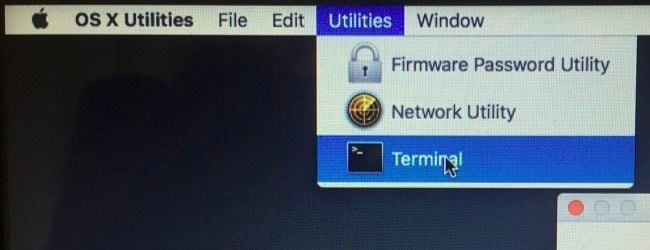
- Firstly, you need to restart your system in the Recovery mode. To do this, turn on your Mac and keep holding the Command + R keys at the same time.
- In no time, Mac would load the Recovery Mode screen. Here, go to the toolbar and click on Utilities > Terminal.
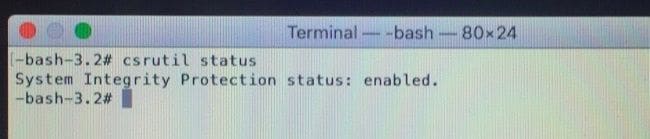
- Great! This will launch the Terminal window on the screen so that you can enter the related commands. Before you disable SIP on Mac, check its status by entering the "csrutil status" command. This will let you know if SIP is enabled or disabled on Mac.
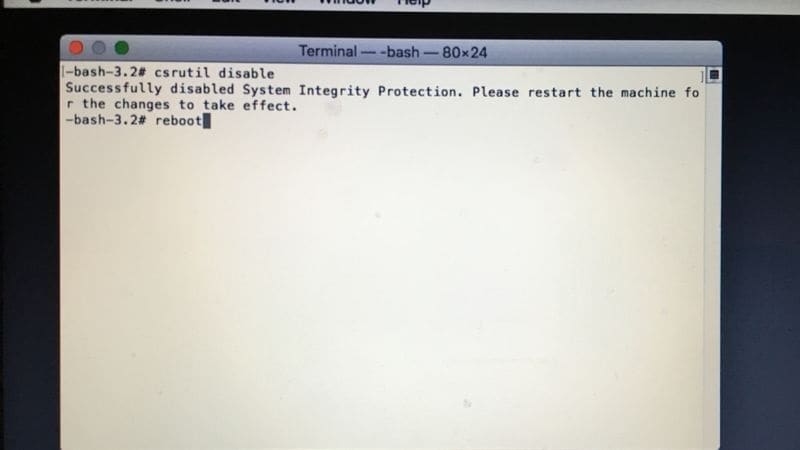
- If the feature is turned on, then you can disable System Integrity Protection by entering the command "csrutil disable". Once you get the success prompt, you can restart the Mac.
Kindly note that when the Mac Sierra recovery is finished successfully, you should again turn on the SIP feature. To do this, follow the same drill, but enter the "csrutil enable" command instead of the one that disables it.
Step 2. How to Recover Data on a Working macOS High Sierra
Once you have disabled SIP on Mac, you can easily get back your lost data using a reliable data recovery tool.
Out of all the available options, Recoverit Data Recovery for Mac by Wondershare is one of the most reliable and well-functioning recovery tools. It doesn't matter if your Mac is functioning or not, it can recover your data under all scenarios.
Recoverit Data Recovery: What can it do?
It runs on macOS 10.10 and later, including macOS Sonoma. Since the tool requires no prior data recovery experience, you can follow a click-through process to get your data back.
- The application is extremely user-friendly and will let you select the location of your choice. It can be an external device, Mac's HD, or even a particular folder.
- The tool supports more than 1000 different formats and is known for its exceptional recovery results.
- There is a provision to first preview the extracted content and later save it to any desired location.
- Full support to all kinds of file systems like APFS, HFS+, NTFS, exFAT, and more.
- The basic version of the tool is available for free that offers a data limit to recover (users can later upgrade to a pro version).
Read More: Full Comparison between exFAT and FAT32
How to Recover Data on Mac using Recoverit?
Firstly, make sure that you have the Recoverit Data Recovery application installed on your system. If not, visit its official website, download the setup file, and install it. Once it is done, follow these basic steps to do Mac Sierra recovery.
Step 1: Select a location to scan
As you would launch the Recoverit app on your system, you would be asked to select a location to scan. This can be any drive or partition on your system from where you have lost your data. There is also a provision to attach external media and select it from here.

Step 2: Scan the desired location
Once you pick a location, click on the "Start" button for the application to look for any unavailable or deleted content. You can view the progress of the data extraction process from an on-screen indicator.

Step 3: Preview and restore your files
In the end, the extracted data will be displayed under different categories. You can preview your photos, videos, or documents, and select the files you wish to retrieve. In the end, you can click on the "Recover" button and save them to a secure location of your choice.

Video Tutorial on How to Recover Deleted Files on Mac Even Emptied Trash
Part 3: How to Recover Data on Unbootable macOS High Sierra
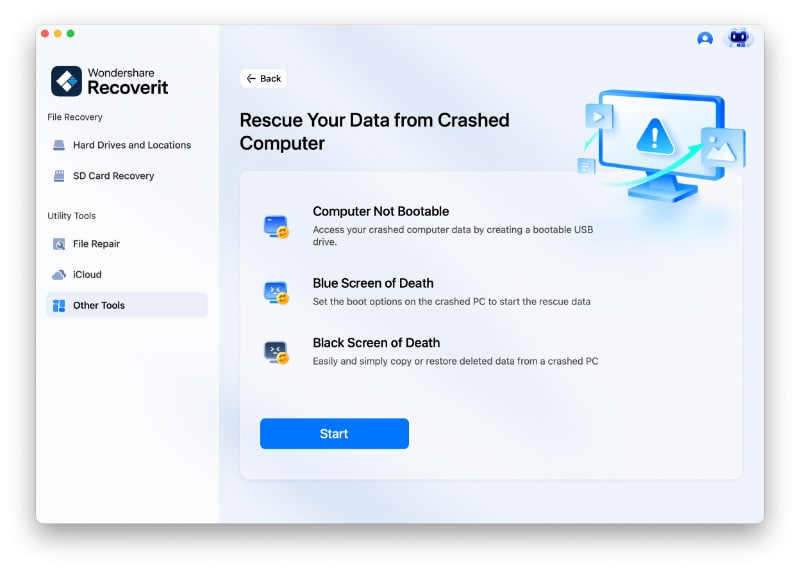
In case if your Mac is not turning on or is malfunctioning, then don't worry - you can still use Recoverit Data Recovery. The application can be used to create a bootable media on another working system and perform Mac Sierra recovery afterward. Therefore, if your Mac is not able to boot, then consider following these steps.
Step 1: Launch Recoverit on a working system
Firstly, install and launch Recoverit on another computer that is working fine. From its home, select the option to recover data from a crashed computer. Also, attach a USB drive or hard disk that you wish to convert to a bootable media.
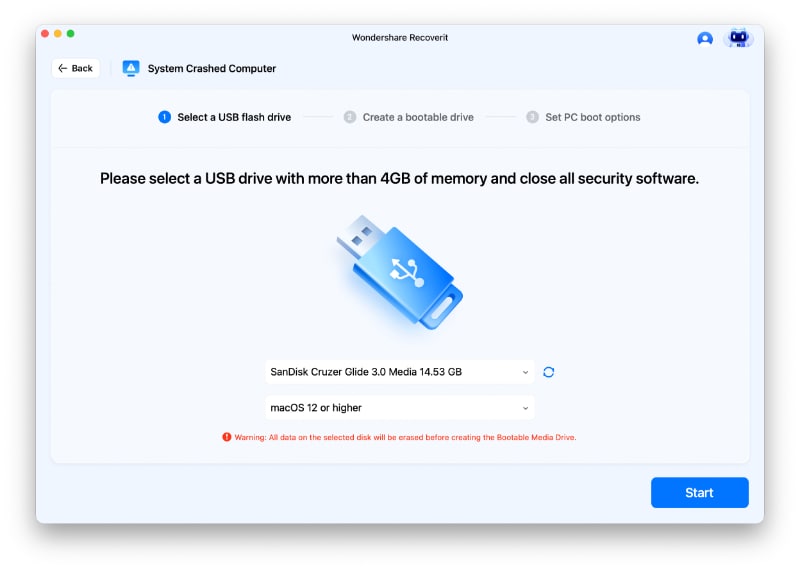
Step 2: Create a bootable media
Recoverit will display the following screen for creating a bootable media for macOS. Just click on the "Start" button to begin things.
Furthermore, you can select the connected source (USB drive or a hard disk) that you wish to convert to a bootable media.
Since the process will delete all the existing data on the device, you will get the following warning. Click on the "Format Now" button to continue.
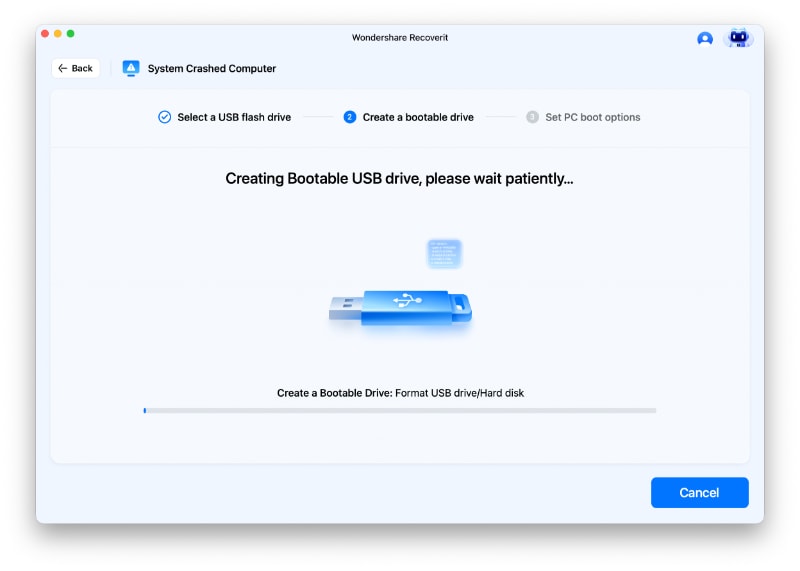
Sit back and wait for a while as the application would format the connected source and makes it a bootable media.
Make sure that you don't disconnect the device or close the application in between. In the end, you will be notified so that you can safely remove the bootable media.
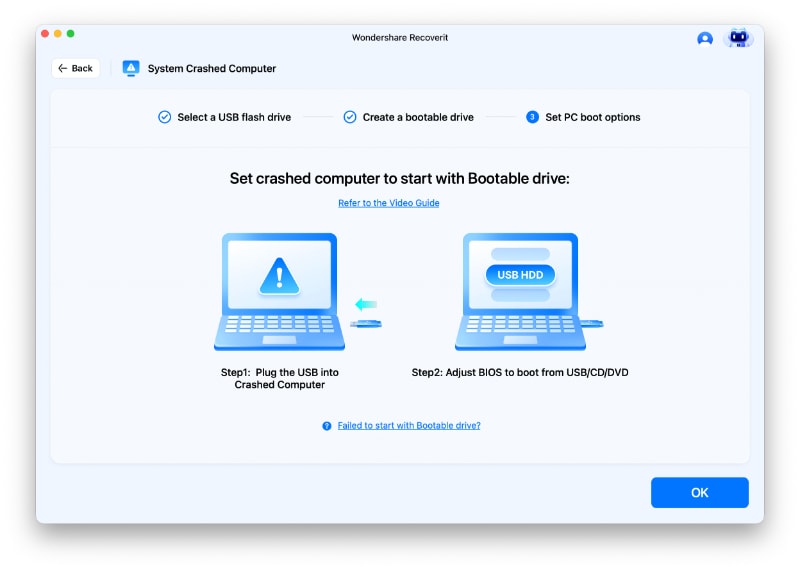
Step 3: Boot your Mac from the new source
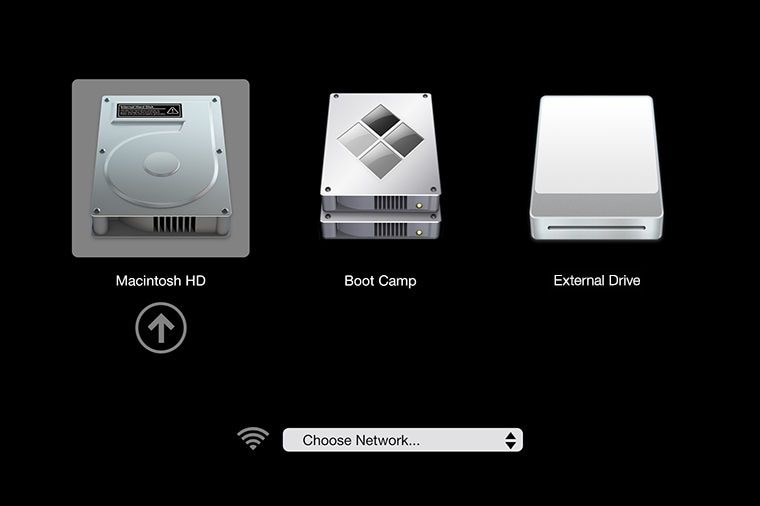
Great! You are almost there. Now, you need to connect the newly created bootable media to your Mac and turn it on. As it starts, press and hold the Option key to launch the Startup Manager. From here, simply connect the bootable media to launch Recoverit and extract your lost or deleted files easily.
There you go! After reading this guide, you would certainly be able to do Mac Sierra data recovery like a pro. Just make sure that you disable System Integrity Protection on your Mac first.
Since it is quite easy to disable SIP on Mac, you won't face any trouble doing the same. Later, you can just use a reliable data recovery tool like Recoverit to get back your lost, deleted, or unavailable content in no time.
People Also Ask
-
Is it safe to disable system integrity protection?
Yes, it is safe to disable SIP on Mac temporarily while using a reliable app (like Recoverit Data Recovery). Once you have retrieved your data, you can go back to the Terminal and enable SIP again to keep your system protected.
-
How do I know if system integrity protection is enabled?
As stated above, simply launch Terminal from the Recovery Mode on Mac and enter the "csrutil status" command. This will display the present running status (enabled or disabled) for SIP.
-
Can I recover deleted files on Mac?
Firstly, you can visit the Trash folder to see the temporarily saved deleted files on Mac. If they are not present on Trash, then consider using a reliable data recovery tool. It will help you extract your important files that are no longer available for you to access.
-
Is it safe to recover files using any software?
Yes, it is safe to recover your files using a third-party data recovery tool. Needless to say, the tool should be reliable, secure, and have a positive reputation in the industry. For instance, Recoverit Data Recovery is a 100% secure recovery application that is trusted by leading experts and one can try it for free as well.
What's Wrong with Mac
- Recover Your Mac
- Fix Your Mac
- Delete Your Mac
- Learn Mac Hacks


Sue Wayne
staff Editor