How to Fix Sound Not Working on Lenovo Laptop
You worked hard throughout the day, and now you wanted to relax a bit by watching your favorite sitcom. Now, as you hit the play button, you find that there's no sound coming from it. While you might get all worked up about it, it’s a typical issue that can be solved using various methods.
The article features a detailed insight into the sound not working on the Lenovo Thinkpad issue. It includes some of the frequent causes, efficient ways to fix speaker audio issues & sound not playing on videos, and some helpful tips to avoid the laptop from crashing.
Part 1: What Causes Lenovo Laptop Sound Not Working
People often tend to start fixing the issue without truly investigating the root cause of the problem. When there’s no sound on Lenovo Thinkpad, you must check whether it's the system settings, the speaker, or any other device causing the issue. Here are the possible reasons that affect the sound on your laptop.
1. Causes
While the reason for sound not working on Lenovo laptop could be different, it generally falls under the following three categories.
One of the possible reasons why the sound on Lenovo not working is the recent changes in the audio settings. It often gets frustrating to address the root cause of the problem. But if you could find the issue, few clicks are all you need to solve it.
Just like any electronic device, speakers often start to show issues after a certain time. There might be some mechanical problems resulting in no sound. If you think that's what the case is, you should take it to the Lenovo service center.
If it's not the laptop or the speaker, then it might be a video-related issue. Numerous factors affect the way sound plays on a browser like YouTube. Sometimes plugins and ad block extensions also affect the sound of a video on a browser.
2. Solutions
The solution to the sound issue on the Lenovo laptop only works if you correctly address the source of the problem. Here are some key effective solutions that work in different scenarios.
- Update your Audio Driver
- Modify your Registry
- Check the Sound Settings
- Troubleshoot Hardware Problems
- Ensure that the Volume is Audible
- Disable Audio Enhancement
- Ensure that Volume is not Turned-Off
- Unmute the Browser and Plugins
- Wondershare Repairit
Part 2: Lenovo Laptop Solutions to Sound Not Working Issue
Those who have Windows 10 installed on their laptops might face a sound problem quite often. From speakers not plugged-in correctly, outdated drivers to messed-up audio settings, the possible causes could be many. While sound not working on the laptop might seem as huge a problem, it is not if you know what’s causing the issue.
As briefly mentioned earlier, here are some of the effective methods that could solve sound not working on Lenovo Thinkpad.
Solution 1: Update your Audio Driver
Audio Driver acts as a nervous system for the sound originating from the speakers. It converts the signal coming from a program to a format that can be acknowledged by the speakers.
Now, no sound issue may occur if you have recently installed the wrong audio driver. However, the same problem can also arise if you have an outdated driver as well. If your laptop has a long-pending sound driver update, follow the steps to check the updates on the driver.
Step 1: Click on the Windows + R keys to open the 'Run' command dialogue box.
Step 2: Write 'devmgmt.msc' in the dialogue box to open Device Manager.
Step 3: Now, right-click on the sound driver and tap on the 'Update Driver' tab.

Step 4: Select the 'Search Automatically for Updated Driver' tab to initiate the process.
It might take longer for the download and installation to be completed.
Tip: Make sure that your Lenovo laptop is connected to Wi-Fi to ensure that you don’t get out of data.
Solution 2: Modify Your Registry
As reported by many people, their laptop speakers were not working using Realtek drivers. In such a scenario, you can fix the issue by changing a couple of settings through Registry Editor. Now, the steps mentioned below will let you know how to fix the sound not working on Lenovo.
Step 1: Press Windows + R keys to open the 'Run' dialogue box.
Step 2: Write 'regedit' in the dialogue box and click on 'OK.'
Step 3: As it opens the registry, click on 'HKEY_LOCAL_MACHINE,' followed by the 'SOFTWARE' tab.
Step 4: Click on 'Microsoft' tab and select 'Windows.'
Step 5: Follow the navigation, CurrentVersion -> MMDevices -> Audio -> Render.
Step 6: Now, right-click on the 'Render' and select 'Permissions' from the menu.

Step 7: Tap on 'Users' from the list of accounts.
Step 8: In the Allow column, mark ahead of the 'Full Control' option.
Step 9: Tap on 'Apply' to save changes, followed by 'OK.'
Now, check if you solved the no sound issue from the laptop. If not, then follow the next solution.
More Related: How to Fix Generic Audio Driver Detected in Windows 10?
Video Tutorial on How to Fix Sound Not Working in Windows 10
Part 3: How to Fix Speaker Audio Not Working
While sometimes, the problem lies in the audio of the laptop, while other times, the issue lies in the speaker. Here are some of the best solutions to fix the audio of the speaker not working.
Solution 1: Check the Sound Settings
Follow these steps to check if the sound settings are right on your Lenovo laptop.
Step 1: In Windows 10 taskbar, right-click on the sound option and tap on 'Open Sound Settings.'

Step 2: In the sound settings window, you will be an option named 'Choose your output device.' Ensure that the right device is selected, among other options.

Step 3: As you scroll down, click on the 'App volume and device preferences.' Make sure that the apps you are using to listen to any audio are not muted.
Moreover, you must also ensure that the output and input options are chosen correctly.
Solution 2: Troubleshoot Hardware Problems
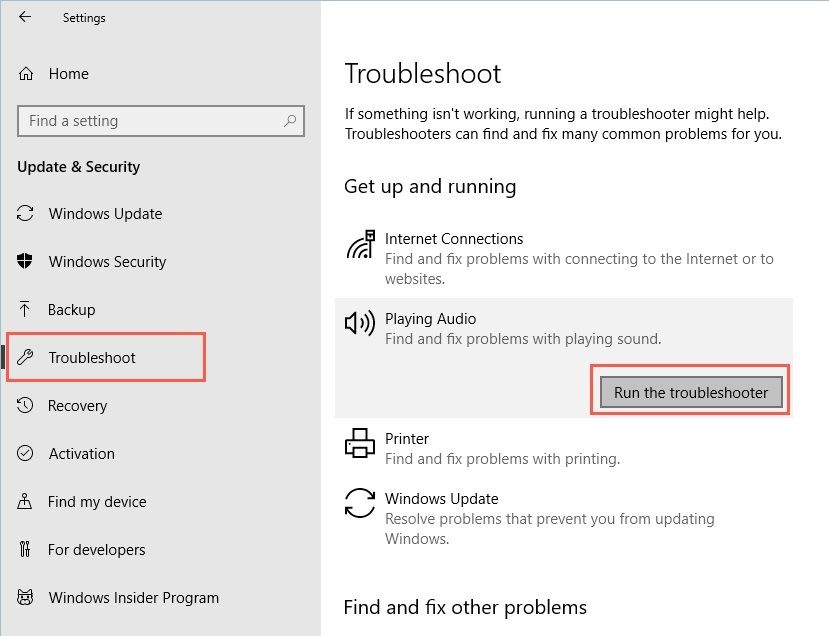
If you are witnessing problems with laptop speakers, you might be able to fix the issue using by running the troubleshooter. Windows 10 has several built-in troubleshooters that help to fix any hardware related issue. As these are also fully automated, all you need to do is click certain options to fix the no sound issue.
Step 1: Open the 'Settings' tab and go to the 'Update and Security' option.
Step 2: From the left panel, click on the ‘Troubleshoot.’
Step 3: Click on the ‘Playing Audio’ tab, followed by ‘Run the troubleshooter’ option.

As the process of troubleshooting is finished, check if the no sound issue persists or not. If it doesn't, you can try running additional troubleshooters, such as Hardware and Device troubleshooter.
Solution 3: Ensure That the Volume Is Audible
It might sound like a highly unlikely scenario. But the reason why you are unable to hear any sound from the speakers is that the volume might be too low. To ensure that the volume is audible, follow the steps below.
Step 1: Click on the sound icon located on the right bottom of the screen.
Step 2: If the slider is halfway, slide it to the extreme right.

Step 3: Moreover, if you have a volume control option in the app, you are playing, adjust it to an audible range. Now, check if sound not working on the Lenovo laptop persists or not.
Solution 4: Disable Audio Enhancement
Audio enhancement is a feature that helps to bring quality sound from the hardware. As depending on the configuration, it may also interfere with the sound system and trigger issues. Hence, disabling the audio enhancement might solve sound not working on Lenovo Thinkpad.
Step 1: Tap on the sound-icon on the right corner of the computer screen and click-on 'Sounds.'
Step 2: Now, in the 'Playback' tab, tap on the 'Speakers' option or any other option, which is your default audio device, and select 'Properties.'
Step 3: Tap on the ‘Enhancements’ tab, check the box before 'Disable all enhancements' and click on 'OK.'

Now, play some music and check if the sound issue is solved or not.
Part 4: How to Fix Sound Not Playing on Videos
Now, the reason that you are unable to listen to sound on the laptop could also lie in the application you are playing it in. If you are playing videos online on some browser, some other factor might be resulting in Lenovo HDMI no sound Windows 10. In such a scenario, the following methods might serve as an effective option.
Solution 1: Ensure that Volume is not Turned-Off
Now, this might sound like an obvious solution to why there’s no sound on a streaming platform like YouTube. But people often turn-off their system that results in no sound playing in the browser or any other application streaming platform. Ensure that the sound system allows playing audio from any source.
Here are the steps to follow to fix the sound issue.
Method 1: Look for the 'Mute' button when playing videos on YouTube. Click on it to unmute the video.

Method 2: You can also press the 'M' button to unmute the volume.
Method 3: If nothing works, then you can simply press the volume increase button, and it will turn on the system.
Solution 2: Unmute the Browser and Plugins
The browser and plugins options may be muted in the volume mixer. You can manually mute and unmute applications in Realtek High Definition Audio settings. Follow the process to unmute them in the volume mixer settings.
Step 1: In the taskbar look for the sound icon and right-click on it. Then tap on 'Open Volume Mixer.'
Step 2: Now, make sure that the browser and plugin sliders are not muted or either very low. Adjust them to the audible sound range.

Solution 3: Wondershare Repairit Video Repair
Sometimes, a corrupt video file could also result in the sound not working on the Lenovo laptop. There could be many possible reasons that lead to the corruption of the video file. Here are some of the frequent causes that lead to the situation.
- Bad Sectors on Hard Drive
If you save a video file in a bad sector of a hard drive, it might compromise the integrity of the video file.
Suppose you are middle of the video file transfer, and the power goes out. If you have no sufficient battery backup, then the abrupt shut down of the laptop might corrupt the video file.
Although this goes without saying, if your laptop houses malicious programs or viruses, it may affect the video or any other data.
Usage of reliable converters doesn’t always do justice to the end product that you might be expecting for a video file. Make sure you are using a genuine converter to create multimedia format files from the video.
And when it comes to repairing a corrupt video file, Wondershare Repairit Video Repair serves as the best application software. Here are some key features:
- It resolves the video corruption issue by rebuilding the video packets. It includes the header, frame, movement, and other essential aspects.
- Wondershare Repairit Video Repair works with different file formats, whether it's MKV, AVI, MP4, or any other.
- It fixes video files regardless of the storage of the video and works on both Windows and Mac OS.
To repair the video files, download the application on the laptop and install it. After installation, click on the Wondershare Repairit Video Repair application icon and follow the process mentioned below.
Step 1: Add Corrupt Video Files
Tap on the 'Add' option on the bottom left corner to add corrupted files from your laptop's hard drive. You can add multiple video files for the repair process.

Step 2: Repair Corrupt Video Files
After adding the corrupt video file to the software, tap on the 'Repair' tab to initiate the repair process. Soon the repair process begins.

Step 3: Preview Corrupt Video Files
Once the repair process completes, the software allows you to click on the ‘Preview’ tab to check whether the video files are repaired.

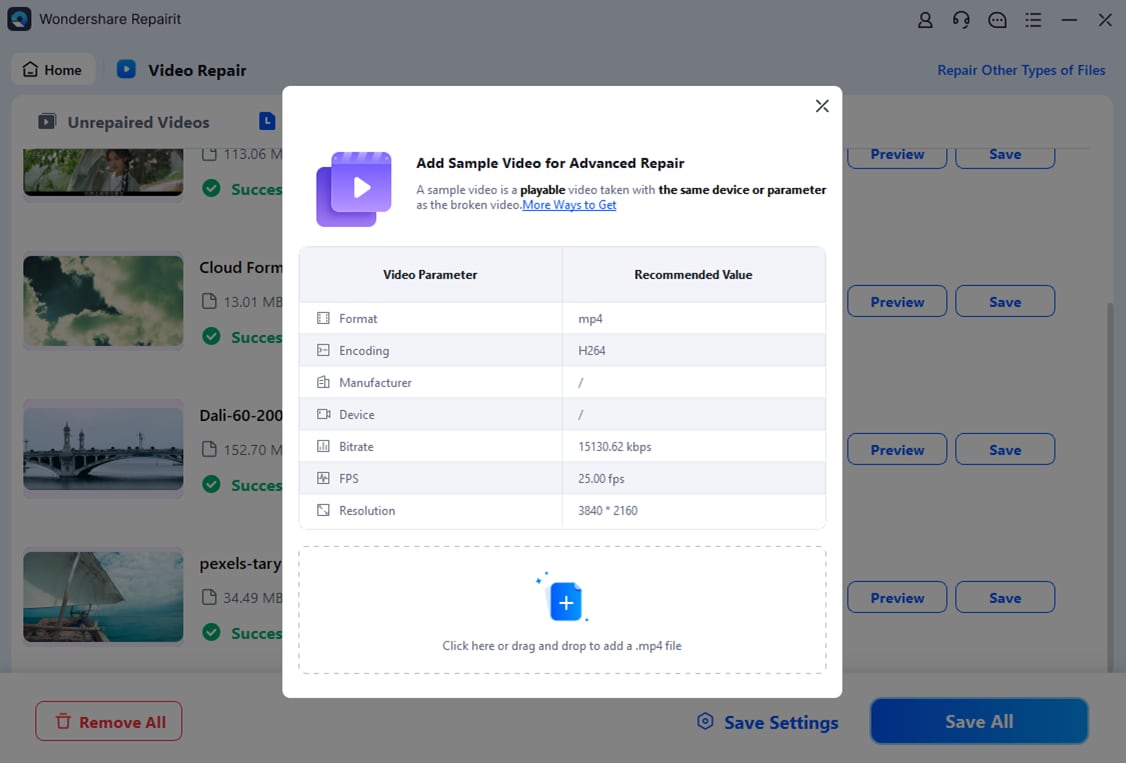
Step 4: Add a Sample Video
Now, if the videos aren't repaired, then you can try the 'Advanced Repair' option. To add a sample video, click on the folder icon. As the sample video is created from the device and formats the same as the corrupted file, the advanced repair feature uses the information to repair the corrupt file.

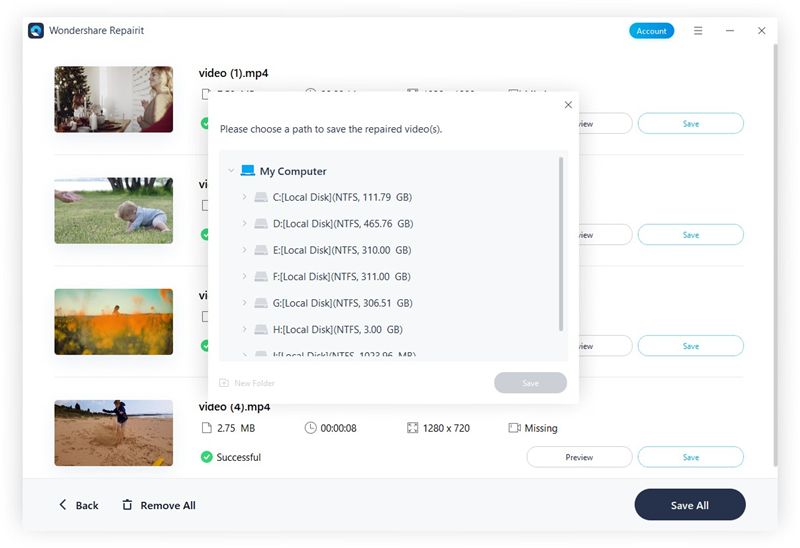
Step 5: Save Repaired Video
If the video files are repaired, then tap on the ‘Save’ option and select a location to save the repaired files.

With this step your video repair process completes. You can enjoy watching your videos on your Lenovo laptop. But make sure not to save the repaired file at the same location from where it previously got corrupted.
Part 5: How to prevent Lenovo Laptop Crashing or Not Working
Timely maintenance and Windows optimization help to keep your computer healthy in the long run. Here are some of the effective tips to prevent your laptop from crashing.
Tip 1: Keep the Audio Driver Updated
If you have a pending audio driver update, then it might create problems in the smooth functioning of the audio. As it may also lead to a system crash, you must ensure that you keep the audio driver updated.
Tip 2: Avoid Running Multiple Programs At Once
If you are running multiple programs at once, the efficient handling of all the processes may be compromised. It leads to system or BSOD errors.
Tip 3: Defragment Hard Drives Regularly
One of the great features of defragmentation of the hard drives is it keeps the bad sectors at bay. Make sure that you defragment your hard drives at least monthly, if not weekly.
Tip 4: Delete Browser Cookies and Junk Files
Make sure that you get rid of all the junk and temporary files on your computer. It ruins your browsing experience and also slows down your laptop.
Tip 5: Ensure YouTube Sound Settings
If you like to spend your free time watching YouTube videos, it is important to set the default setting that suits your video watching experience.
Closing Words
The next time the audio of your Lenovo laptop doesn't work, you know what to do! While it may ruin your experience, it is not a difficult problem to solve. Now, if you think that the video is corrupted, you can use Wondershare Repairit Video Repair software to repair the corrupt video files.
Related Questions Searched for Frequently
-
1. How do I turn up the volume on my Lenovo laptop?
You can click on the volume icon on the bottom right corner of the taskbar and regulate the volume from there only.
-
2. How do I fix the sound on my Lenovo?
Numerous methods can be used to fix the sound issue. It includes updating the audio driver, system update, troubleshooting audio issues, and many more.
-
3. Why is my sound not working on my Thinkpad?
Sound not working on your laptop could be a result of many factors. From fault in system sound settings, outdated drivers to corrupt video files, the reason could be anything.
-
4. Can a tool like Wondershare fix audio not play on video?
Yes, absolutely! Wondershare works best to repair corrupt video files. The user-friendly software can even need a sample video to fix the corrupted file.
Solve Media File Problems
- Recover & Repair Photos
- Recover & Repair Videos
- Recover & Repair Audio
- Recover & Repair Cameras


 ChatGPT
 Perplexity
 Google AI Mode
 Grok
Grok


Eleanor Reed
staff Editor