How to Backup Windows 10 to Network Drive
It is always advisable to have a backup copy of the information you work with, however, backups usually take up a lot of space, and depending on the amount of information you need to back up, it may be unfeasible to use external storage media to store your backups. Since external disks are usually much more expensive than conventional disks and cloud storage services usually charge fees to expand the storage capacity of your service. On the other hand, networks will allow you to use the available space of other computers connected to the same network remotely and for free.
Part 1: Methods to Backup Windows 10 to Network Drive
Q: My laptop's hard drive is failing, and I would like to back up my information to another computer. Is there a way to back up my information with Windows 10 to a network drive?
There are various methods that you can use to back up your information to a Network drive. You can use File History to back up your information or even the Backup and Restore tool. Both methods are effective and free, however, if you want to customize the backup processes you can use professional backup tools. In this post, I will talk about each of these methods and I will show you how to use them step by step.
Part 2: Get to Know about Network Drive
Windows has tools that greatly facilitate the management of networks, in this way you can access devices, folders, or disks that are connected to the network remotely. This utility is commonly used to use printers or scanners remotely, however, a network can be used to facilitate the transfer of data from one computer to another, making it extremely easy and versatile to backup or share your information.
Part 3: Backup Windows 10 to Network Drive via Backup and Restore
Back up and Restore es una herramienta nativa de Windows 7, sin embargo, esta herramienta está disponible en Windows 10. Back up and Restore permite realizar respaldos del Sistema Operativo, sus configuraciones y carpetas, creando una imagen de recuperación del sistema.
A. How to Create a Backup
Step 1: Go to the Backup section

You can find this section in the Settings left panel
Step 2: Click on "Go to Backup and Restore (Windows 7)"

To access the Backup and Restore tool, you must click on its label that is in the lower part of the screen.
Step 3: Go to "Set up backup"

Into the "Back up and restore" section, click on "Set up backup" option
Step 4: Click on "Save on a network …"

Here you must click on the "Save on a network …" a button that is located on the right side of the window
Step 5: Select the Network location

To select the network location, you must click on the "Browse…" button, then a pop-up window will be displayed, here you can manually browse and select the specific folder where you want to store the backup.
Step 6: Enter the Network credentials

In the lower part of the window, you will see a couple of boxes, here you have to enter the username and password of a user account on the target machine. Then click on "Ok."
Step 7: Select the drive

Once you've correctly added the network location, it should be displayed in the available backup locations. If so, make sure it is selected and click on "Next."
Step 8: Customize your backup

Now you can choose between a full backup or a customized backup, you can manually choose the folders or drives you want to back up. Once you've decided and selected the option you deem necessary, click on "Next"
Step 9: Confirm the process

Now, all you have to do is click on "Save settings and run backup". Then, the process will start automatically.
B. How to Restore to backup
Step 1: Click on "Restore my files"

Go back to the "Back up and Restore (Windows 7) section. Here you can choose between restoring your files or Recover system settings. Click on the option you deem necessary.
Part 4: Backup Windows 10 to Network Drive via File History
Windows File History allows you to create backup copies of your files and folders on any other storage device. The tool is very easy to use and allows you to schedule automatic backups and customize the selection of folders that will be backed up. In this way, you can back up your information on a Network with great ease, and restore the information, simply copy the files back to their original location.
Below I will show you how to do it step by step.
Step 1: Go to the Backup section

In the Settings section, go to the "Backup" category. Once there, click on the "More options" label
Step 2: Go to advanced settings

Once you have accessed the "More options" section you will see a couple of options listed. Click on "See advanced settings"
Step 3: Select a drive

Once you have clicked on "See advanced settings" a window will be displayed with a summary of the status of the current configuration of your File History. Click on "Select a drive," this option is located on the left side of the window.
Step 4: Add the Network location

Within the drive selection window, you will see an option that will allow you to add new Network locations to your list of Available drives. Click on "Add Network Location" and select the Network folder you want to use to store your backups. (Note that the Network will ask for your access credentials).
Step 5: Confirm the settings

Make sure the location is correct and that it has available space enough to store your backup files. Then, click on "Ok."
Step 6: Turn On

Once you have confirmed the location where you want to store your backups, you will see again the summary of the current status of the File History backup system. On the left side of the window, you will see some options that will allow you to customize some features and even schedule the automatic backup process.
Part 5: Backup Windows 10 to Network Drive via AOMEI Backupper
The above methods serve their purpose efficiently, however backing up your computer information is a very important task and the above-mentioned methods may not be effective enough to back up your information. For this reason, it is recommended to use professional data backup software. AOMEI Backupper is an excellent tool that allows you to automate the backup processes and to customize them with total freedom.
Below I will show you how to use it.
Step 1: Go to System Backup
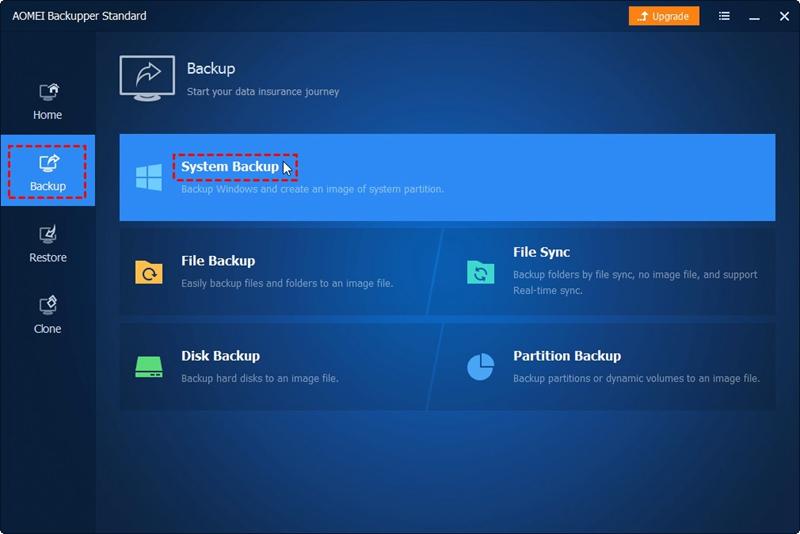
Once you have installed and opened the software, go to the Backup section and click on "System Backup", keep in mind that this option will create an image of your operating system, with which you can easily recover your settings and files, however, If you prefer to only backup one or more folders, you can choose "File Backup". The rest of the steps will continue to be useful.
Step 2: Select the target location

The upper part of the window will show you the files that will be backed up, while at the bottom you will have to choose the destination folder. To choose a Network location, you must click on the arrow to open the drop-down menu and there you have to click on the "Select a network location" option.
Step 3: Enter the network credentials
After clicking on "Select a network location" a pop-up window will be displayed, there you can enter the name or IP address of the network. Once you have entered the address and password (if it is requested), click on "OK"
Step 4: Schedule
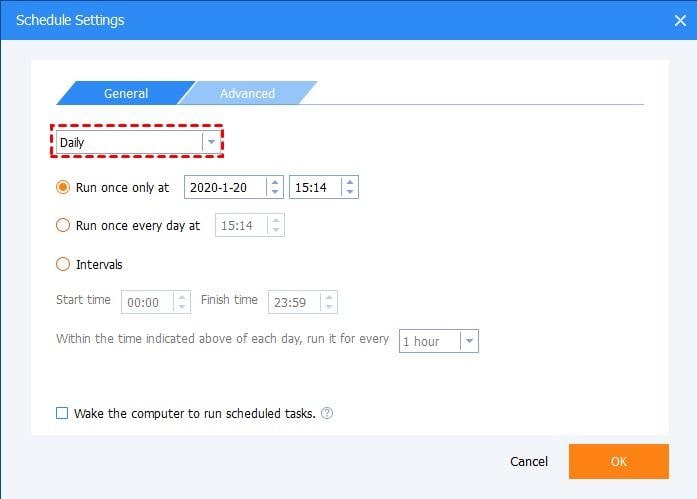
Before finishing the process, click on the clock icon to open the schedule options. In this window, you can customize the automatic backup schedule by day, week, month, year or you can even maintain synchronization in real-time. In this way, when you make any changes to the information, the backup copy will be automatically updated. Once you're done. Click on "Ok"
Step 5: Finish the process
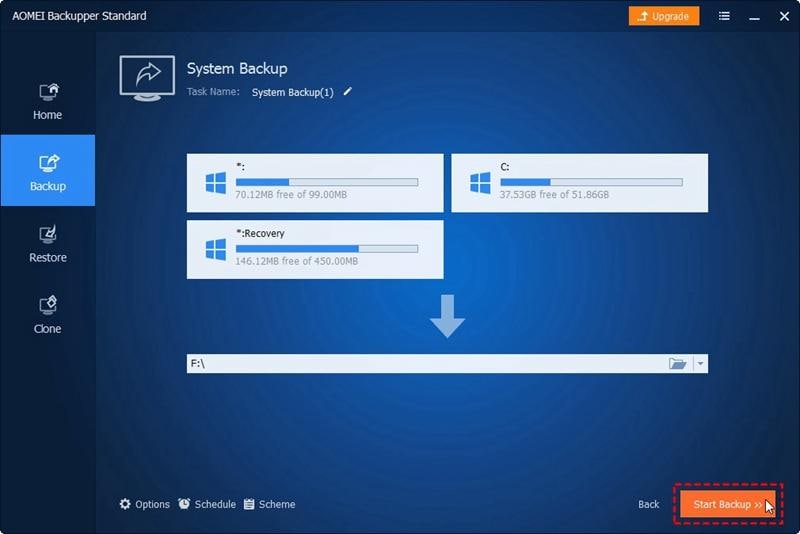
Once everything is set up correctly, click on "Start Backup" and AOMEI Backupper will take care of the rest.
Conclusion
As you may have noticed, Windows has tools that allow you to use a network drive to store your backups, whether you decide to create an image or only backup specific folders, it is a great way to keep your information always backed up for free without paying monthly fees for cloud storage or carrying an external disk with you, also, with the help of AOMEI Backupper you can optimize and automate any backup processes with great ease.
Data Backup Services
- Computer Backup
- Hard Drive Backup
- Mac Backup
- Cloud Backup


Amy Dennis
staff Editor