How to Copy and Backup Files without Admin Rights?
On a Windows computer, you can create multiple user accounts, either guest or with administrator permissions. The difference between one type of account and another is that the last one mentioned gives the user privileges for several tasks that a guest cannot do. However, there are times when Windows (under the administrator account) requests authorization to make changes to the computer by installing a program, modifying or copying information. Here you will know how to solve this problem and an excellent alternative to copy your files without admin rights.
Copy and Backup Files without Admin Rights
Q: I want to back up my files, but Windows asks me to provide administrator permission. The only account of my computer is the administrator one, so I don’t know why this is happening. Could you help me out?
Windows is an operating system that tries to work with high-security standards to provide the highest confidence to its users. It progressively updates so that netizens can use your PC while protecting your information.
Another of the security mechanisms that it handles is the administrator and guest accounts; this is to protect and keep the files of the owner of the equipment safe. If a user in a guest account tries to install a program or edit files (copy, paste, and delete), they will not be able to do so due to restrictions imposed by Windows. On the other hand, if you enter an administrator account, you can enjoy all the privileges in the applications and files.
However, errors can occur in which administrator permissions are requested despite being in the correct account; this can be due to many factors; however, you will wonder if this has a solution.
There are alternatives to recover the admin rights; however, if you are in an emergency and need to make a backup or copy your information, you should use an application that allows you to do this without having to have permissions. Currently, there is quite a few software that can help you complete this need, but the one that is most recommended is Wondershare UBackit.
2 Methods to Copy and Backup Files without Admin Rights
As I mentioned, there are ways to copy and backup your files without having admin rights. Next, I will share with you two methods that will help you: the first is a very reliable software, which is Wondershare UBackit, and the second is to solve the error that asks you for administrator permissions.
1 Copy Files Without Admin Rights
If you require effective, safe, and reliable software, Wondershare UBackit is the best option. This professional application will help you to make copies and backups of your files in just a few clicks without the need for admin rights.
Wondershare UBackit can get your files or folders backed up at ease. With only 2 clicks, you can get you files backed up to HDD, SDD or USB drive. I will show you how easy it is to use this program. In this case, I will show you the steps so that you can make a backup of your files.
Step 1 Launch Wondershare UBackit
Launch UBackit Data Backup tool on your computer after the download process completes. Select the Create New option from the screen, then, click File Backup.
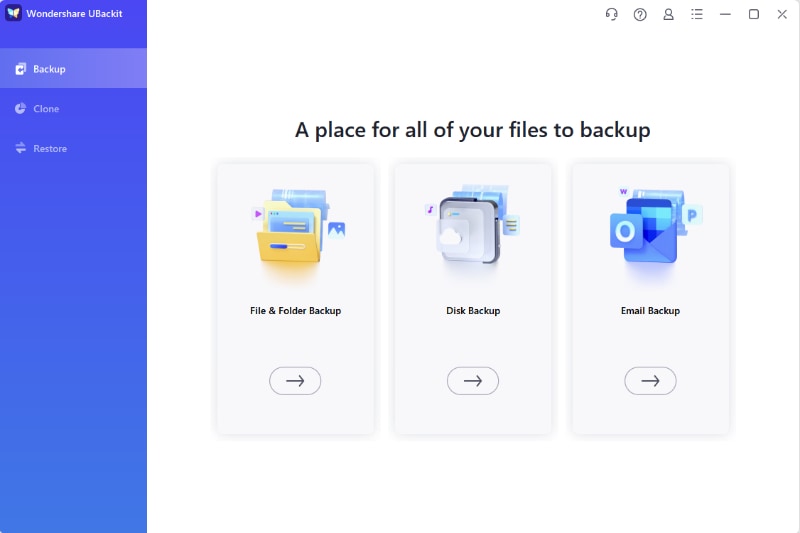
Step 2 Select Files/Folders from Hard Drive
Select the files you want to copy and paste. Then click Select to continue.
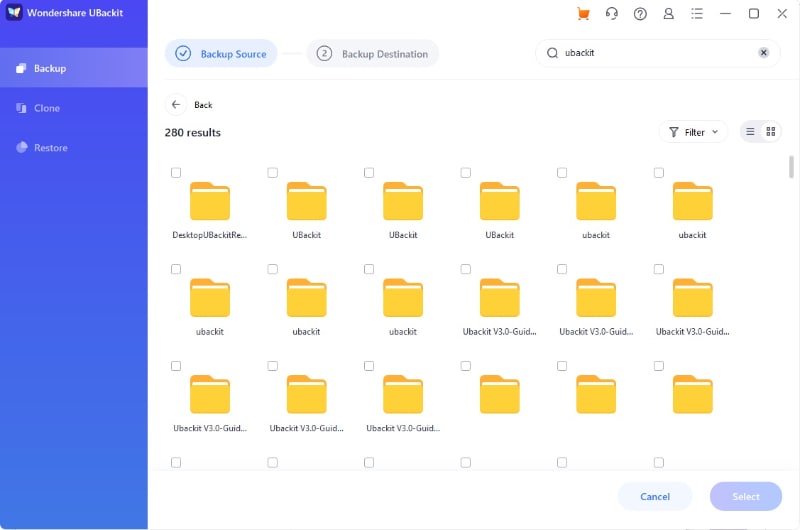
Step 3 Choose Backup Destination
Now you need to select the Backup destination where you want to paste the files. Tap the Select button to start the backup process.
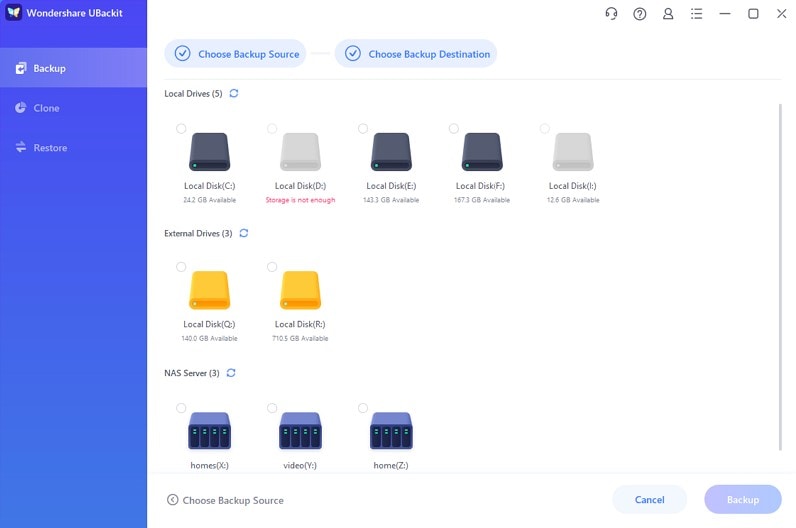
Step 4 Complete The Backup Process
You need to wait a few seconds or minutes to let the process completes, which depends on the size and volume of the backup data. Once it finishes, UBackit will send you a notification. You can find 3 options at the bottom of the backup folder: Schedule, Backup, View. The Schedule one enables you to set daily, weekily, monthly and non-stop automatic backup plan. You can start a new backup by clicking Backup. And to preview the backup, you can select the View option. In this way, you can copy and backup files without Admin rights.
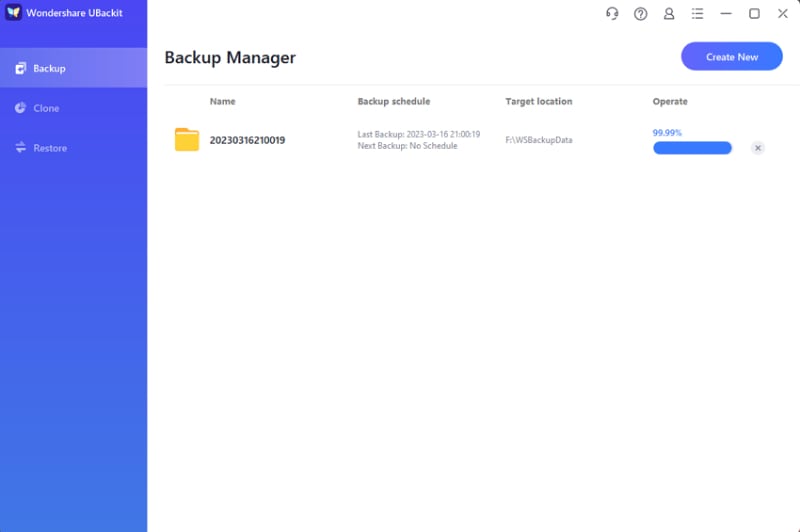
There are in-built incremental and automatic backup functions, you can bakup your files without Admin Rights daily, weekly, monthly or even non-stop. One-Month free trial is provided, do not miss it.
2 Fix Need administrator permission to copy this file/folder error and copy files
To solve the problem, you can carry out three tasks. I will show you step by step how to do each of them.
1. Take the Ownership of a File or Folder
It is important to remember that Windows restricts read and write permissions for security reasons; however, both administrators and file owners are not affected by this restriction. Next, I will show you how to solve this problem by changing the owner of the file or folder.
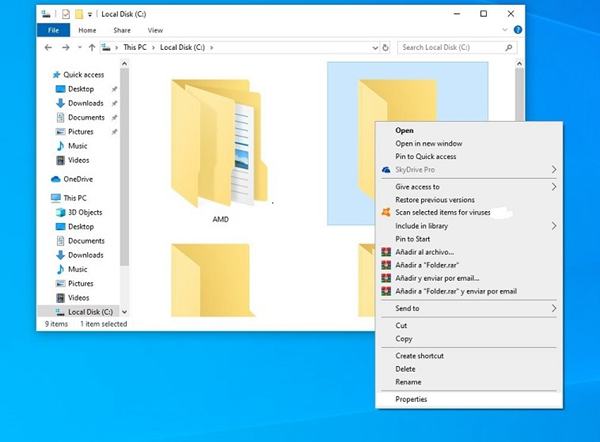
Step 1: Open the file or folder properties
To access the properties of the file or folder, you must right click on its icon and select the Properties option in the drop-down list.
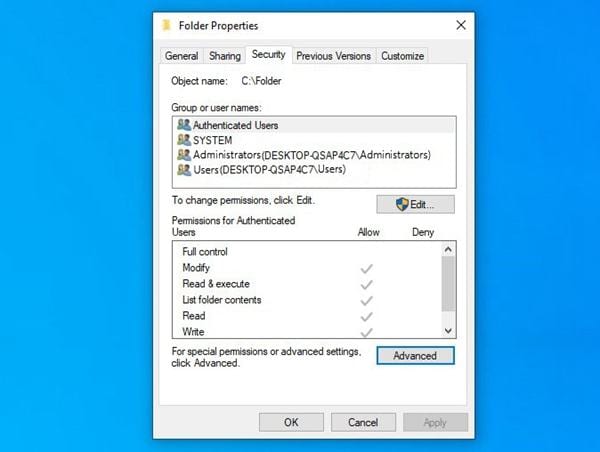
Step 2: Open the Advanced settings
Once you have opened the properties window of the folder or file, go to the Security section and click on the Advanced button located at the bottom of the window.
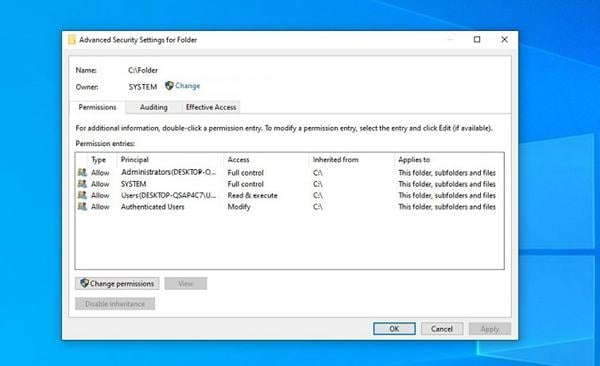
Step 3: Change the Owner
Within the advanced security configuration window, you will be able to see and edit the access parameters of the different users to this folder or file. In this case, click on the Change button at the top of the window next to the Owner label.
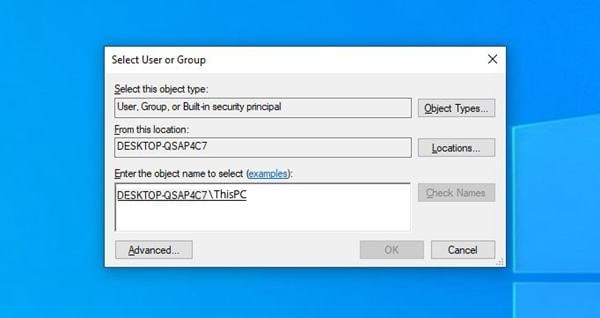
Step 4: Set your user account as the owner
A window will appear from which you can assign a new owner. For this, you must click on the text box at the bottom of the window and write the name of the user account to which you want to attribute the owner value. Now click on the Check Names button and click on Ok.
Step 5: Check the box and confirm the changes
Now, all you have to do is check the Replace owner on sub-containers and objects box and then click OK.
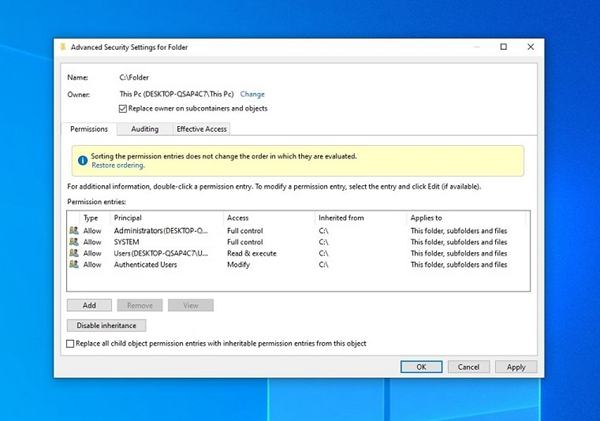
2. Turn off UAC or User Account Control
This method consists of adjusting the Windows security control to a less strict level; in this way, you can make changes to the files from any account. However, to make this adjustment, you will need to do it from an administrator account. Here I will show you how to do it, step by step.
Step 1: Open the Control Panel
You must first access the Control Panel. You can do it from the Windows start menu. You only need to type Control Panel in the search bar and then click on its access icon.
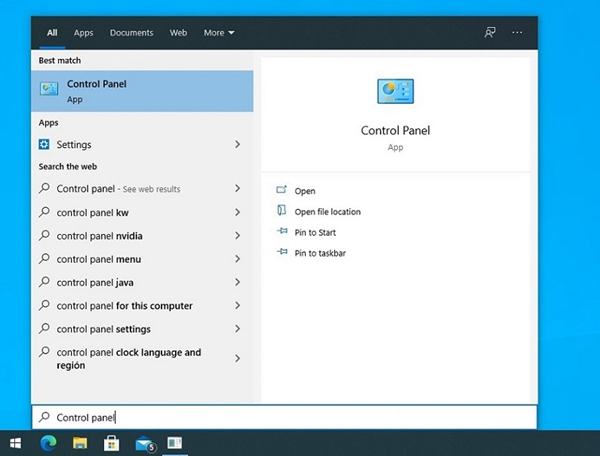
Step 2: Go to User accounts
Inside the Control Panel, you should make sure that the icon organization mode is set to Large icons or Small icons; you can edit this feature by clicking on the top right of the window, next to the View by label. Now you must click on the User Accounts icon.
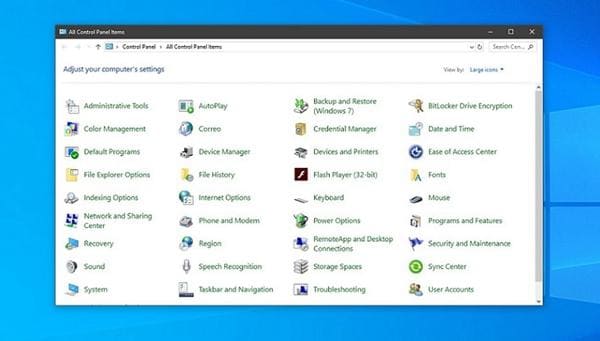
Step 3: Go to Change User Accounts Control Settings
Within the User Accounts window, you will see some options that will allow you to adjust some characteristics of the account you are using, click on Change User Account Control settings.
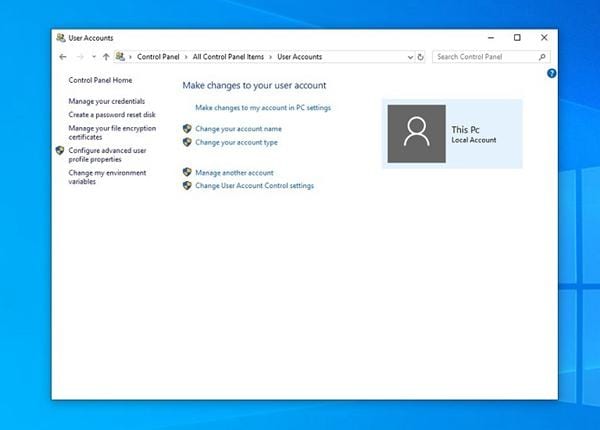
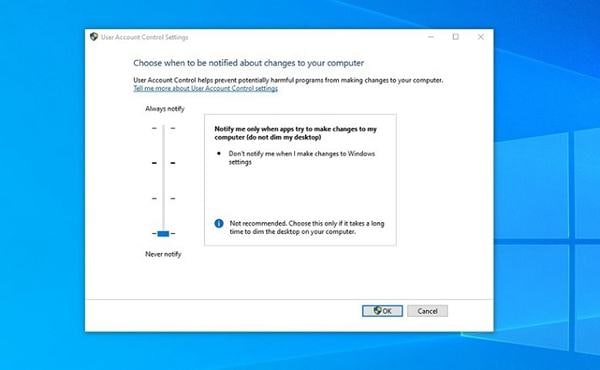
Step 4: Set the UAC value
Now, all you have to do is to set the UAC value to Never notify and click OK.
3. Enable the Built-in Administrator Account
Finally, there are cases in which the Windows administrator account does not have sufficient privileges to interact with some critical system files; nonetheless, you can solve this problem by activating the Built-in Administrator Account. This tool has more advantages than a standard administrator account, so this should fix the problem. This procedure is simple to perform. I will show you how to do it below.
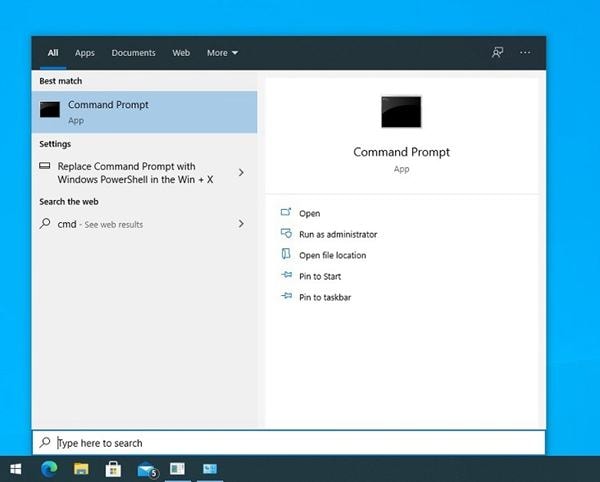
Step 1: Open Command Prompt in administrator mode
The first thing you should do is go to the Windows start menu, type Command Prompt and select the Run as administrator option that appears on the right menu.
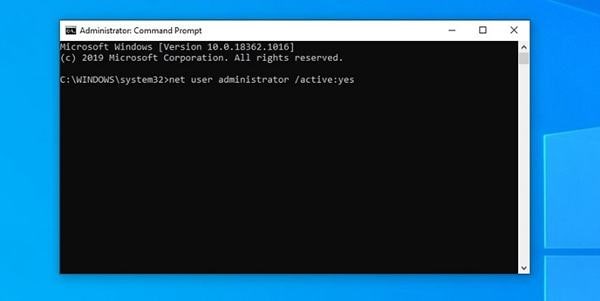
Step 2: Enter the code
Once you have opened Command Prompt you will see a window like the one shown in the image. All you have to do is write the following code and then hit Enter. net user administrator /active: yes
Conclusion
Admin Rights are a Windows security mechanism that is very functional for those users who need to share their PC. The fact that only the administrator account can have all the permissions and privileges to make specific changes is synonymous with advantages and peace of mind. However, there are times when there may be a misconfiguration, and if you need to copy and back up files, it will spell big trouble. Fortunately, there is Wondershare UBackit, a professional software in which you will not need special permissions to make your backups fast and safe, and with the best quality.
Data Backup Services
- Computer Backup
- Hard Drive Backup
- Mac Backup
- Cloud Backup


 ChatGPT
 Perplexity
 Google AI Mode
 Grok
Grok


Amy Dennis
staff Editor