How to Disable Offline Files in Windows 7
Q: How to disable offline files in Windows 7?
"I have been using windows 7 for quite a while now, but I'm striving to know the methods to disable windows 7 offline files. I want to disable the offline files because I'm running out of space on my computer. I only want to disable offline files to create more space on my computer. I'm hoping to see the simplest ways to conduct this task, if there is any software for this purpose, then I also want to know that. However, I'm also not aware of offline files in detail"
Many individuals are not aware of disabling the Windows 7 offline files and look for simple methods, that's pretty normal. In reality, you just need the right methods to do that. In this guide, you will have a built-in function method for your ease to disable offline files. Furthermore, you can also use AOMEI Backupper to sync files in Windows 10. At the start, we will be discussing some common reasons because of which people disable offline files in Windows 7. Once you have read them, you will have detailed methods. Just stick to the guide with great concentration.
What are offline files?
Windows always give its users multiple built-in features to cherish. However, to disable offline files. This is a built-in sync feature of windows 7, 8, 10, which works with the sync center. The primary task of this built-in feature is to develop network files and folders which users can cherish offline when there is no connection available to the computer. Yet, you need to enable offline files to make offline files folders available on your computer while you use it offline. Once you have enabled it, offline files will be stored in system drives that are windows/ CSC folder by default. Still, there are also methods to make the offline files disable.
Why you need to disable offline files in Windows 7
It is very clear why people enable offline files for their use. However, there are a lot of reasons why people choose the option of disabling offline files in Windows 7. Getting to know the reasons behind it can help in understanding the situation more clearly. Apart from the utility of offline files, people still choose to disable offline files in windows 7 because of some reasons which are listed below;
1. Always available offline not working in windows 7
Once you have enabled the offline files in Windows 7, you are still required to go to the mapped network drive to develop the network files offline. However, the option of available offline every time in the context menu, once you right-click the specific files or folders.
2. Offline files cannot be activated
Whenever you enable the offline files, you are required to restart the computer. Yet, in some cases, you still witness the message "Offline files enabled" but they are not. You try to restart your computer but still, the offline files aren't activated.
3. Certain files will not be synced
Multiple files aren't synced. Especially, the files with extensions like MDB. Ldb. Mdw can never be synced.
4. There are too many conflicts when you sync offline files
The computer is vulnerable to a variety of ongoing conflicts. Moreover, if the file sync process has a conflict, the remaining offline files are prone to be canceled.
5. Offline file synchronization does not finish in windows 7
The errors are usually an indicator that the task can not be performed properly. Yet, when you start offline file sync in Windows 7, this error can occur. You can also receive this message that "specified network name is no longer available".
How to disable offline files in Windows 7?
The easiest way to disable offline files is to utilize the built-in utility of windows 7. Windows never leave you unsurprised with its utilities. All you need to do is to locate them and utilize them for the right purpose. This is the finest way you can perform all the required tasks. Moving on, these are the steps to disable offline files in Windows 7, follow them carefully;
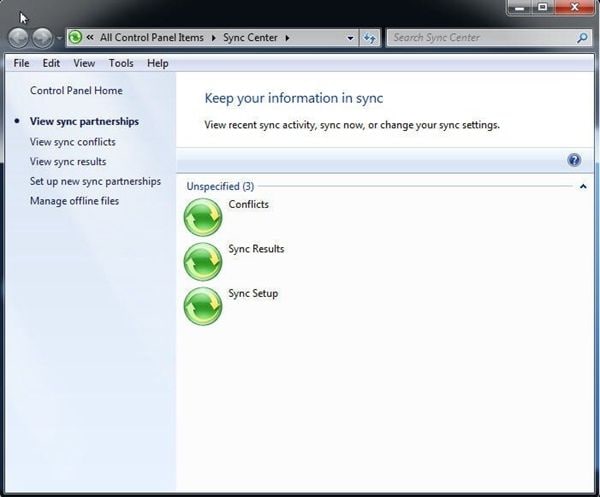
Step 1: First of all, you need to open the search box and type "Sync center", then you can select it from the context center.
Step 2: Over here, you are required to choose the option "Manage offline files" under the sync center windows.

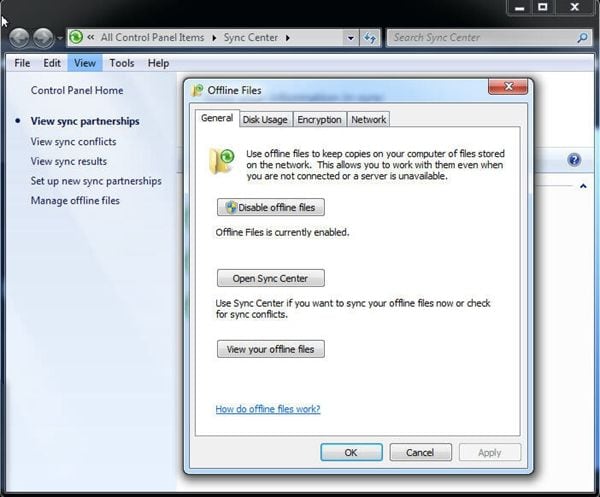
Step 3: Furthermore, you need to click "Disable offline files" in the offline file windows.

Step 4: Once you have followed all the steps, you need to restart your computer. If you do not restart the computer, the task will not be completed. The offline files will not be disabled, which will make all your steps useless. Make sure you restart the computer.
How to sync files in Windows 7 with AOMEI Backupper?
In the guide above, you have cherished the questions and methods of offline files. Yet, offline files have multiple restrictions and limitations. It does not have such advanced features. If you want to satisfy your needs, you must utilize third-party software for your ease. It will surely give you advance and amazing features to enjoy. Well, there is no other software like AOMEI Backupper which can fulfill your needs to sync files in windows 7;
AOMEI Backupper
AOMEI Backupper is one of those software's which contain diverse features and distinctive capabilities for their users. It also contains all features of the Standard Edition, provides complete and reliable PC backup and restore strategies for any of the windows version. System Clone, Backup Scheme, Dynamic Disk Backup, Dissimilar Hardware Restore, Merge Images, etc. and many other diverse and useful features are available. Not only the backup, but the software allows you to an auto-sync USB drive when connected with File Sync. The software is compatible with almost every operating system. There are a vast number of functions that this software contains. You can conduct incremental or differential backup for the scheduled task, this software allows you to set backup schedules as hourly, daily, weekly, or monthly. It is highly recommended to utilize this software to sync files in Windows 7 or any other windows, just follow the steps to use the software;
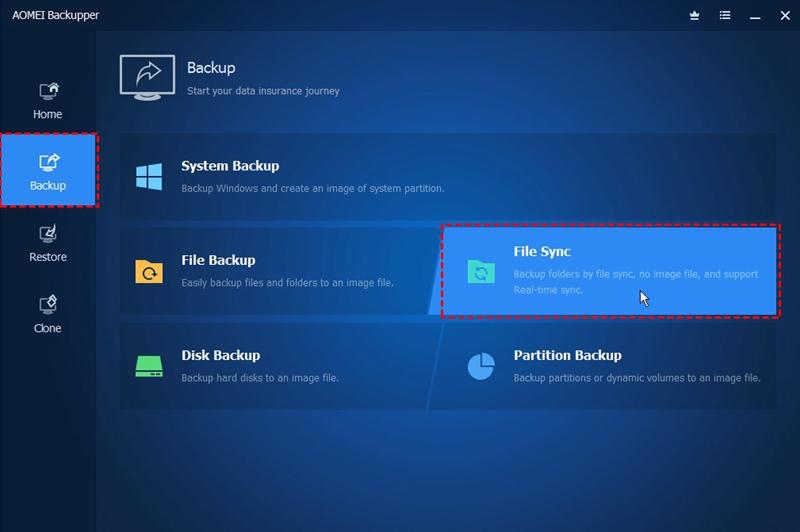
Step 1: Firstly, download and install AOMEI Backupper on your computer. After that, properly launch the software.
Step 2: In the main window, choose the option of "file sync"

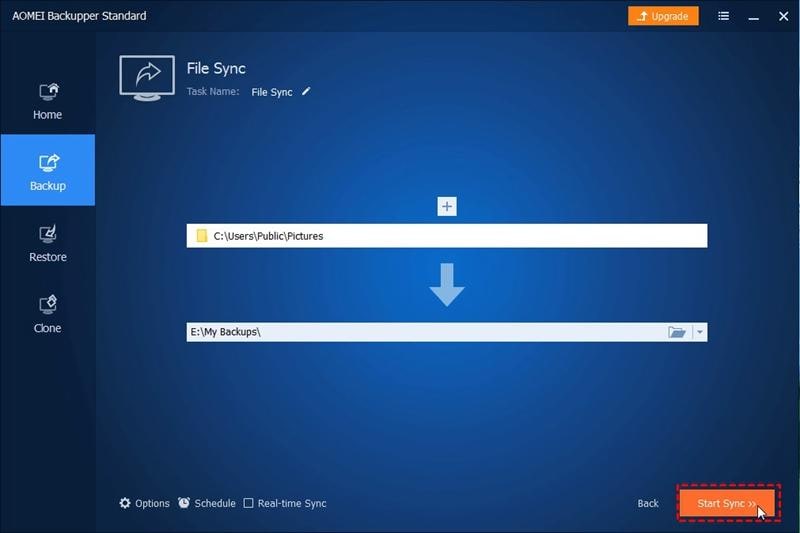
Step 3: Then, you can easily select the files that you want to sync using the software. You can click the "Add folder"> computer or any other location to choose your desired files.

Step 4: Now, you need to choose the destination path of your files. You can choose the drop-down menu to select the path. You have multiple options for destination path, you can utilize any of the storage devices to store your synced files.
Step 5: You can set up the schedule for this operation. Choose the option "Schedule" on your screen and choose the option as per your demands.
Step 6: Once you have modified all the options, you need to click "start sync" to enable the process.

Conclusion
Windows 7 has multiple problems and multiple built-in solutions. All you need to do is to follow them properly. When talking about backup files, this utility is also enjoyed by the majority population around the world. However, it still fails to provide the essential features to the users. This is the reason that many people choose the option to disable offline files. Yet, you can utilize the astonishing AOMEI Backupper to replace the option of offline files. This software gives you multiple other features to enjoy. All you are required to do is to download the software and follow the steps.
Data Backup Services
- Computer Backup
- Hard Drive Backup
- Mac Backup
- Cloud Backup


Amy Dennis
staff Editor