Fixed Host Process for Setting Synchronization with High CPU Usage
Resolve high CPU usage from the Windows SettingSyncHost.exe process by installing pending system updates, modifying registry permissions, or disabling the native sync service and using AOMEI Backupper instead.
● To fix corrupted synchronization permissions, open Regedit and grant your user Full control over the HKEY_CURRENT_USER \ Software \ Microsoft \ InputPersonalization \ TrainedDataStore \ en-GB \ 2 registry key.
● Because native Windows syncing only covers basic settings like themes and passwords, you can disable it and use AOMEI Backupper to synchronize custom folders across devices via a shared Homegroup network location or a linked cloud drive.
Ask AI for a summary
SettingSyncHost.exe or Host Process for Setting Synchronization is a native Windows process that is responsible for syncing the settings of your computer, based on the Microsoft or Outlook account linked to your operating system with the rest of the devices connected to this Microsoft or Outlook account. Sometimes this process reaches high levels of CPU usage, and this can dramatically affect the performance of your computer. Fortunately, this is a simple problem to solve. In this post, I will explain how.
Part 1: Methods to Host Process for Setting Synchronization with High CPU Usage
Q: How to fix the host process for setting synchronization with high CPU usage error?
For some years, syncing has become a fundamental tool in Windows operating systems. This importance is because it is increasingly common for people to have multiple devices connected to the same Microsoft account. Since, with the help of syncing, it is possible to create a customized environment for each user.
High CPU usage derived from the SettingSyncHost.exe process is a relatively common problem, and there are several ways to solve it. However, it is relevant to keep in mind that each method works differently, therefore, it is likely that not all alternatives are suitable for your particular case.
Nowadays, the methods that exist to solve this problem are quite simple to perform; if any of these methods do not solve the problem, you can try the others without wasting much time.
Part 2: Overview of Host Process for Setting Synchronization
Host Process for Setting Synchronization or SettingSyncHost.exe is a native Windows process. This process is in charge of syncing the information and Windows settings between the devices linked to your Microsoft account. This task requires an internet connection to be able to transfer data from one device to another and, multiple factors can hinder the correct functioning of this service. However, most of them emerge a registry file in the system becomes corrupted or incompatible with its environment.
As you can imagine, the syncing service will not necessarily stop when it fails to sync the information correctly; on the contrary, it will repeat the process indefinitely until it achieves its objective. For this reason, your computer's CPU will exert much more effort than it should.
Part 3: How to Fix the Host Process for Setting Synchronization with High CPU Usage Error?
As I mentioned earlier, several methods can fix the high CPU usage problem. Next, I will proceed to explain each one of them, remember that if any of these methods do not solve the problem, you can try another one.
Method 1: Update Windows:
It may seem incredible, but Windows is not perfect and is used by millions of users every day, increasing the speed with which users find security vulnerabilities and errors in the system. When this happens, the Microsoft development team creates fixes for these problems, and this alters the original structure of the operating system. Keep in mind that over time an outdated operating system may conflict with the rest of the configurations, generating all kinds of problems. However, this problem is easy to fix through Windows' automatic update tools.
Step 1: Open Windows Update tool

The first thing you should do is go to the Windows start menu, type Check for updates, and click on the shortcut.
Step 2: Run the scan process
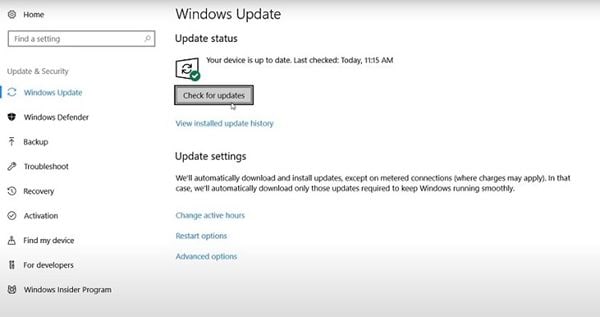
A window like this will appear, and here you must click on the check for updates button. Once you have pressed the button, Windows will automatically search and install the available updates.
Step 3: Reboot your PC
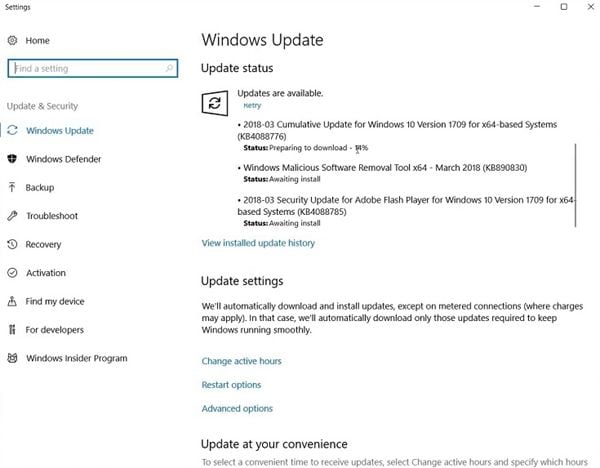
When the updates have finished installing, you will see a summary like the one shown in the image. Now all you have to do is reboot your PC.
Method 2: Add Ownership for a Registry Key:
This method consists of granting control permissions over the syncing services to the user. It is important to remember that the configuration of many computers (mainly those companies assign for work purposes) limit some functions of the operating system, to optimize the performance of the computer for work. Nonetheless, this can cause various types of errors and even instability in the operating system.
Step 1: Open the registry editor

The first thing you should do is go to the Windows menu, type Regedit and click on its shortcut, which is the one with the blue icon.
Step 2: Find the en-GB\2 folder

Within the registry editor, you can click on the arrows next to the folder icons to display the content and go to the next location.
HKEY_CURRENT_USER \ Software \ Microsoft \ InputPersonalization \ TrainedDataStore \ en-GB \ 2
Once you have found the en-GB \ 2 folders, right-click on it and select the Permissions… option.
Step 3: Add permissions
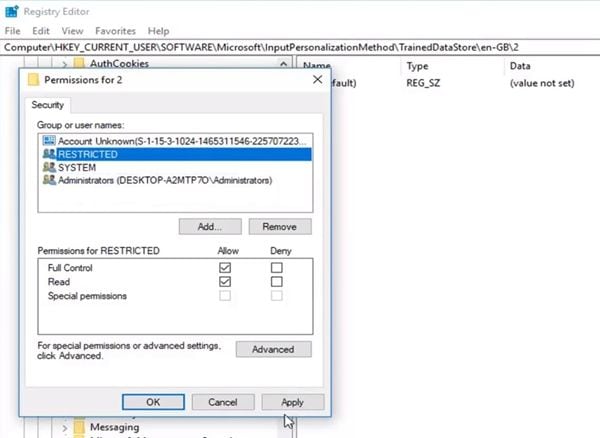
A window like this will appear. Here you must select your user in the Group or user names: section and check the Allow box in the Full control option of the Permissions for (User name) section.
Method 3: Disable Synchronization process and replace it for specialized software:
A very effective way to solve this problem is simply by disabling Windows automatic syncing processes. It is worth mentioning that the Windows sync service only syncs some operating system settings like a theme, language preferences, accessibility, and passwords. Many times, these settings are easily adjustable on any other device, so it would not be worth syncing them. Nevertheless, if you want to sync any other type of files you can use professional data syncing and backup software.
I suggest using AOMEI Backupper. This tool has everything you need to automate any syncing process without affecting the performance or integrity of your operating system; besides, it has an extremely intuitive and ergonomic user interface.
For this process, two options will allow you to sync your data between multiple computers. The first is through a Network location, and for this, you will need to create a folder and share access to it through the Homegroup from one or more destination computers. The second option is through a cloud storage service, in which case, you will need to have an account of one of these services with enough space and link the account with the devices you want to sync the information.
Step 1: Create a Network folder

In the target computer, go to the location where you want to store all the information resulting from the sync process. Then right-click on any blank space to create a new folder, now right-click on the folder, and move the cursor over the Give access to option, this will allow you to see the options related to this feature. Click on Homegroup (View and edit).
Step 2: Add people to share with
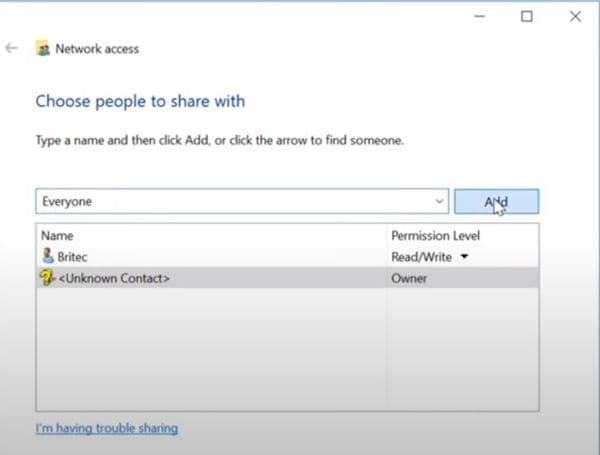
In this window, you can add different computers that are connected to the Network and give them permission to add and edit information in this folder.
Step 3: Choose a Sync method
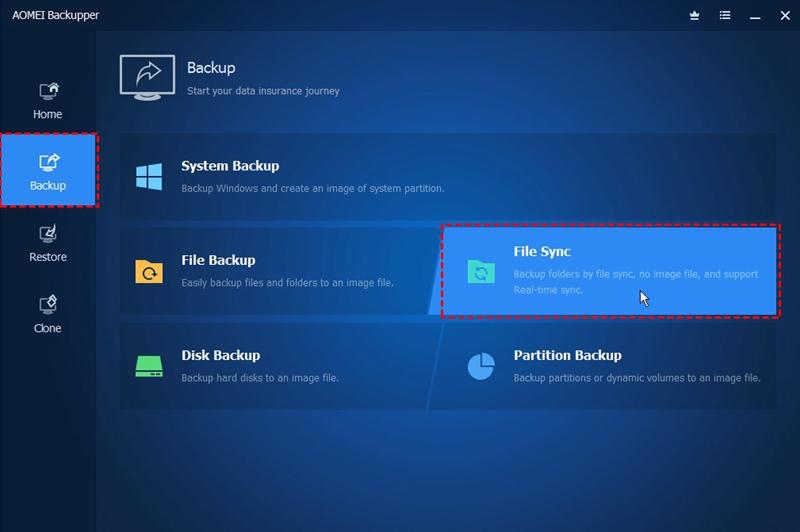
Once you have downloaded, installed, and opened the software, you will see a window like this. Click on the Sync section, located on the left side of the window, and carefully read the description of each of the sync methods, then choose the method that you consider appropriate based on the descriptions.
Step 4: Set the synchronization preferences

Click on the + Add Folder button and select a folder that you want to sync with another device. Now click on the drop-down list button and select the Select a network location option and follow the instructions in step 5. If you have a cloud storage service, click on Select a cloud drive, and in the pop-up window, select your cloud storage service. To finish click on Start Sync >>
Conclusion
SettingSyncHost.exe or Host Process for Setting Synchronization is a Windows service that seeks to make the user experience smoother and more personalized. However, this process is also known for causing performance issues. It is for this reason that many users prefer to disable this service to avoid problems. Fortunately, there are professional alternatives like AOMEI Backupper that allow you to manage any backup and syncing process without the risk of affecting the performance of your computer.
Data Backup Services
- Computer Backup
- Hard Drive Backup
- Mac Backup
- Cloud Backup


 ChatGPT
 Perplexity
 Gemini
 Claude
 Grok
Grok


Amy Dennis
staff Editor