How to Make SSD Bootable for Windows
To make an SSD bootable for Windows 10 without reinstalling the operating system, clone your existing HDD to the SSD using AOMEI Backupper and manually configure the new drive as the primary boot device in your computer's BIOS or UEFI firmware.
● When utilizing the Disk Clone option, your SSD must have sufficient storage capacity for the HDD's entire contents; if space is limited, choose System Clone instead, and ensure the SSD Alignment box is checked.
● If transferring data to an SSD with a larger capacity than the source HDD, select the Manually adjust partition size option and drag the configuration bar to maximize the usable space before starting the clone.
● After cloning, press the DEL key during startup to access the firmware and assign the SSD as boot priority number 1 via the Boot Device Priority menu in BIOS or the Switch All window in UEFI, ensuring you save changes before exiting.
Ask AI for a summary
There are two main options when it comes to data storage on a computer. SSDs and HDDs have advantages that make them unique; however, SSDs have much higher read and write speeds than an HDD. For this reason, it has become the ideal choice for storing operating systems; nevertheless, when Users decide to use an SSD as the boot device for Windows, problems such as the computer not starting Windows at any time may arise. This problem has a solution, and, in this post, I will explain how to fix it.
Part 1: Method to Make SSD Bootable for Windows
Q: A few days ago, I bought an SSD to install Windows on it, but when I turn on my Windows computer, it does not start at any time. Is there a way to fix this problem?
In recent years it has become very common for users to decide to replace their HDD as the leading storage unit with an SSD due to the high data read and write speeds that SSDs have. Also, this practice allows the use of replaced HDDs, only as a storage device, but you should keep in mind that this process is not as simple as connecting your new SSD and installing Windows on it.
For your computer's firmware (UEFI / BIOS) to be able to identify the disk from which you want to boot, you must first make some adjustments to the firmware boot parameters. Besides, you must consider the option of cloning your HDD instead of just installing Windows 10 on your new SSD.
In this post, I will explain in detail why the transfer speeds of an SSD are higher than those of an HDD. Additionally, I will show you how to change the boot priorities of your computer's firmware, both in BIOS and UEFI, and also, I will show you how to clone the information from your HDD to your new SSD in the easiest and safest possible way.
Part 2: SSD boot VS. HDD boot in Windows 10
There are many rumors regarding the speed of Windows 10 boot from an SSD. It is said that the boot speed from an SSD is much higher than that of an HDD and the reality is that it is so.
The read and write speeds of an HDD are limited by the number of revolutions per minute (RPM) generated by the axis that rotates the aluminum plates inside. Besides, these devices are extremely fragile because in their inside there are moving parts that need to stay in an exact position.
On the other hand, SSDs use more sophisticated data transfer systems (Bus), which can be compared to multiple parallel highways, transferring data in the form of energy, also, because SSDs do not have moving parts inside, they are much less fragile than an HDD. Despite this, the data transfer speed of an SSD is still limited but is still considerably faster than an HDD.
For this reason, it is common to practice to use an SSD as the operating system boot medium, reducing load times to just a few seconds.
Part 3: How to Clone HDD to SSD?
Now that you know the main advantages of an SSD, it is time to talk about disk cloning.
If you decided to replace your HDD with an SSD, you are probably thinking of installing Windows 10 from scratch on your SSD and then copying the files from your HDD. This option can be efficient, but it is not efficient because when creating a new installation of Windows 10, you will be discarding all the updates and configurations of your previous operating system. This problem can be solved by re-adjusting the settings, downloading the necessary updates, and even sorting the files by hand, but as you may have noticed, performing all of these processes is an arduous task that can take many hours of work.
To replace an HDD with an SSD, I recommend you clone the disk; in this way, you will not even have to install Windows 10. This is because the cloning will copy all the information that is in your HDD and will restructure it to adapt it to the infrastructure of an SSD. Here I will show you how to do it with the help of professional data backup software called AOMEI Backupper. You can download it for free through its official website.
Step 1: Click on Disk Clone
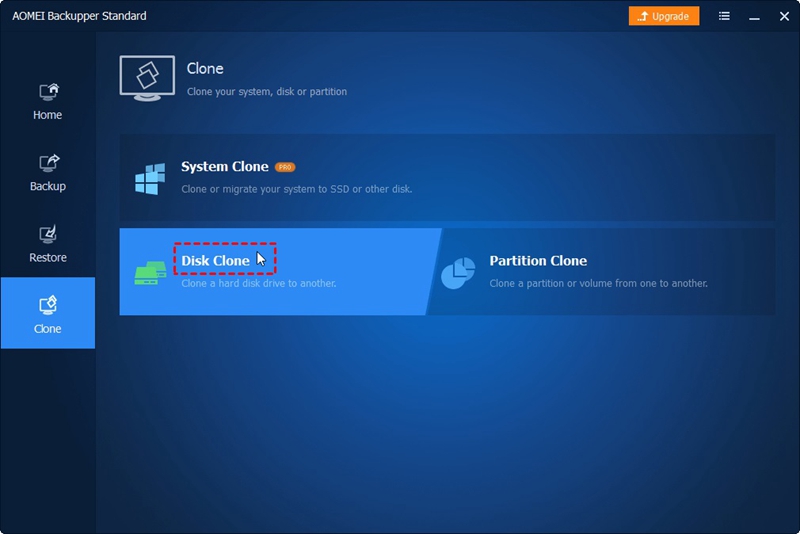
Once you have installed and opened the software, go to the Clone section and click on the Disk Clone option (to use this option, your SSD must have enough storage capacity to store the content of your HDD; if this is not your case, you can select the System Clone option to save space).
Step 2: Choose a Source Disk

Select your HDD disk and then click the Next button.
Step 3: Choose a Destination Disk
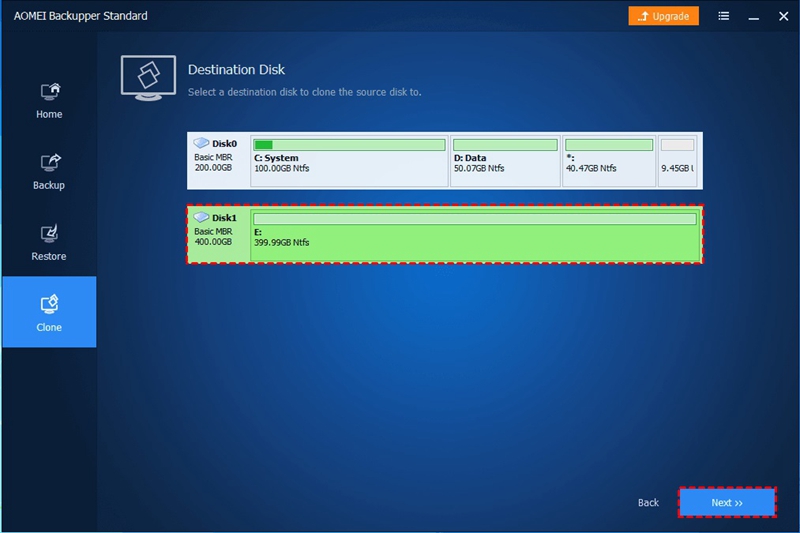
Now you must select your SSD and then click on the Next button.
Step 4: Set the Cloning preferences
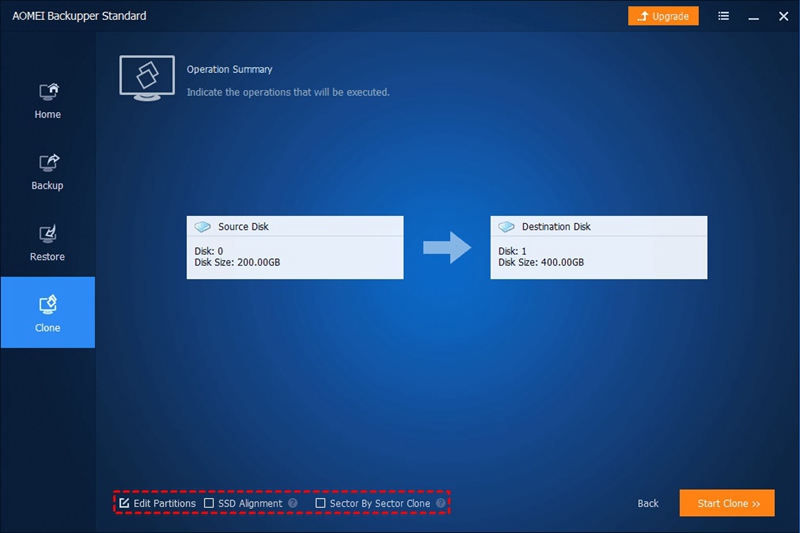
Once you have selected both disks, you will see a window like the one that is shown in the image. Go to the bottom of the window and check the SSD Alignment box and then click Edit partitions.
Step 5: Adjust the partition size
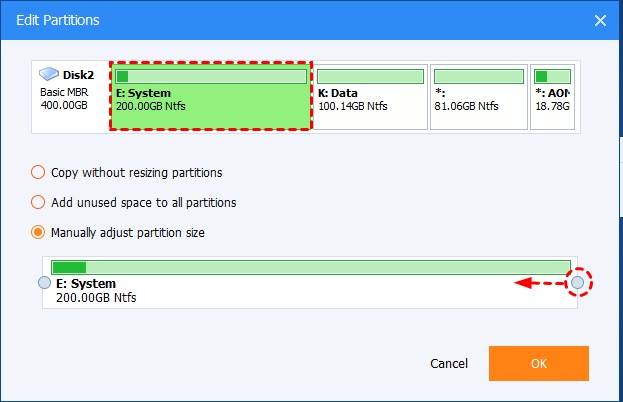
Usually, SSDs tend to have less storage capacity than an HDD; but, if your SSD has a greater storage capacity than your HDD, you will have to select the Manually adjust partition size option. Then, you will have to drag the bar below to adjust the partition size to the maximum. Once you have finished, click OK and then click Start clone.
Part 4: How to Boot from SSD Drive after Clone?
Before starting to use your SDD as a boot device, you must redefine the boot parameters of your computer's firmware. This process is quite simple, but you should keep in mind that there are two types of firmware currently, and the steps vary a bit depending on what firmware you have (BIOS or UEFI). Below I will show you how to do it with these simple steps.
Step 1: Open the firmware configuration menu
The first thing you have to do is turn on your computer while pressing the DEL key (The key may vary depending on the manufacturer) to access the BIOS or UEFI setup menu.
Step 2: Change the Boot Device Priority
- How to change the Boot Device Priority on BIOS
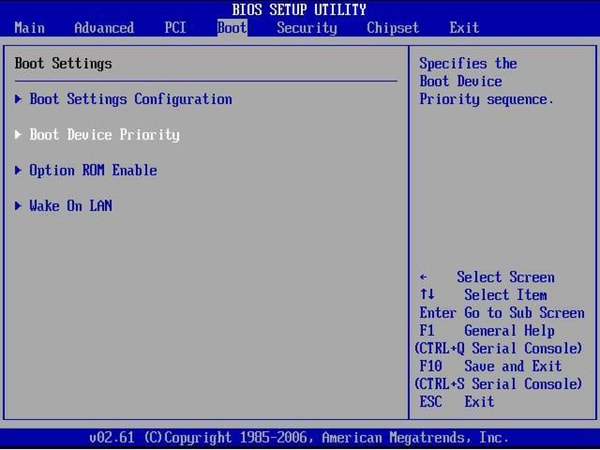
Once you have accessed the BIOS setup menu, you should go to the BOOT section and select the Boot Device Priority option. Now you should put your SSD in priority number 1. Before you have finished, make sure to save the changes before exiting the BIOS setup utility. (Remember that to move between the options in this menu, you will not be able to use your cursor. In the right panel of the screen, you will see the instructions to interact with the BIOS setup utility).
- How to change the Boot Device Priority on UEFI
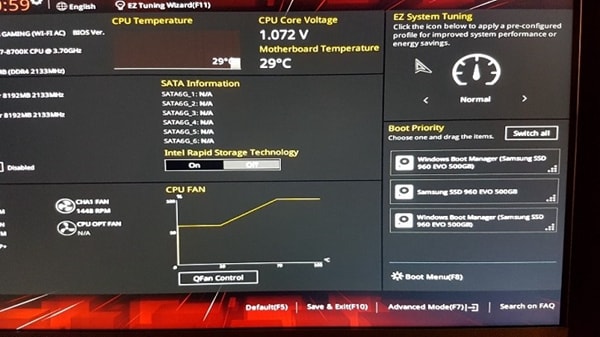
Once you have accessed the UEFI configuration menu, go to the panel on the right and click the Switch All button. A window will appear from which you can assign your SSD as the number 1 boot priority. When it has finished, do not forget to make sure to save the changes.
Step 3: Reboot your PC
Once you have changed the boot parameters of your computer's firmware, you will have to restart your computer so that it repeats the boot process, but this time from your SSD.
Remember that now, your computer has started Windows 10 from the SSD; henceforth, you can use your old HDD as a storage medium, this means that you can format it to eliminate the operating system stored in it. Therefore, you will be able to move the larger folders and files from your SSD to your HDD to save space, or you can unplug it to avoid wear and tear if you do not want to use it anymore.
Conclusion
As you may have noticed, SSDs are excellent storage media and are capable of making the user experience much more comfortable due to the short waiting times in loading processes. Furthermore, you can use tools such as AOMEI Backupper to speed up the process considerably. To replace one disk with another, but you must bear in mind that booting the operating system requires a different storage device, it requires a specific configuration in the boot priorities scheme of your computer's firmware.
Data Backup Services
- Computer Backup
- Hard Drive Backup
- Mac Backup
- Cloud Backup


 ChatGPT
 Perplexity
 Gemini
 Claude
 Grok
Grok


Amy Dennis
staff Editor