How to Fix Location Is Not Available in Windows 11/10/8/7? 11 Methods
You get the error message - location is not available in Windows 10 when your system denies you access to any files or folder. This post will guide you about the situations when you get this error and the different methods to fix this error.
When you try to access the files or folders on your computer, do you ever get the message, “location is not available in Windows 10?” Do not bother, as many users experience it. This usually happens when the folder or file reported in the error message is deleted or moved to some other location.
Here, we will discuss why this error comes up and how to fix it.
Part 1: Why "Windows 10 location is not available" Error Happens
When you get the error – location is not available in Windows 10, there can be a number of reasons behind it. Here are some of them:
- Virus attack
- Power failure
- Incorrect operation
- Damaged or corrupt records
- Hard drive with bad sectors
- Wrong file system
- Problem with the USB port
- Unsafe removal of removable drive
- Corrupt Windows update
- Corrupt registry
- Misconfigured files
- Cluttered hard disk
- Unsuccessful installation of program
- Faulty user account
- Error due to third-party antivirus
- Empty or corrupt desktop folder
These are some of the reasons that can cause location is not available in Windows 10 error. All these reasons can create a different situation. But in any situation, you will get the message - location is not available in Windows 10/8/7.
It doesn’t matter in which situation you get the error message; you can fix it with the methods discussed in the next part.
Part 2: How to Fix Location Is Not Available in Windows 10?
As said above, there can be many reasons that can be behind the error. Whatever be the reason, you will get a method to fix it. Take a look.
Method 1: Restore Default Desktop Settings
When you are unable to access the desired file or folder, fix it quickly by restoring default desktop settings with the below steps:
- Go to “This PC” and select the drive where the Window is installed on your system. Usually, it is in C drive.
- At the empty space, right-click on it and tap on “properties.
- Now choose the “Location” tab and left-click on the tab “restore default.
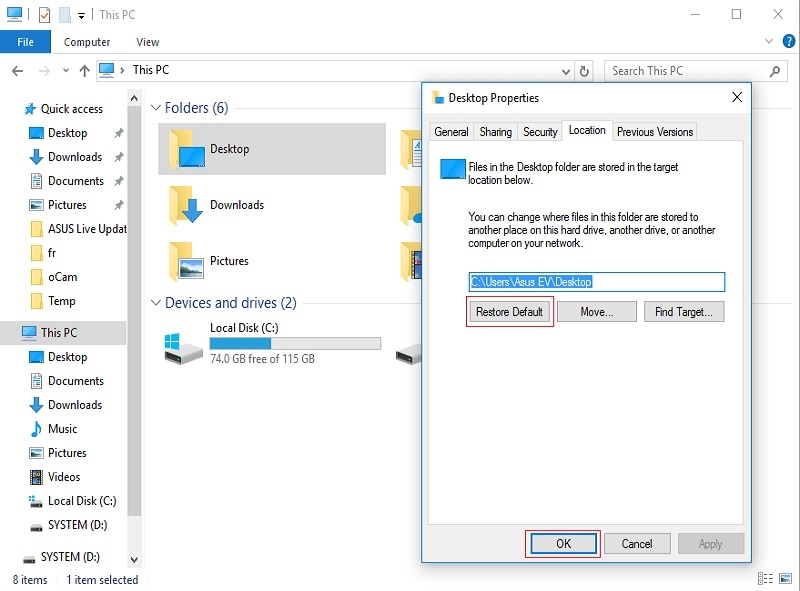
- Now restart your system after closing all the links
After this step, check if the error is fixed? If not, proceed with the next method.
Method 2: Manually Copy the Desktop Folder to System Profile
When you get the error – location is not available in Windows 10, you can try to copy the desktop folder to the system profile by following the below steps:
- Go to “This PC” and then under “devices and drives,” double click on “C” drive.
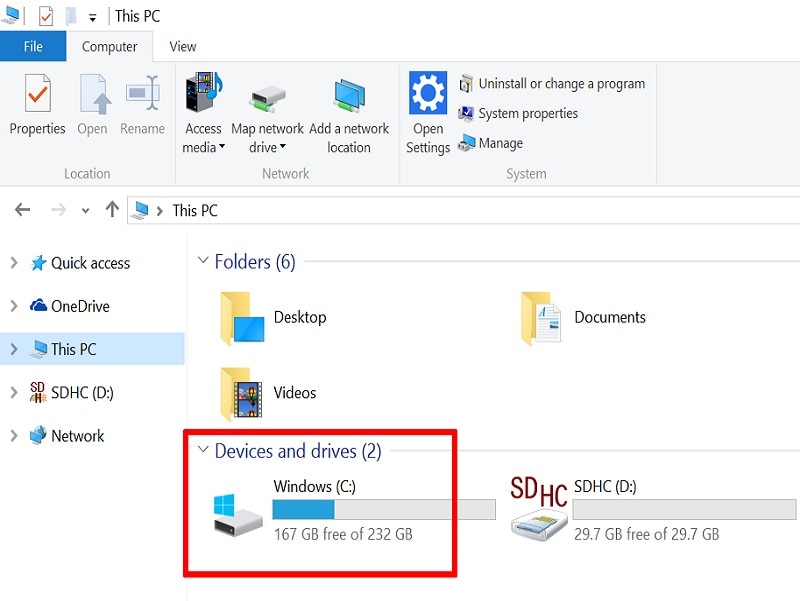
- Now double-click on the “users” folder to reach the “default” folder. If you are not able to see the “default” folder, enable the option “view hidden files” in the “view” tab. You can find it in the file explorer’s menu.
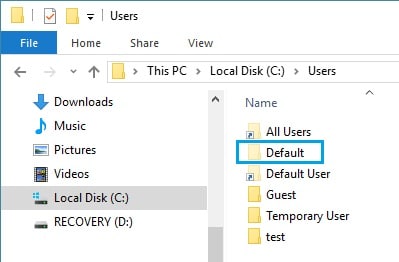
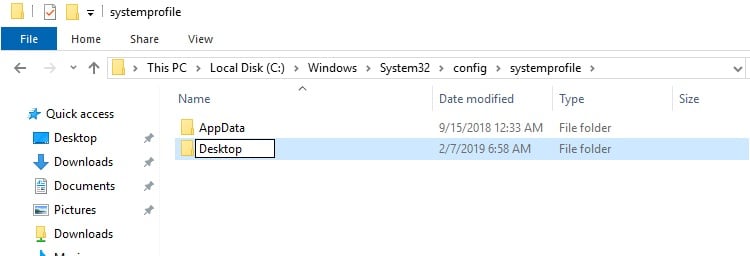
- Now, look for the “desktop” folder and right-click on it. Select “copy” from the menu and then move to the system profile by following the below path:
C drive -> windows -> system 32 -> config and then systemprofile
- Now, in the system profile, paste the desktop folder copied in step 3. Restart your computer, and now check whether the error is resolved.
Method 3: Add Desktop Location to Registry
You can quickly add a desktop location to the registry with the following steps:
- Run command prompt as administrator.
- Type “regedit” and press enter.
- Now proceed to the following path:
HKCU\Software\Microsoft\Windows\CurrentVersion\Explorer\User Shell Folders
- Type the following and press enter:
%USERPROFILE% \Desktop
C:\Users\%USERNAME%\Desktop
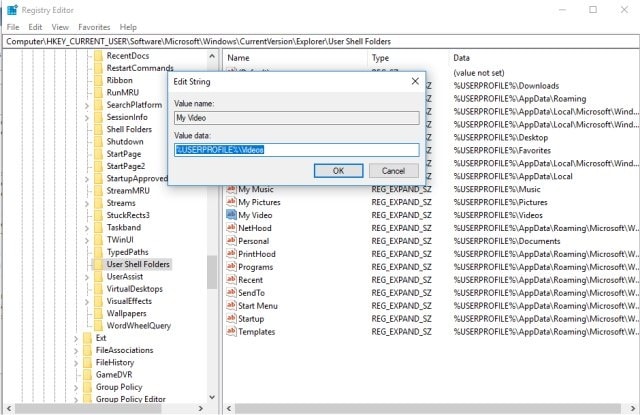
- Now exit and restart your system.
Check whether the error is fixed.
Method 4: Use the Command Prompt to Reset your User Permissions
Try this method with the below steps:
- Type cmd in your Windows search box to look for Command Prompt. Right-click on the CMD and then select “Run as administrator.
- Type the following commands. Press enter after each command:

The user permissions are reset. Now check can you access the files and folders or the error is still there. If the error – location is not available in Windows 10 is still there, then try the next method.
Method 5: Restart File Explorer Process
This method will reset temporary files, that are causing the error – location is not available in Windows 10. Try this method with the below steps:
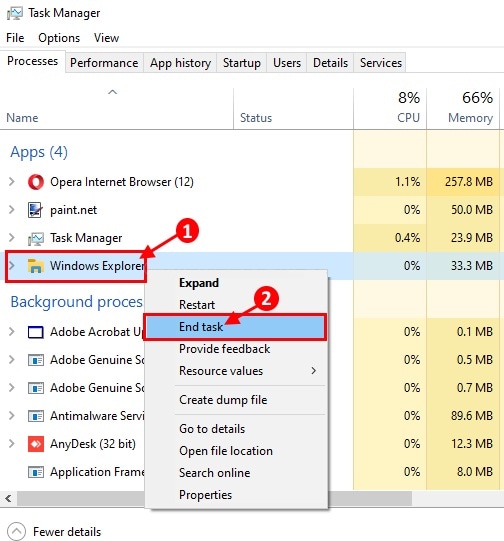
- Open “Task Manager.” You can do it by pressing Shift, Ctrl, and Enter altogether.
- Go to the tab named “Processes.
- Go to “Windows Explorer,” right-click on it, and then select “End Task.” It will terminate the process.
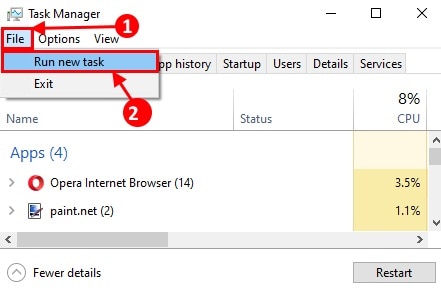
- Now click on “File” in the task manager and then select “Run new task.
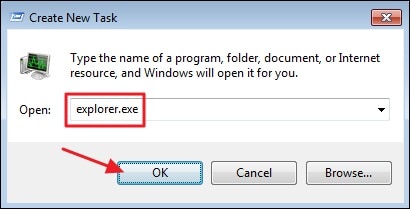
- Type “explorer.exe” in create new task window. Then tap on “OK,” and it will open file explorer.
The problem might have resolved by now. If not, then check the next method.
Method 6: Enable Safe Mode
To repair the errors on Windows, the first method you should try is to boot your computer into Safe Mode.
- Restart the computer.
- Press F8 frequently till you see the Advanced options on the screen.
- Go to Troubleshoot->Advanced options->Startup settiings, then click the Restart option at the bottom.
- Press F4 to boot your computer into Safe Mode.
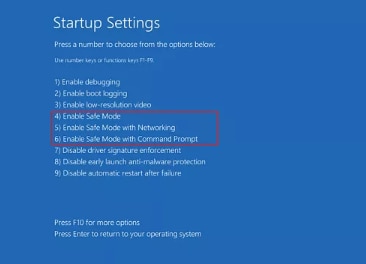
Method 7: System Restore
It is one of the best methods to get back any of your lost or deleted data. So, when you get the error – location is not available in Windows 10, you can use system restore to get all the data that you have saved before the error.
- Type “System Restore” in the search box and then select “Create restore point.
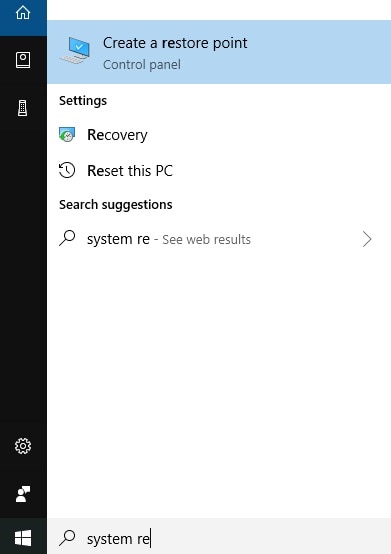
- Now select “choose different restore point” and then click on “next.
- From all the available restore points, select the one that has data stored to the point when the error occurred.
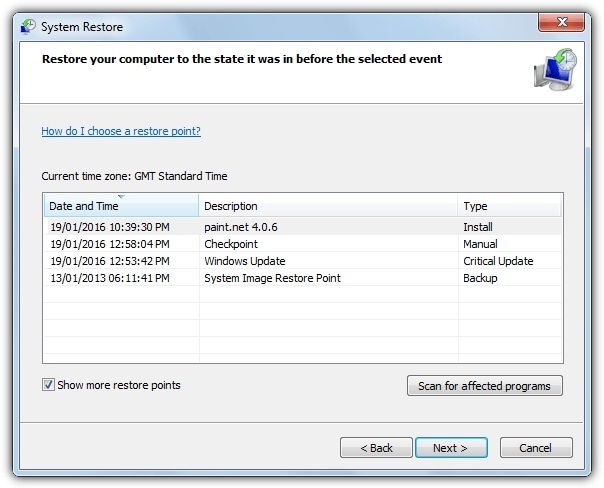
- Once the system is restored to its original state, check if the error message still appears or is it resolved.
Method 8: Take Ownership of the File/Folder
The problem could happen if you don't have the administrative rights to open the file or folder. In this case, you can take the administrative rights following this way:
- Type in CMD in the search box next to the Start menu, and press Enter.
- Right-click on Command Prompt and select Run as Administrator.
- Type the following command in the Command window and press Enter:
> cmd.exe /c takeown /f "C:\System Volume Information\*" /R /D Y && icacls "C:\System Volume Information\*" /grant:R SYSTEM:F /T /C /L
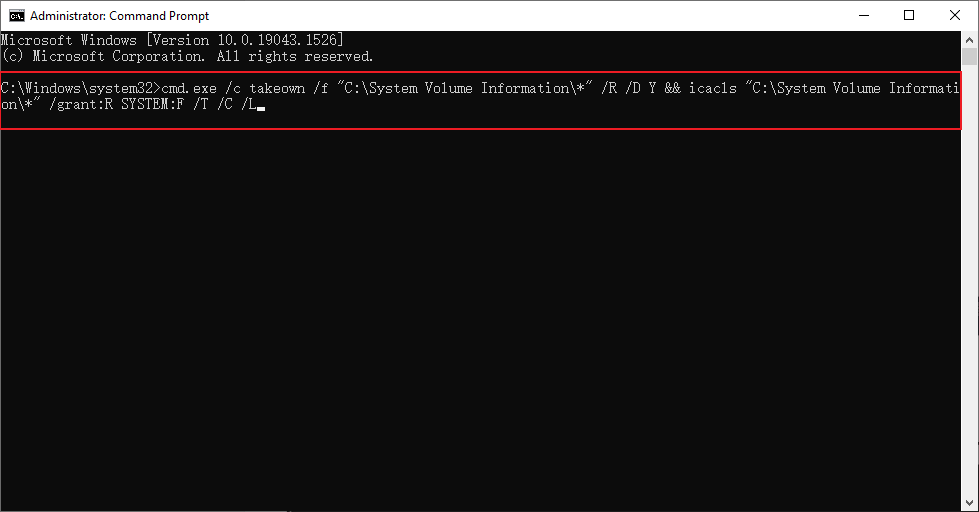
It will show SUCCESS when the process completes. Now restart your computer and check if the problem is solved.
Method 9: Run CHKDSK Scan
If there is bad sector on your disk, it can also cause the location is not available issue on your computer. Try running CHKDSK scan to fix it:
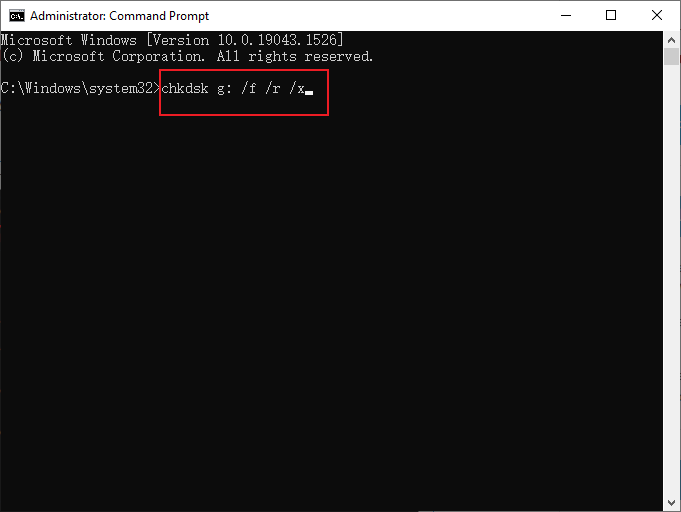
- Launch Command Prompt as administrator and type in the following command and press Enter:
chkdsk g: /f /r /x(Replace g with the actual drive letter of the inaccessible disk)
- When the process completes, restart your computer and check if the problem is solved.
Method 10: Access the Full Control of the File/Folder
Giving full rights to the user can also solve the location is not available on Windows problem. Follow this:
- Right-click on the Folder/File, and click Properties.
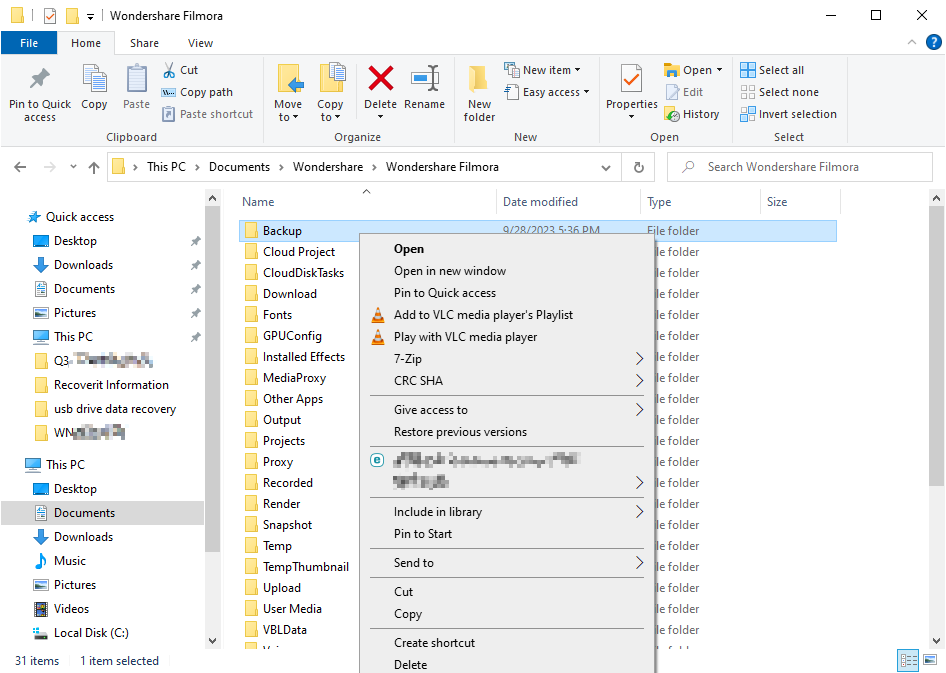
- Go to the Security tab, and select Everyone under the Group or user names section. Then, click Edit.
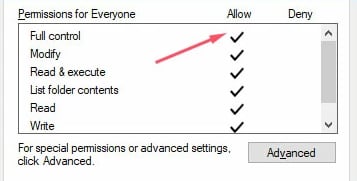
- Still select Everyone, and check the Allow box for the Full control option.
- Click OK to confirm the settings.
Method 11: Restart the RPC service
Restarting the RPC service can potentially resolve the location is not available in Windows error. Follow the steps below:
- Press Windows+R to launch the Run dialog box.
- Type services.msc and press Enter to open Services.
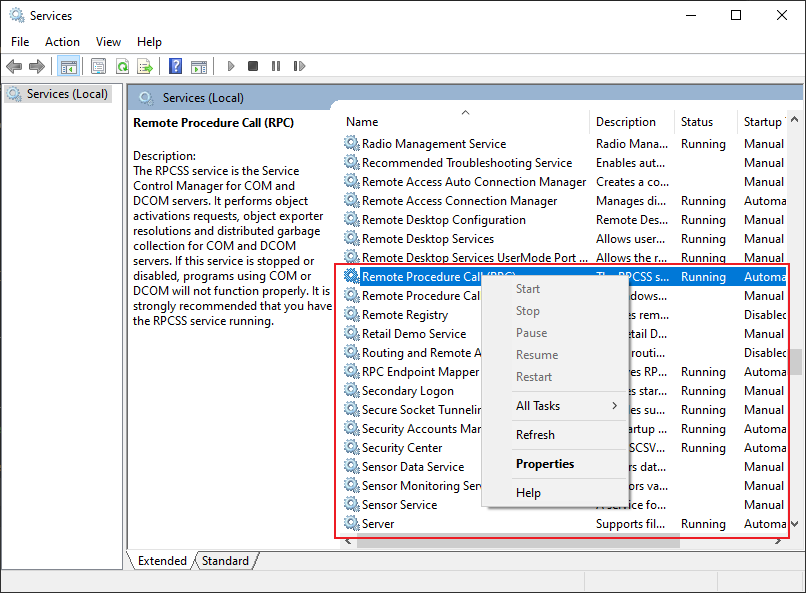
- Locate the Remote Procedure Call (RPC) service.
- Right-click on the RPC service and select Restart/Start from the context menu.(If the Restart/Start button is grayed, it means that the RPC service runs well.)
- Wait for the service to start, then close the window.
- After that, try accessing the location or file that was previously showing the location is not available error.
Bonus Tip: Restore Data from Inaccessible Drive (Important)
After trying all these above methods, if you are not able to access the folder or drive, then recover your data with the best Wondershare Recoverit data recovery software. You can restore data quickly with the three quick steps.
Step 1: Select Location of inaccessible data
Download and install Wondershare Recoverit software on your system and then select the location of the inaccessible data.

Step 2: Scan your selected location
Begin the all-around scan to allow the software to look for the lost files. You can see all the recovered files when the scanning is in progress. You can stop or pause the scan in-between if you think your required data is recovered.

Step 3: Preview recovered files
When scanning completes, Wondershare Recoverit allows you to preview the files before you finally recover and save them. Save them to a new location when you see all the required files are recovered.

With this step, the required inaccessible data is recovered. Now you can access it without facing any issue.
The Bottom Line
When you get the error - location is not available in Windows 10, it can be frustrating, but the methods discussed above will help you fix the error. However, if you are unable to fix it, you can recover your data quickly with the Wondershare Recoverit data recovery software.
People Also Ask
-
Why am I seeing the "Location is not available" error in Windows?
The "Location is not available" error typically occurs when Windows cannot access a specific file, folder, or network location. It can be caused by various factors such as file system corruption, network connectivity issues, incorrect permissions, or malware/virus infections.
-
Can a corrupted file system cause the "Location is not available" error in Windows?
Yes, a corrupted file system can cause the "Location is not available" error in Windows. If the file system becomes damaged due to hardware issues, power outages, or other factors, it can prevent Windows from accessing certain files or folders, resulting in the error message.
-
How can I check file or folder permissions in Windows?
To check file or folder permissions in Windows:
1.Right-click on the file or folder you want to check and select "Properties" from the context menu.
2.Click on the "Security" tab to view the list of users/groups that have access to the file/folder.
3.Review the permissions assigned to each user/group and make changes if necessary. Note that you may need administrator privileges to modify permissions.
Rescue & Fix Files
- Recover Document Files
- Repair Document Files
- Recover & Repair More
- Clear & Delete File


 ChatGPT
 Perplexity
 Google AI Mode
 Grok
Grok


Theo Lucia
chief Editor