How to Delete Downloads on Mac
You might wonder why anyone would want to delete the downloads on their Mac right after the downloads are done, right? The answer’s very obvious: There are so many files in the Mac that there isn’t even enough space to download anything anymore!
And that’s not even getting into the fact that your macOS can start misbehaving once your hard disk is too filled up. And don’t forget about how disorganized and cluttered your Mac will be if you have too many downloads scattered everywhere.
Either way, you’re in luck, because simple yet effective ways to get rid of your downloads will be given to you right here.
Is It OK to Delete Downloads on Mac
Yes, it’s very OK to delete files on your Mac. As long as you don’t go about deleting necessary or important files, you’re good to go.
Why Should You Delete Downloads on Mac
The main reason you should delete downloads on your Mac is to keep it optimized. If you don’t have sufficient space in your hard disk, how will your macOS function properly? It won’t. So, don’t let all those videos, music and other files clog up your mac.
Part 1: How to Find Downloads Folder on Mac
With computers, there is never a single way to do things. Similar to other operating systems, macOS has a default directory where it stores all the files you download. This is the user “Downloads” folder, located via this path:
~/Downloads/ while the exact path would be /Users/username/Downloads/
It must be pointed out that any medium you use to download files on your Mac will have the downloads ending up in the aforementioned folder. So regardless whether you’re using Safari, Google Chrome, Mozilla Firefox, AirDrop and most other file transfer software out there, the directory is often the same.
You have many options at your disposal when it comes to locating your Mac downloads folder. Some are faster than others but to narrow them down to the best 3, you can find the folder via your Dock, Finder or keyboard shortcut.
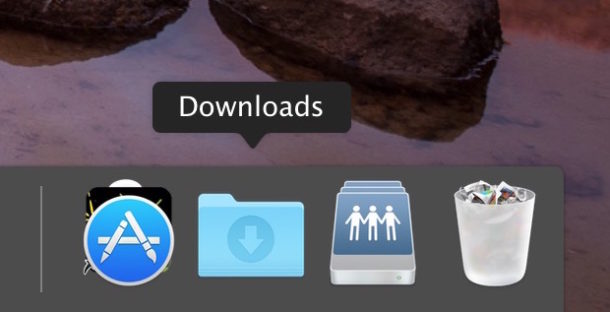
Solution 1: Dock
1. The most recent versions of macOS already have a “Downloads” folder. Simply click on it to open the folder, then proceed to move anything you don’t need to the Trash.
Solution 2: Keyboard
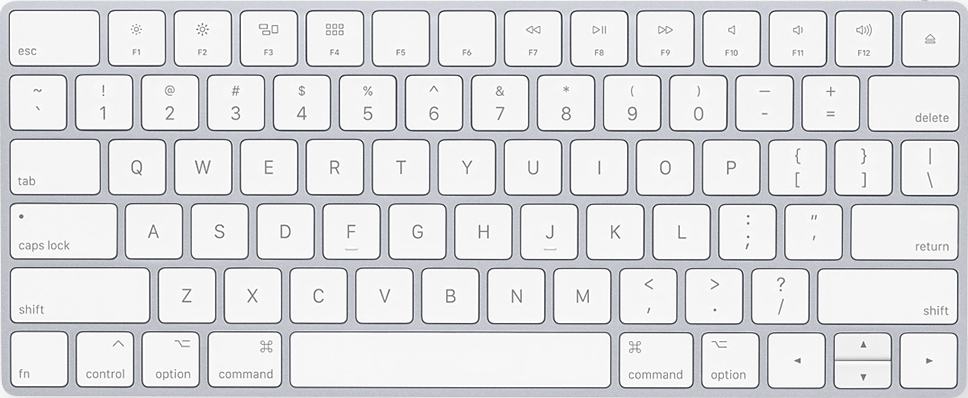
1. Open your Finder.
2. Press this key combination: “Command” + “Option” + “L.” That’s it. The Downloads folder will open up right after you do that. The speed and simplicity of this method is one reason it’s probably the best way to open up the downloads folder.
Solution 3: Finder
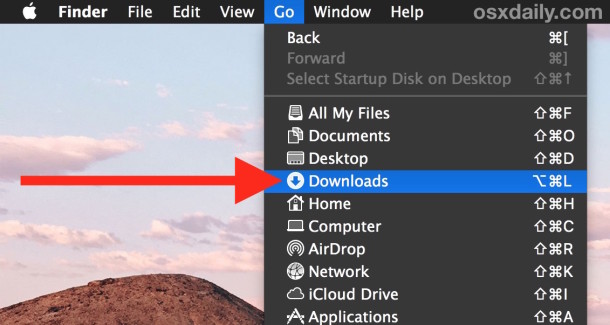
1. Go to the “Finder” option on the menu bar atop your Mac.
2. Click “Go” on the menu bar.
3. Select “Downloads” from the drop-down menu and it will open up the Downloads folder.
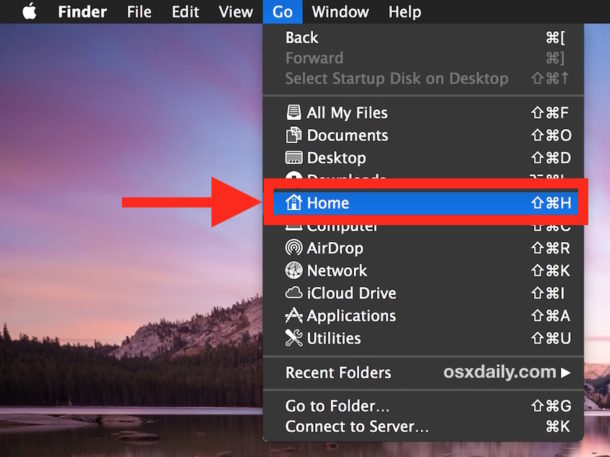
4. Alternatively, you can click on “Home” if you don’t see the “Downloads” option. Do that and the folder should be visible within the “Home” folder.
Part 2: How to Delete Multiple Downloads on Mac
The good news is, there are numerous ways to go about deleting multiple files on your Mac. The bad news is, you probably don’t know the best and most effective of them.
No worries. This post will teach you the most relevant of the many options. Which of them you decide to choose depends on several factors. For instance: Would you prefer manually deleting the files or would you rather let third-party apps handle it for you? The choice is yours.
Solution 1: Directly Delete Downloads from Mac
1. Go to “Finder” on your Mac’s dock and click on it.
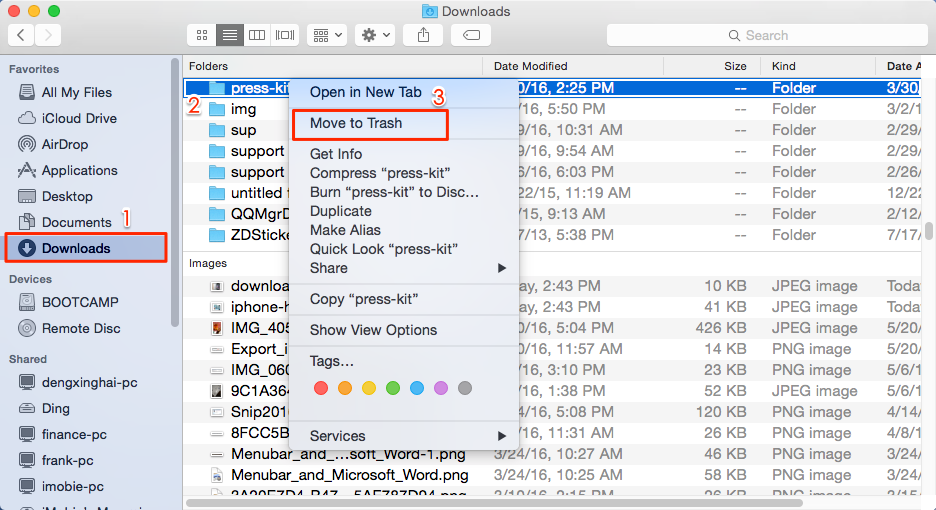
2. Once the window opens up, you will see “Downloads” located on the left pane. Click on it. It will reveal all your downloads on the right pane.
3. Press this key combination: “Command” + “A”. Just like how pressing “Ctrl” + “A” in Windows highlights and selects all the files on a page, the former key combination serves the same function for Mac.
You can also select the files individually if you so wish, but it’s slower that way.
4. Next, right-click on the highlighted files and click on “Move to Trash.”
5. Empty your Trash.
Solution 2: Go Menu
1. Click “Finder” on your Mac’s dock.
2. Click on the “Go” option on the menu bar.
3. Select the “Go to” folder.
4. A window will appear where you will see a search bar of sorts. Type this in it: ~/Downloads
5. Click on “Go.”

6. Once the Downloads folder opens up, click on “View” option on your Mac’s menu bar.
7. Select “As List” (the whole point of doing this is to make navigation around the folder easier for you).
8. The contents of the folder will be listed out in detail. You will see columns on “Date Modified”, “Size”, “Kind”, etc.
9. Use this option to sort by size and determine the largest files in the folder, then delete them, or just highlight everything and delete them.

Solution 3: Terminal
Terminal is one Mac’s most powerful tools. If you know your way around it, you can execute commands that can alter almost every part of your Mac. Deleting multiple downloads on Mac is very easy using this nifty utility. You only need to type in a few commands:
1. Move the files to be deleted to your desktop (to make the process easier).
2. Open up your Applications/Utilities folder.
3. Launch “Terminal.”
4. Type this command in Terminal: cd ~/Desktop (That command will take you to the Desktop directory).
5. To delete a download, simply type in this command in Terminal, followed by the name of the download to be deleted: rm
For example, if you have a file on your desktop called “Clip.mp4”, simply type this command in Terminal to delete it: rm Clip.mp4. Then press “Enter/Return”.
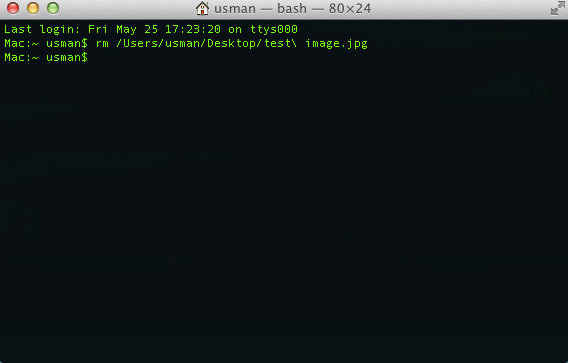
6. To delete multiple downloads, simply type in the “rm” command once, followed by all the names of the downloads to be deleted. Like so: rm Clip.mp4 Clip6.mp4 Chapter.rtf
7. Press “Enter/Return.” The files will all be deleted permanently.
Part 3: How to Clear Downloads on Mac Skype and Browsers
As you would expect, your browsers play a large part in filling up your downloads folder and subsequently, your hard drive, because most of the download is done through them, isn’t it?
Clearing your browsers’ histories and deleting the files in the said folders are crucial to keeping a hard drive running smoothly. The same goes for Skype’s downloads.
Skype
1. Open up your Skype.
2. Press the “⌘” + “,” keys. Or, you can navigate to your Mac’s menu bar atop your screen and select “Skype.”
3. Select “Preferences.”
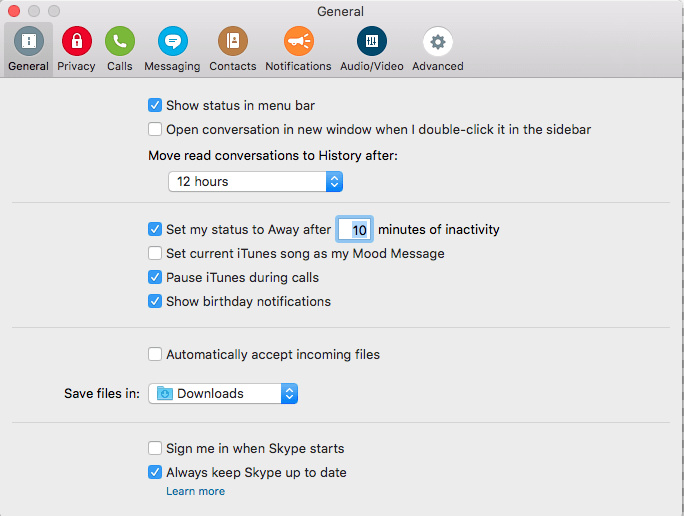
4. A window will appear. Look for the “Save files in” option. In front of it is the folder where all the files downloaded via your Skype are stored. You can open it up and delete the files in there or even change where the save directory is to a folder that’s more easily accessible to you for the sake of convenience.
Google Chrome
1. Open up your Chrome browser.
2. Press the “⌘” + “,” keys. Or, you can navigate to your Mac’s menu bar and select “Chrome.”
3. Choose “Preferences.”
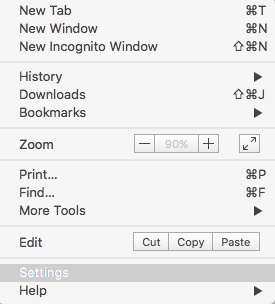
4. A window will appear. Look for the “Show advanced settings” option. Click on it.

5. Look for “Downloads.”
6. Open the folder up and “Trash” everything that’s in it.

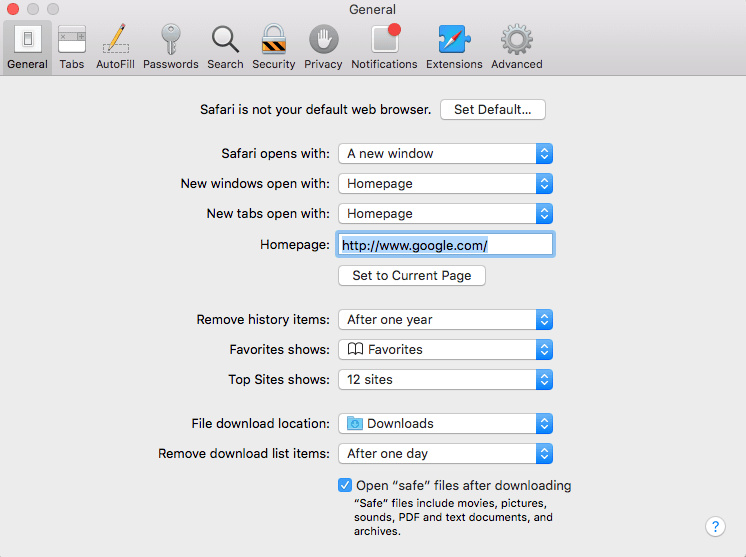
Safari
1. Open up your Safari browser.
2. Press the “⌘” + “,” keys. Or, you can navigate to “Preferences” via your Mac’s menu bar.
3. A window will appear. Look for “File download location.”
4. Open the “Downloads” folder up and “Trash” everything that’s in it.
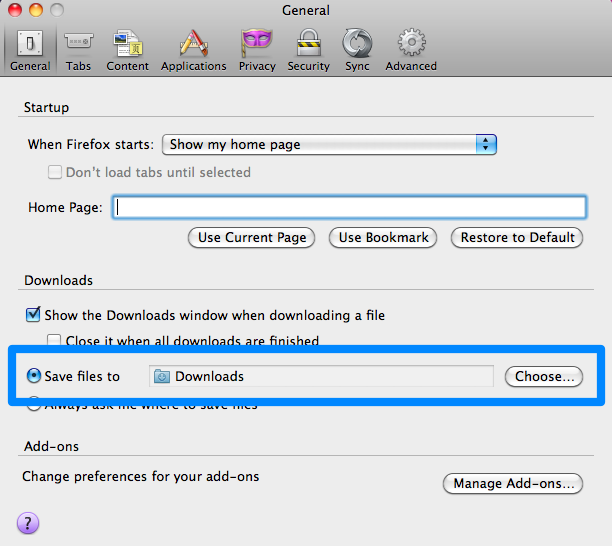
Firefox
1. Launch your Firefox browser.
2. Click on “Firefox” on your Mac’s menu bar.
3. In the drop-down menu, click on “Preferences.”

4. A new window will open up with the “General” tab open. You will see your Firefox’s default download location. All the files you downloaded will be there. Open it up and delete them.
Part 4: How to Recover Deleted Downloaded Files on Mac
You’ve learned how to locate your Mac downloads folder and delete the files in there but now you’re going to learn how to reverse that. Reverse the action? Yes, because situations abound when immediately after you delete files from a folder, you realize some of those files are extremely necessary. Hasn’t that ever happened to you?
This is a recurrent problem which has plagued many a Mac user. Matter of fact, it’s something that still happens to computer users the world over. Whether you deliberately or inadvertently delete the files, they’re still gone for good…or are they?
Introducing Recoverit Mac Data Recovery, the only solution you need to recover deleted files from your Mac. This powerful tool is capable of extremely important functions.
Recoverit doesn’t care if the files you deleted were pictures, videos, PDF files, audio files, etc. It can recover them all, and you only need to do this:
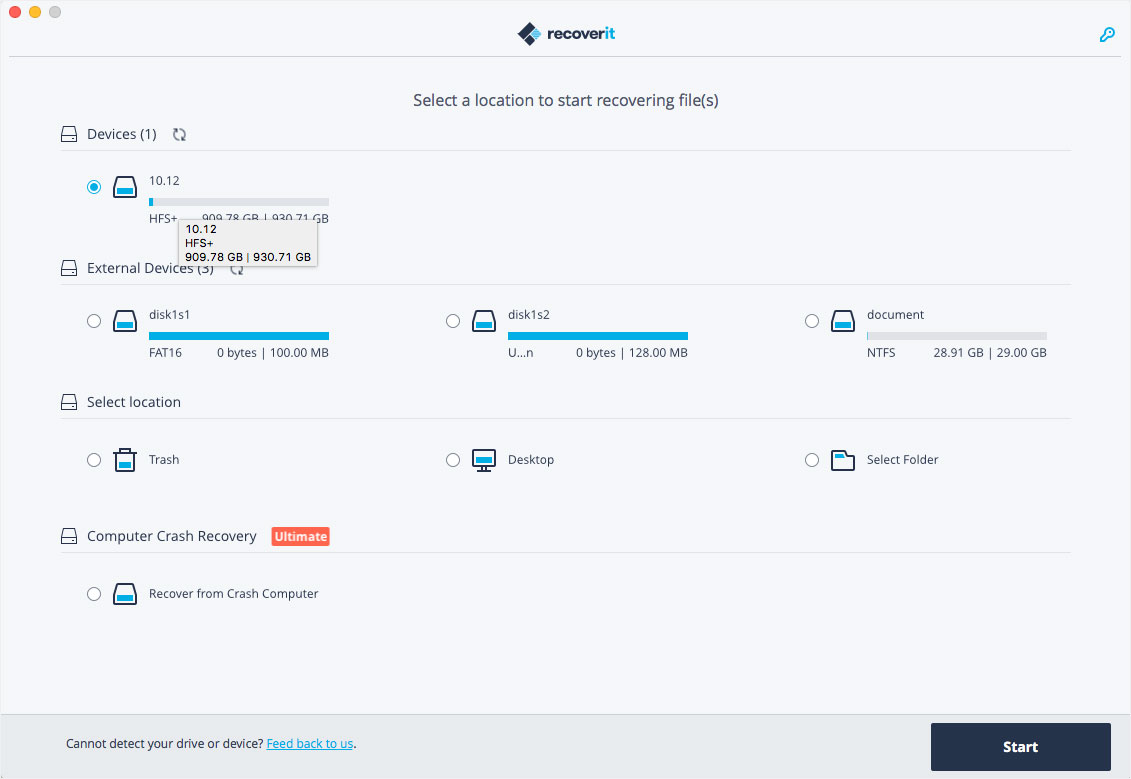
Step 1: Choose a Location
- Launch Recoverit and select the drive to be scanned. The drive should be where your Mac Downloads folder is located; where the deleted files once were. Click the “Start” button.
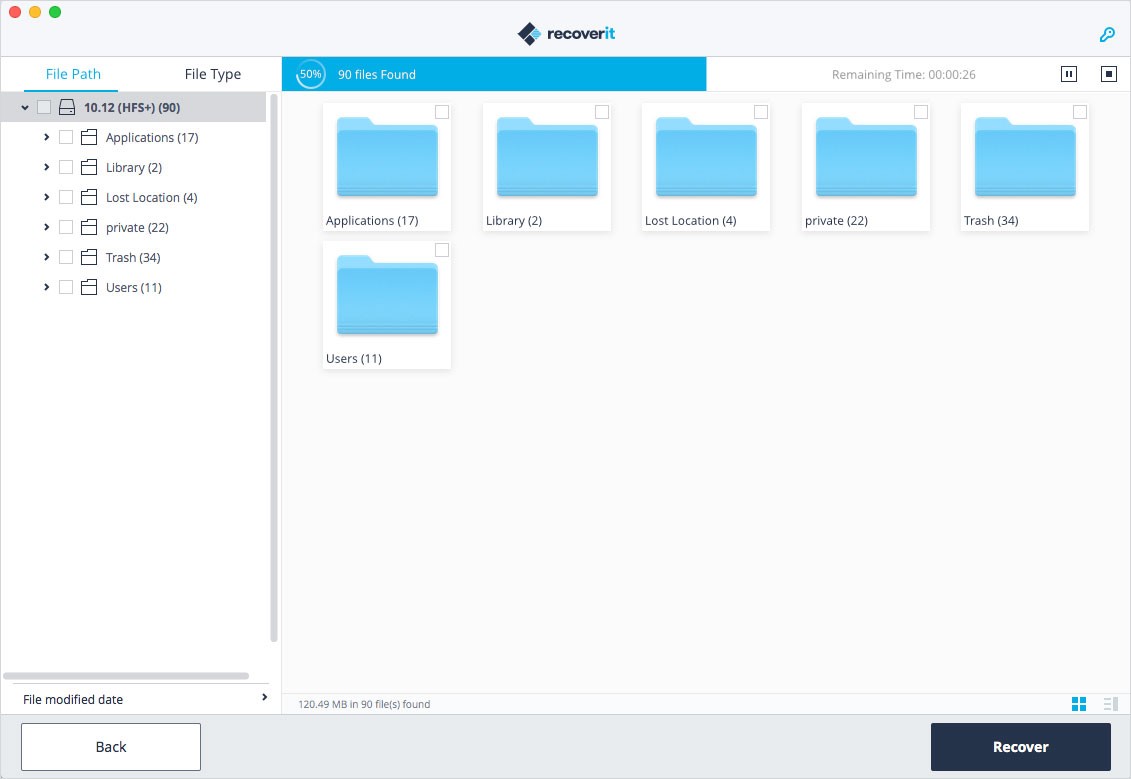
Step 2: Scan the Location
- The scan will commence and once it concludes, a window will display a preview of the deleted files. You can even tick and untick filters while the scan is still running to make your search easier and quicker if you’re seeking to recover particular file types and not everything. For example, you can utilize “File Type” or “File Path” to help streamline your search. And if for any reason you want to pause or stop the scan process, a feature has been provided that enables you to do that too.
Step 3: Preview & Recover Data
- A window will open up where you will be given a preview of the deleted files that can be recovered. Select the ones you want to recover.
- Click the “Recover” button at the bottom right. Your files will be recovered, regardless of what type they are: Audio, video, documents, etc.
- You are advised to save the recovered files in a different directory than the drive they were initially deleted from. And you’re all done!
You see how easy it is to use Recoverit Mac Data Recovery? The three simple steps are: Select a drive, scan it, then preview your files and finally, recover them.

Closing Words
Mac’s simplicity transcends more than just how you navigate around its various windows and interfaces. You can also see it’s very simple to utilize functions that other operating systems make difficult; functions like opening your downloads folder and getting rid of unneeded files to make way for more important ones.
And because Recoverit Mac Data Recovery has also taken this simplicity and incorporated it into its design, using the software to get back any deleted files is a breeze. You don’t have to stress yourself in anyway way whatsoever.
Just click a few buttons and let the software do all the work for you. It doesn’t get any better than that, does it?
What's Wrong with Mac
- Recover Your Mac
- Fix Your Mac
- Delete Your Mac
- Learn Mac Hacks



David Darlington
staff Editor