

 TL;DR:
To resolve the Windows "we couldn't update the system reserved partition" error, you must free up at least 13-15 MB of space in the partition by deleting unnecessary font files via Command Prompt or expand the EFI System Partition by shrinking the C: drive by 200 MB.
● Assign the drive letter Y to the partition in Disk Management, open an elevated Command Prompt, navigate to EFI\Microsoft\Boot\Fonts (or Boot\Fonts for MBR systems), and run the command del *.* to delete fonts and reclaim space.
● Execute chkdsk X: /f /r to repair bad sectors in the partition, or use DISM.exe /Online /Cleanup-image /Restorehealth and sfc /scannow to fix corrupted Windows image and system files blocking the update.
● Always verify if your system uses MBR or GPT before modifying partitions to prevent boot data corruption, and temporarily uninstall third-party antivirus software that might lock the partition space.
Ask AI for a summary
 ChatGPT
 Perplexity
 Gemini
 Claude
 Grok
Grok
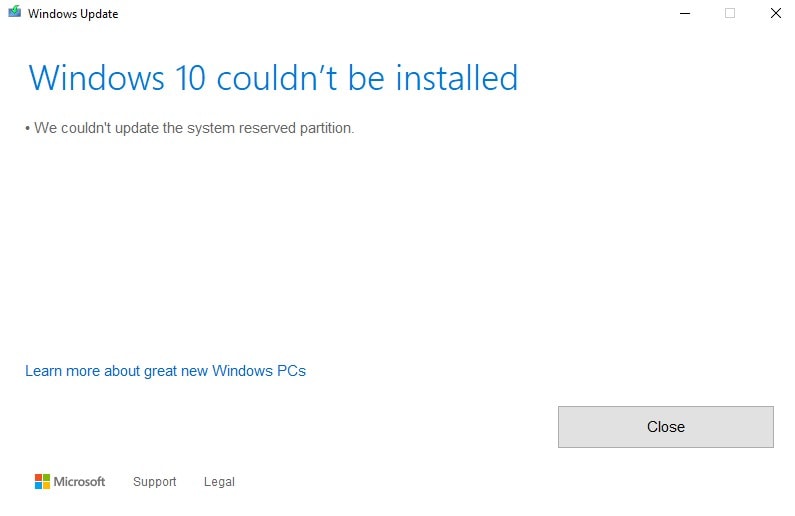
When updating Windows, you might have faced the “we couldn't update the system reserved partition” error. This problem is typically observed in cases where you attempt to install large updates or upgrades and become stuck. The major component involved in this process is the System Reserved Partition, which Windows relies on for rebooting and security files.
This article offers you a detailed guide on how to resolve this issue while highlighting the major reasons behind it. When trying to fix it, if you lose the System Reserved Partition, you’ll be introduced to an innovative recovery tool as well.
Try Recoverit to Perform Windows Data Recovery
 Security Verified. 3,591,664 people have downloaded it.
In this article
-
- Fix 1. Free Up Space by Deleting Font Files
- Fix 2. Expand the Size of EFI System Partition
- Fix 3. Move or Delete Unnecessary Files
- Fix 4. Check and Repair Partition Errors
- Fix 5. Disable Antivirus or Third-Party Security Software
- Fix 6. Repair Corrupted System Files Using SFC and DISM
- Fix 7. Run Windows Update Troubleshooter

Part 1. What Causes the Solved: "We Couldn't Update the System Reserved Partition" Error
Before you resolve the “we couldn't update the system reserved partition windows 11” issue, review the mentioned reasons causing it:
- Insufficient Free Space in System Reserved Partition: System Reserved Partition is a small part of the hard drive, but Windows needs this space to boot files and update data. Thus, if the partition is full mainly because of the security tools or antivirus program placing extra files, the update will not proceed.
- File System Corruption or Partition Errors: When the partition is damaged, Windows is not able to utilize it in updates. This may occur because of bad sectors in the hard drive or power outages. As this partition contains vital information about boot, Windows requires this to be in good health.
- Windows Update Component Issues: Sometimes, the error isn't caused by the partition itself but by the update system. If the Windows update components are broken, the background process freezes, and Windows can’t properly communicate with the System Reserved Partition.
- EFI or ESP Partition Nearly Full: On modern PCs with UEFI firmware, the EFI System Partition works like the System Reserved Partition. Hence, if it's clogged with old boot files, recovery data, or leftovers from past updates, new updates can’t be installed.
- Third-party Apps or Unusual Partition Usage: Certain antivirus or disk tools may save their own boot files, fonts, or settings in the partition. This can take up valuable space and leave little room for Windows updates, and cause failures.
Part 2. Precautions Before Fixing "We Couldn't Update the System Reserved Partition" Error
After understanding the reasons for “windows 11 we couldn't update the system reserved partition,” ensure to follow the given prerequisites before you try any solution:
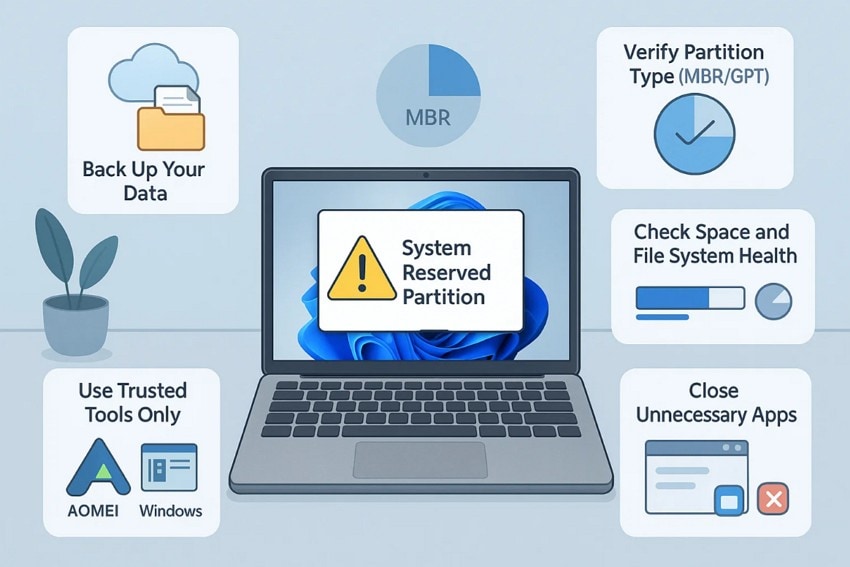
- Back Up Your Data: It is a good practice to always save your important files and system data first before doing any modifications to the partition. Any mistake in the partition control or command line program can cause severe data losses or render the PC inoperable.
- Verify Partition Type: Besides creating a backup, check whether the system uses MBR or GPT for its partitions. It's necessary because the step to resize the partition can differ depending on the type, and using the wrong method can corrupt your boot data or prevent updates.
- Use Trusted Tools Only: Always stick to a reliable partition assistant or Windows’ built-in Disk Management. Additionally, avoid using manual commands unless you are experienced and can reduce the risk of errors.
- Check Space and File System Health: Before modifying the partitions, ensure that there is enough free space and run checks for errors. When doing so, only delete or move necessary files to avoid damaging the system.
- Close Unnecessary Apps: To be on the safe side, shut down all programs and background processes before starting the partition fixes. This is essential because running apps can interfere with the partition changes and slow down or block the repair process.
Part 3. How to Fix "We Couldn't Update the System Reserved Partition" Error
To resolve the “couldn't update the system reserved partition” error, adhere to the given solution and know which one works best for you:
Fix 1. Free Up Space by Deleting Font Files
This solution is the reliable way to free up space and fix this error, mainly when the partition is nearly full. Know that Windows updates require at least 13–15 MB of free space in the partition to write boot configurations and upgrade data. So, removing the unnecessary font style via the given guide will help you reclaim the space without affecting your system’s core functions:
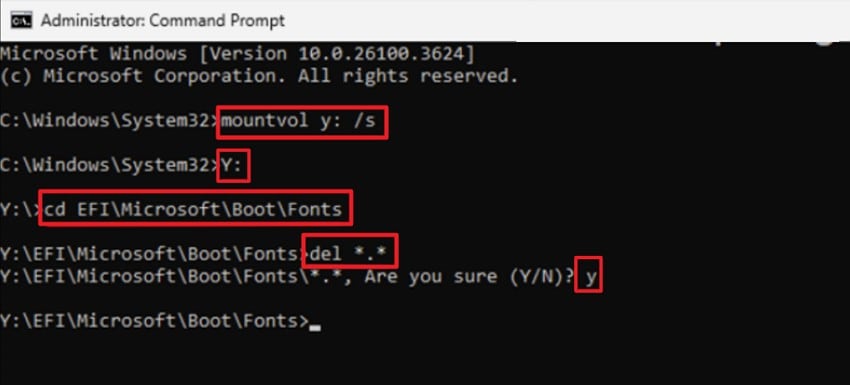
Step 1. In Disk Management, right-click on the “System Reserved Partition” and select “Change Drive Letter and Paths” to assign the drive letter “Y.”
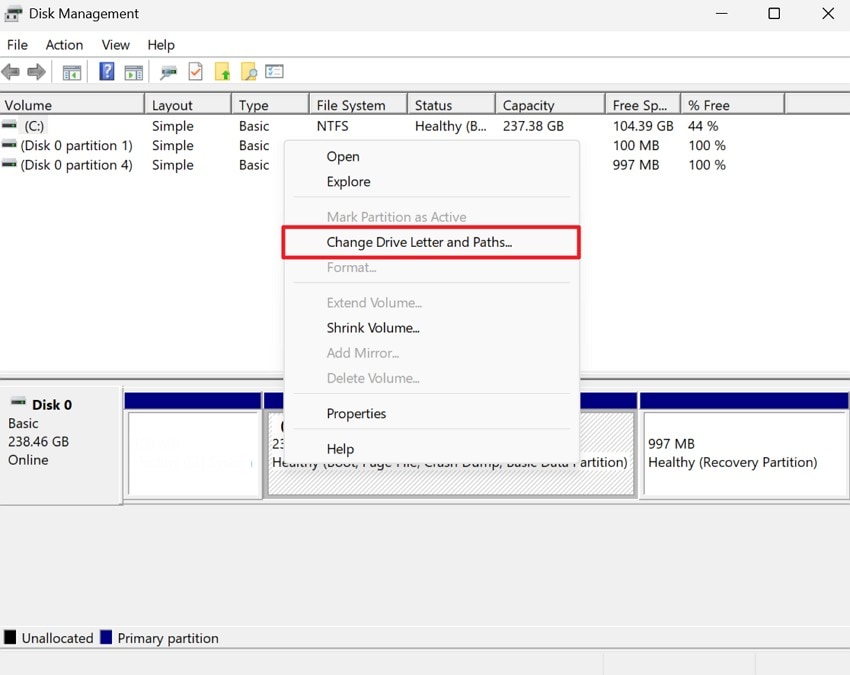
Step 2. After that, run Command Prompt as administrator, type “Y”, and hit the “Enter” button to navigate to the partition. Then, run “cd EFI\Microsoft\Boot\Fonts (or cd Boot\Fonts for MBR systems)” to move inside the font directory. Now, type “del *.* or del *.ttf” and hit the “Enter” key, and if prompted, type “Y” and choose “Enter” again. Once done, restart the PC and try to install the update again.
Fix 2. Expand the Size of EFI System Partition
To resolve the “windows 11 couldn't update the system reserved partition,” you can also try to expand the size of the EFI System Partition. This will help make space to install Windows boot and update files, particularly those of newer systems and versions, such as Windows 11. The presented tutorial is a permanent solution that guarantees the installation of further updates without difficulties:
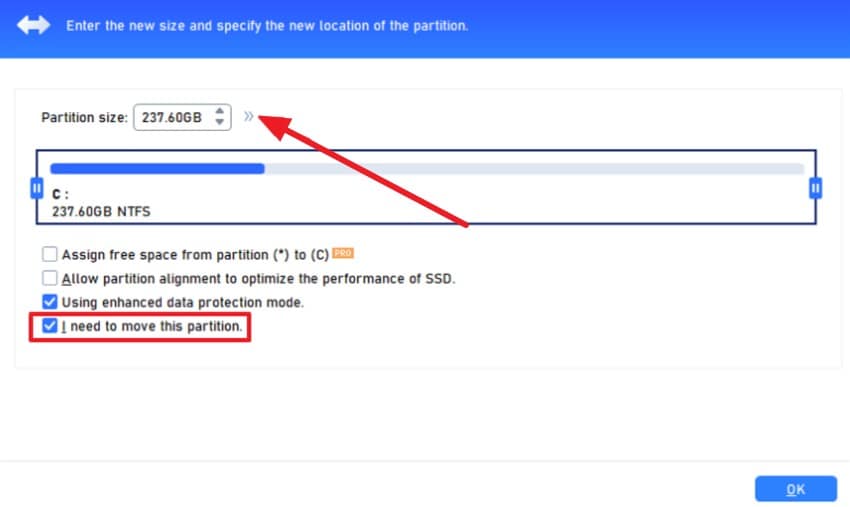
Step 1. Consider using a reliable partition assistant for this purpose. Once the platform has been launched and you have chosen the drive C:, select the "Resize/Move Partition".

Step 2. Next, select the “I need to move this partition” option and tap the arrows next to the “Partition Size” tab.
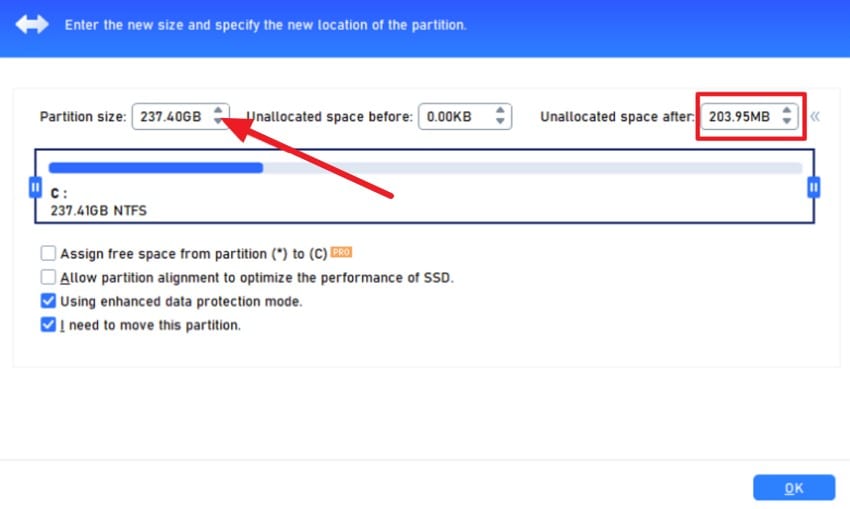
Step 3. Choose the “Partition Size” menu and decrease the size of the C: drive to 200MB. In the next step, allocate the space that was freed to the "Unallocated Space After" menu.
Fix 3. Move or Delete Unnecessary Files
When dealing with the “we couldn't update the system reserved partition” issue, try to move or delete the unnecessary files. It is able to clean up space for important boot files and updates quickly and usually fixes the issue even without resizing or re-creating system partitions.
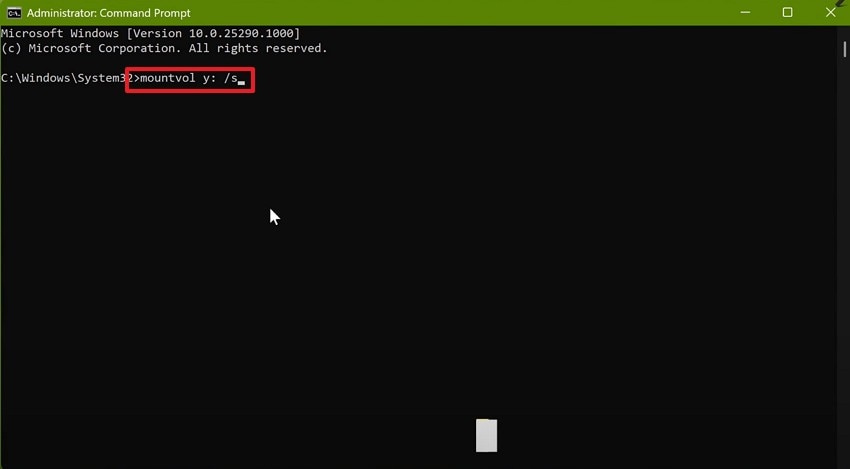
Instructions. Launch Command Prompt as administrator, type the command “mountvol y;/s”, and hit the “Enter” key. After that, follow the same steps given in Fix 1 to delete the unnecessary files.
Fix 4. Check and Repair Partition Errors
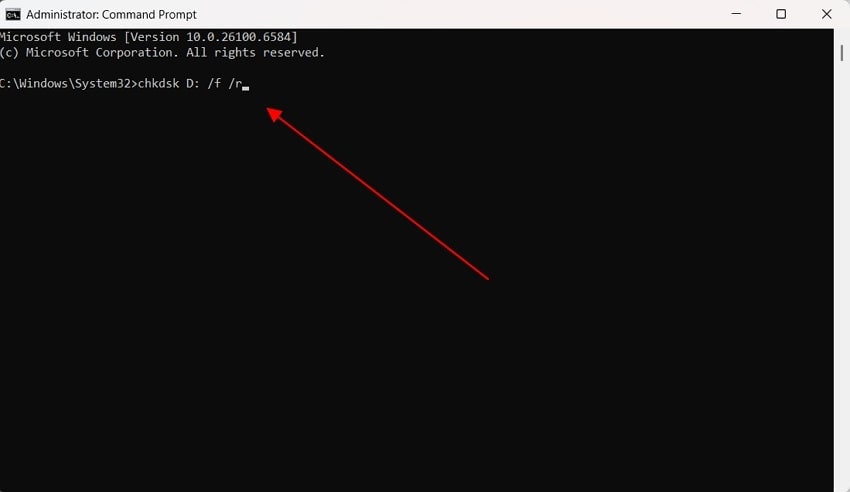
Try to check and repair the partition with an ideal partition manager to get rid of the “we couldn't update the system reserved partition windows 11” issue. Third-party applications or the built-in CHKDSK of Windows can be used to search for bad sectors, file system inconsistencies, and other errors. Plus, regular checking also helps maintain the health of boot managers and prevents future update failures:
Instructions. Navigate to the “Search” bar to start Command Prompt as an administrator. Continue to add the command “chkdsk X: /f /r,” which fixes the structural issues across a file system and repairs the corrupted parts of the drive, respectively.
Fix 5. Disable Antivirus or Third-Party Security Software
Note that attempting this solution can resolve the “windows 11 we couldn't update the system reserved partition” issue. It is because these programs often add their own files to the System Reserved Partition or lock it while running. It can prevent Windows from accessing the necessary space to update boot files and system data. Hence, temporarily turning off such software ensures the partition remains accessible, as guided below:
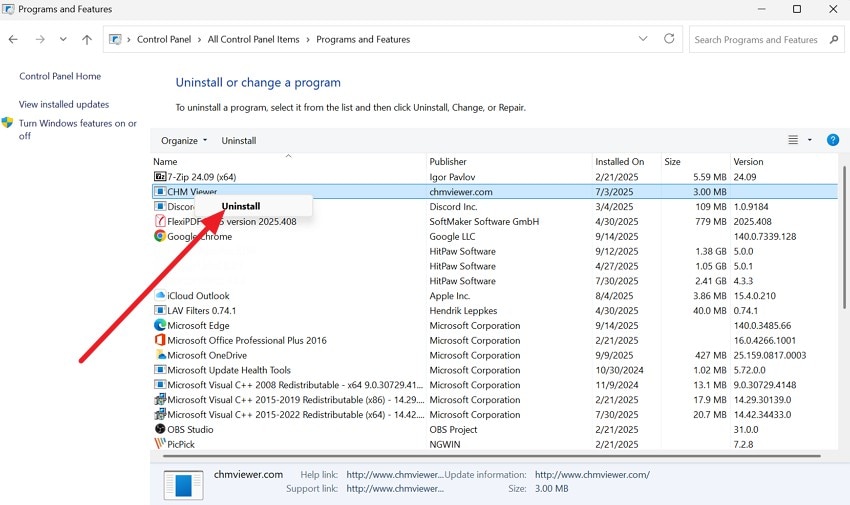
Instructions: To uninstall a program, head to the Control Panel and go to the “Programs and Features” tab. There, right-click on the program you want to remove and choose the “Uninstall” button. Then, restart the computer to ensure all the services and locked files are released.
Fix 6. Repair Corrupted System Files Using SFC and DISM
Repair the corrupted system file using SFC and DSIM, as there is a chance that even after freeing up space, damaged or missing system files can block updates. Hence, SFC scans and repairs protected system files, while DISM fixes the Windows system image, restoring any corrupted components. So, to resolve the “couldn't update the system reserved partition” issue via this solution, review the listed steps:
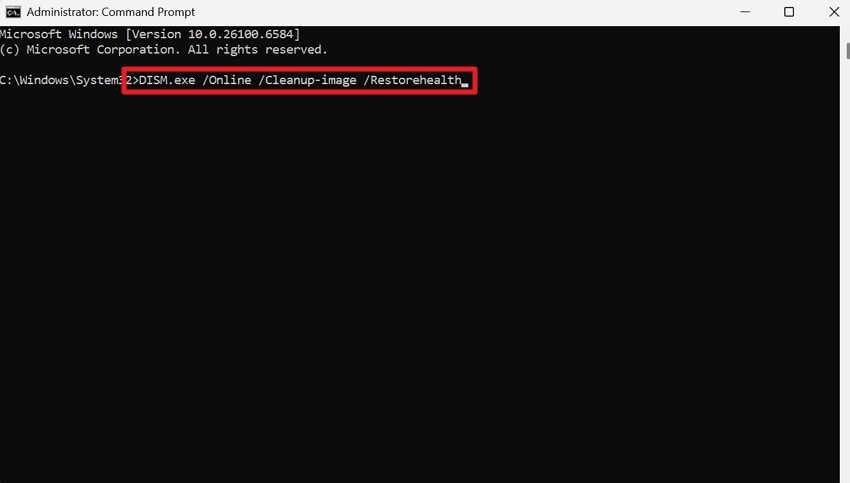
Run DISM to Repair the Windows Image:
Step 1. Open Command Prompt as Administrator and enter this command “DISM.exe /Online /Cleanup-image /Restorehealth” and wait till the process ends.
Run SFC to Scan and Repair System Files:
Step 2. In the same Command Prompt, type “sfc /scannow” and wait for SFC to complete its scan and automated repair of damaged files.
Fix 7. Run Windows Update Troubleshooter
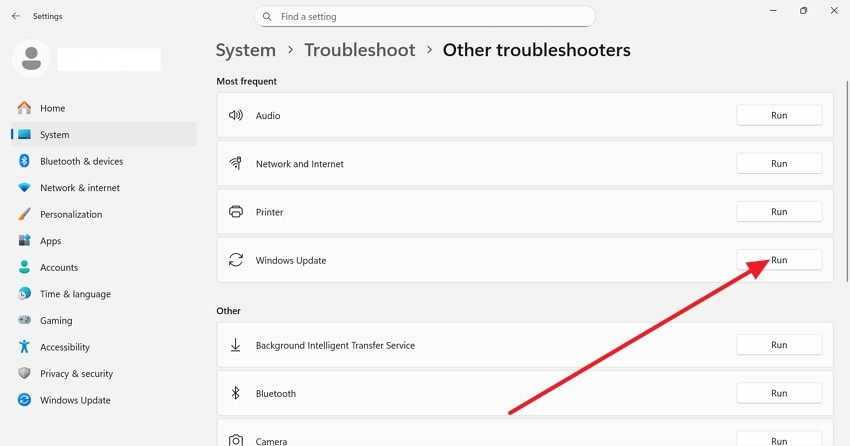
Running the Windows Update Troubleshooter is a helpful first step for resolving the “windows 11 couldn't update the system reserved partition” issue. It is a Microsoft-created tool that scans automatically to find the usual update issues, such as space, permissions, or system partition issues. It provides safe, guided fixes, helping Windows identify and repair underlying issues, as guided below:
Instructions. From the settings, head to the “System > Troubleshoot > and > Other Troubleshooters” tab. Next, locate the “Windows Update” option, press the “Run” option beside it, restart the system, and then try rerunning Windows Update.
Part 4. Recover Data or Restore Lost System Reserved Partition (When Missing or Inaccessible)
When trying to resolve the “we couldn't update the system reserved partition” issue, if you have lost data or the System Reserved partition, use Wondershare Recoverit. This utility allows you to restore lost files or partitions on different storage media, such as Windows/Mac and Linux. It also supports various partitions, such as exFAT, FAT16, FAT32, NTFS, ReFS, HFS+, along with seamless restoration.
For retrieving lost data or a partition, the tool performs a quick scan and allows you to track performance with a preview facility. Users have complete control over data retrieval and can stop or resume the process when needed. Additionally, users can restore the files in batches to save the manual hassle, as the tool requires zero expertise.
Key Features
- Diverse Compatibility: This tool is compatible with Windows 11/10/8.1/8/7/Vista, and also with macOS.
- Image Recovery: The program enables you to restore images of different formats, such as CRW, JPEG, JPG, PNG, PSD, RAW, etc.
- Outlook & Archives Recovery: As a versatile option, it enables the recovery of Outlook & Archives, including BKL, BKS, EDB, EML, EMLX, etc.
Detailed Guide to Restore Data or Restore Lost System Reserved Partition with Recoverit
After learning how to deal with the “windows 11 we couldn't update the system reserved partition” issue, here is how Recoverit restores the lost data or partition:
Step 1. Access Recoverit and Locate the Targeted Drive
Within the “Hard Drivers and Locations” tab, select the hard disk under the “Quick Access” or “External Drives” tab after launching the tool.

Step 2. Start the Quick Scanning and Wait Till it Ends
The tool will initiate a quick scanning process to locate lost data or partitions, which you can pause at any time.

Step 3. Preview the Retrieved Files in Batches and Restore
When the process ends, preview the retrieved file and choose the “Recover” button to fetch it to the device.

Conclusion
Summing up, if you are facing the “we couldn't update the system reserved partition” issue, this guide has given you various fixes. Review the detailed steps, follow the prerequisites, and determine which solution works for you. If you face any data or partition loss in this process, Recoverit allows you to recover in batches with a preview facility.
FAQ
-
1. What is the System Reserved Partition in Windows?
The System Reserved Partition is a small part of the hard drive that stores essential boot files and recovery data. Windows employs such partitioning during booting up and updating in order to control boot operations, security, and recovery of the system. -
2. How much free space do I need in the System Reserved Partition for updates?
Windows updates usually need at least 13–15 MB of free space in the partition for boot files and system upgrade data. On newer UEFI systems, the EFI partition may require 100–500 MB free to store updates and boot configurations successfully. -
3. Should I disable the antivirus before fixing this error?
Yes, temporarily disabling antivirus software prevents the software from blocking access to the System Reserved Partition during updates or repairs. This ensures Windows can safely write necessary files, perform updates, and fix partition-related errors without interference from security programs.


