
 TL;DR:
You can partition a Windows hard drive to organize files or dual-boot operating systems by using the built-in Disk Management tool with formatting, or by using third-party software to modify the disk without formatting.
● Windows Disk Management capabilities depend on your OS version; Windows Vista through Windows 10 allow you to shrink and extend volumes, while Windows 2000 and XP are limited to creating, deleting, and formatting partitions.
● Partitioning without formatting requires a tool like AOMEI Partition Assistant Professional, which allows you to split an existing partition that is not completely full or directly reallocate free space between partitions.
● Creating multiple partitions isolates your operating system from personal data to minimize loss during system crashes, but it degrades disk performance during frequent cross-partition data access and offers no protection against physical drive failure.
Ask AI for a summary
 ChatGPT
 Perplexity
 Gemini
 Claude
 Grok
Grok
In this article
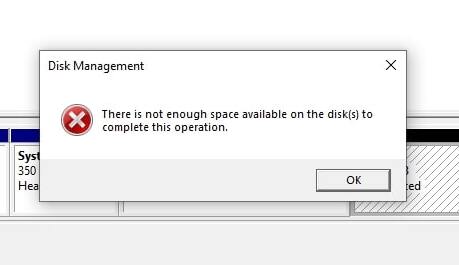
Partitioning a hard drive is important on Windows 11/10 as it helps you better organize your files and allows you to easily separate storage for program files, data files, and operating systems. However, partitioning your hard drive can be complex if not done correctly, as data loss is possible during the disk partitioning process.
This comprehensive guide will look at how to partition hard drives with or without formatting. We’ll also go over how the partitioning process will be safe.
Part 1. What Does Partitioning a Hard Drive Mean?
Partitioning a hard drive is dividing a physical hard disk into several partitions and managing the hard disk drive by shrinking, extending, deleting, creating partitions, and changing partition size, label, location, etc.
Why is it necessary to partition a hard drive? Here are some of the most common reasons for partitioning a new or existing hard drive:
- Run multiple operating systems: If you want to run different operating systems on the same computer, you'll need several separate partitions because each system requires its partition.
- Better data organization: After partitioning a hard disk into several logical drive partitions, you can more precisely organize your data on each partition, such as one for your operating system, one for your data, and so on.
- Lessen the risk of data loss: By creating separate partitions for your operating system and other personal data, you can keep your files safe and minimize data loss when the operating system crashes and requires reinstallation.
Will you lose data when you partition a hard drive? It depends. Partitioning a drive does not necessarily erase data, but it can lead to data loss if not done carefully. Learn more in the article Does partitioning a drive erase data?
Part 2. How To Partition a Hard Drive With Formatting?
Disk Management, a built-in tool in Windows, can partition a hard drive with formatting on Windows 10.
Note: Before partitioning a hard drive with Disk Management, you should know that it has different features in different Windows operating systems.
- Disk Management in Windows 10/8/7, Vista, and Windows Server 2008 can shrink volume, extend volume, shrink volume, create volume, delete volume, and format volume on a hard drive.
- Disk Management in Windows 2000/XP and Windows Server 2003 can only create a partition, delete a partition, format a partition, and change the drive letter on a hard drive.
Partition a New Hard Drive With Disk Management
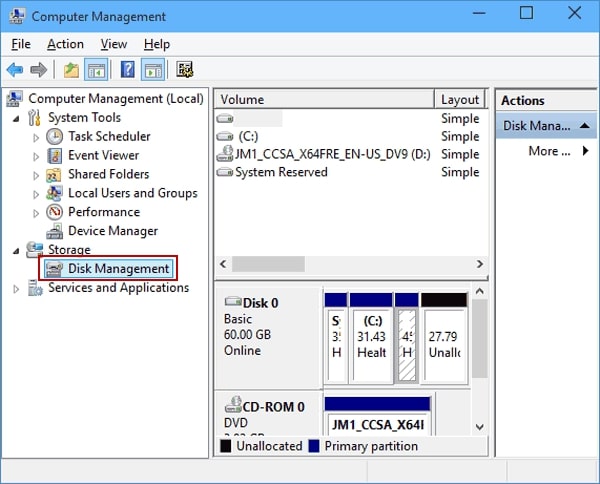
Step 1. Right-click This PC/My Computer > Manage > Device Manager > Disk Management.
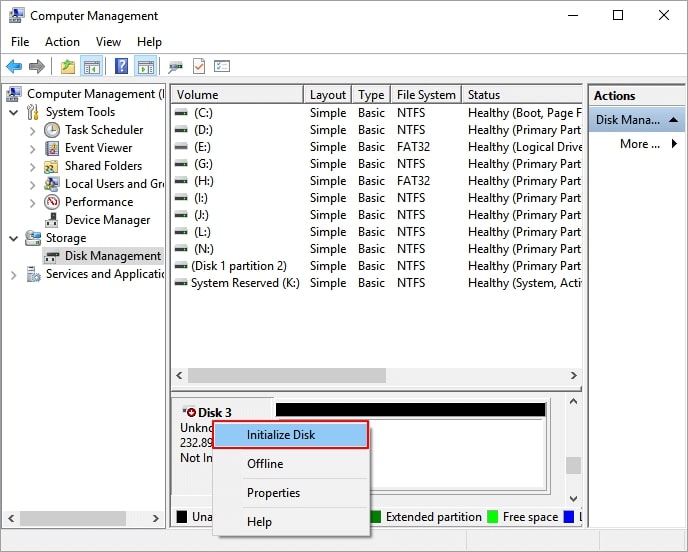
Step 2. Set up the new hard drive.
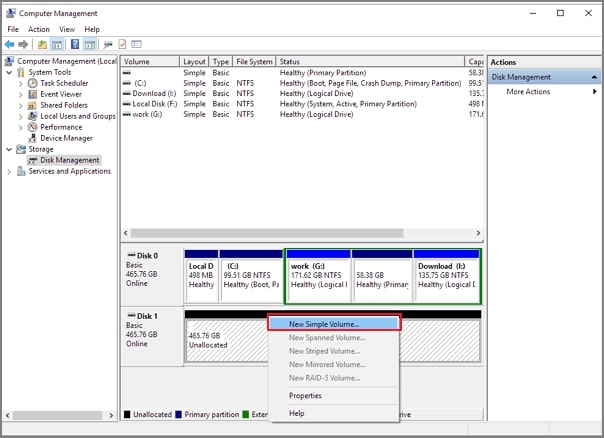
Step 3. Right-click the unallocated space to make a new partition and select New Simple Volume. Then, select the volume size, drive letter, and file system.
Partition an Existing Hard Drive With Disk Management
Step 1. Launch Disk Management.
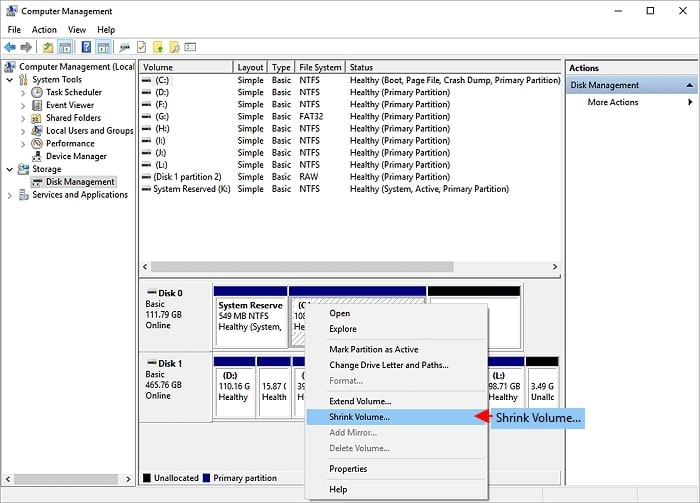
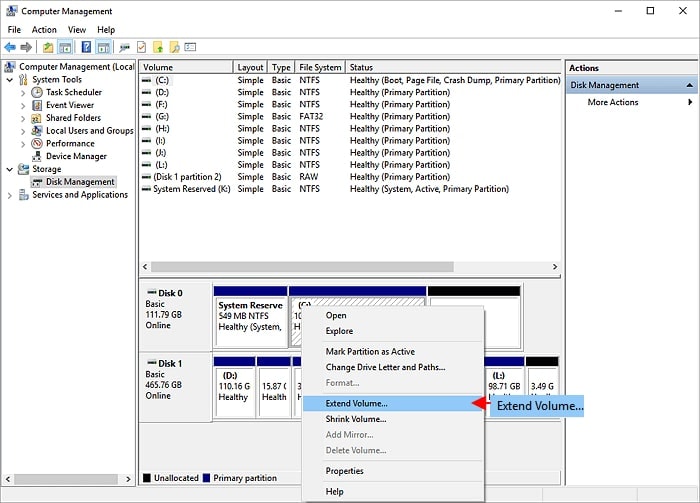
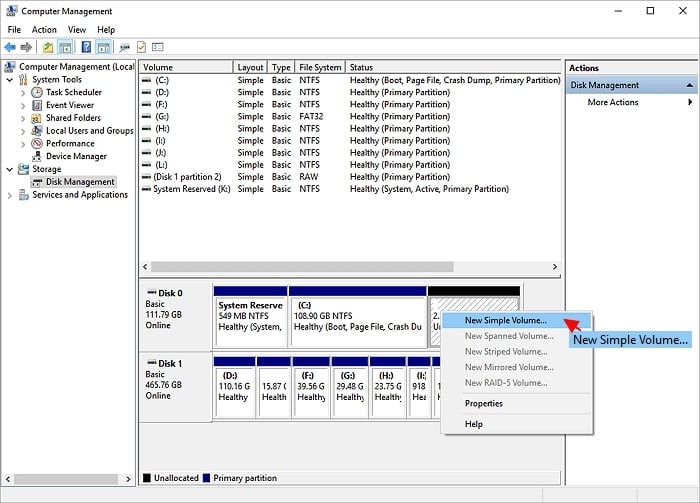
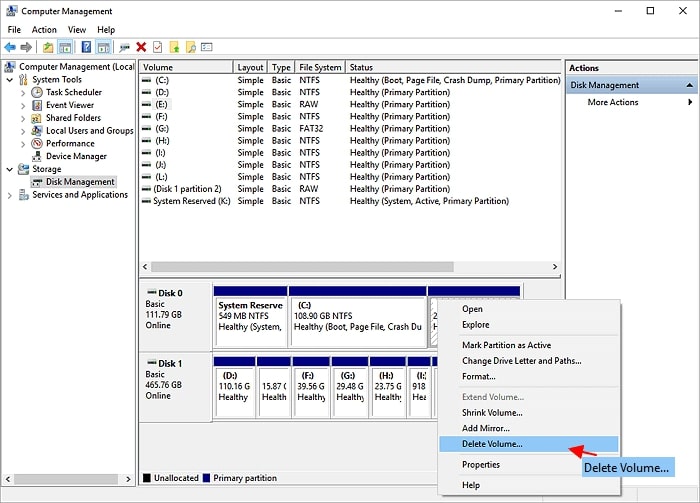
Step 2. Partition your hard drive. Right-click the partition first and do the following:
- Select Shrink Volume. Change the partition size and press Shrink to confirm.
- Select Extend Volume. To proceed, click Next and add the unallocated space to the target partition. To finish, press Next and Finish.
- Choose New Simple Volume. To proceed, click Next, then specify the new partition size, drive letter, and file system. Tap Finish.
- Select Delete Volume. Press Yes.
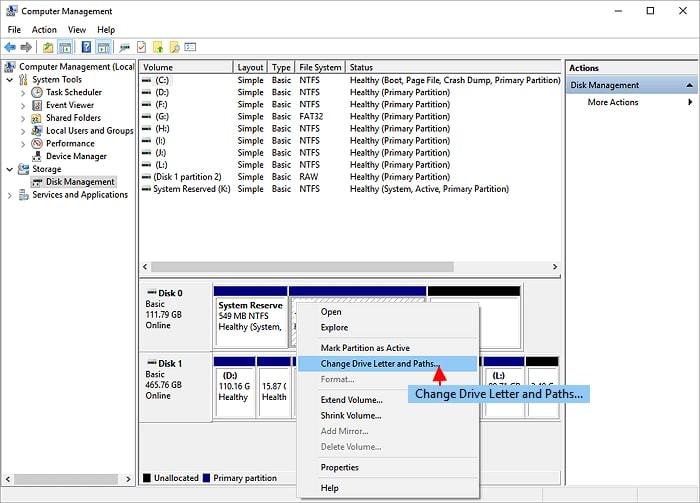
- Select Change Drive Letter and Paths. To change the drive letter for your partition, click Change.
You may also like: How To Partition a Hard Drive on Windows 11?
Part 3. How To Partition a Hard Drive Without Formatting?
You can use a third-party disk partition manager, such as AOMEI Partition Assistant Professional, to partition a hard drive without formatting. It is compatible with all Windows 11/10/8/7/XP/Vista versions (32-bit and 64-bit). In addition, it has various features such as Merge Partition, Split Partition, Move Partition, Allocate Free Space, etc.
The "Merge Partition" function is recommended if you merge unallocated space into an existing partition. On the other hand, "Split Partition" can be used to divide a large partition into two smaller ones. Furthermore, the "Quick Partition" feature is ideal if you partition a new hard disk. The following sections will demonstrate partitioning a hard drive without formatting using those three functions.
Method 1. Divide the Partitions
To create a new partition, you can only split the unused space of an existing partition. You cannot split the partition if a partition is completely used up.
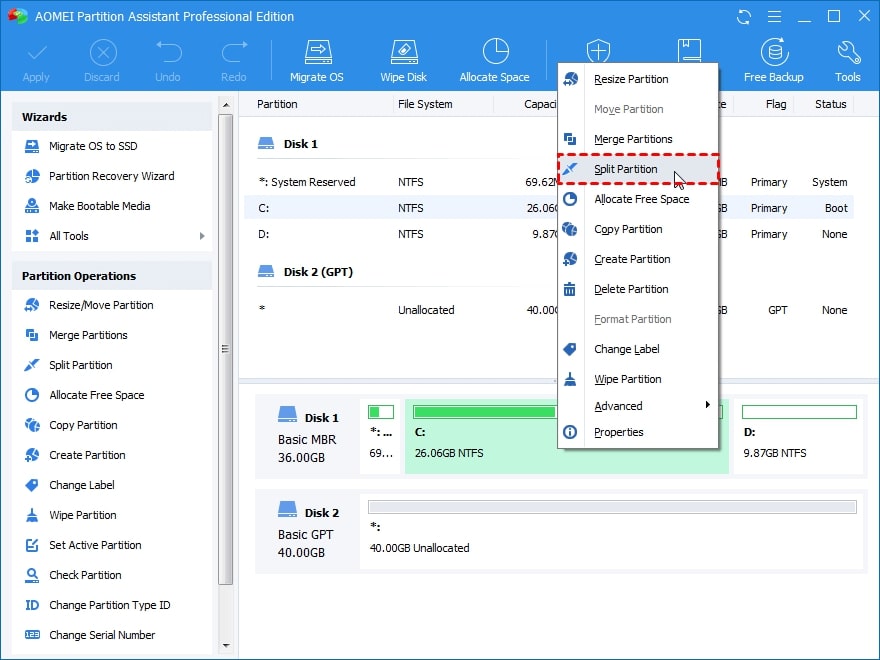
Step 1. Install and run the AOMEI Partition Assistant. Right-click the partition you want to split and choose Split Partition.
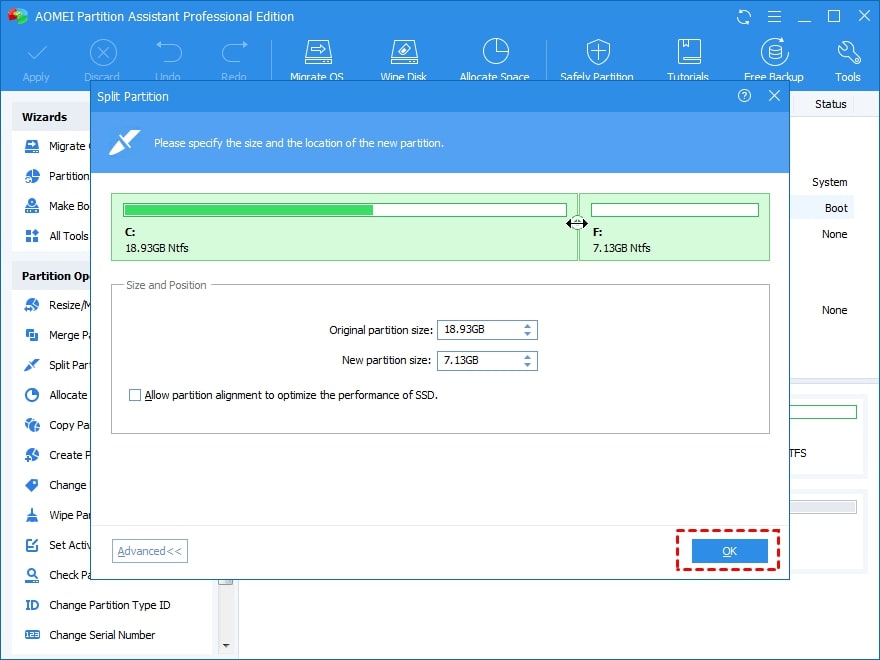
Step 2. You can change the partition sizes. You can also type in the size you want. Click OK to continue.
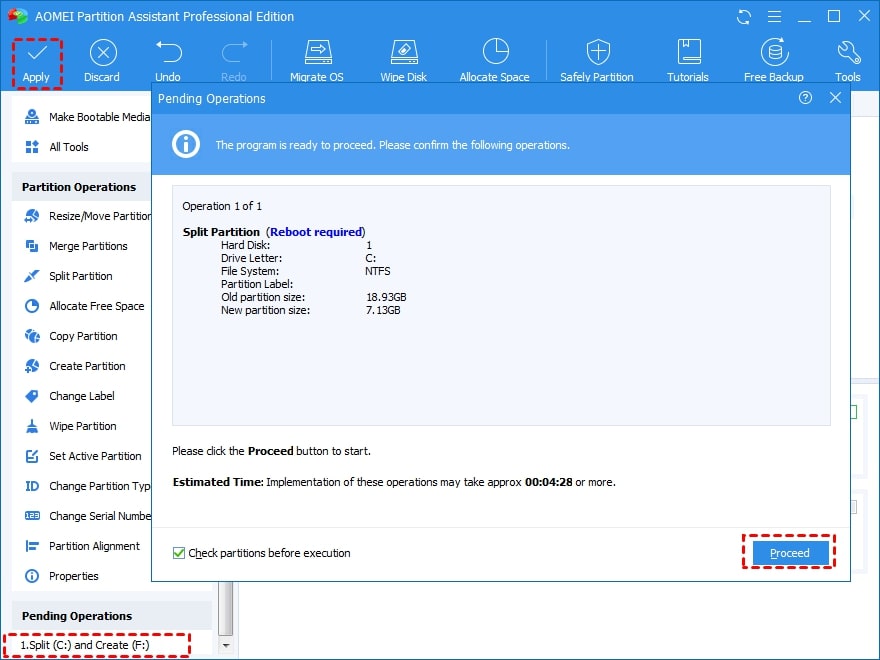
Step 3. To confirm the change, click Apply and Proceed.
Method 2. Transfer Available Space
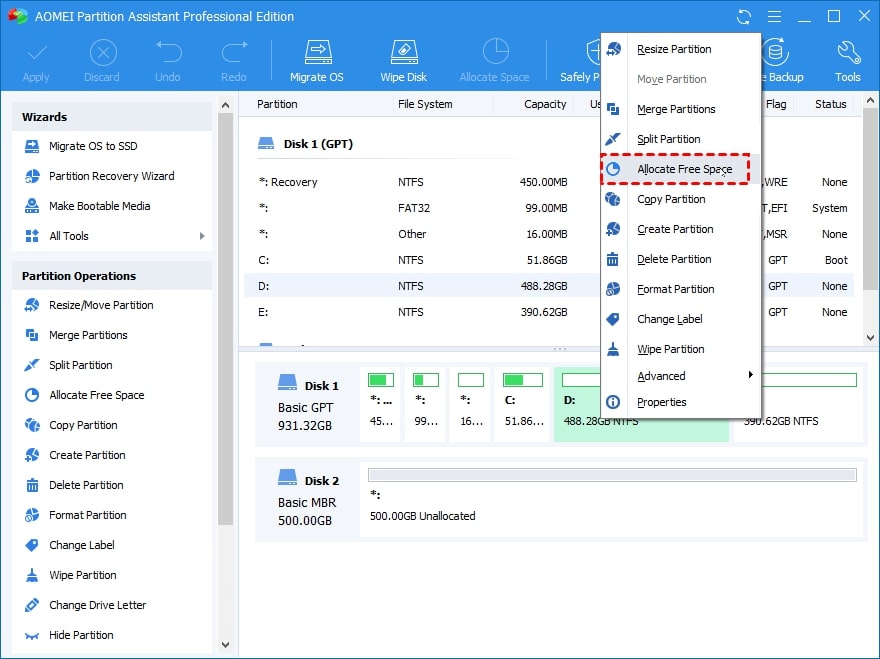
If one partition is nearly full, but another has plenty of free space, the Allocate Free Space feature allows you to assign free space from one partition to another directly.
Step 1. Right-click the free space partition and select Allocate Free Space.
Step 2. You can choose how much space to give to each partition here.
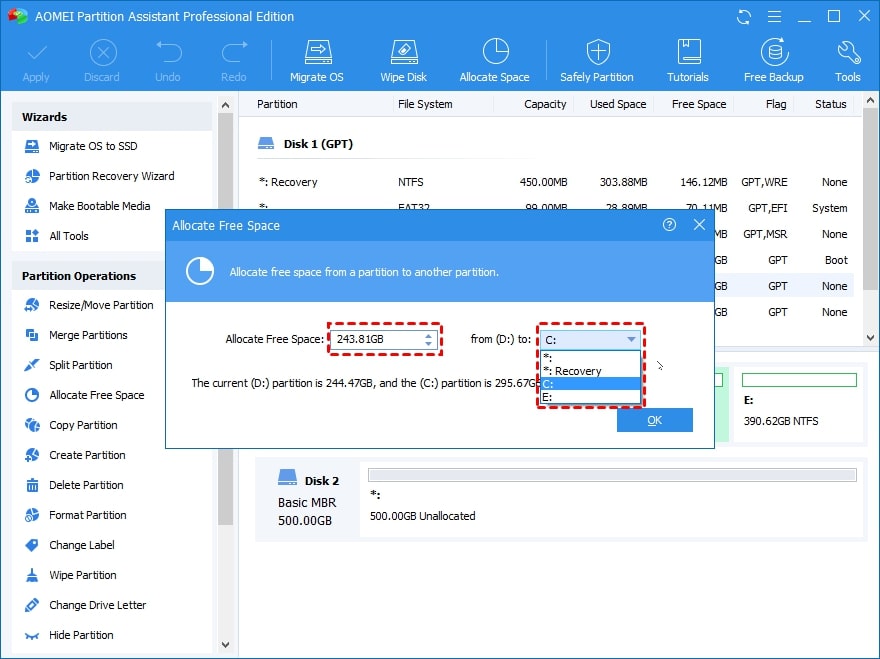
Step 3. To commit the pending operation, click Apply.

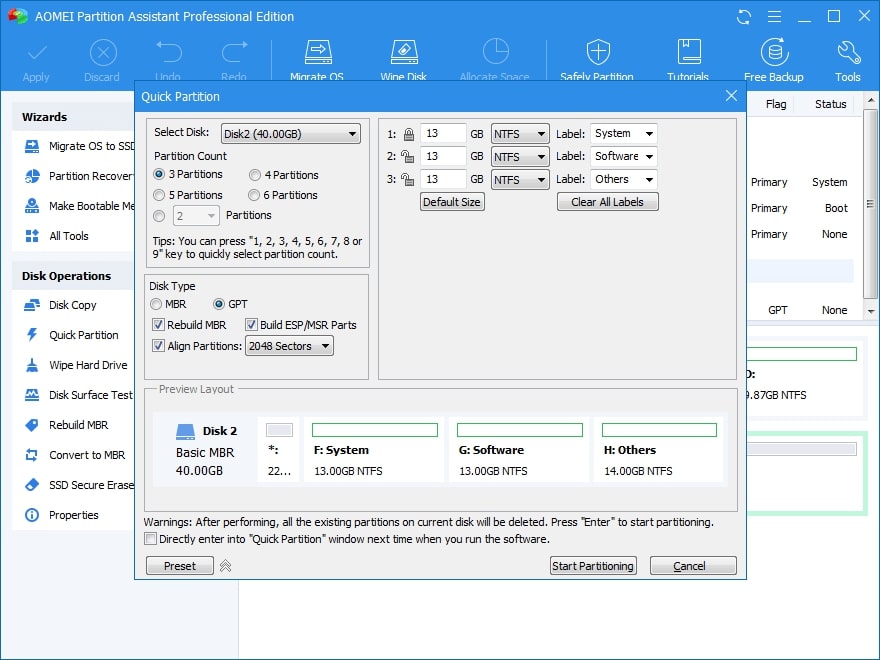
Method 3. Quick Partition
You can use AOMEI Partition Assistant Pro's Quick Partition function to partition a hard disk without formatting.
Step 1. Launch AOMEI Partition Assistant after the installation.
Step 2. Choose the Quick Partition option on the left panel or right-click the hard disk you want to partition and then select Quick Partition from the drop-down menu.
Step 3. Set the partition parameters such as partition count, partition type, partition size, etc. on the pop-up Quick Partition window. Finally, click the Start Partitioning button to partition a hard disk without formatting.
Part 4. Tool That Makes the Partitioning of Hard Disk Safe
One of the terrifying consequences of partitioning your hard drive is "data loss." No matter how carefully you partitioned the disk, there is a chance that you will lose some or all of the data due to the formatting process. If an unexpected data loss occurs, you’ll need secure third-party hard disk data recovery software.
Fortunately, here’s Wondershare Recoverit to help you. This data recovery software will instantly recover data from deleted files and partitions. Regardless of drive size, the tool can recover permanently deleted data from a hard drive unlimited data in a very short period.

Wondershare Recoverit – Leader in Data Recovery
5,481,435 people have downloaded it.
Recover lost/deleted data from formatted hard drives, raw hard drives, and lost or resized partitions.
Full data recovery is supported for all devices with NTFS, FAT16, FAT32, HFS+, APFS, and other file systems.
Recover over 1000 file types from almost any storage media, such as SSDs, HDDs, USB drives, SD cards, external hard disks, etc.
The Advanced Deep-Scan algorithm digs deeper into the data structure and achieves a record-breaking 96% data recovery rate.
Steps to Recover Data From a Partitioned Hard Drive
Step 1. Select the Hard Drive
Launch Recoverit and select the partitioned hard disk where you have lost data during the partitioning process.

Step 2. Scan for Lost Data
The partitioned hard disk recovery software will scan the drive for the missing data and files.

Step 3. Preview and Recover
You can preview all detected files like photos, videos, music, and office documents during or after the scanning. Finally, select your desired files and click Recover.

For Windows XP/Vista/7/8/10/11
For macOS X 10.10 or later
Part 5. Does Partitioning a Hard Drive Affect Performance?
Partitioning a hard drive can either improve or degrade performance. Whether or not to create multiple partitions is a matter of personal preference. Partitioning allows users to save data by category, making accessing, organizing and managing data easier. It can also improve overall computer performance on systems with smaller file systems.
On the other hand, partitioning a hard drive reduces disk performance on systems where data is accessed frequently and with multiple partitions because it forces the disk to access data on each partition.
Part 6. Should You Partition Your Hard Drive?
Hard drive partitioning is one such topic that sparks heated debate. Some people strongly believe disk partitioning can improve performance and make data backup easier. However, others believe improper disk partitioning may jeopardize one’s system's security and performance.
The truth, however, lies somewhere in the middle. Knowing the benefits and drawbacks of a hard disk partition ahead of time can help you decide whether to go for it or not.
Benefits of Partitioning a Hard Drive
Why should you partition your hard drive? Here are some significant reasons to partake in this procedure.
1. Improved Data Organization
Partitioning allows you to organize your files to make searching for a specific file more straightforward and seamless.
2. Simpler Backup Process
When you have two or more partitions, you can easily select which one needs to be backed up. It will simplify the backup process by reducing backup file sizes and processing time.
3. Data Security
Disk drive partitioning can aid in the security of sensitive data. It is possible to avoid malware attacks by implementing strict security protocols, data encryption, and an additional firewall on the partition containing sensitive data. Drive partitions can be useful when a specific partition is corrupted because you can use previous backups to restore that partition.
4. Several File Systems
A hard disk partition enables you to use multiple file systems.
5. Dual Booting
It is the capacity to perform 2 distinct operations in a single device. Furthermore, a hard disk partition allows you to install multiple operating systems on your computer in different partitions.
Disadvantages of Partitioning a Hard Drive
In contrast hand, there are several reasons why you should avoid partitioning your hard drive. Here are a few examples.
1. False Sentiment of Safety
Having multiple partitions can lead to a data loss disaster if you're not careful. While Windows displays separate entries for each partition you've created, they all reside on the same physical drive. As a result, if your hard drive fails, you will lose everything on it.
2. Complexity and Error Probability
If you have multiple partitions, you will likely lose the organizational benefits simply by keeping track of them. Even if you have an extra partition or two, you will still need to configure Windows to save your files and software on the other partitions. It is more complicated than saving everything on a single partition and is unnecessary for most people.
3. Wasted Space
Aside from filling the drive, you don't have to worry about overall disk space with a single disk partition. However, when using multiple partitions, you may have limited space on one partition but plenty of free space on another. Because of the limited space, you may lead to worse scenarios.
Summary
You may partition your hard drive if you encounter the following scenarios:
- To arrange files systematically and avoid data redundancy
- To enhance system performance and improve security
- If you intend to run more than one operating system on your computer.
The Bottom Line
There are several considerations to ensure nothing goes wrong when partitioning your hard drive with or without formatting. You can employ Disk Management or a third-party tool. Before performing any partitioning on your Windows computer, it's a good idea to back up your important files. If you lost data after the partitioning, you could also use Wondershare Recoverit to help get data back.
For Windows XP/Vista/7/8/10/11
For macOS X 10.10 or later


