Google Photos stores millions of photos. A large number of users seek ways to delete images from Google Photos. This guide walks you through the process of removing photos from your Google account. We'll cover all the different methods available to ensure you can manage your photo library with ease.
Deleting photos can free up space. It also protects your privacy. Whether you're looking to permanently erase images from Google Photos or simply need a quick way to delete a picture, this guide covers every approach to suit your needs.
Learning how to delete Google Photos is important. We will show how can I delete photos from Google Photos step by step. You'll also discover how to retrieve deleted photos from Google Photos, in case you ever need to.
Follow our simple steps to remove Google Photos safely.
Table of Contents
-
- Method 1: Turn Off Backup & Sync Before Deleting
- Method 2: Use Google Photos Web to Select and Delete in Batches
- Method 3: Delete Photos from Google Photos Mobile App (Android/iOS)
- Method 4: Use Shift + Click to Select Multiple Photos Quickly
- Method 5: Empty Trash to Permanently Remove Deleted Photos
- Method 6: Check Archive and Shared Albums for Hidden Photos
Part 1: Common Reasons – Why Users Want to Delete Google Photos
Many people ask how can I delete Google Photos for various reasons. Understanding why helps you choose the best deletion method.
- Privacy Issues: Many users are concerned about the safety of their personal images and how their data is handled within Google Photos.
- Storage Constraints: Google Photos can consume significant storage space, prompting users to manage or delete content to free up room.
- Duplicate Photos: Multiple copies clutter your photo library
- Account Management: Cleaning up old accounts and unused services
- Service Migration: Moving to different photo storage platforms
- Family Sharing Issues: Problems with shared albums and permissions
- Photo Organization: Removing unwanted photos for better organization
- Security Breaches: Protecting photos after security concerns
Part 2: Can I Delete All Google Photos Easily?
Deleting all photos from Google Photos is possible but takes time. Google does not offer a single "delete all" button. You must delete photos in batches or use specific methods.
The process requires patience and planning. The process of deleting photos from Google Photos varies depending on the size of your collection. If you're dealing with a large number of images, it may take more time and require a more methodical approach to ensure everything is properly removed.
Part 3: How to Delete All Photos from Google Photos
Learning how do I delete a photo from Google photos starts with understanding the process. Google offers multiple options for removing photos, depending on your device and preferences. Each method works for different situations and user needs.
We will show you how can I delete photos from Google Photos using six proven methods. These steps help you remove photos from Google Photos safely and completely.
Method 1: Turn Off Backup & Sync Before Deleting
Turn off backup before you delete Google photos. This prevents new photos from uploading while you work. It also stops deleted photos from syncing back to your device.
Backup and sync can cause problems during deletion. New photos might upload while you delete old ones. This creates confusion and makes the process longer. Turning off backup gives you control over what happens.
Google Photos automatically syncs across all your devices. When you delete photos, sync might restore them from other devices. This defeats the purpose of deletion. Always turn off backup first to avoid these issues.
Why use this method:
- Prevents new uploads during deletion process
- Stops sync conflicts between devices
- Gives you full control over the deletion process
Steps:
Step 1. Open the Google Photos app or web browser.
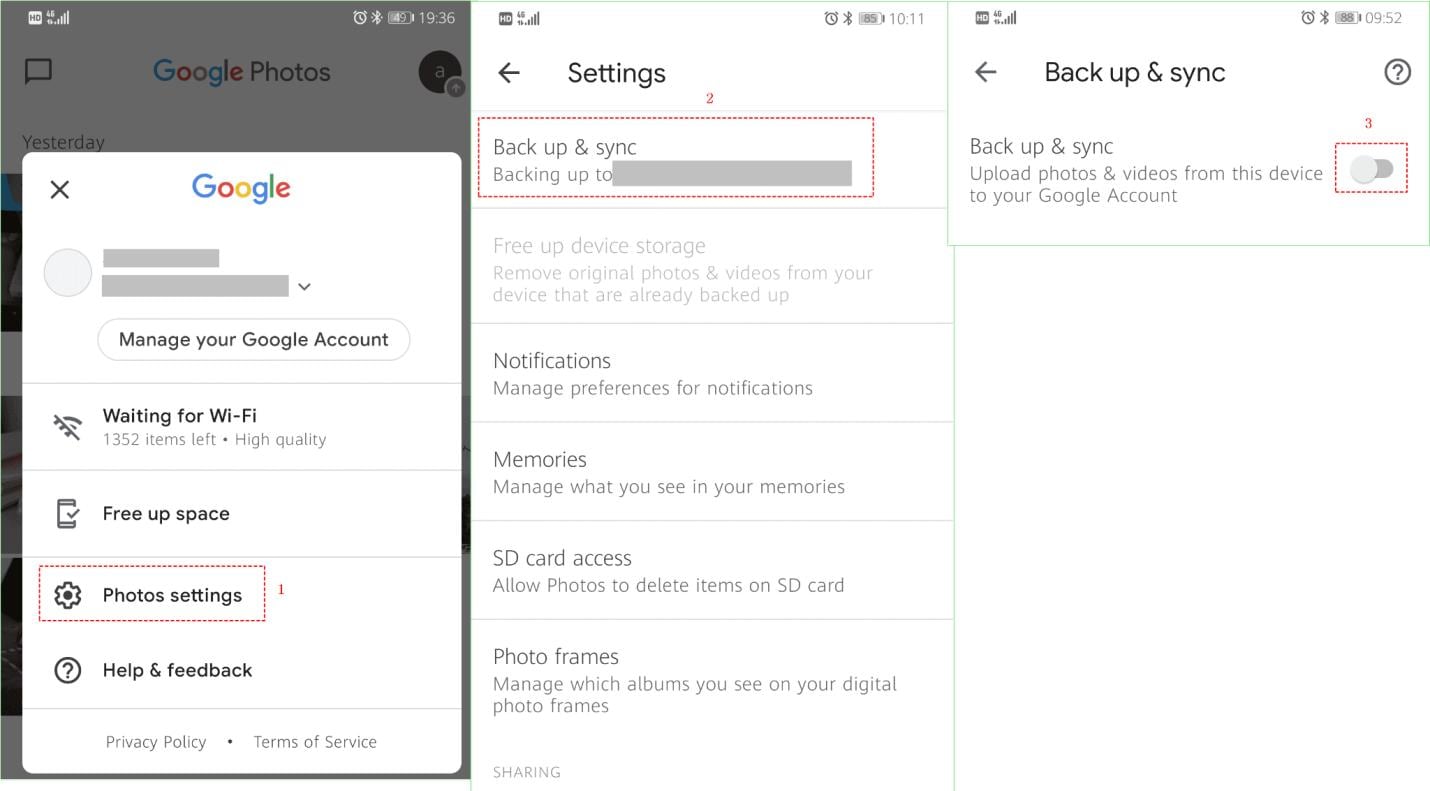
Step 2. Go to Settings. Turn off Backup & Sync.
Method 2: Use Google Photos Web to Select and Delete in Batches
The web version is best for bulk deletion. You can select many photos at once. This method is faster than using mobile apps to delete photos from Google. The computer screen shows more photos at the same time.
Web browsers offer better tools for photo selection. You can see thumbnails clearly on big screens. The interface responds faster than mobile apps.This streamlines the deletion process, making it faster and more efficient.
How to delete photos from Google Photos becomes easier on web. With just a few quick clicks, you can easily select hundreds of photos at once. The web version handles large batches better than mobile apps. Professional users prefer this method for mass deletion.
Why use this method:
- Faster selection of multiple photos
- Better visibility on larger screens
- More efficient for large photo collections
Steps:
Step 1. Go to photos.google.com in your web browser.
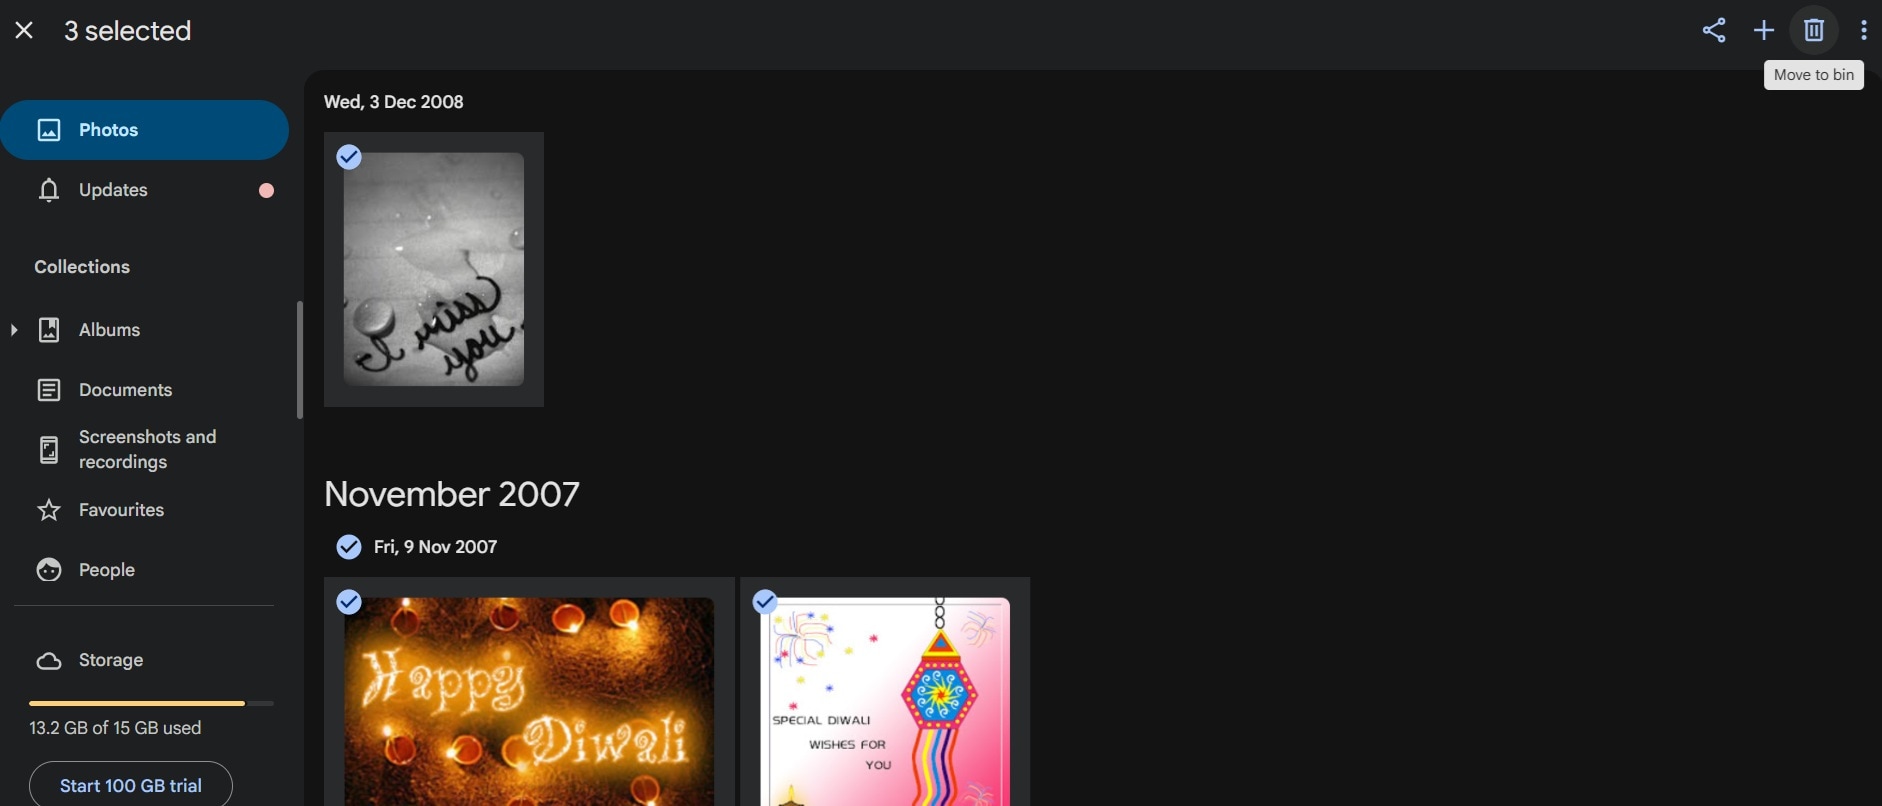
Step 2. Select multiple photos. Click the delete button
Method 3: Delete Photos from Google Photos Mobile App (Android/iOS)
Mobile apps work well for smaller deletions. Deleting photos from Google Photos using a smartphone or tablet is especially handy when you're not near a computer. The intuitive touch interface allows for quick and effortless selection, making the process feel seamless and natural.
Deleting photos from Google Photos on a mobile device is straightforward thanks to its user-friendly touch controls. You can tap individual images to select them, or press and hold to activate multi-select mode for bulk deletion. The interface is optimized for finger gestures, making navigation and photo management smooth and intuitive.
Mobile deletion works best for recent photos. You can quickly remove photos you just took. The app shows your newest photos first. This makes it easy to delete unwanted photos right after taking them.
Why use this method:
- Works on any mobile device
- Good for small batches of photos
- Easy access when traveling
Steps:
Step 1. Open the Google Photos app on your phone.
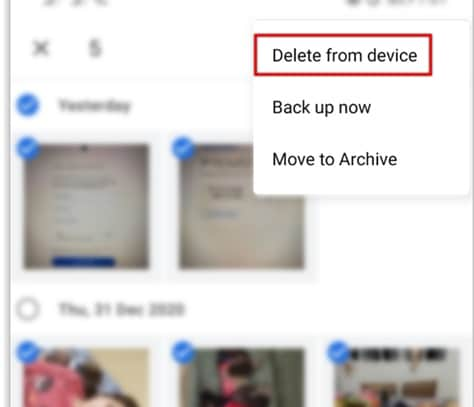
Step 2. Select photos and tap the delete icon.
Method 4: Use Shift + Click to Select Multiple Photos Quickly
This method speeds up photo selection on web browsers. Hold Shift and click to select ranges of photos. It makes deleting large groups much faster. This keyboard shortcut is a time-saver for bulk operations.
How do I remove photos from Google Photos quickly? Shift-click works like selecting files on your computer. Click the first photo you want to delete. Hold Shift and click the last photo. Everything in between gets selected automatically.
This technique works with thousands of photos at once. You can select entire months or years of photos. The selection happens instantly without lag. Professional organizers use this method to clean up large photo collections efficiently.
Why use this method:
- Selects hundreds of photos quickly
- Reduces clicking time significantly
- Works with any web browser
Steps:
Step 1. Click the first photo, hold Shift, and click the last photo.
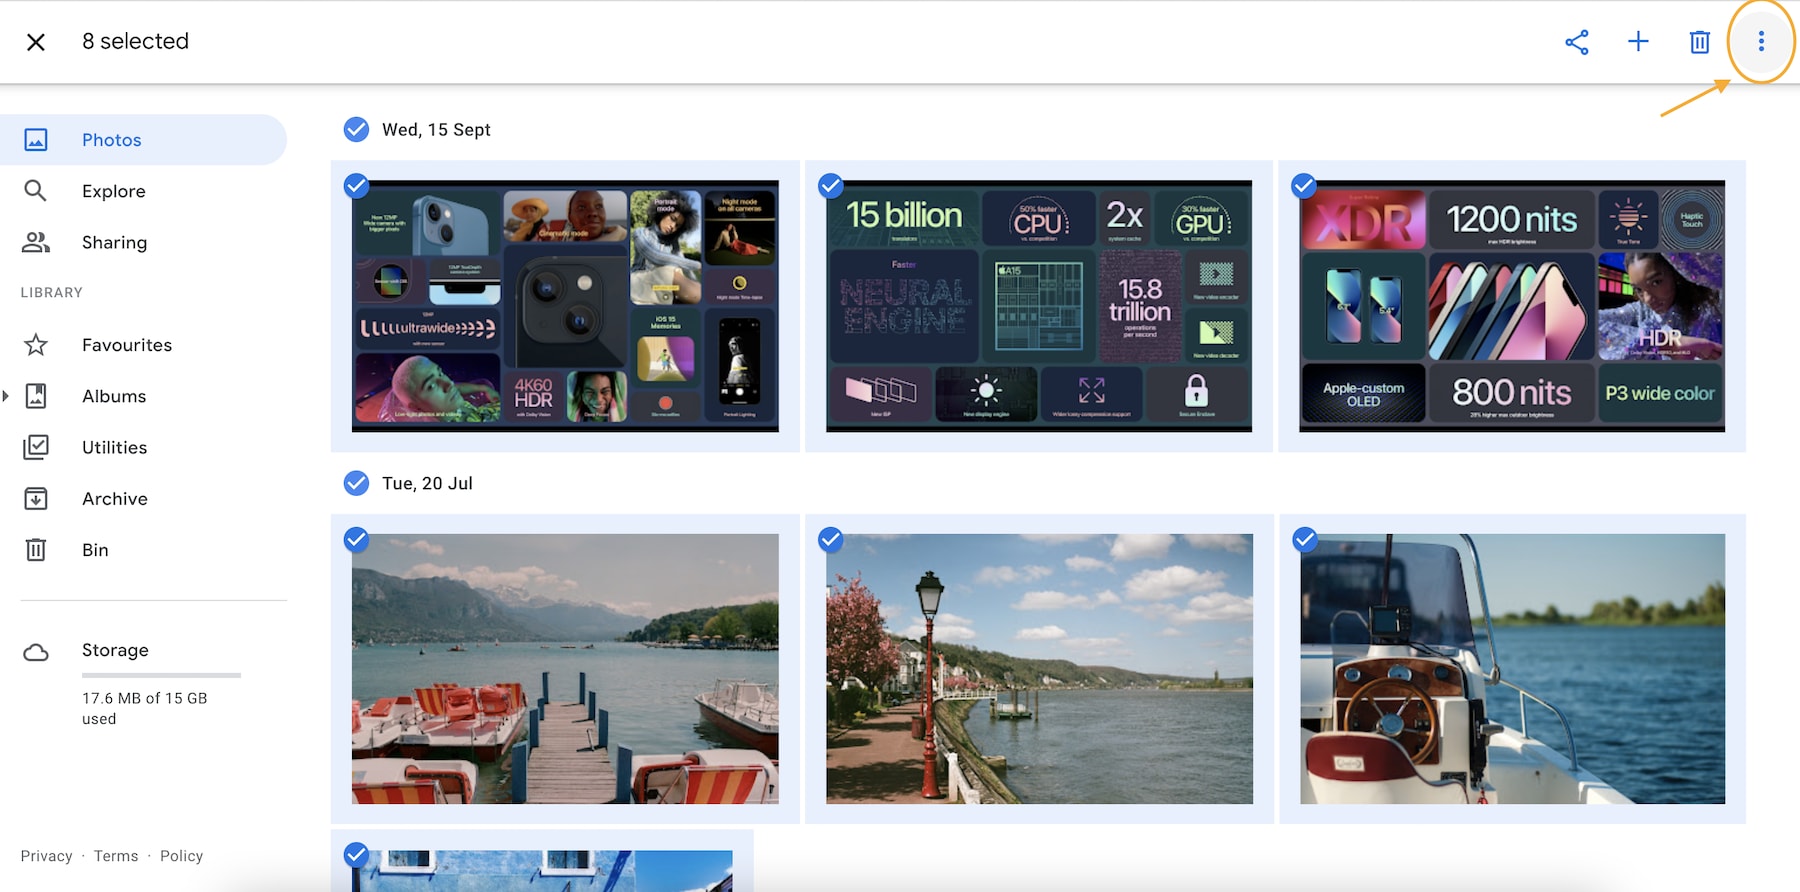
Step 2. All photos in between get selected automatically.
Method 5: Empty Trash to Permanently Remove Deleted Photos
Deleted photos go to the trash first. You must empty the trash to permanently remove photos from Google Photos. This step is crucial for complete deletion. Without emptying trash, photos remain in your account, taking up space.
The trash folder holds deleted photos for 60 days. During this time, photos still count toward your storage limit. They also remain accessible if someone knows where to look. Emptying trash removes them completely from Google's servers.
How do I remove Google Photos completely? Emptying trash is the final step. Once you empty the trash, photos cannot be recovered through Google. The deletion becomes permanent and irreversible. Always double-check before emptying trash.
Why use this method:
- Ensures complete photo removal
- Frees up storage space immediately
- Cannot be undone once completed
Steps:
Step 1. Go to the Trash folder in Google Photos.
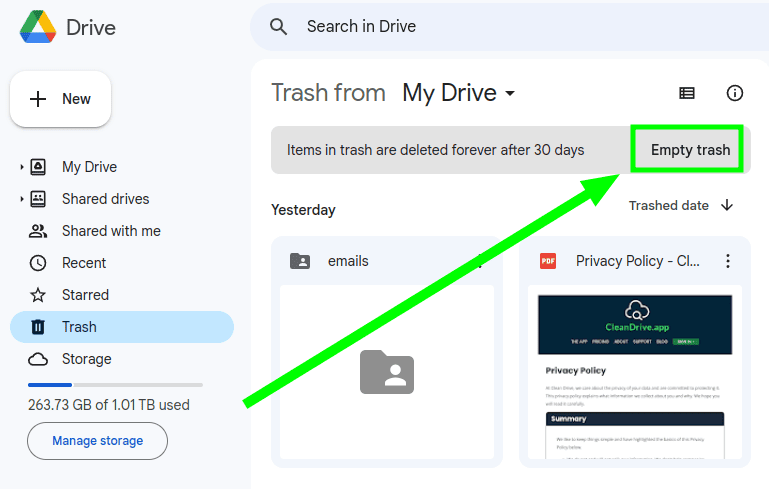
Step 2. Click "Empty trash" to delete permanently
Method 6: Check Archive and Shared Albums for Hidden Photos
Some photos hide in archives and shared albums. Check these locations to remove Google Photos completely. Missing this step leaves photos in your account. These hidden photos can surprise you later when you think everything is deleted.
Archive folder contains photos you manually archived. These photos don't show in your main timeline. They remain in your account until manually deleted. Many users forget about archived photos during cleanup. Always check the archive section.
Why use this method:
- Finds hidden photos you missed
- Ensures complete account cleanup
- Removes photos from shared spaces
Steps:
Step 1. Check the Archive folder for hidden photos.
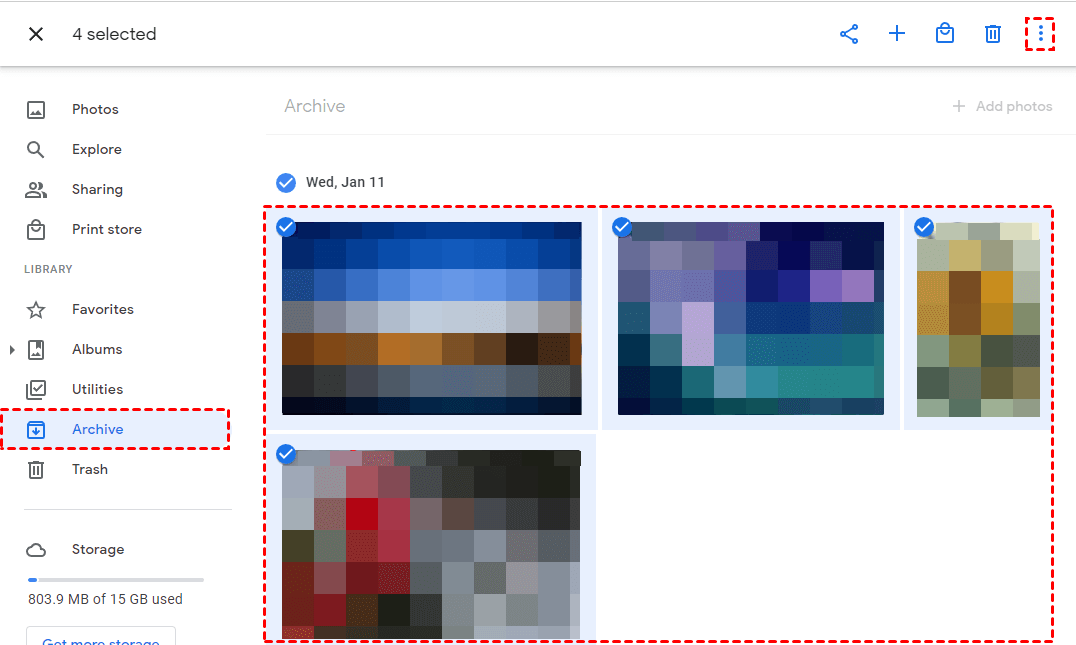
Step 2. Review shared albums and remove your photos
Part 4: Use Recoverit to Restore Accidentally Deleted Google Photos
Recoverit helps when you need to recover deleted Google Photos. This powerful tool finds deleted photos from various devices. It works with computers, phones, and cloud storage systems.
The software scans your devices for deleted photo files. It can recover photos even after emptying the trash. Recoverit supports many file formats and storage types.
Many users accidentally delete important photos. Recoverit provides a safety net for these mistakes. The tool has helped millions recover their precious memories.
Why use Recoverit:
- Recovers photos from multiple devices
- Works with various file formats
- High success rate for photo recovery
- Easy-to-use interface
- Supports cloud storage recovery
- Free scanning to preview recoverable photos
Recovery Steps:
Step 1. Download and install Recoverit on your computer. Select the location where photos were stored.

Step 2. Scan for deleted photos and preview results.

Step 3. Select photos to recover and save to a safe location.

Video Tutorial: How to Recover Deleted Photos from Google Photos?
Part 5: Pro Tips to Delete Google Photos Safely and Completely
Deleting photos safely requires careful planning. These tips help you avoid mistakes and ensure complete removal. Follow these guidelines when you delete Google photos.
- Create a Backup First: Save important photos before deleting anything
- Check All Devices: Ensure photos are deleted from all synced devices
- Review Shared Albums: Remove photos from albums shared with others
- Clear Archive Folder: Don't forget photos in the archive section
- Empty Trash Completely: Make sure trash is empty for permanent deletion
- Turn Off Auto-Backup: Stop new photos from uploading during cleanup
- Download Important Photos: Save special photos to external storage first
- Double-Check Albums: Verify all albums are empty before finishing
Conclusion
Deleting photos from Google Photos requires multiple steps and careful planning. We covered six methods to help you remove photos from Google Photos completely. Each method serves different needs and photo collection sizes.
Remember to turn off backup before starting the deletion process. Use the web version for faster bulk deletion. Don't forget to check archives and shared albums for hidden photos. These steps ensure you delete Google Photos thoroughly.
The process takes time but protects your privacy and frees storage space. If you accidentally delete important photos, tools like Recoverit can help recover them. Always back up precious memories before starting any deletion process.
FAQs:
-
Q: How do I delete a photo from Google Photos permanently?
To permanently delete a photo from Google Photos, first select the photo and click delete. The photo moves to the trash folder. Then go to trash and click "Empty trash" to delete permanently. Photos in trash are automatically deleted after 60 days, but emptying trash removes them immediately. This action cannot be undone, so make sure you don't need the photos before emptying the trash. -
Q: Can I recover deleted Google Photos after emptying the trash?
Recovering deleted Google Photos after emptying the trash is very difficult through Google's system. Once trash is emptied, Google permanently removes the photos from its servers. However, you might recover photos using data recovery tools like Recoverit if the photos were synced to your device. The success rate depends on how much time has passed and whether the storage space was overwritten with new data. -
Q: How can I delete photos from Google Photos without deleting them from my phone?
To delete photos from Google Photos without removing them from your phone, first turn off backup and sync in Google Photos settings. Then delete photos from Google Photos web or app. The photos will remain on your device storage but disappear from Google's cloud. Make sure backup is off before deleting, or Google will re-upload the photos automatically from your device.


 ChatGPT
 Perplexity
 Google AI Mode
 Grok
Grok


