HOW TO REPAIR CANON/NIKON/SIGMA/SONY LENS
My Canon DSLR is showing "Err 01", should I send my camera for service?
Dealing with the DSLR's a common issue confronted is the errors associated with the lens. Most of the time it is about the communication between the camera and lens is faulty. Be it the canon, Nikon, Sigma, or sony lens, you need a camera lens repair. For this, why you need to rush to any technical support? You can do it on your own. Below are some of the apt solutions which you can follow to carry out the process for camera lens repair i.e. canon lens repair, Nikon lens repair, sigma lens repair, and sony lens repair.
Let's dig in deep with each repair mechanism!
Part 1. Common Issues of Camera Lens
Before heading to the repair mechanism or troubleshooting guide, let's discuss the possible reasons that may cause the errors and in turn disturb the functionality of the camera. Following is a list of causes that needs the repair mechanism.
1 Barrel Distortion:
It is a common issue related to the lens of the camera and needs a camera lens repair. As in this case, the images captured appear as rounded from edges. This problem arises due to the focal length. You must be using any wide focal length camera or you are too close to your subject while capturing the image. The only thing you can do as a solution is to find decent proximity from your subject or you must you a longer focal length lens to adjust the frame correctly.
2 Perspective Distortion:
In this error, you will see the straight and parallel lines to appear as converging ones. This again something related to the proximity of the subject with the camera lens. The closer you are to the subject, the larger it will appear. Using the tilt-shift lenses can overcome the problem. But this is an expensive solution. You can also go for Photoshop and adjust the level of distortion in the image.
3. Vignetting:
As a matter of fact, in this lens error, the image is going to appear darkened from the edges as compared to other regions. This issue typically appears when while taking a shot, the camera lens is capturing its camera edges. Using a wide-angle lens mainly causes this problem. One way to avoid it by stop using the in-camera large lens apertures. You can also fix the issue in the post-processing of the image in Photoshop.
4. Lens flare and ghosting:
When you capture an image, spots and light streaks appear on it. This refers to lens flare. Whereas, there can region on the image with reduced contrasts. This is termed as ghosting. Both of the phenomena take place due to the reflection of light inside the lens basically due to the diaphragm or camera sensor. Using those modern lenses, they have a special coating that will in turn minimize the effect of flare and ghosting. This can also be settled by adjusting the shooting position.
5. Chromatic aberration:
Also termed as fringing, this lens issue is related to the appearance of bright colors on the image. And the photo exhibits the high contrast on the edges. This fringing phenomenon takes place due to the incapacity of the lens to capture all the wavelengths of incoming light in a single focal point. Specialized lens ae there to reduce this lens error.
Part 2. How to repair Canon Camera Lens
Using the canon camera, you can witness an E-18 lens error. Canon lens repair is mandatory for dealing with this issue. This error usually appears on the screen of your camera when the lens gets stuck in its extended position. Once this happens, your camera will start beeping and the screen will flash with this error message. How you can fix this is the question now. Following is the canon lens repair mechanism when it appears the E-18 error. Follow the steps and you will be done with canon lens repair.
Step 1: Start with placing the camera on the table facing it upward.
Step 2: Now, Press and hold the power and simultaneously click the Shutter button.
Step 3: Next step is to replace the battery in the camera, take out the old battery, rest the camera for a few seconds, and then add the new one to it.
Step 4: Now restart the camera and you are all done with fixing the E-18 error with the canon lens repair mechanism.
Part 3. How to repair Nikon Camera Lens
When the subject under examination is a Nikon camera and you need a Nikon lens repair or specifically Nikon Coolpix lens error is the case, we can take an example of a Nikon Coolpix S220 lens Error. Before heading to the steps to fix the error, you need to understand what is causing this error. Following is the list of reasons:
- You dropped the camera when the lens was in its extended position
- The battery is drained completely when the lens was in the extended position
- Any sort of dust particle is present in the lens extension mechanism
- Dirt is accumulated in the camera case
All these reasons might trigger the lens error which needs Nikon lens repair to troubleshoot action.
Here is the stepwise procedure you need to check to nullify the error.
Step 1: Firstly, start with checking the battery. It should be fully charged
Step 2: You need to clear all the dirt in the camera case or the lens extension mechanism.
Step 3: turn down the camera with the lens facing down and shake it to dislodge the stuck.
Step 4: Now turn on the camera without the memory card
Step 5: If required, format the memory card to fix the error. Before formatting shift all the data on it to a secured location on your device.
Step 6: Once done with formatting, press the menu and self-time simultaneously for 2-4 seconds to release the lens that is a stick in its extended position to remove the error.
Part 4. How to repair sigma Camera lens
Sigma lens has quite a fan base while you use your camera for professional photography. Sometimes the sigma lens causes few errors that pop up as a warning message on the camera LCD. Here we are going to discuss the two common errors related to sigma lenses for which you need sigma lens repair action.
Sigma lens error 02:
This error is associated with the memory card present in the camera for storage. In case of any corruption, your memory card is going to cause this error that pops up on the LCD. What could be done as sigma lens repair for this error is three simple steps:
Step 1: Start with removing the warn out memory card from the camera and install it again.
Step 2: If still facing the error, the other solution can be installing the new memory card.
Step 3: After installing a new memory card, you still see the error message, then format the card as it may carry some corrupted files or directories that may cause the error.
Sigma lens error 04:
Another common error message that appears on the camera LCD while using the sigma lens is Err 04. This is the error that encodes for i.e. cannot save the image due to np space on the memory card. Two of the solutions are possible to avoid this error.
Step 1: You can erase the unnecessary data from the memory card to release the space for new data
Step 2: If still, you see the error then format the card and restart the camera
Step 3: Otherwise, replace the existing card with a new card to store the data.
Part 5. How to repair sony Camera lens
While you use the sony camera lens, the common error is this regard is i.e. camera doesn't recognize the lens. For this, you need a sony lens repair action. Just follow this step-wise procedure and avoid the error message to appear in the camera LCD.
Step 1: Check the lens. Using a compatible lens with the camera body will help you skip the chances for the appearance of this error on the camera LCD.
Step 2: Nextly, set the mode dial to the option of Manual (M).
Step 3: Release w/o lens option in the menu should be set Enabled.
Step 4: Now, you have to set the Shutter lock option in the camera menu to Off i.e. referring to no lens.
Step 5: If still you are seeing the error, then try another compatible lens or head towards checking the connectivity.
Step 6: turn off the camera and detach the lens from the camera body.
Step 7: take a look at the metal contacts between the camera body and lens. Any improper connection between them is the cause behind this error.
Step 8: Reattach the lens, and hopefully you are done with fixing the error.
Part 6. More Camera lens repair
Apart from all other common camera lens errors and their corresponding camera lens repair actions, here is another one in which your camera lens is stuck and will not open, retract, or extend. Here is a troubleshooting guide to avoiding the error.
Step 1: Start with turning off the camera, then it on again. A message may appear if the camera detects an excessive stress, dust present on the lens. If this occurs, turn the power of the camera off and then back on again.
Step 2: Next step is to turn the power off of the camera, dismount the battery pack, and remount it into the camera.
Step 3: You can also try to turn the power back on and check if the drive part of the lens moves properly.
Step 4: Lastly, if you see the lens still will not open, retract, or extend, the option you can go for is to reset the camera.
Part 7. How to recover and repair camera video
Recoverit Data Recovery
Recoverit data recovery is competent for recovering the deleted files, photos, videos, emails, and other media. Not just recovery, it successfully restores your data to your devices. It gives wide range compatibility with 1000+ file formats which can be recovered and restored with this utterly professional recovery tool.
Steps to Recover Video with Recoverit:
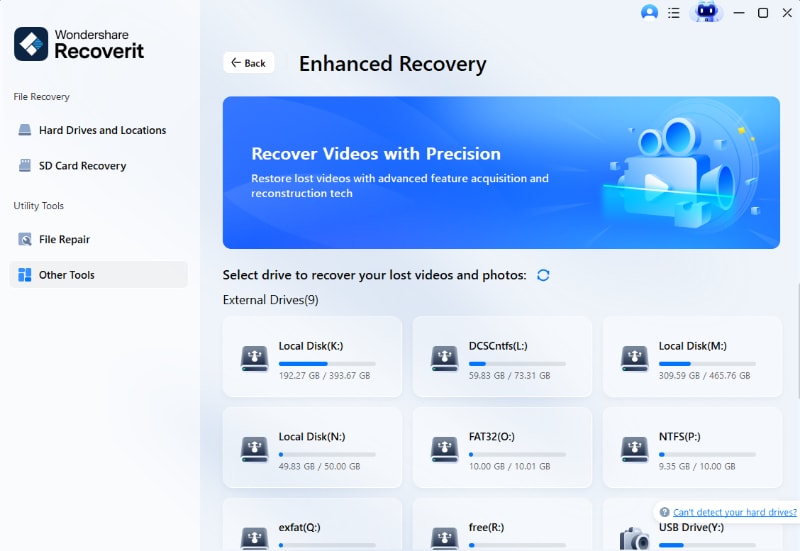
Step 1: Start with downloading the Recoverit video recovery software on your device. Connect your memory card with the Pc to carry out the recovery process.
Step 2: Select the camera or memory card from the menu you are working on. Once selected, click start to continue.

Step 3: The scanning process will be started

Step 4: Once the process of scanning is completed, you will see a preview of recovered data on the screen. Recover your desired data and click recover to continue

Step 5: In the end, save the recovered video. Select the location and save the recovered file.
Advanced Video Recovery function of Recoverit:
Working in compatibility with DSLR, Digital cameras, Drones, Action Cameras, Dashcams, camcorders, SD card, PC, HDD, etc., the advanced video recovery feature of Recoverit is all way your solution to recover those deleted videos. It is easy to use. The following are the steps with which the software works:
- It scans and matches the video fragments
- Merge the fragments from the same video
- It facilitates you to recover your videos and keep 95% of them intact
- You can recover unlimited video files without corruption
Steps to Repair Corrupted Video with Recoverit:
A damaged or broken video? Repair it with Video Repair by using its quick and advanced repair modes. It is going to repair all the videos in the format i.e. MOV, MP4, M2TS, MKV, MTS, 3GP, AVI, and FLV. Here is the list of features:
- It repairs multiple formats of videos.
- Runs a free scan for corrupt videos and preview repaired videos before saving them
- There are no limitations regarding the size of Video files for repair
- You can repair as many corrupt Video files as you
Step 1: Add your corrupted videos
Launch the application on your computer. To repair your corrupted video files, you can add it through clicking the Add button or "Add video and start repairing" area.

Step 2: Repair your videos
As soon as you have added all the corrupted videos, click on the Repair option to start the video repair process.

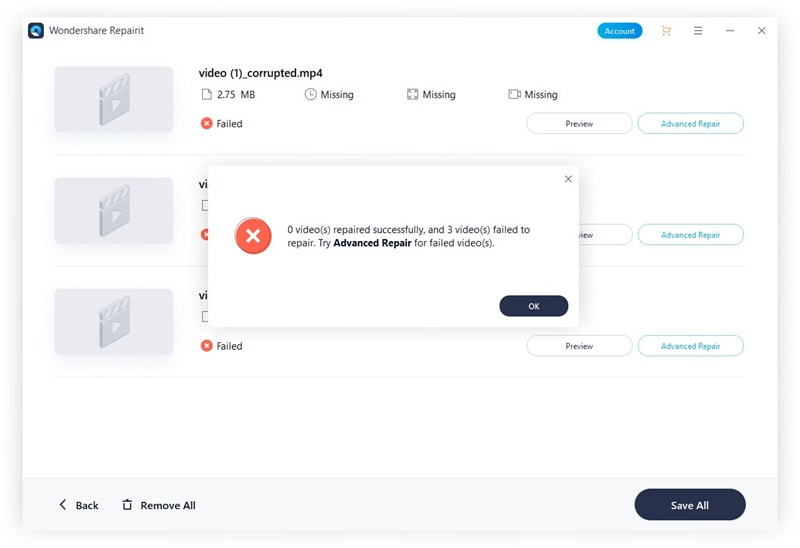
Step 3: Preview the videos
It will take some time to repair and once it has finished the repair process, a reminder showing info of successful fix will pop up on the screen. Press OK to close the operation.

Step 4: Advance mode for severely corrupted video (optional)
If the videos are severely corrupted and not repaired successfully, please go to the advanced repair mode. Just click the Advanced Repair button.
Then add a sample video and repair it now.

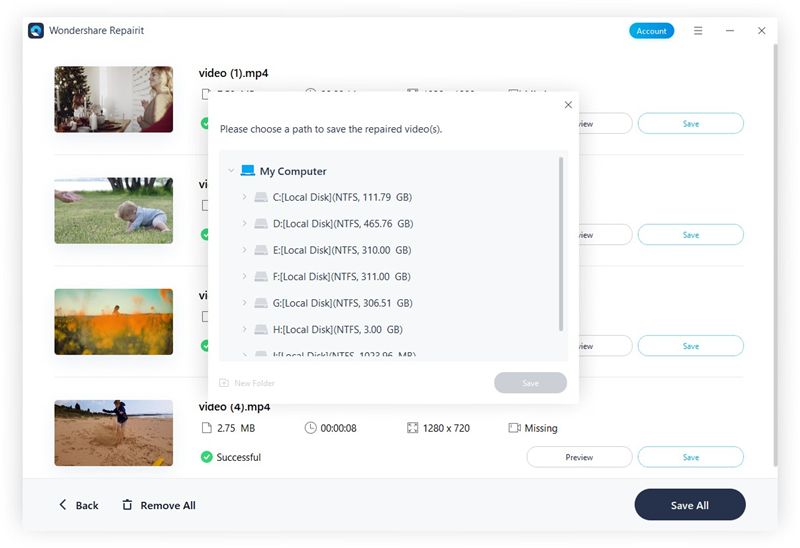
Step 5: Save repaired video
The advance repair will perform the repairing process and prompt a success message when the process is completely done. Now, you can play these videos and you will not see any error on the screen.
Solve Media File Problems
- Recover & Repair Photos
- Recover & Repair Videos
- Recover & Repair Audio
- Recover & Repair Cameras


 ChatGPT
 Perplexity
 Google AI Mode
 Grok
Grok


Eleanor Reed
staff Editor