How to Sync Google Photos to PC? 4 Solutions
To sync Google Photos to a PC, you can manually download selected items via the web interface, export your complete library using Google Takeout, or automate local folder backups with Wondershare UBackit.
● For selective syncing, use the Shift+D shortcut on the web platform for individual pictures, or navigate to Library > Albums > Download All to save pre-created collections directly to your local storage.
● Google Takeout (takeout.google.com) is designed for bulk transfers by generating a compressed archive link sent via email, but it restricts you from choosing specific photos to download.
● Wondershare UBackit requires pointing to a local folder where your photos are already saved to function, providing automated and incremental backup schedules (daily, weekly, monthly, or real-time) to a secondary drive.
Ask AI for a summary
A while back, I had to abruptly change my computer and took the assistance of Google Photos to sync my pictures. Surprisingly, I found that it was so easy to sync my Google Photos and later restore them to another computer. Ideally, a lot of people take the assistance of Google Photos to sync their data but can’t seem to sync Google Photos to a hard drive. Well, this is exactly what I’m going to help you do today! In this post, I will let you know how to sync Google Photos to PC in three smart ways!

Part 1. What Can you Do with Google Photos?
Released way back in 2015, Google Photos is a popular cloud-based storage and sharing service that is offered for free by Google. Ideally, if you have a Google account, then you can access 15 GB of free space on the Drive (Google Photos).
Using Google Photos, you can directly upload your pictures from your smartphones or computers to the cloud. This will help you keep your photos in one place and you can easily sync them between different devices. Therefore, Google Photos can help you back up your pictures or sync them, as per your requirements.

Even though the free version of Google Photos only offers 15 GB of space, you can later get dedicated premium plans to buy more storage.
Part 2. 4 Solutions to Sync Google Photos to PC
Method 1. Sync Google Photos to PC via Browser
Most of the users of Google Photos take the assistance of its web-based platform to quickly upload or sync their pictures. Therefore, if you only wish to sync selected Google Photos to PC, then why not directly download them from the Drive. To learn how to sync Google Photos to PC via your browser, just follow these steps:
- At first, you can go to the official website of Google Photos, log-in to your account, and simply browse all the saved pictures that are available on its Drive.
- Now, you can select any picture by clicking on the dot icon from its top. Once the picture is selected, you can view a checked icon in the corner.

- Following the same approach, you can manually select multiple photos that you want to download. You can also use the Shift key to make multiple selections at once.
- After you have selected what you wish to backup, just click on the three-dot icon from the top and choose the “Download” option.

- If you want, you can simply select your photos and press the Shift + D key combination to directly sync Google Photos to PC.
Method 2. Sync Google Photo Albums to PC Online
Apart from selective pictures, you can also backup the entire album from Google Photos to your computer. Needless to say, this option to sync my Google Photos will only work if you have already created different albums on the Drive. Here’s how you can sync Google Photos to PC easily.
- To begin with, just go to the official website of Google Photos and log-in to your account. From the sidebar, you can check the available albums under the “Library” section.
- Just expand Library > Albums and click on any album of your choice to view the stored pictures.

- Now, to save the entire album, click on the three-dot icon from the top-right corner of the screen.
- From the available options, click on the “Download All” button to save the entire album on your PC’s local storage.

Method 3. Sync Google Photos to PC via Google Takeout
Lastly, you can also take the assistance of Google Takeout to sync all Google Photos to a PC at once. The online tool helps us download our saved Google data (from all the linked services to our account) as an archive file on our system. If you want, you can also use Google Takeout to transfer your data to other cloud-based services as well.
While this is a more time-saving method, this will download all the saved Google Photos on your computer and will not let you pick what you wish to save. To learn how to sync Google Photos to PC with Google Takeout, you can follow these steps:
- To sync Google Photos to a hard drive, you can simply visit the official website of Google Takeout (https://takeout.google.com/) and log-in to your account.
- This will provide a detailed list of all the linked Google services and your data under different categories. If you want, you can click on the “Deselect All” option so that you can only enable selective options later on.

- Now, you can scroll down the Google Takeout page to find the Google Photos section. Before you click on the “Next” button, just make sure that the Google Photos option is selected.

- To proceed, you can choose to get the download link via an email in the Delivery Method field. You can further select the file type and click on the “Create Archive” button.

That’s it! You can now just wait for a while as Google Takeout would sync Google Photos to a hard drive via a compressed folder (that you can later unzip).
Method 4. Sync Google Photos to PC with Wondershare UBackit
As you can see, it is pretty complicated to sync Google Photos to a PC and you can’t use it to back up or restore other data files. Therefore, you can consider using Wondershare UBackit that provides a user-friendly and comprehensive solution to backup and restore your data.
- With UBackit, you can maintain a dedicated backup of any file, folder, partition, etc. on the location of your choice.
- It supports the backup of all the major data types such as your photos, videos, music, documents, emails, and more.
- You can use its inbuilt filters and search options to manually handpick what you wish to back up.
- The application will maintain different history versions and would take an incremental backup to save the overall storage.
- It also offers an automatic backup feature to schedule the backup process as per your preference (daily, weekly, monthly, or ongoing).
How to Sync Google Photos to PC with UBackit Data Backup?
Step 1. Launch Wondershare UBackit
After downloading and installing Wondershare UBackit, launch the program. Click Create New from the main screen followed by File Backup to sync Google Photos to PC.

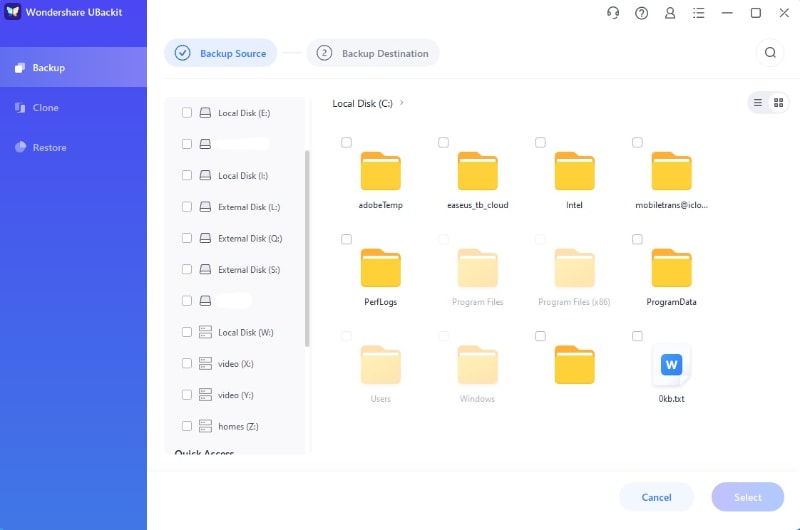
Step 2. Select Google Photos to Backup
Find the folder where Google Photos are saved, and select the files that you want to sync to PC. Then click Select to continue.
Step 3. Select Backup Destination
Here you need to select one drive where you want to save the backups. Then click Select to get the Google Photos Sync process started.

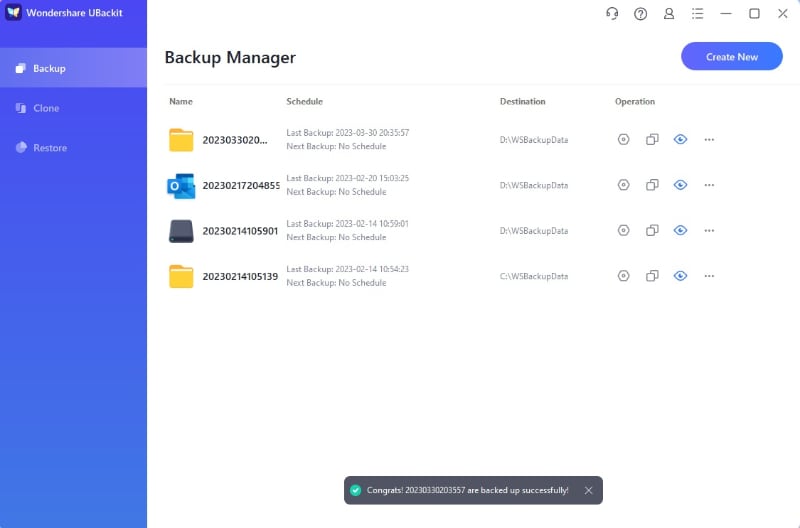
Step 4. Complete Google Photos Backup
Just a few seconds or minutes later, the sync process will complete and you will find the backup folder in the Backup Manager section. You can find the Schedule option at the bottom of the backup folder. By clicking on it, you can set a daily, weekly, monthly, or real-time automatic Google Photos sync schedule. So you don't need to manually transfer the files to sync Google Photos to PC anymore.
Conclusion
There you go! As you can see from this guide the different methods I followed when I had to sync my Google Photos to PC. Ideally, you can sync Google Photos to PC manually by visiting its website or use the Google Takeout service to download all photos in one go. Besides that, if you wish to backup and restore your data in a better way, then a professional tool like Wondershare UBackit would be an ideal choice.
Data Backup Services
- Computer Backup
- Hard Drive Backup
- Mac Backup
- Cloud Backup


 ChatGPT
 Perplexity
 Gemini
 Claude
 Grok
Grok


Amy Dennis
staff Editor