Upload and Backup the Entire Folder to Google Photos
You can upload entire folders to Google Photos by enabling device folder synchronization on mobile, using the Google Backup and Sync app on a PC, or activating the built-in sync feature for Google Drive.
● Syncing directly from Google Drive requires using the identical Google account and is strictly limited to jpg, gif, tiff, or raw files larger than 256 pixels.
● Mobile folder uploads are activated via the "Back up device folders" setting and include unlimited free storage for photos up to 16MP, with subscription expansions available up to 30TB.
● Wondershare UBackit provides a local alternative for users avoiding cloud subscription fees, enabling automatic daily, weekly, monthly, or non-stop folder backups to internal or external PC drives.
Ask AI for a summary
Have you found a folder with a ton of subfolders, which are full of images and videos? Do you want to upload the entire folder to Google Photos, but do not know how to do it?
Google Photos is a very popular storage space to store photos and videos. It is also one of the most famous backup tools. The excellent interface and smart search feature of Google photos allow users to find the desired images in few seconds.
No matter whether you use the iOS device or an Android phone, Google Photos can store and backup all images safely. But, many users, are not able to upload folders to Google Photos.

To help you, in this article, we have discussed the three best ways to backup and upload the entire folder to Google Photos.
Take a look!
Transfer Folders from Google Drive to Google Photos
No doubt that Google has integrated storage of Google Drive, but many users (almost every) prefer to store images and videos in Google Photos.
The pictures that you want to save for a long time need to upload to Google Photos for better management. Following are the steps that you can use to add folders from Google Drive to Google Photos.
Method 1: Download and Upload
An easy way to upload folders from Google Drive to Google Photos with download and upload feature. First, download the entire folder that you want to upload on Google Photos from your system.

After that, you can upload the folder to Google Photos by following the steps mentioned in the second part of this article.
Method 2: Enable Google Drive in Google Photos
Another way to select folders to backup in Google Photos is to enable Google Drive in Google Photos.

Go to official Google Photos and then go to settings. Under the settings enable “Google Drive - Sync photos & videos from Google Drive.”

Now, it will automatically sync photos as well as videos in Google Drive to Google Photos. But, this method has the following requirements:
- Your Google Drive account should be the same as your Google Photos account.
- The images must be larger than 256 pixels.
- The file type of photos and videos should be jpg, gif, tiff or raw.
Add Folders from PC to Google Photos
If your trip photos are currently stored on your system or an external hard drive, then you can add that folder to Google Photos.
To do so, you will need to visit photos.google.com and sign in with your Google account. After that, go to ‘Upload’ and select a folder from your pc to upload to Google Photos.
For more clarity go through the below steps to set up the backup and sync app on PC:
Step 1: First install Google Backup and Sync app on your system.
Step 2: Now, sign in to your Google Account that you want to use for Google Photos.

Step 3: After completing the sign-in, choose to back up only photos or videos, and tap “CHOOSE FOLDER”. Now, select an image or video folder from your system that you want to backup.

Step 4: Now, under “Photo & video upload size,” choose the desired upload size to create a Google photos backup folder.
Step 5: In the next step, select whether you want to sync the files in Google Drive to your system or not.

Step 6: Finally click “START “to add the selected folder from your PC to Google Photos.
Upload Folders from Mobile Phone to Google Photos
If you’re looking for the best cloud option to backup your phone images, Google Photos is the right choice. It’s easy to use and offers unlimited free storage for photos up to 16MP.
Further, it also works with host of devices, including smartphones and tablets.
The Google Photos backup folder from the phone is direct and easy. You will need to follow the following steps to upload folder to Google photos from your phone.
Step 1: Go to the Google Photos from the application on your phone or from home screen. Now, click on the menu icon available in the upper left corner on the home page of Google Photos.

Step 2: After this, head to Settings, and click on “Back up & sync”.

Step 3: Now, click on the “Back up device folders”, this you can see all photo folders to back up in your device.
Step 4: From the list, toggle the switch on the folder that you want to upload on Google Photos.

Step 5: Finally, the folders with backup enabled will automatically upload the images you’re your phone to Google Photos.
Note: Backing up your photos to a cloud service like Google Photos has many benefits. Unlike a physical hard drive, there’s little risk of mechanical failure. Storage capacity is also much larger (up to 30TB in Google Photos) and easier to expand with a subscription.
Backup Folders on Wndershare UBackit
If you are not willing to pay for the Google Photo subscription and want to backup big-size data, then consider using Wondershare UBackit. It is an amazing data backup software that act as a reliable data manager. With this software, you can easily back up your files, folders, and hard drive data automatically as well as incrementally.
Here are the simple steps that you can follow to use Wondershare UBackit for the backup of the photo or video folders.
Step 1: Launch Wondershare UBackit
First, you will need to install the software from the official website of Wondershare UBackit on your system. Once the application is installed, click on the UBackit icon to launch it.
Step 2: Backup desired folders, files, or hard drive data
After launching the Wondershare UBackit, look for the “Backup & Restore” option from the sidebar and click on it. After that click on the “Start” icon.

Now, you will need to select a source to back up. Source can be any fro your system including disk.
Are you wondering How to select folders to backup in Google Photos?
If yes, then under source option, you can select entire folder from Google Photos as well that you have downloaded in your system.
Step 3: Choose Backup Destination
After selecting the folders to back up, you will need to choose a destination location to save the backup.

Destinations can be any including, a USB flash disk, an internal PC drive or an external source connected to your system.
Step 4: Set Automatic Backup
To make backup easy on time, UBackit offers an automatic backup option too. On this software you can select the backup frequency such as daily, weekly, monthly, and non-stop backup.
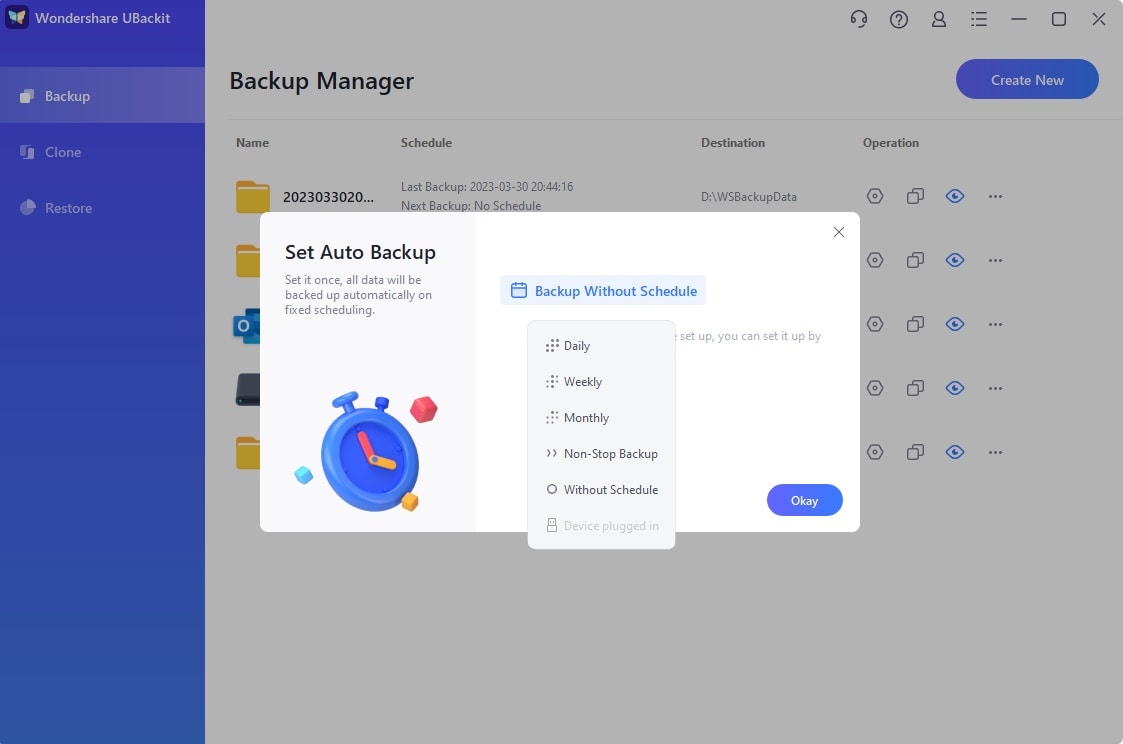
Note: it is an optional step.
So, you can also use the Wondershare UBackit to upload folders to Google Photos. First, take backup on PC and then upload folders to Google Photos.
Final Words
Follow any of the above ways to upload folders to Google photos. If you want to back up the big photo folder, then Wondershare UBackit is also great option for you.
In addition to "data backup", this software also enables you to transfer photos from Google photos backup folder or from one source to another.
Data Backup Services
- Computer Backup
- Hard Drive Backup
- Mac Backup
- Cloud Backup


 ChatGPT
 Perplexity
 Gemini
 Claude
 Grok
Grok


Amy Dennis
staff Editor