
Jun 03, 2026 • Filed to: Take Data Backup • Proven solutions
 TL;DR:
Backing up a Western Digital (WD) NAS drive to the cloud requires choosing between the built-in My Cloud Home app for native WD cloud storage or third-party software like AOMEI Backupper for flexible transfers to external cloud providers.
● The built-in My Cloud Home app utilizes native OS tools like Windows 8 File History or Windows 7 Enterprise and Professional Backup and Restore, but it restricts backups exclusively to WD's proprietary cloud system and cannot sync with other cloud storage services.
● AOMEI Backupper bypasses this restriction by allowing NAS backups to third-party services like OneDrive, requiring you to first install the target cloud drive locally on your computer and map the NAS drive using its network name or IP address.
● While basic NAS backup capabilities are available in the AOMEI Backupper freeware, configuring file format filters or scheduling automated backups requires the Professional edition.
Ask AI for a summary
 ChatGPT
 Perplexity
 Gemini
 Claude
 Grok
Grok
While using NAS devices as a means of storage has become quite a norm, backing them up to a safe haven has become more important. Although many people tend to use NAS devices as backup storage, this is not such a safe idea. This article will be discussing how to perform a Western Digital backup to cloud storage.
It is one of the biggest NAS device providers in the world for those who don’t know Western Digital. Performing a Western Digital cloud backup is a very easy process, especially if you use the methods we’ll be recommending below. This article will also provide some additional tips on keeping your NAS device performing at optimal conditions. Stay with us!
Why backup NAS to cloud?
As we mentioned earlier, some people do not see the need to back up their NAS devices to the cloud as they see it as a reliable source of storage. However, NAS devices are hardware, and they are susceptible to damage, just like other parts of a system are. Here are a few reasons why you should backup your WD NAS drive to the cloud:
The best option for business organizations:
Performing a WD NAS cloud backup is vital, especially if you run a business organization. This way, if your NAS device gets damaged, you can easily keep the company running with the data stored in the cloud. When the NAS device gets re-installed, restoring your data is even easier thanks to the cloud backup storage.
Apart from providing a source of backup, it is also a great way for your staff to collaborate on projects together. Cloud backup services provide collaboration features that will make group sharing and brainstorming even easier among staff in the workplace.
Gives multiple choices of backup
Storing your data to the cloud helps to fulfill the laws of the 3-2-1 data storage principle. This states that you should have three different data backups with at least two of them in different formats, and one of them should be in a different backup location. With Western Digital cloud backup, you can fulfill this law very easily. All you need to add is a local backup software like Backupper, and you’re good to go.
You can hand over your files to even more secure hands.
Cloud drives guarantee a safer means of backup storage compared to NAS devices. They will conduct automatic backups, which you do not even have to authorize once set up. You can have your files secured by yourself and your cloud service provider at once. Your files are safer this way, and one of them will come through if the other fails.
Eliminates the use of physical drives
You’ll agree that it can be quite annoying to have to carry those pesky external drives along with you whenever you go out. However, a WD My Cloud Google Drive backup, for example, will allow you to access your files in two different online locations. This way, working in any location is significantly easier.
How to backup WD NAS to Cloud?
While there are a lot of ways to backup WD NAS Drive to the cloud, we'll be discussing two of the easiest ways you could do this without hassle. While one is inbuilt with the NAS Drive, the other is a user-friendly third-party app.
1. The My Cloud Home App
The in-built method is using the My Cloud Home app. The My Cloud Home device is a cloud storage device that allows you to back up to the cloud using its cloud system using the app. You can also use the app to share your backed-up files with others.
However, you can’t use the mobile app to backup to other cloud storage services. It is compatible with any type of operating system and lets you backup your photos, music, videos, and other files to the WD NAS device only as long as you have an internet connection.
While you can perform your Western Digital Cloud backup with different operating systems such as the macOS Time Machine, Windows 7 Backup and Restore (you must be using the Windows 7 Enterprise or Professional), and the Windows 8 or higher File History.
While these three have their different approaches to doing this, we’ll be using the Windows 8 or higher file history to explain how to sync WD My Cloud and back it up to the WD cloud:
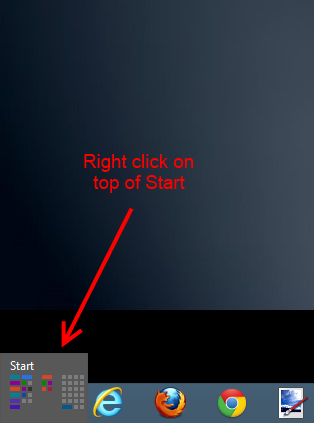
Step 1: Click on the Start button at the lower left side of your screen
Step 2: On the window displayed, click on the Control Panel

Step 3: On the Control Panel window, click on File History.

Step 4: On the File History window, click on Select Drive, located on the left-side panel.
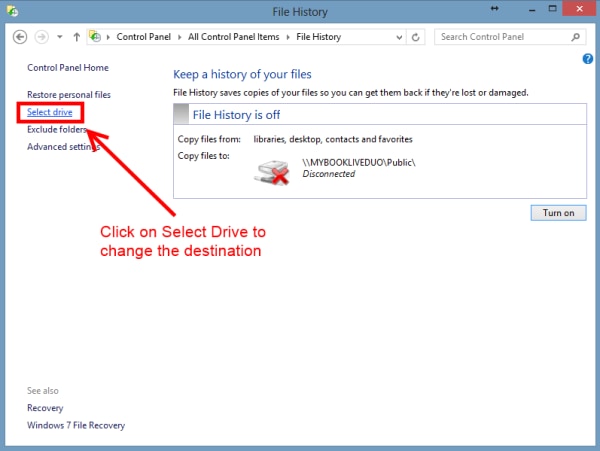
Step 5: The available drives will be listed. Click on Add network location to search for network drives to add to the list.

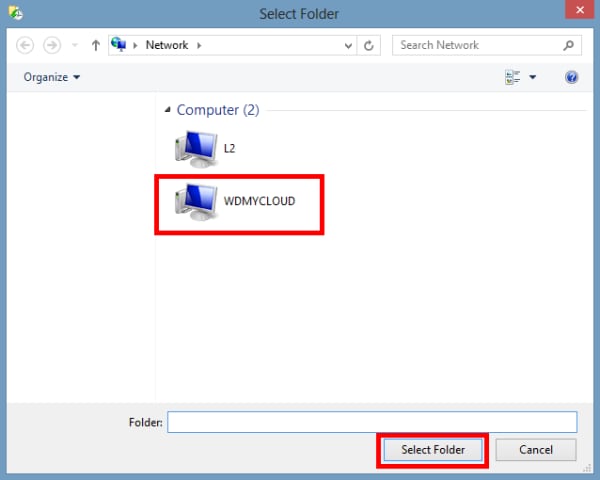
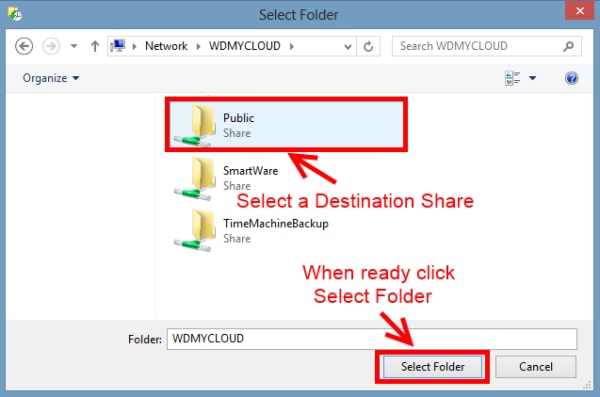
Step 6: From the list of network drives, select the WDMYCLOUD, and click on Select Folder.
Step 7: The available shares within the network drive will be listed. Select a share to hold the File History backup and click Select Folder.
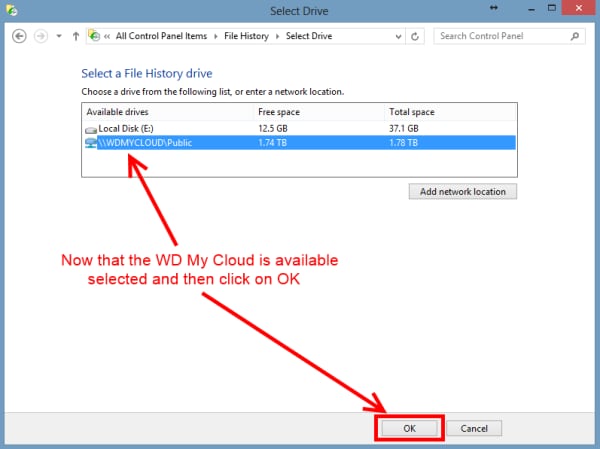
Step 8: Now, the selected share will be listed as an available drive. Select it and click on ‘Ok.’
Step 9: Once you’ve selected a share, File History will begin the backup into the selected share. You can find more options in the Advanced Settings panel.
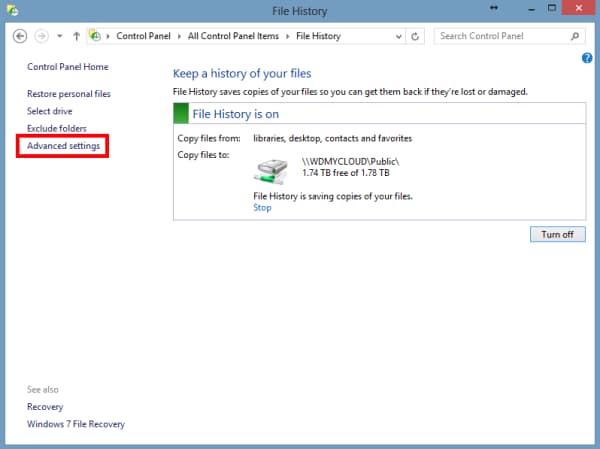
Step 10: Under advanced settings, you can alter settings like how long you want to keep backups and how frequent the automated backups should be.

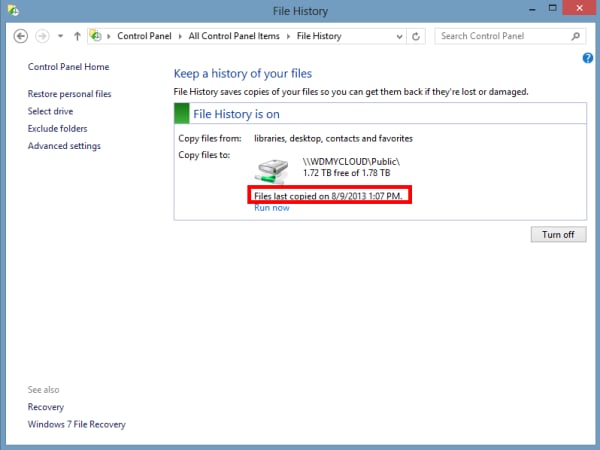
Step 11: Wait until the backup finishes. The file history panel will display the last time you ran the backup and an option to run it again.
This is how to backup WD NAS drive to cloud on the Windows 8 file history. It is also compatible with other operating system versions, and you just need to follow the equivalents.
2. Backupper
While the My Cloud Home app is a great option, it does not provide you with enough versatility. This is because it cannot create as many file formats as third-party apps like Backupper will offer you. Also, it doesn’t back up to other cloud services. This doesn’t give your files enough security as you’ll expect.
However, with Backupper, you can perform other functions like sync, clone, backup to various cloud devices, local storage devices, and so much more. It can also back up your files in a variety of file formats. This makes it an even better option than the WD My Cloud Home app.
Here are the steps to perform a Western Digital backup to the cloud:
Step 1 - Download and install any cloud drive of your choice to your computer. For this example, we’ll be using OneDrive.
Step 2 - Download and install the Backupper software on your computer. After this, launch the software.
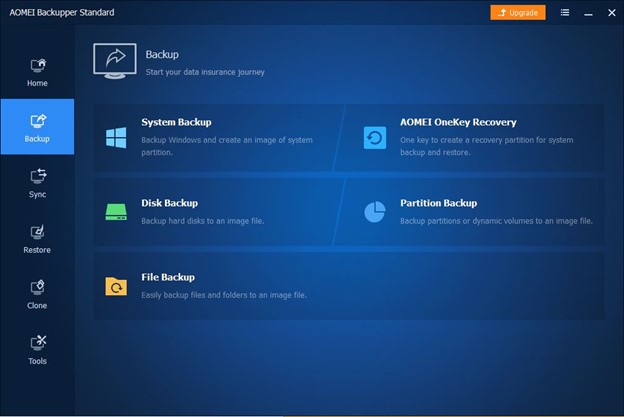
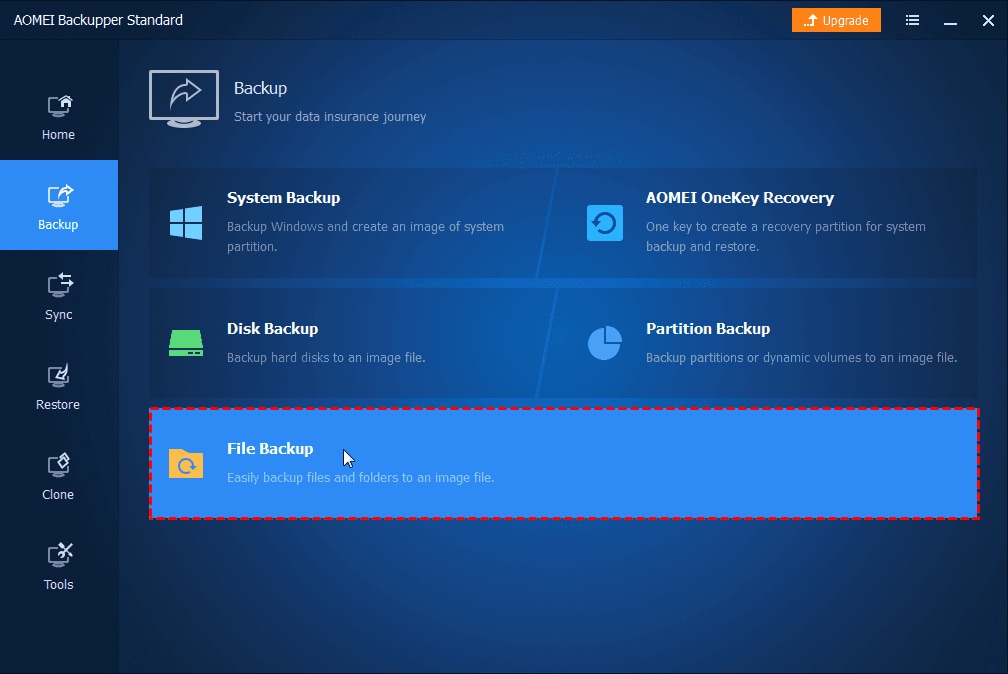
Step 3 - After launching the software, it takes you to the home interface. To pair your WD NAS box with cloud backup, click on ‘Backup’ then select ‘File Backup.’
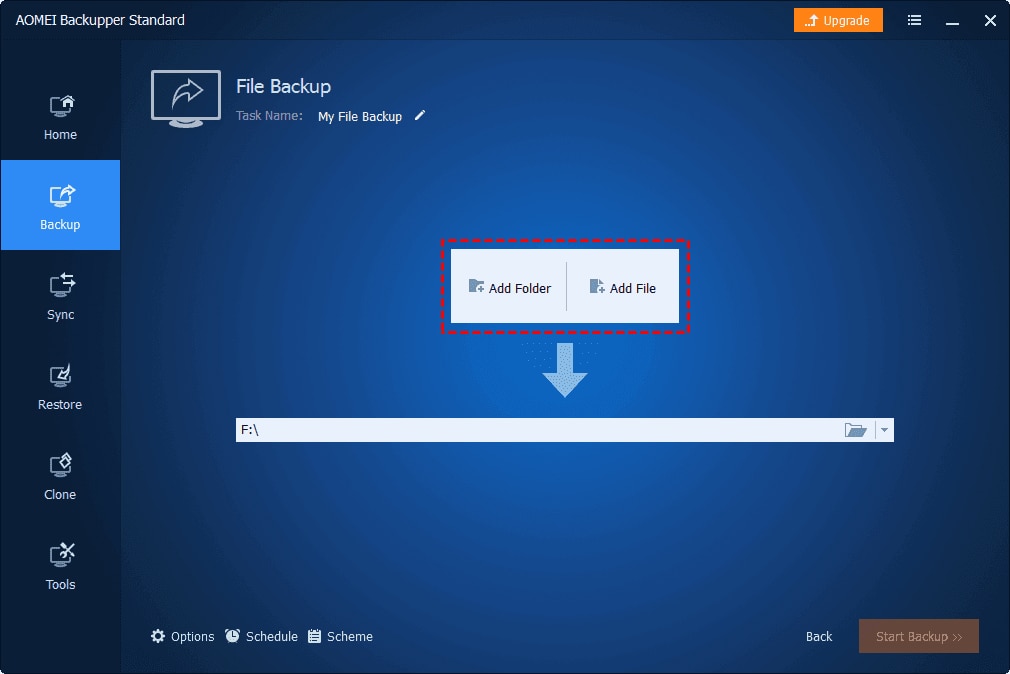
Step 4 - In the next window, you’ll add the files or folders you have on your Network Attached Storage that you’ll like to backup to your cloud service. To do this, you click on ‘Add file’ or ‘Add folder.’ A prompt will ask you to add your NAS drive. Select your NAS drive using the left-placed sidebar and click on 'Open' to dismiss the prompt.
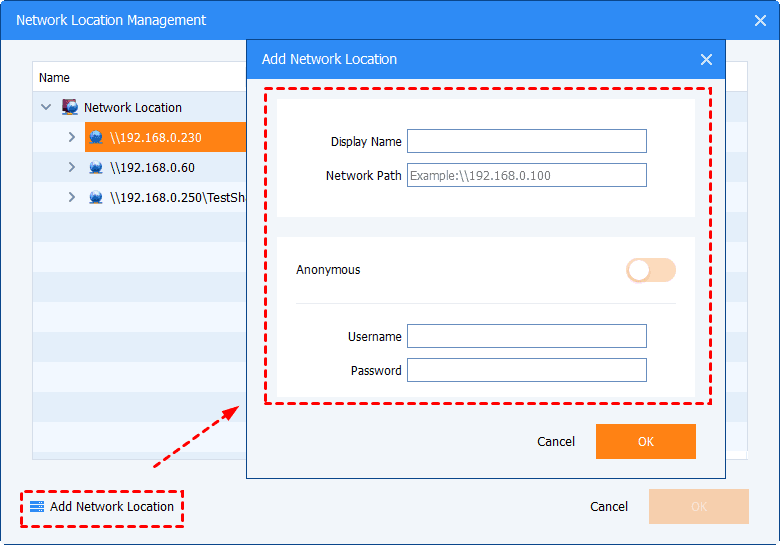
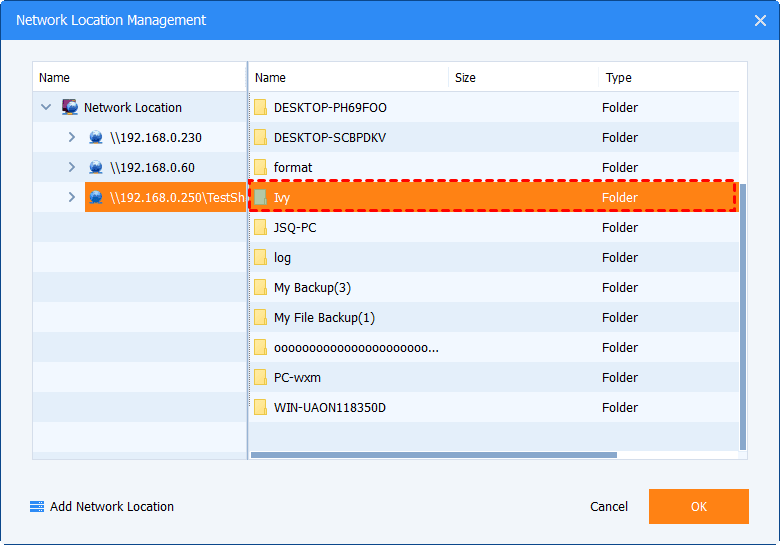
Step 5 - The next window will display a Network Location Management page. Click on 'Add Network Location' and enter your NAS drive's name or IP address. If the drive is encrypted, don't forget to input your username and password as well.
Step 6 - On the next page, Backupper will show you the contents of your WD NAS drive. Select the file(s) you’ll like to store to your online backup for NAS devices. Click on ‘Ok’ when done.
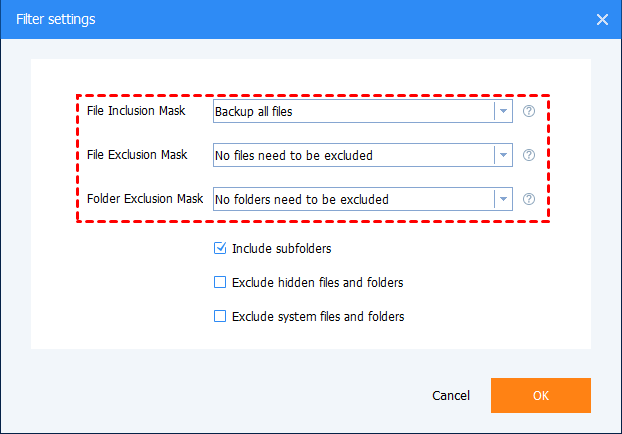
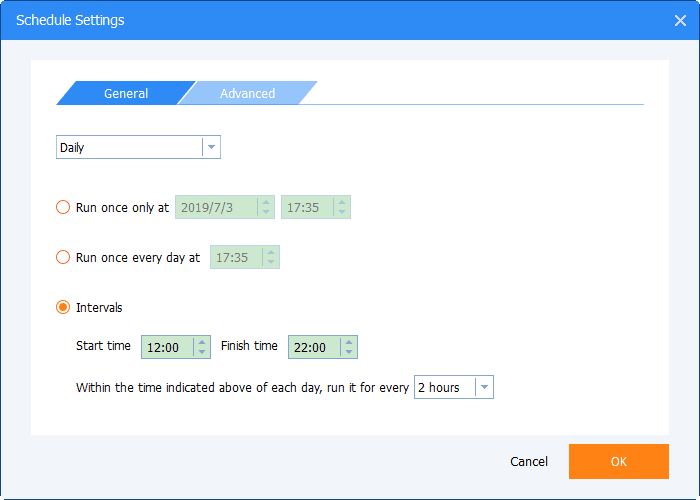
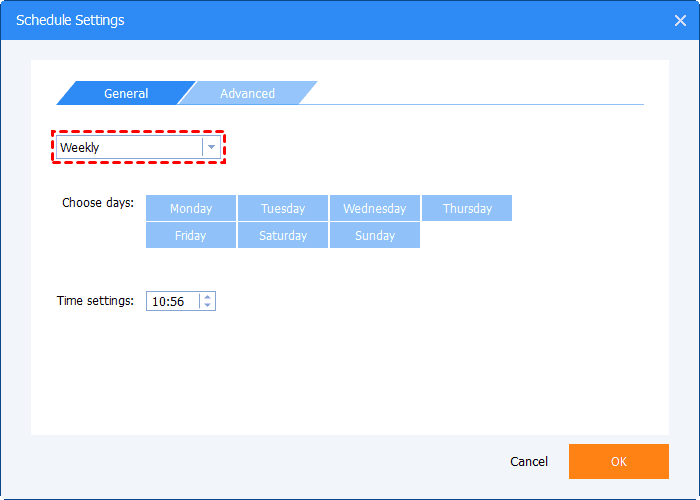
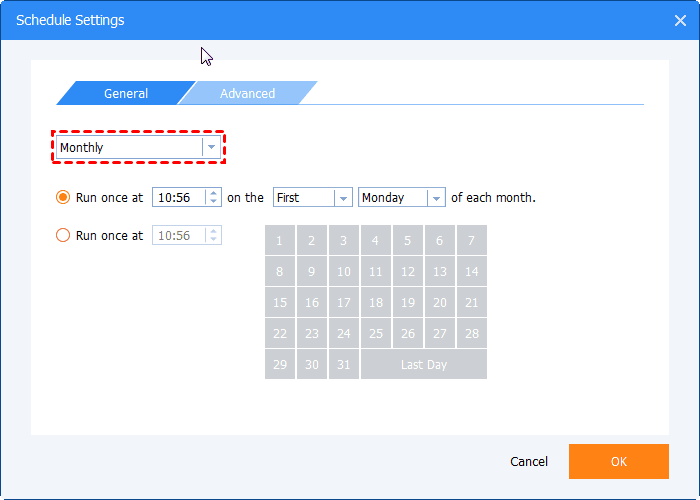
Step 7 - The software will then bring up the filter settings page. Here, you can choose not to backup specific file formats, and you can also schedule automated backups to make cloud backup for NAS devices even easier. However, this feature is only available in the Professional edition.
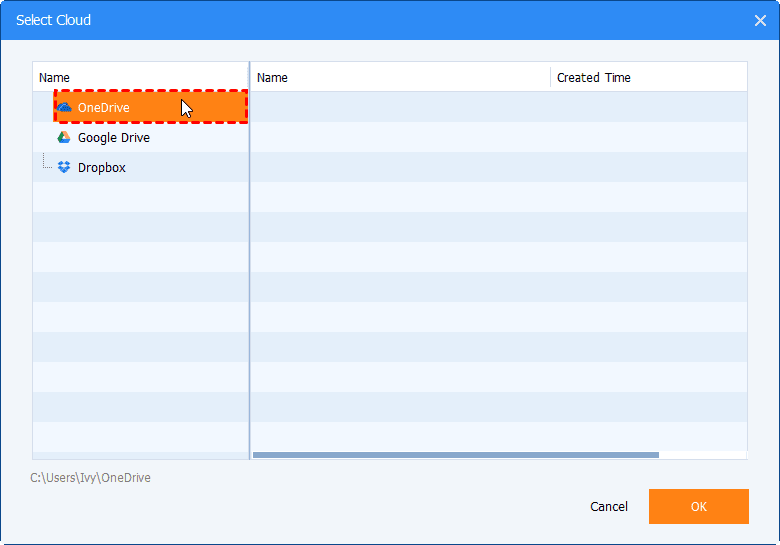
Step 8 - You’ll then return to Backupper’s main interface page. Click on the triangle icon (on the right side, next to the folder-shaped icon). Then, click on 'Select a Cloud Drive.' You can set up more advanced options by clicking on 'Options,’ 'Schedule,’ or 'Scheme' in the bottom portion of Backupper's interface.

Step 9 - It takes you to the ‘Select Cloud’ page, where you choose the cloud service provider you want to backup your NAS drive to. If you can’t find it, then try reinstalling the cloud backup software.
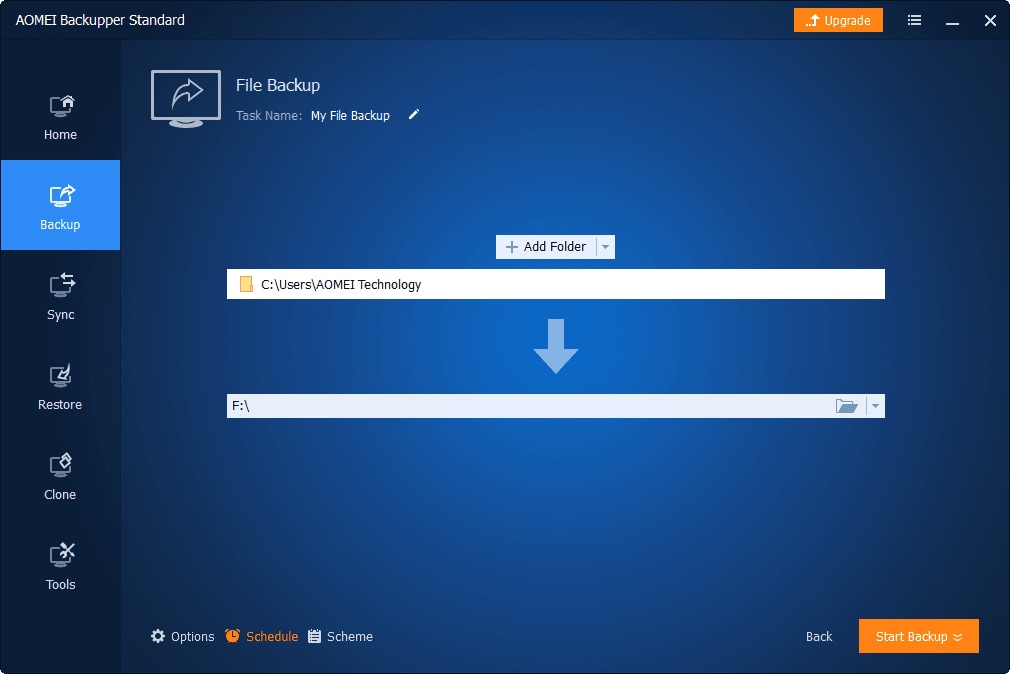
Step 10 - It will then return you to the home interface. Click on ‘Start Backup’ to combine your NAS box with cloud backup. That’s all. Your WD NAS cloud backup is complete!
Additional Note: You could also schedule your AOMEI backupper to back up your files at certain intervals at its own will. This way, you do not have to worry about forgetting to back up your files. However, you have to use the Professional Edition to do this.
Other Backupper functions
Backupper can not only perform NAS cloud backups but can do a whole lot more. Apart from backing up NAS drives to the cloud, here are a few other functions that Backupper can execute:
Backup
AOMEI offers both local and cloud storage features to its users. Under backup, you can have a file backup, system backup, partition backup, or disk backup.
Sync
Backupper is widening the gap between it and other local backup software by including the cloud sync. With this feature, you can sync files from online backup services such as OneDrive and Google Drive.
Clone
You can also clone your files by using AOMEI Backupper. Similar to the backup process, there are many types of cloning. You can do a disk clone, system clone, command line clone, partition clone, and clone with partition alignment.
Restore
You can also restore your files using the Restore feature. There are different restoring processes when using Backupper. Each one depends on the backup mode.
Conclusion
Backing up your WD NAS drive to the cloud is very important, especially when it is your primary source of storage. Apart from backing it up, you should observe simple security tips like not giving the password out unnecessarily. Also, do not expose the device to moisture, sunlight, or physical impact as these factors increase its susceptibility to damage.
FAQs
-
Q: What is the best online backup service?
A: While many online backup services can help with your Western Digital Cloud backup, a few of these services are known for their credibility and incredible storage plans. They include Google Drive, OneDrive, Backblaze, iCloud, and so much more. -
Q: How do I back up to the cloud for free?
A: The best way to backup your device to the cloud is to use Backupper freeware. With this incredible backup software, you can not only backup but also clone, sync, and restore from your cloud service. -
Q: How much does online backup cost?
A: The cost of online backup services varies from one provider to another. One of the cheapest is Google Drive, where you can get 100GB for just $1.99/ month or $19.99/year. -
Q: How do I automatically back up files?
A: To backup your files automatically, you can use the Backupper software to make these backups without any hassles. It guarantees a stress-free and seamless backup for your files.
Data Backup Services
- Computer Backup
- Windows 10 Backup
- Windows 8 Backup
- Best File Sync Software
- Driver Backup
- SD Card Backup
- Best Incremental Backup
- Onedrive Automatic Backup
- Hard Drive Backup
- Mac Backup
- Cloud Backup


Amy Dennis
staff Editor